A traditional setup of Pull Zone CDN benefits static resources such as CSS, JS, images and sadly it doesn’t speed up the HTML Document request which comes very first.
If you have a global audience, your website deserves to be globally faster and not just in one country where its server exists.
BunnyCDN has 53 PoPs. How about caching WordPress pages at the edge? 😍
Reducing TTFB is possible by caching HTML Document request along with static content of WordPress homepage, Post, Pages, archives, etc.
I will outline step-by-step information on how you can use BunnyCDN for Caching Everything of HTML Document request in a reverse-proxy You can send and receive data back and forth without exposing your hosting origin IP address to snoopers.
When request cached at BunnyCDN Edge, the user can experience a blazing fast experience.
I believe BunnyCDN is an excellent choice for Full Site Delivery purpose compared to all other available solution in the market. The consistency in optimized routing and developer-friendly API of BunnyCDN is far better than its rival.
So, let’s get started.
I will explain you everything how it works and not.
Prerequisite
- Cloudflare DNS only mode
- Your WordPress site should be at www or subdomain hostname.
- HTTPS Enabled (Let’s Encrypt or OpenSSL)
Why www instead non-www, isn’t old-fashion?
- www can be a standard CNAME which can be resolved by the local ISP and return regional IP instantly.
- I don’t recommend using CNAME Flatenning or ANAME for the root domain as offered by some popular managed DNS services provider. Because, the ANAME/ALIAS is resolved by your DNS provider’s nameserver instead of by a recursive resolver (ISP, Google Public DNS, OpenDNS or other) and this may lead to end-users being routed to a far-away CDN node and consequently getting a poor experience.
Switch to a hostname like www or switch to Bunny managed DNS services, which will allow pointing a domain directly to the Bunny pull zone. This is going to permanently solve the routing issue associated with ANAME. 👏
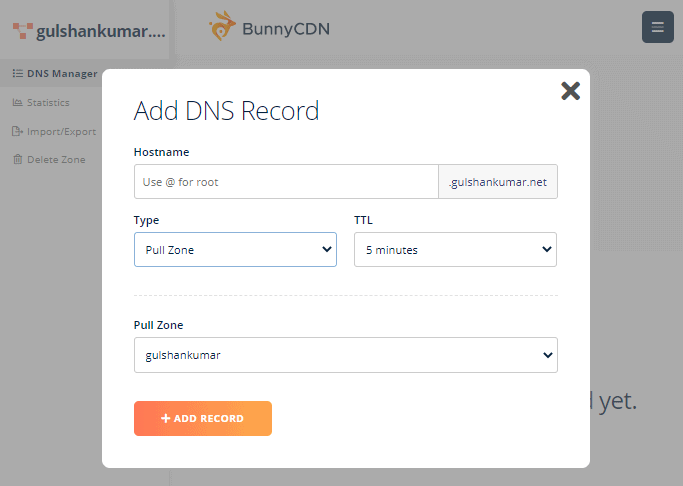
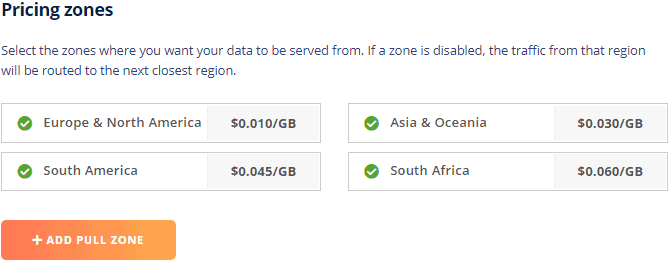
Step 1. Create a new Standard Tier Pullzone
- Login to BunnyCDN
- Add a Pullzone with Hosting IP (Shared, Dedicated doesn’t matter) as origin URL
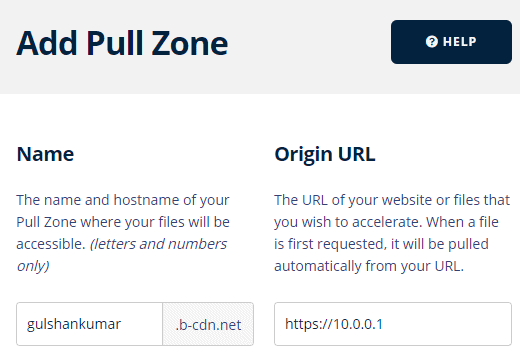
Why hosting IP? Because we need to fetch content from the hosting server.
Choose the Standard Tier and all pricing zones selected for the fastest experience.
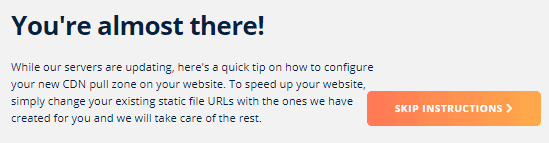
Since this is not classic setup, please skip this instructions.
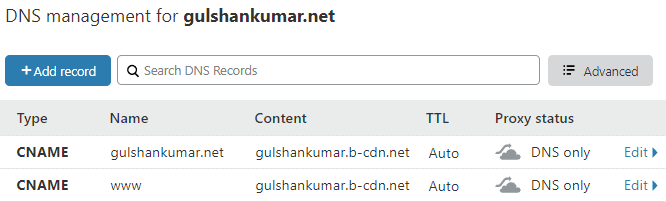
Step 2. Point DNS
Using Cloudflare DNS only mode, we can point both hostname using CNAME record to Pull zone address which is gulshankumar.b-cdn.net as per previous step.
- Simply, go to Cloudflare DNS menu for your desired domain
Step 3. Pullzone General Settings
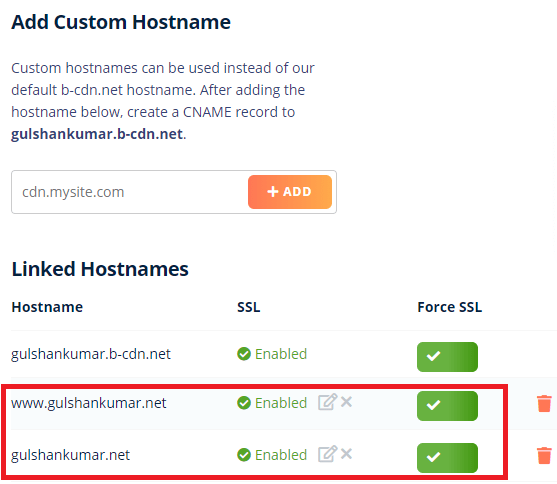
- Go to your Pull zone > General Settings > Add custom hostname
- Add your domain
www.example.com(Primary domain for serving WordPress pages) - Also,
example.com(For redirection from non-www to www with BunnyCDN). - Next, use one-click to install SSL and force HTTPS for all.
Step 4. Caching
This is basic caching configuration, later we will customize further as per requirements.
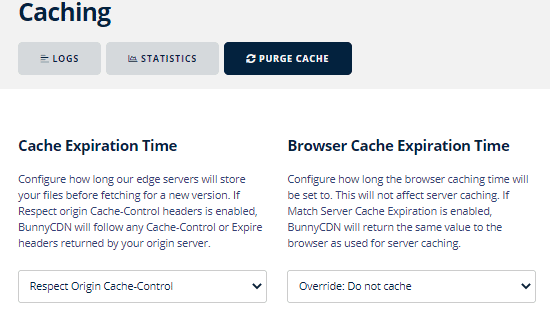
Cache Expiration Time: Configure how long our edge servers will store your files before fetching for a new version. If Respect origin Cache-Control headers is enabled, BunnyCDN will follow any Cache-Control or Expire headers returned by your origin server.
In simple term, it’s a setting to define Edge TTL. I strongly recommend leaving it to “Respect Origin Cache-Control” because WordPress sends the no-cache HTTP header for a URL such as /wp-login.php, /wp-comments-post.php, /wp-admin/ etc. Accordingly, we want to BunnyCDN not ever to cache that response.
The “Respect Origin Cache-Control” requires not having Cache-Control: max-age=0 header for serving cached response.
- For example, when you’re at login page or logged inyou will see
cache-control: no-cache, must-revalidate, max-age=0 - This means, the HTTP response cannot be served from disk cache unless validated first from the requesting server.
Browser Cache Expiration Time: Configure how long the browser caching time will be set to. This will not affect server caching. If Match Server Cache Expiration is enabled, BunnyCDN will return the same value to the browser as used for server caching.
This is a generic setting to adjust browser cache with Cache-Control header.
Avoid ‘Match Server Cache Expiration’ and change it to Override: Do not cache as soon as possible. Because we don’t want to cache HTML response in the visitor’s browser.
Until then BunnyCDN can serve non-modified files with the minimal overhead of HTTP 304 response. To bypass, we can setup Browser Cache for static files separately using Edge rules.
Step 5. Turn off Disabling Cookies
In same Caching menu, you can find option for turning off disabling cookies.
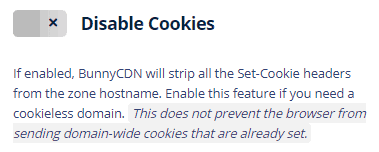
We need to preserve cookies because WordPress CMS uses various session cookie to remember logged in user, comment author, etc.
- wordpress_{hash}
- wordpress_logged_in_{hash}
- wordpress_test_cookie
- wp-settings-{UID}
- wp-settings-time-{UID}
- wp-saving-post
- wp-postpass_{hash}
WordPress also set cookie in browser for the comment feature. These cookies doesn’t matter because when cached, we can’t allow saving visitor their Name and email.
- comment_author_{hash}
- comment_author_email_{hash}
- comment_author_url_{hash}
If you do not enable cookies, first of all you can’t login to the dashboard which would be a major problem.
Error: Cookies are blocked or not supported by your browser. You must enable cookies to use WordPress.
WordPress Login page
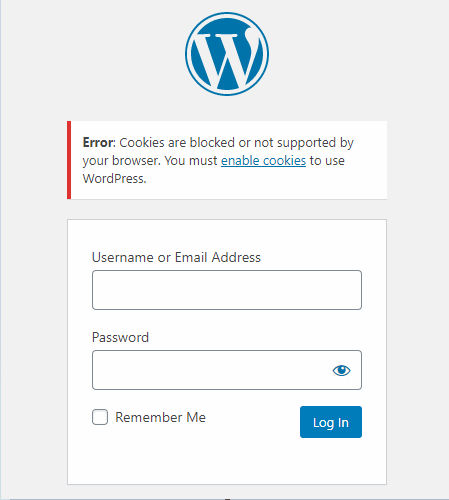
Therefore you must turn off ‘Disable cookies‘ feature in Caching menu of Pull Zone.
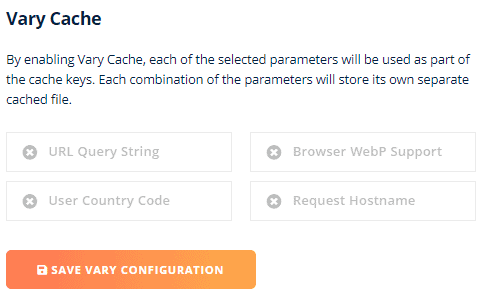
Step 6. Adjust Vary Cache
- If your web server is configured to server WebP dynamically for the supported browser, then enable Vary Cache Browser WebP support. You can also enable vary cache for URL Query string as well to be on the safe side.
Step 7. Please do not enable Perma Cache
Perma cache is strictly not recommended with reverse-proxy setup. I repeat this.
Generally, perma cache of BunnyCDN is suitable for static WordPress site delivery.
In case of reverse-proxy, it doesn’t allow POST request or bypassing cache via edge rule.
This creates a huge problem like login page not working, comment moderation status not showing, etc. It requires a lot of customization to make it work. If you’re interesting, keep reading.
Workaround
- I assume, www.example.com uses Perma Cache.
Seperate WordPress Dashboard over different hostname
- Make sure you’ve Let’s Encrypt Wildcard SSL certificate for your domain
example.com - Add an alias
secure.example.comin the Virtual Hostname for Dashboard URL. If you miss this critical step, you may get redirected to the server default page.
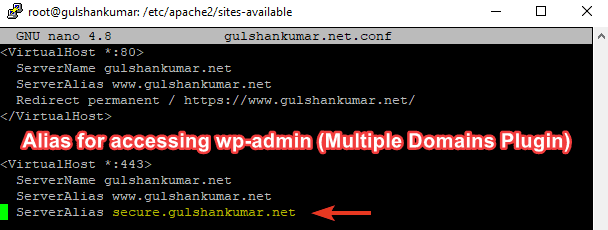
- Now, add same alias via Multiple Domains plugin.
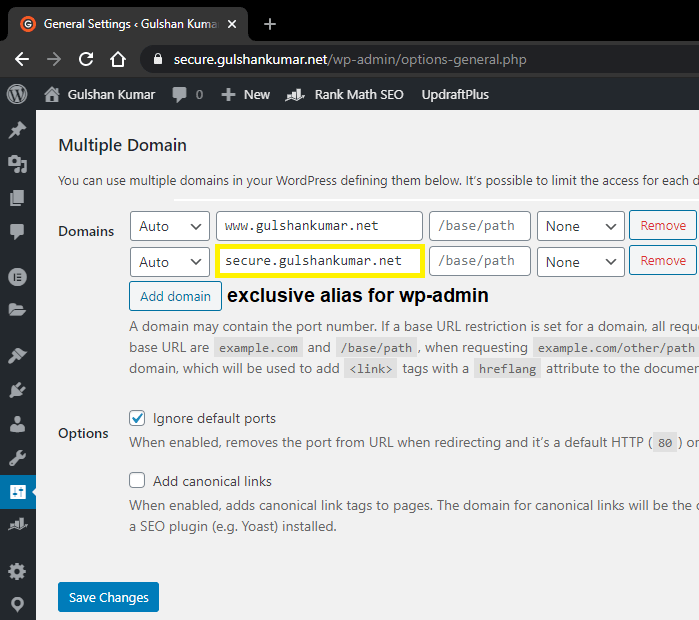
- Point
secure.example.comto origin Server IP and keep Cloudflare Proxy enabled for it. - At Cloudflare SSL Settings, you may keep Full Strict mode with valid SSL at the origin.
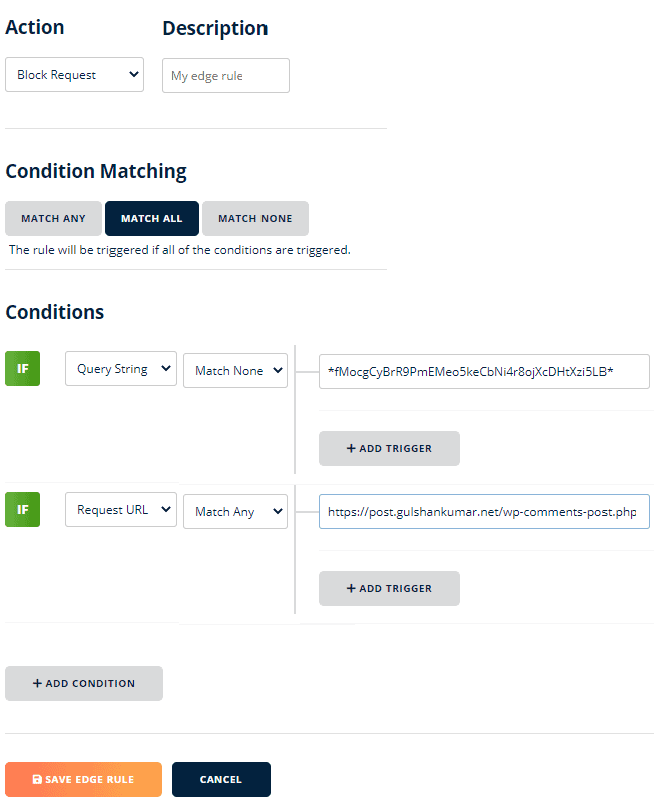
Seperate POST requests hostname
- Create another Pullzone with origin URL to your server IP
- Add a custom hostname
post.example.com - Using Edge rule, Set Request header with the name
hostand valuewww.example.com - Use Real-Time Find & Replace plugin to modify Comment and Ajax POST path.
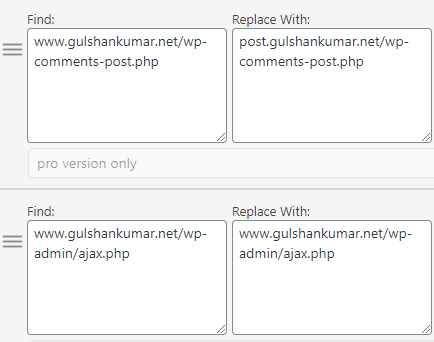
Wondering, why I have added long query string in Comment path? This is optional for preventing spam comment.
Normally, WordPress doesn’t send a follow-up email to comment author but if you’re using Comment Reply Email Notification it has a little workaround to search-replace path.
There may be more issues. If you’re not interested in debugging, please don’t use Perma Cache as I have already warned in beginning.
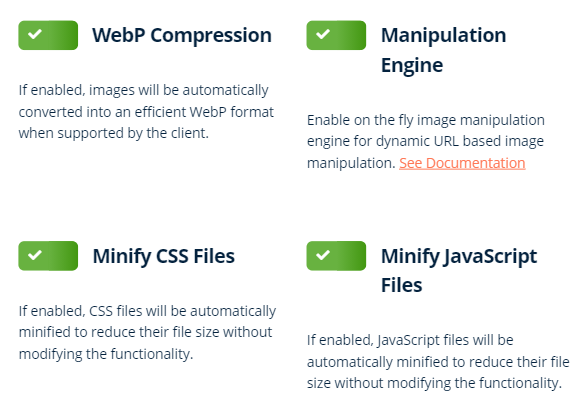
Step 8. Enable Bunny Optimizer (Recommended)
These services allow you to optimize Images with WebP compression, running on-the-fly image manipulation such as resizing, cropping, adjusting the colour, etc. Also, it can minify CSS and JS. These services cost $USD 9.50/mo. This feature can save money by serving less bandwidth.
Step 9. Create Edge Rules
Thankfully, BunnyCDN is so flexible when it comes to defining edge rule. It truly matches all kind of attributes that is important for the perfect reverse-proxy WordPress setup.
Step 1. Set request hostname
Multiple domains can have the same IP address. For communication between BunnyCDN and Origin server, we need to tell BunnyCDN to contact with a particular hostname.
For example
wget https://10.0.0.1/foo.zip--header "Host: www.example.com" – no-check-certificate
- Action: Set Request Header
- Header name: host
- Header value:
www.example.com - Condition Matching: Match any
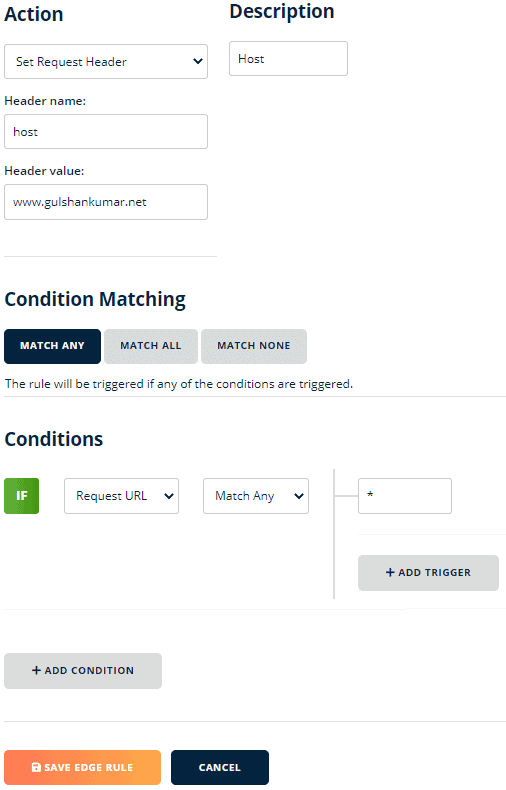
Then save the Edge Rule. This is the first important step of successful setup.
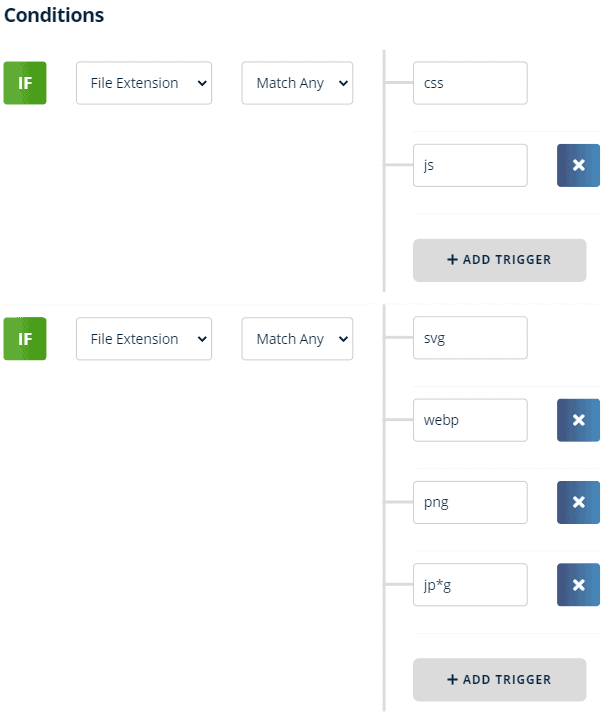
Step 2. Leverage Browser Caching for static files
Since in our previous step three of “Browser Caching Configuration“, our setup of BunnyCDN Pull zone is set to Override: Do not cache.
That is good for dynamic Content-Type such as plain text, HTML, XML files to load in visitor’s browser with Cache-Control: public, max-age=0 header response.
Specifically for the static files, we can instruct BunnyCDN to send response header for long duration browser cache.
- Action: Set Response Header
- Header name:
Cache-Control - Header value:
max-age=31536000 - IF Condition Matching: Any
We can skip adding ‘Public’ syntax of privacy.
Step 3. Bypass Edge Cache for certain cases
Use of bypassing cache by cookies
- Only for logged-in users, we can show Admin Toolbar.
- When a user visits the cart, checkout page.
To achieve this function, we need to keep Edge Cache TTL to 0 seconds with “Override Cache Time” action edge rule.
- Action: Override Cache Time
- Cache time in seconds: 0
- Description: Bypass Cache
- IF Conditions: Request Header
- Header name: cookie
- Match any:
*wp**WordPress**woocommerce* - If Query String: Match Any: unapproved*
- If Query String: Match Any: s=*
Why not Response Header? That won’t work. We use ‘Request Header‘ condition to validate presence of previous set-cookie response.
This cookies should cover most cases.
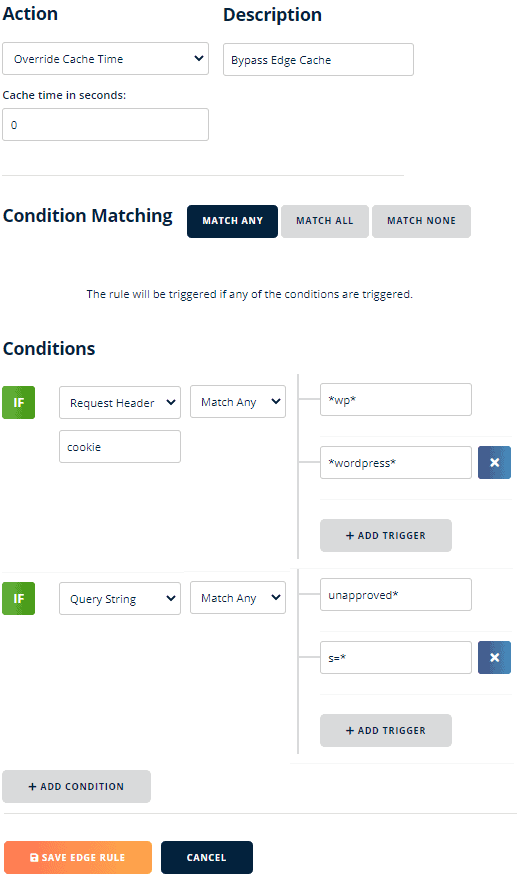
Make sure ‘Comment must be manually approved’ is checked since we need the query string ‘unapproved’ to display moderation status.

Steps 9. Handling Purge
Partial purge by URL
The goal of this method is to preserve Cache at edge.
- Login to BunnyCDN Dashboard
- Go to Purge Menu
- Make purge request for by given URL
Let say you updated a post Why DuckDuckGo is awesome? You can purge following path.
#1. Front page where post appeared
https://www.example.com/
#2. Post
https://www.example.com/ddg/
#3. Pagination
https://www.example.com/page/1/
#4. Related Category
https://www.example.com/category/search-engine/
#5. Related Tag
https://www.example.com/tag/privacy/
Automated Partial Purge
The goal of this method is to automate the purge.
- This is required when you update or publish any post or pages.
- When you change the widget or theme
Solution: Install and activate Cache Control plugin.
- Keep max-age=0, and set the
s-maxage=<seconds>based on your regular update frequency. - If you don’t like plugin method, use below function via Code Snippets plugin. Feel free to adjust the value as per your requirements.
- We do not recommend setting
max-age=<ttl>to preventing affecting UX.
add_action( 'template_redirect', function () {
    // Exclude logged in users
     if( !is_user_logged_in() ) {

    // For homepage and its subpage archives - 4 hours

      if (  is_home() || is_front_page() ) {
         header( 'cache-control: public, s-maxage=14400' );
    }

 // For Static Page - 16 hours
    if ( !is_home() && !is_front_page() && is_page() ) {
        header( 'cache-control: public, s-maxage=57600' );
    }

  // For Single Blog Post - 24 hours
    if (  is_single() ) {
        header( 'cache-control: public, s-maxage=86400' );
    }

   // For Category, tags, author, search results - 4 hours
       if ( is_category() || is_tag() || is_author() || is_search() ) {
        header( 'cache-control: public, s-maxage=14400' );
    }

   // For Feed - 10 minutes
                 if (  is_feed() ) {
        header( 'cache-control: public, s-maxage=600' );
    }

    // For 404 page - 10 seconds
                 if ( is_404() ) {
        header( 'cache-control: public, s-maxage=10' );
    }
  }
} );
Purging Entire Cache
Solution: Install the BunnyCDN plugin and set the API key. Purge manually visiting the plugin UI when required.
Step 10. Restore IP Behind BunnyCDN
Since BunnyCDN act as a proxy for the visitor, WordPress will see BunnyCDN IP which doesn’t change often. Due to repeated comment from the same IP, WordPress will block the commenting feature by saying
“You are posting comments too quickly. Slow down.”
WordPress Commenting System
Solution
Method 1. Using wp-config.php (Quick)
- Put below code in the wp-config.php file. After then, WordPress will recognize the visitor IP.
// HTTP_X_REAL_IP holds real visitor IP in case of Bunny
if ( isset( $_SERVER['HTTP_X_REAL_IP'] ) ) {
    $_SERVER['REMOTE_ADDR'] = $_SERVER['HTTP_X_REAL_IP'];
   }
}
/* That's all, stop editing! Happy publishing. */
Method 2. Apache Virtual Host
Enable the remote IP module
sudo a2enmod remoteip && systemctl restart apache2Then, add below line in the Virtual host file.
RemoteIPHeader X-Forwarded-ForThere are few other methods as well.
Step 11. Enforce Canonical path
For www
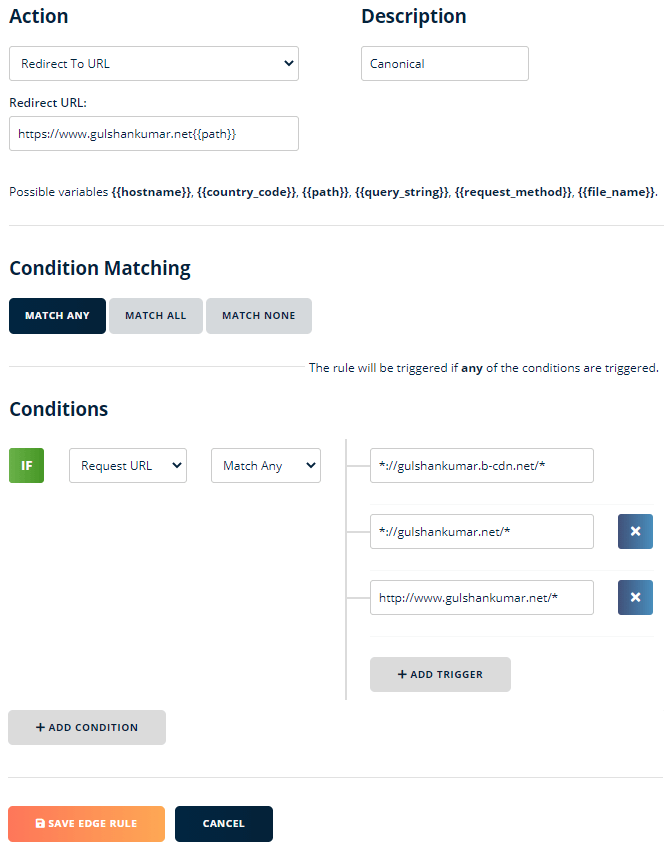
- Redirect URL:
https://www.example.com/{path}
Strictly, the scheme should be same as WordPress origin.
Condition
- *://example.b-cdn.net
- *://www.gulshankumar.net
- https://www.example.com
Similarly, we can do for non-www or subdomain as well.
Feel free to comment below if you’ve any question or feedback.
It took four hours in writing this, crafting screenshot, would greatly appreciate it if you could share with your fans. Thank you! 🤗
Why not use Cloudflare as reverse proxy?
BunnyCDN offers better performance in terms of pricing. The edge rule feature of BunnyCDN is much powerful and user-friendly than CloudFlare. You can see our detailed comparison.

Very informative and useful
Hi,
It seems I am having an issue with Automated Partial Purge for newly posted articles. I tried Cache-Control plugin and a snippet with php code, but none of them purge cache after an update unless I manually click ‘Clear Site Cache’.
Is there any solution you can suggest?
Many thanks!
I am confused by reading your queries. Unclear, which specific method are you using?
– My plugin
– OR, Cache Control?
– Both?
Thanks
Sorry for confusion. I am using your plugin. For the purge I tried the cache-control plugin. The cache wasn’t purged after the new post. The plugin was deactivated and I tried php snippet (with your code) and still no automatic purge.
Cache-Control or Snippet that you tried, simply set a header
cache-control: public, s-maxage=14400which tells CDN to keep page fresh for the 14400 seconds. Between this if you update a new post, you just need to wait. There will not be instant purge.Ok, understood.
Can I make a suggestion.
I want my editors to be able to purge the cache with “Clear Site Cache” button, so I had to add
“if ( ! current_user_can( ‘manage_options’ ) || current_user_can(‘editor’)” to the plugin.
If possible add this as an option in the plugin settings.
Thanks
“current_user_can(‘edit_others_pages’)”
This works best to be exact, since both editor and admins can edit pages
You did an excellent job. Keep it up.
Thanks dear for your kind encouraging words.
This, this my friend is exactly what I have been looking for. I love you!
I’ve been trying static html output plugins, I’ve tried using WordPress as a headless CMS with Gatsby.js – I’ve tried setting up storage zones and I think I’ve tried everything I could think of to get my site hosted on BunnyCDN but with WordPress as a backend.
You’ve done what nobody else could, you’ve enabled all my content to be hosted on a CDN which is exactly how it should be.
Your instructions here are very in depth and complete – however, I think that now they may not be so necessary – I installed the plugin and activated it, added my Bunny API key and your plugin setup absolutely everything else so I didn’t need to do all the other steps.
There’s only one flaw I’ve found and that is that my DNS server won’t let me set the domain (ie just domain.com) name as a CNAME (and I think it breaks the RFCs to allow that anyway, so I’m not sure why CloudFlare lets you do it?) – could we have an option in the plugin to only set up
www.domain.comon Bunny and not domain.comI don’t want domain.com routed through Bunny anyway, just the www version 🙂
Gulshan, thank you. You are an absolute legend for providing this. Check your wallet 🙂
Hi Steve,
Please read this article https://www.gulshankumar.net/using-cloudflare-dns-without-cdn-or-waf/
Thanks for your feedback and kind support. Much appreciated.
Regards,
Gulshan
I see that plugin supports AMP (official) but not AMPforWP?
Can you please advise.
I got this error, so had to disable ampforwp plugin:
“Fatal error: Uncaught Error: Call to undefined function amp_get_permalink() in /home2/illsp/public_html/wp-content/plugins/edge-caching-firewall-bunnycdn/functions.php:612 Stack trace: #0 /home2/illsp/public_html/wp-includes/class-wp-hook.php(287): edge_caching_and_firewall_with_bunnycdn_purge_on_post(2499, Object(WP_Post), true) #1 /home2/illsp/public_html/wp-includes/class-wp-hook.php(311): WP_Hook->apply_filters(2499, Array) #2 /home2/illsp/public_html/wp-includes/plugin.php(484): WP_Hook->do_action(Array) #3 /home2/illsp/public_html/wp-includes/post.php(4309): do_action(‘save_post’, 2499, Object(WP_Post), true) #4 /home2/illsp/public_html/wp-includes/post.php(4411): wp_insert_post(Array, false, true) #5 /home2/illsp/public_html/wp-includes/nav-menu.php(576): wp_update_post(Array) #6 /home2/illsp/public_html/wp-admin/includes/nav-menu.php(1193): wp_update_nav_menu_item(965, 2499, Array) #7 /home2/illsp/public_html/wp-admin/nav-menus.php(423): wp_nav_menu_update_menu_items(965, ‘AMP’) #8 {main} thrown in /home2/illsp/public_html/wp-content/plugins/edge-caching-firewall-bunnycdn/functions.php on line 612”
Not supported for AMP for WP.
Brilliant! Thanks for amazing plugin – saves so much time!
Before installtion ,I use woocommerce
1. Will your plugin cache product page differently for guest user and login user? because woocommerce will show “my account” on top right for login user only.
2. Do you have except page to cache html like cart page or checkout page?
3. Is your plugin compatible with woocommerce?
Thank you for developing this plugin ^^
I changed dns on cloudflare, and I had to delete one A because I couldnt add the ones from the dashboard as “dns with the name already exist”….
Now website is offline :/ Asked cloudflare if they can restore default dns, hope they can do it also on free plans..
For example.com and www hostnames, replace A record to CNAME as below.
CNAME - example.com - example.b.cdn.netCNAME - www - example.b.cdn.net
It should work.
Gulshan, button to download plugin is dead? it’s error.
Fixed.
Please check this SS: https://prnt.sc/xqsimt
I tried to Cname root domain but my one is using flattening.
How to stop it like yours?
That’s perfectly fine and how it works. Mine is also same in cropped screenshot.
hello sir
I tried to use the plugin above and I succeeded.
Is there no need to do any more settings? when using the plugins above.
No additional settings required. That’s the feature.
Does this plugin support multisite? I want to ask the site for production support. I saw a good increase using the plugin.
I have not tested with Multi Site. You can try and let me know how it goes.
not working for multisite sir. The plugin does not make direct arrangements to bunny.net.
Thanks for letting me know. I cannot support multi site at the moment. Will see in future.
In step 2 you mention to use the hostname from BunnyCDN pull zone to add CNAME record but we will already have those entries (www and non-www of our website) in the DNS, so you mean which should delete those and add these new entries? i.e. the A record should be removed with CNAME? As example.com and www are added as A record currently.
Yes.
That’s what I did and site is offline. Maybe I should wait? Even tho it doesn’t seem ad propagation error. https://ibb.co/4Z4xXqy
hi gulshan,
me again here.
so, i just try this tutorial on one of my site.. i try it on obetu.com, its a site that i use to try and experiment new thing that i don’t understand.
so, what i do is, i try your tutorial without the prequisite “Your WordPress site should be at www or subdomain”. Basically, i don’t know how to migrate to www. So i just did it on the site directly. And after a day of trying, its work. That site feel alot faster.
But.
There is a few problem, wordfence cannot get real ip address from user. I also use cloudways bot protection, and it also cannot get real ip address from user. The ip adress that it get is bunnycdn ip address.
So, my question is, what should i do to make it work? like wordfence can get real user ip instead of bunny?
If this problem persist, and i insist to continue with it, is there anything bad that could happen?
Thanks again for having patiente to reply my question.. And I’m sorry about my bad english.
Hi Yudha, try X-Forwarded-For mode in WordFence.
hi gulshan,
just to let you know, you have double step 3 above.
Also i have a few question..
1. the prequisite “Your WordPress site should be at www or subdomain.” My site right now is on root domain like example.com, so if i want to follow this guide, what should i do? move my site wordpress installation to www subdomain? i’m sorry if my question sound dumb, i’m just that dumb.
2. I notice you have the same pict for step2 and step3, and i couldn’t quite understand, if its suppose to be same pict, or you mistakenly do that.
i think that for now.. thanks..
Hi Yudha,
Here’s my answer to your questions.
Thanks & Regards,
Gulshan