Introducing Static WordPress – the revolutionary new way to experience the power and flexibility of the world’s most popular content management system, without the performance and security risks of a traditional dynamic setup. With Static WordPress, your website is built as a set of static HTML pages, providing lightning-fast load times and enhanced security for your visitors. Say goodbye to slow page loads and hello to a faster, more secure website with Static WordPress.
Key Difference in Traditional vs Static WordPress
| Parameter | Traditional WordPress | Static WordPress |
|---|---|---|
| 🌐 DNS | Points to WordPress Server IP address | Points to CDN hostname linked with static Storage |
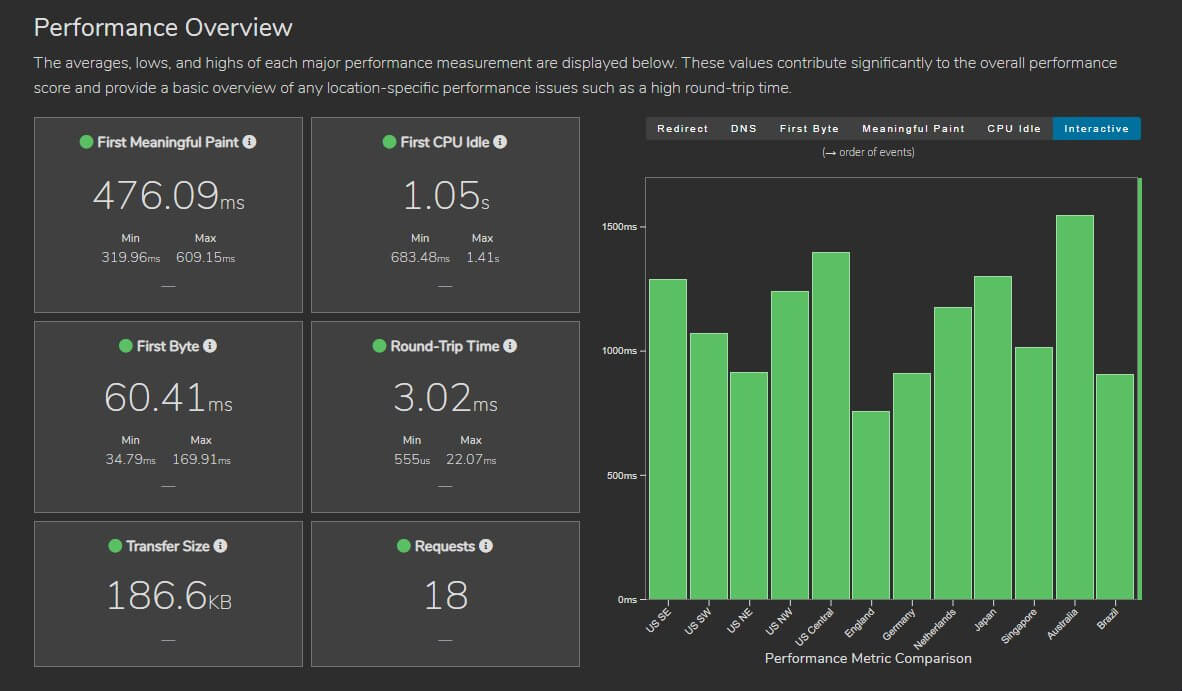
| 🚀 Web Perf | Expensive to get TTFB <200 ms worldwide | Inexpensive way to get TTFB <200ms worldwide |
| 🏠 Env | Linux Ubuntu, PHP, MySQL, NGINX/Apache | Cloud Storage for static hosting and CDN for seving |
| 🛡️ Security | Brute-force, SQL Injection, XSS is a common thing | Greatly reduces the attack surface |
| 🛒 E-Com | You can use WooCommerce | You can use Snipcart |
| 🍻 Support | Search, Comment, Contact Form 7, Users, WPML | Search, Comment, Contact Form 7, Users, WPML |
At the time of writing this tutorial, this blog was a live example of a Static WordPress for perf & security reasons.
Comment, search and form can work.
So how this works?
- Let’s say
gulshankumar.net,www.gulshankumar.netpoints to BunnyCDN hostname which is linked to BunnyCDN Storage.
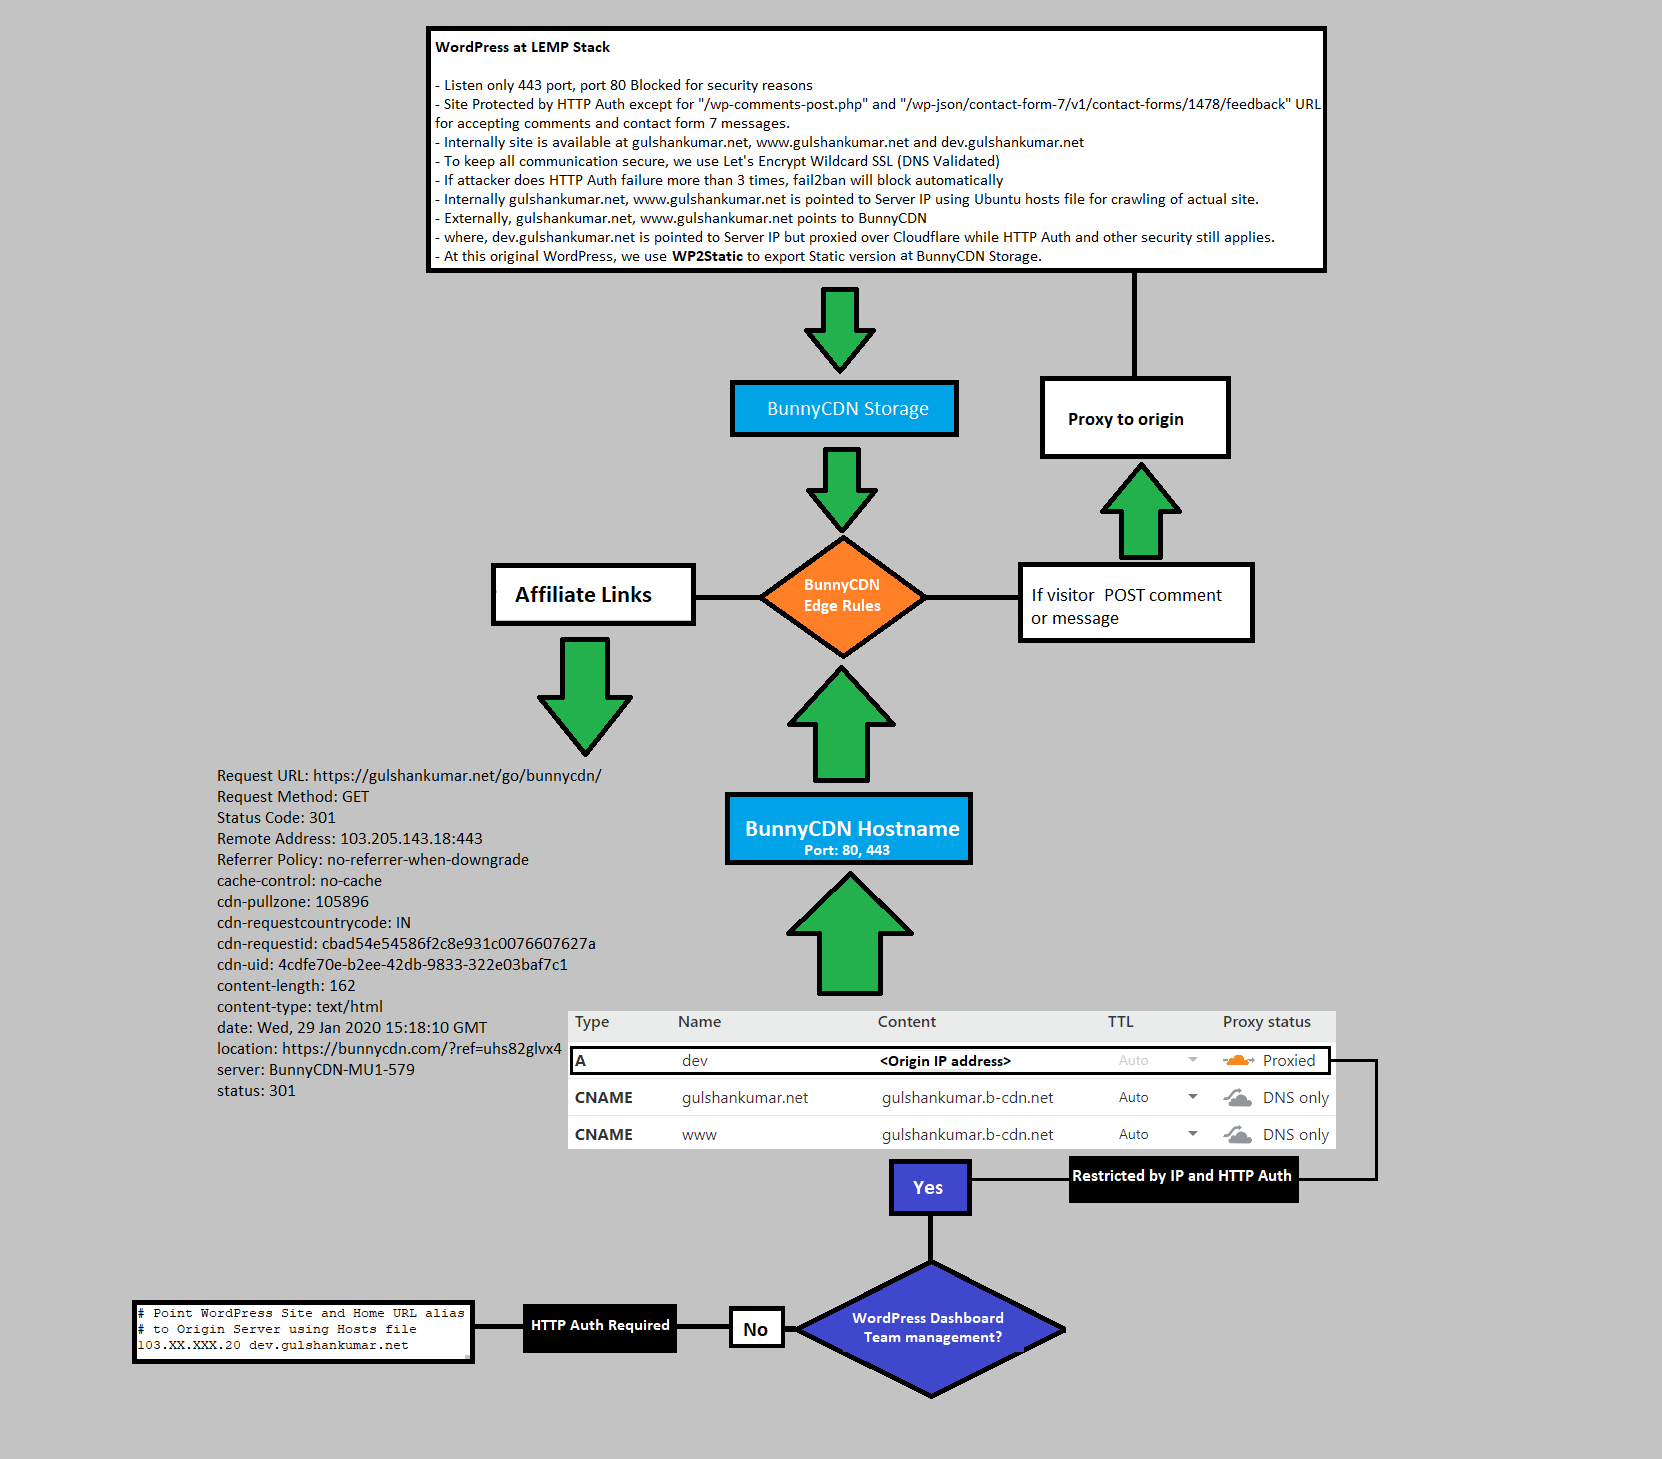
Before we proceed, there are some prerequisite things to do for the best user experience. Once a custom environment is ready, for Static HTML Output plugin, we can deploy Static WordPress at BunnyCDN.
1. Use Google Custom Search Engine
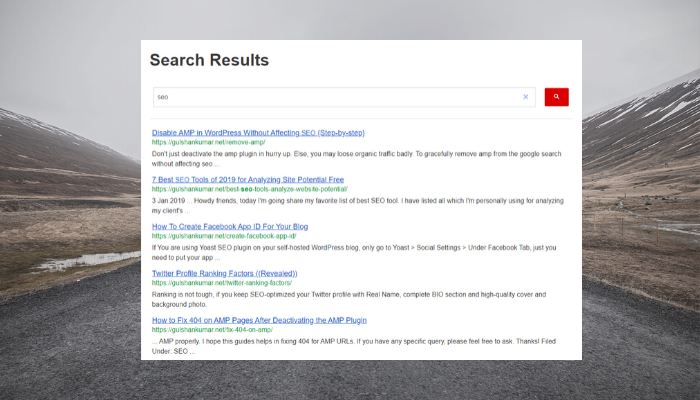
- WordPress native search works at permalink like
https://example.com/?s=search+queryand it cannot work with Static HTML site. It will return homepage just like any query string. - WordPress Search is slow, uncached, often shows irrelevant result. Static site gives you strong opportunity to fix that by using Google Custom Search Engine. You can serve “Search Results” page always in HIT mode.
Read how to properly integrate CSE for GeneratePress Theme.
2. Take a complete Backup of WordPress
Just a hint, you may use UpdraftPlus or All in One Migration Premium plugin to take backup. Or, you can do manually as well.
3. Restore WordPress AS IS at Germany based LEMP Stack
Read how to deploy WordPress at LEMP Stack.
- The most important thing is environment and LEMP is the best stack to perform well.
- BunnyCDN Storage server is located in Germany. For faster deployment, it’s better to have Development site on same location.
- Since we want to accept Comments, Contact Form 7 messages, allow Contributor as well; this is required for housekeeping.
- Incase you don’t need comments or contact form 7, then you may keep local server at Linux machine (Windows OS is not recommended).
4. Link a Subdomain to WordPress for Managing Dashboard
- We need to keep development area at a subdomain
dev.gulshankumar.netaddress. This would be password protected. - In WordPress, Install and activate Multiple Domains plugin and configure as below.
- Using Cloudflare DNS, point
dev.gulshankumar.netto the LEMP Server IP where WordPress is installed. Keep it proxied with Cloudflare.

This plugin will take care of URL rewriting based on Request Hostname.
Do not directly change WordPress primary domain to dev.example.com. This will create problem. I have explained at the end of this article.
5. Password Protect Server excluding Contact Form 7 & Comment URL
Excluded path
- dev.gulshankumar.net/wp-json/contact-form-7/v1/contact-forms/1478/feedback
It should return error 404 with below response body
{"code":"rest_no_route","message":"No route was found matching the URL and request method","data":{"status":404}}
- dev.gulshankumar.net/wp-comments-post.php
Ideally, It should return error 405 for the GET request.
Password Protected path
- dev.gulshankumar.net
## Allowed path
dev.gulshankumar.net/wp-json/contact-form-7/v1/contact-forms/1478/feedback
It should return error 404 with below response body
{"code":"rest_no_route","message":"No route was found matching the URL and request method","data":{"status":404}}

dev.gulshankumar.net/wp-comments-post.php

It should return special error 405


##Blocked Path
dev.gulshankumar.net/anything/
It should return 401 if credential not provided.
Thanks to CloudBooklet who helped me in setting up HTTP Authentication as per my requirement.
Install Apache Tools for .htpasswd generation
SSH your Server and type following commands
sudo -s
apt install apache2-utils -y
Generate Password
htpasswd -c /var/www/.htpasswd gulshanwhere username is gulshan, enter the password. Now, you will see output like this
root@WordPress:~# htpasswd -c /var/www/.htpasswd gulshan
New password:
Re-type new password:
Adding password for user gulshan
Find hashed password using below command and save it at secure place.
cat /var/www/.htpasswdSetup custom 401 page
- Add a
custom_401.htmlfile at/var/www/htmldirectory as per below configuration.
Configure NGINX Server Block for Static HTML Output
- Edit your existing server block at
/etc/nginx/sites-available/gulshankumar.net - You need to replace
.gulshankumar.netwith own domain. This is in the wildcard format to match development subdomain also.
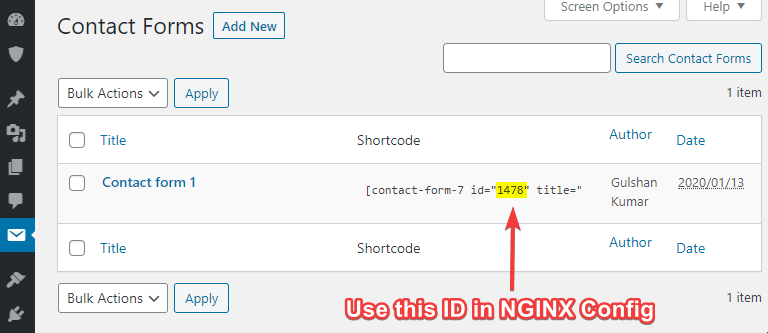
- Setup correct Contact Form 7 ID in the NGINX configuration.
- Below rule will enable password protection as needed, also adds few useful tweaks for Static HTML Output.
server {
root /var/www/html;
index index.php index.html index.htm;
server_name .gulshankumar.net;
client_max_body_size 0;
server_tokens off;

# Grace period for crawling and deployment
fastcgi_read_timeout 10800;

# Show Real IP for Comment Author instead showing BunnyCDN IP
set_real_ip_from 0.0.0.0/0;
set_real_ip_from ::/0;
real_ip_header X-Forwarded-For;

# Make sure to create Custom 401 page
        error_page 401 /custom_401.html;
        location = /custom_401.html {
                root /var/www/html;
                internal;
        }
# Allow access to Development site only over HTTPS requests
    listen [::]:443 ssl http2 ipv6only=on;
    listen 443 ssl http2;
        ssl_protocols TLSv1.2 TLSv1.3;
        ssl_certificate /etc/letsencrypt/live/gulshankumar.net/fullchain.pem;
        ssl_certificate_key /etc/letsencrypt/live/gulshankumar.net/privkey.pem;
        ssl_session_cache   shared:SSL:20m;
        ssl_session_timeout 20m;
        ssl_ciphers 'TLS13+AESGCM+AES128:EECDH+AES128';
		ssl_prefer_server_ciphers off;
		ssl_early_data on;

error_page 404 /404.html;
error_page 500 502 503 504 /50x.html;

# Allow posting comments
location = /wp-comments-post.php {
  auth_basic off;
  fastcgi_pass unix:/run/php/php7.4-fpm.sock;
  include fastcgi_params;
  fastcgi_param SCRIPT_FILENAME $document_root$fastcgi_script_name;
  fastcgi_param SCRIPT_NAME $fastcgi_script_name;
}

# Allow CF7. Please replace 1478 to own form ID.
location = /wp-json/contact-form-7/v1/contact-forms/1478/feedback {
  auth_basic off;
  try_files $uri $uri/ /index.php?q=$uri&$args;
}

location / {
# Whitelist
satisfy any;
allow 127.0.0.1;
deny all;
auth_basic           "Secure Area";
auth_basic_user_file /var/www/.htpasswd;
try_files $uri $uri/ /index.php?q=$uri&$args;
}

location ^~ /wp-login.php {
satisfy any;
allow 127.0.0.1;
deny all;
 auth_basic           "Secure Area";
 auth_basic_user_file /var/www/.htpasswd;
 fastcgi_pass unix:/run/php/php7.4-fpm.sock;
 include fastcgi_params;
 fastcgi_param SCRIPT_FILENAME $document_root$fastcgi_script_name;
 fastcgi_param SCRIPT_NAME $fastcgi_script_name;
}

location ~* \.php$ {
if ($uri !~ "^/uploads/") {
fastcgi_pass unix:/run/php/php7.4-fpm.sock;
}
include fastcgi_params;
fastcgi_param SCRIPT_FILENAME $document_root$fastcgi_script_name;
fastcgi_param SCRIPT_NAME $fastcgi_script_name;
}

location ~* .(ico|svg|css|js|txt|gif|webp|jpeg|jpg)$ {
satisfy any;
allow 127.0.0.1;
deny all;
auth_basic           "Secure Area";
auth_basic_user_file /var/www/.htpasswd;
expires 3d;
log_not_found off;
}
# Enable Gzip compression.
gzip on;
# Disable Gzip on IE6.
gzip_disable "msie6";
# Allow proxies to cache both compressed and regular version of file.
# Avoids clients that don't support Gzip outputting gibberish.
gzip_vary on;
# Compress data, even when the client connects through a proxy.
gzip_proxied any;
# The level of compression to apply to files. A higher compression level increases
# CPU usage. Level 5 is a happy medium resulting in roughly 75% compression.
gzip_comp_level 5;
# Compress the following MIME types.
gzip_types
        application/atom+xml
        application/javascript
        application/json
        application/ld+json
        application/manifest+json
        application/rss+xml
        application/vnd.geo+json
        application/vnd.ms-fontobject
        application/x-font-ttf
        application/x-web-app-manifest+json
        application/xhtml+xml
        application/xml
        font/opentype
        image/bmp
        image/svg+xml
        image/x-icon
        text/cache-manifest
        text/css
        text/plain
        text/vcard
        text/vnd.rim.location.xloc
        text/vtt
        text/x-component
        text/x-cross-domain-policy;
}
# End
Test Configuration
nginx -tReload NGINX
service nginx reloadFeel free to block TCP 80 in the Cloud Firewall of your server if don’t need HTTP request for dev area.
- There is really no need of accepting any insecure request at Development area.
- If you still want for your convenience, you may add a redirect at the top of server block.
server {
    listen 80;
    return 301 https://$host$request_uri;
}
...
6. Setup BunnyCDN
BunnyCDN is a globally fastest low-latency CDN. We will use it for serving our WordPress site.
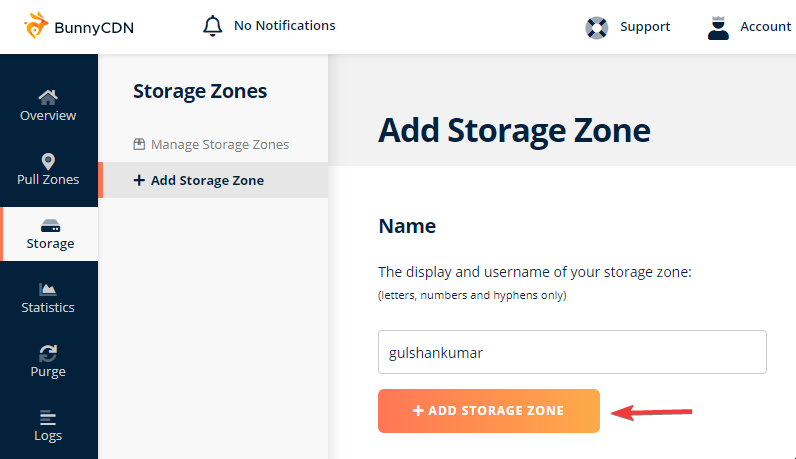
Step 1. Add a Storage zone
This is where we will host WordPress Static version files.
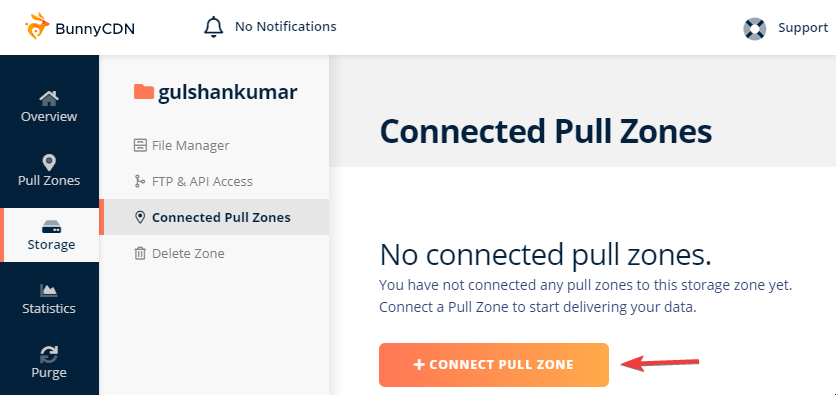
Step 2. Connect Storage Zone to Pull Zone
This step will tightly integrate your Storage with Pull zone to serve all requests from the CDN.
Set a name of your Pull zone
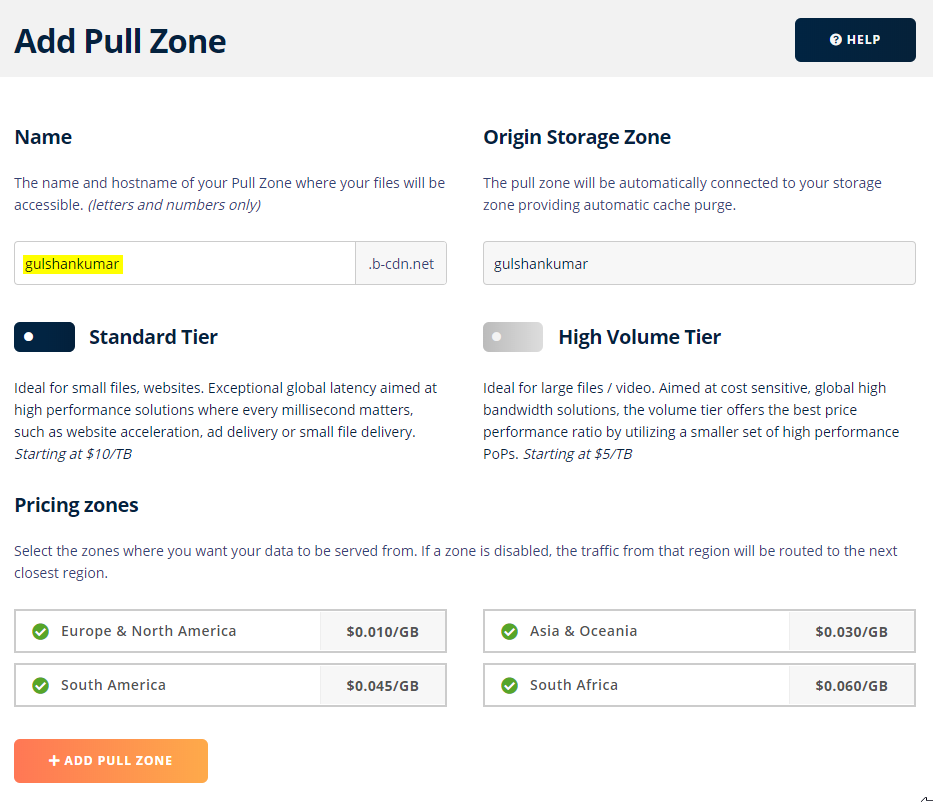
Skip introduction and head over the below basic configurations.
Step 3. General Settings
- Add minimum two custom hostnames: non-www and www version like
gulshankumar.net,www.gulshankumar.net
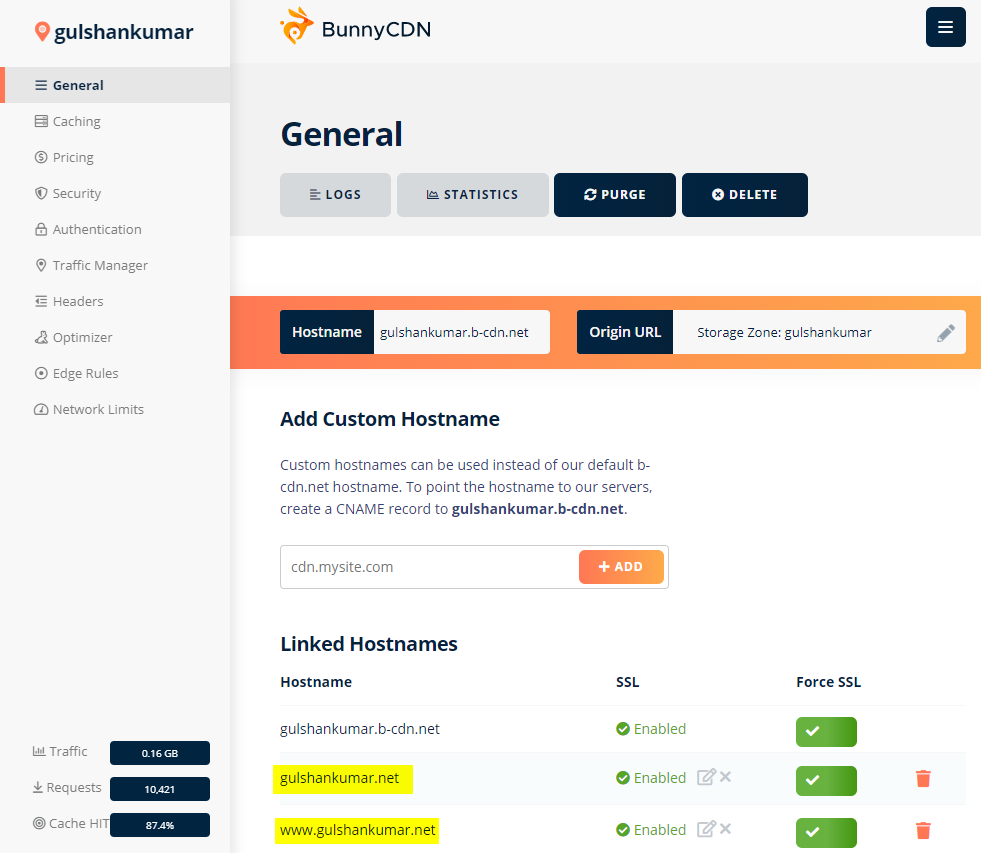
I am using Cloudflare for the DNS because it supports CNAME flattening.
- Login to Cloudflare and point DNS as below. Then you would be able to install SSL Certificate in one click.
CNAME ---- @ ------- gulshankumar.b-cdn.net -- DNS only Mode
CNAME --- www ------ @ --- DNS only Mode
A ------- dev ------ LEMP Server IP ------- DNS and Proxy mode
⚠️ Please do not use Cloudflare Cache Everything or Ignore Query String rule for dev subdomain. To be on the safe side, add bypass cache rule at the top of all page rule. The matching URL should be like this *gulshankumar.net/*
Okay, let’s see the next step.
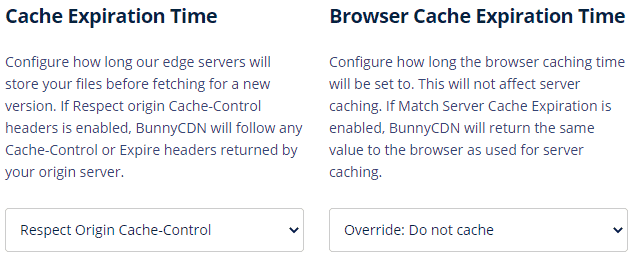
Step 4. Optimize Pull zone Caching behaviour
- Cache Expiration time: Respect Origin cache-Control.
- Browser Cache Expiration time: Override: Do not cache
- Query String Short: Enabled
- Disable Cookies: Keep enabled for having a cookieless domain.
- Optimize for Media Files: Enabled
- Vary Cache: Disable altogether. (Important for Search results,
fbclid,utmand etc query string related pages)
Step 6. Pull Zone Security
- Do not block root path access.
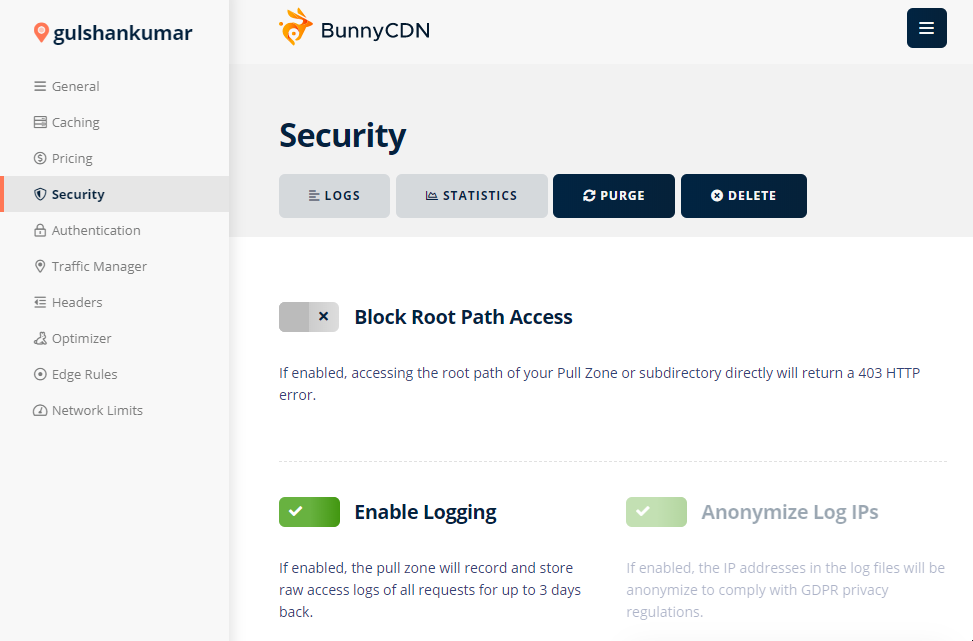
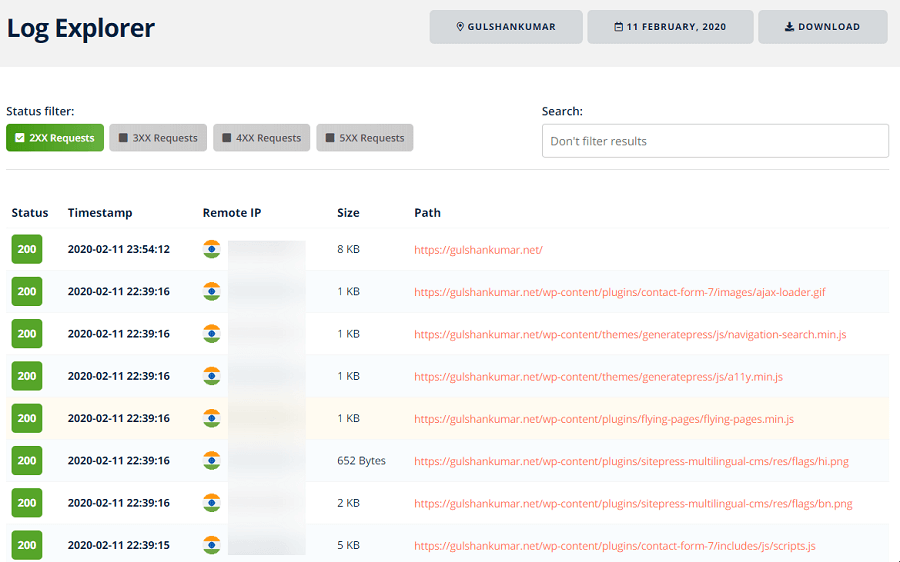
- BunnyCDN has a beautiful way to represent logs detail. Keep Logging Enabled. It would be helpful in technical debugging.
Configure Edge Rule
BunnyCDN offer edge rule to customize the behaviour of Pull zone CDN. At the moment, there is no priority feature to execute rule in a order. In that case, Match None condition would be useful.
Case 1. Force custom hostname and non-www path
Your site can be accessed over BunnyCDN Pull Zone address as well as all added custom hostnames. Concerning branding, serve all requests from a single hostname as per site URL.

- Action: Redirect URL
- Description: Enforce Custom Hostname and non-www
- Redirect URL:
https://www.gulshankumar.net{{path}} - Condition matching: Match any
- Condition: If Request URL (match any)
*://gulshankumar.b-cdn.net/* - Condition: If Request URL (match any)
*://www.gulshankumar.net/*
If your URL begins with www, please keep last request URL condition in non-www form. 😊
Case 2. Managing Redirection or Affiliate Links
For example, If you visit https://affiliate.gulshankumar.net/bunnycdn/ it will redirect to my affiliate link of BunnyCDN.
Things to know
- Using Edge rule you can setup redirect with 301 response.
- BunnyCDN serve HIT response for redirection with
no-cachefor browser. This eliminate the risk of serving old link. 👍 - Previously, I had
x-robots: noindex, nofollowheader response with 3XX response. Currently, it is not possible to assign multiple actions but you can match multiple things. As solution, I keeprel="nofollow"tag in HTML whenever possible.
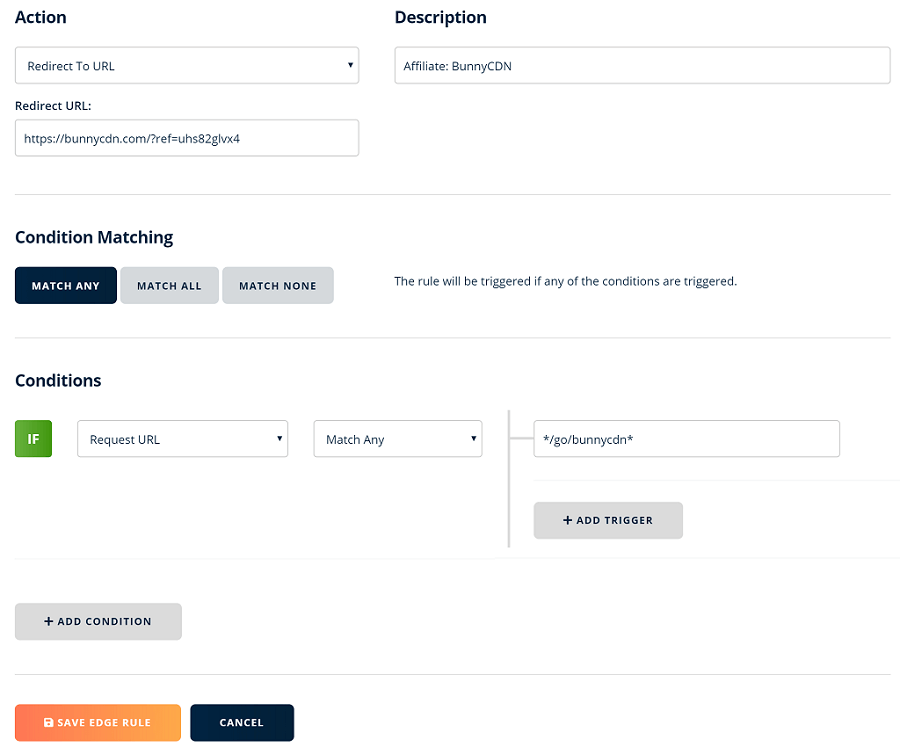
- Action: Redirect URL
- Description: Affiliate: BunnyCDN
- Redirect URL:
https://bunny.net/?ref=uhs82glvx4 - Condition matching: Match any
- Condition: If Request URL (match any)
*/go/bunnycdn/*
Alternative method: 302 Redirect with Custom HTTP response
This will require two HTTP requests. First HTTP 200 for /go/bunnycdn/ and another 302 for the landing page. I feel this approach might be affordable if Edge rule becomes a premium feature after a certain limit in the future!
- Create a file
/go/bunnycdn/index.htmlin Storage like this. - Then set a response Header
x-robotswith valuenoindex, nofollow
Case 3. Using WordPress Comment & Contact Form 7 with Static Site
To handle WordPress comments and Contact Form 7 in a static site, proxy request with the origin server IP address by matching URL. BunnyCDN handle the “POST” method gracefully.
Advantages
- ✅ No extra DNS lookup or HTTP requests
- ✅ Privacy-Friendly
- ✅ Amazing fast
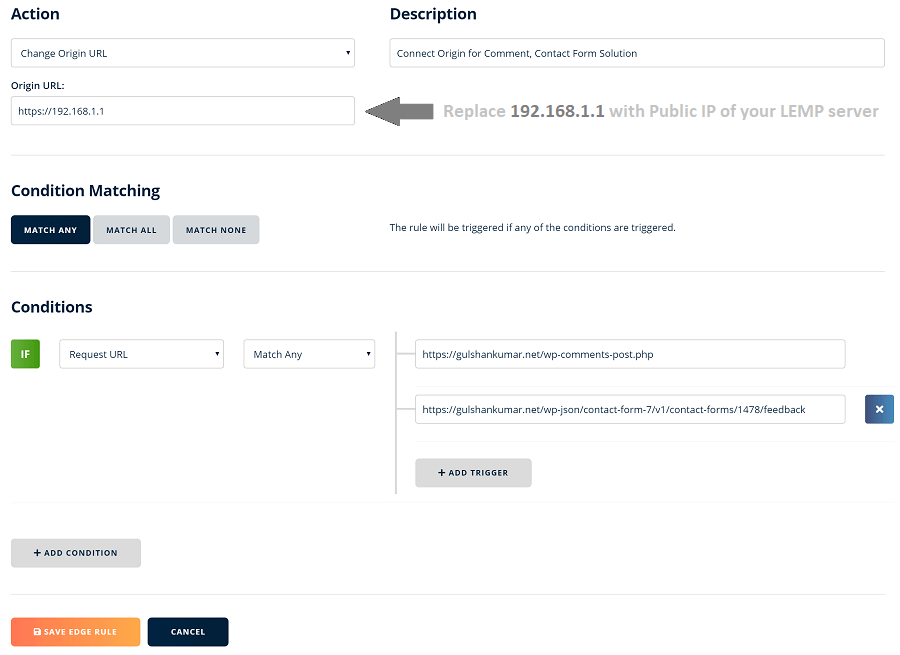
- Action: Override origin
- Description: Connect origin for Comment, Contact Form Solution
- Origin URL: Enter Public IP address of Origin online LEMP server in the HTTPS scheme URL form.
- Condition matching: ANY
- Conditions: If request URL (match any)
- Trigger:
https://example.com/wp-comments-post.php - Trigger:
https://example.com/wp-json/contact-form-7/v1/contact-forms/1478/feedback
A few more things …
- Replace
1478my Form ID to own that you can find at Contact Form 7 page inside WordPress dashboard. override cache time to 0 secondsset a response headerCache-Control: no-cache, no-store
⚠️ max-age=0 doesn’t mean browser is not suppose to cache, they can do due to last modified.
⚠️ Contact Form 7 uses content-type: application/json; charset=UTF-8 MIME type to make POST request on message submission where wp-comments-post.php uses text/html; charset=UTF-8 and it shouldn’t be intrepreted same as text/html type. If you add similar rule based on these MIME type then make sure to exclude these paths using MATCH NONE Condition.
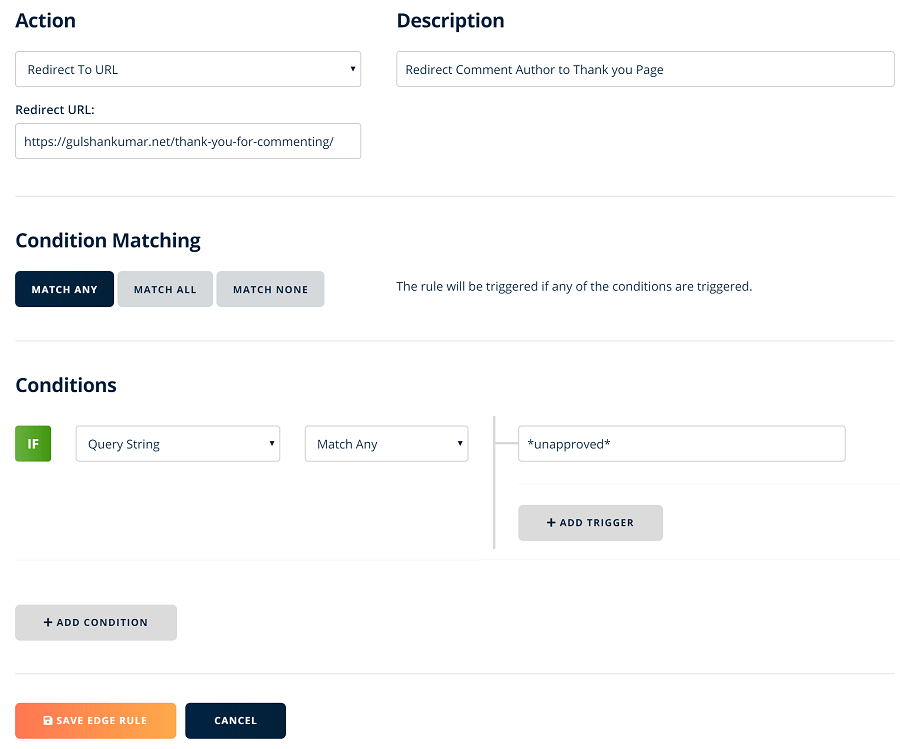
Case 4. Redirect Comment Author to Thank you page
Generally when a visitor leave a comment on a WordPress Blog the POST request goes to https://example.com/wp-comments-post.php and they are redirected with HTTP status code 302 to https://example.com/permalink/?unapproved=575&moderation-hash=xyz with message “Your comment is awaiting moderation”.
In case of static site instead of serving same page over query string with HTTP 200 response, we can use the “unapproved” query string to redirect the Comment Author to Thank you page.
This is how it can be done.
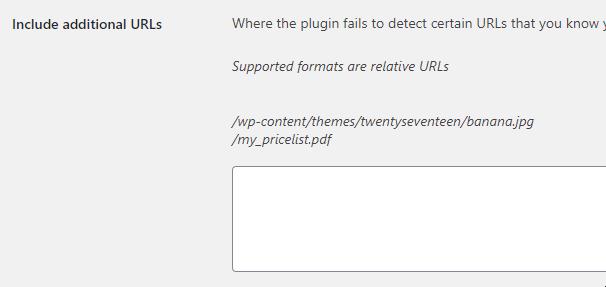
Case 5. Fix Broken Background Elements
The plugin which I am going to use in this tutorial called “Static HTML Output” has one little issue. Sometimes, it doesn’t fetch background file from CSS.
Method 1: Use Include additional URLs feature which comes in this plugin.
Method 2: Leverage “Override origin” feature of BunnyCDN.
- Fix missing Contact Form 7 GIF loader
First, upload the missing file at a directory in the Storage zone file manager.
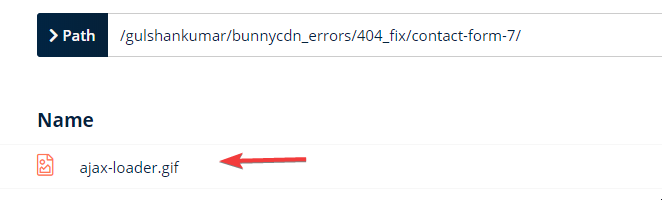
Then override the Origin URL by matching requested URL using “Edge rule”

- Similarly, fix missing play button for native Video embed
Upload the file
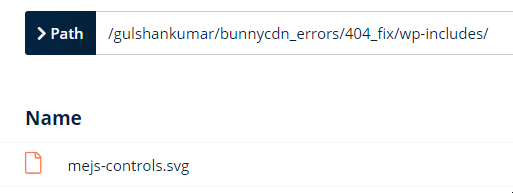
Then override the origin to rewrite the request.

Case 6. Make WordPress Faster with HTML Caching
BunnyCDN is very flexible when it comes to setting up HTML Cache. They support a wide range of array to match request and set custom rule accordingly.
In laymen terms, when you open any site. Your browser send some information like user-agent, accept type, hostname to its server using Request Header and return some Information using Header Response for developer and browser to deal with it. In this part, we are going to talk about HTTP header Response.
- Cache-Control: This header is used to set caching instruction for browser or proxy.
- max-age: Hint client or proxy may use previous response body without any validation for fixed period of time.
- s-maxage: This takes precedence over max-age to hint how long cached response a CDN/Proxy can serve.
HTML content are supposed to have freshness over time. It’s better to have short response time.
BunnyCDN supports last modified header. You can keep max-age=0 to effectively use 304 response. Browser don’t need to download whole response body for subsequent same request instead HTTP response only each time to check if browser can serve cached response or not. If not matched, then it will download fresh information with HTTP Status code 200.
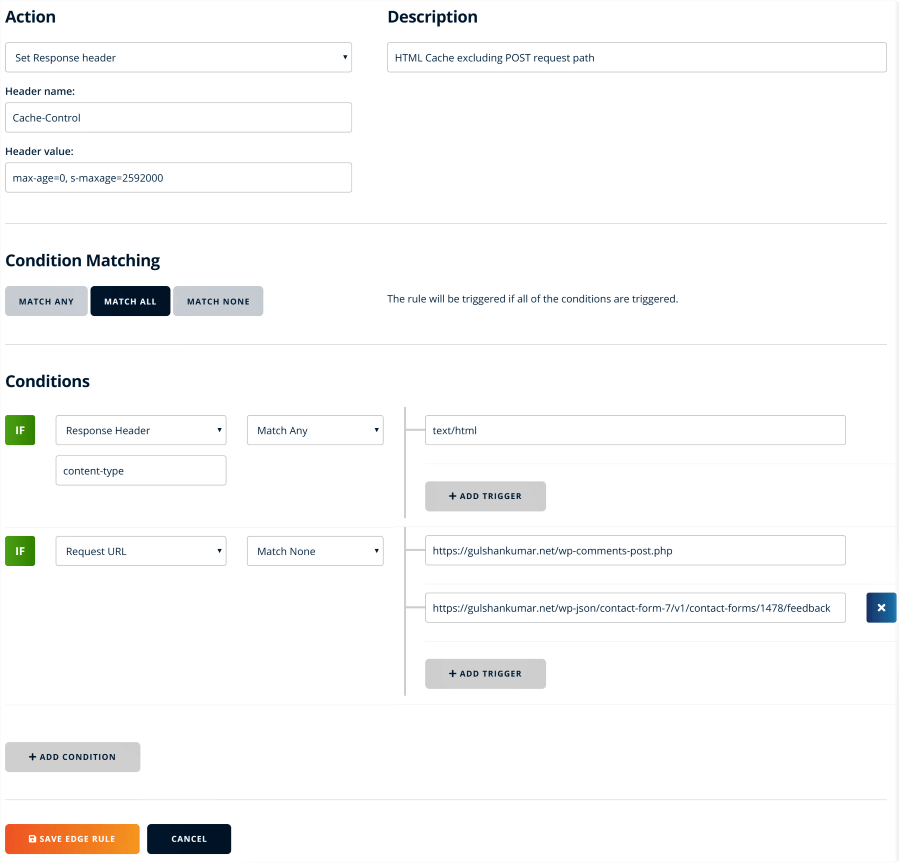
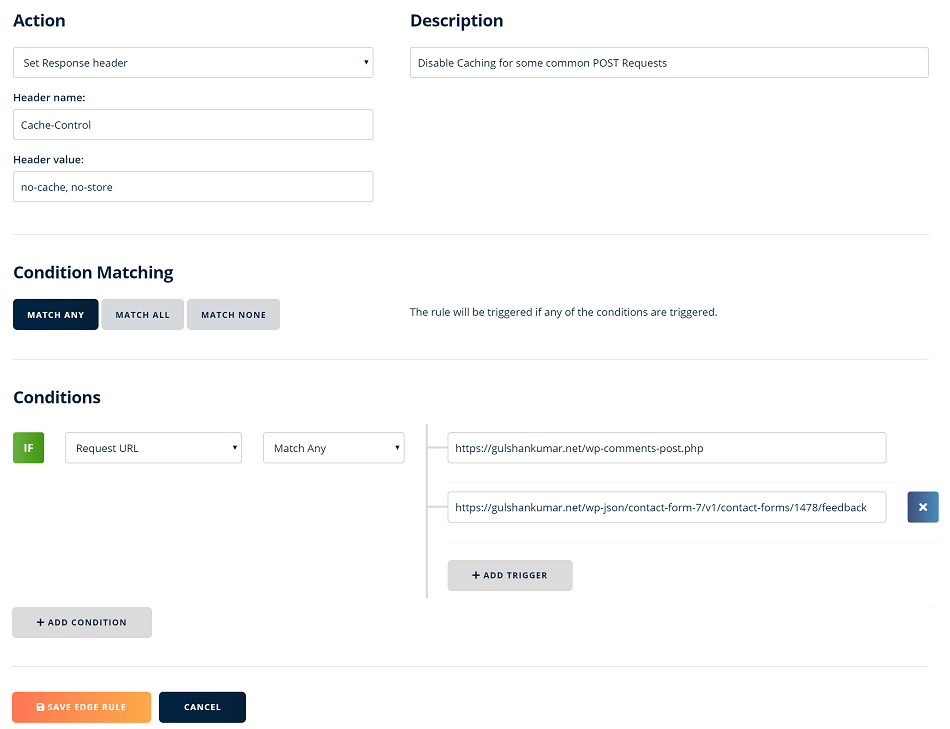
We shouldn’t cache any POST request but just anything that matches text/html Content type.
- Action: Set Response Header
- Description: HTML CDN Cache Excluding POST request path
- Header name:
Cache-Control - Condition Matching: Match All
- Header value:
max-age=0, s-maxage=25920000 - Conditions: If Response Header (Any): Content-type: Trigger:
text/htmland also addtext/xmlfor the Sitemap. - Conditions: If Request URL (Match None) : Trigger:
https://example.com/wp-comments-post.phporhttps://example.com/wp-json/contact-form-7/v1/contact-forms/1478/feedback
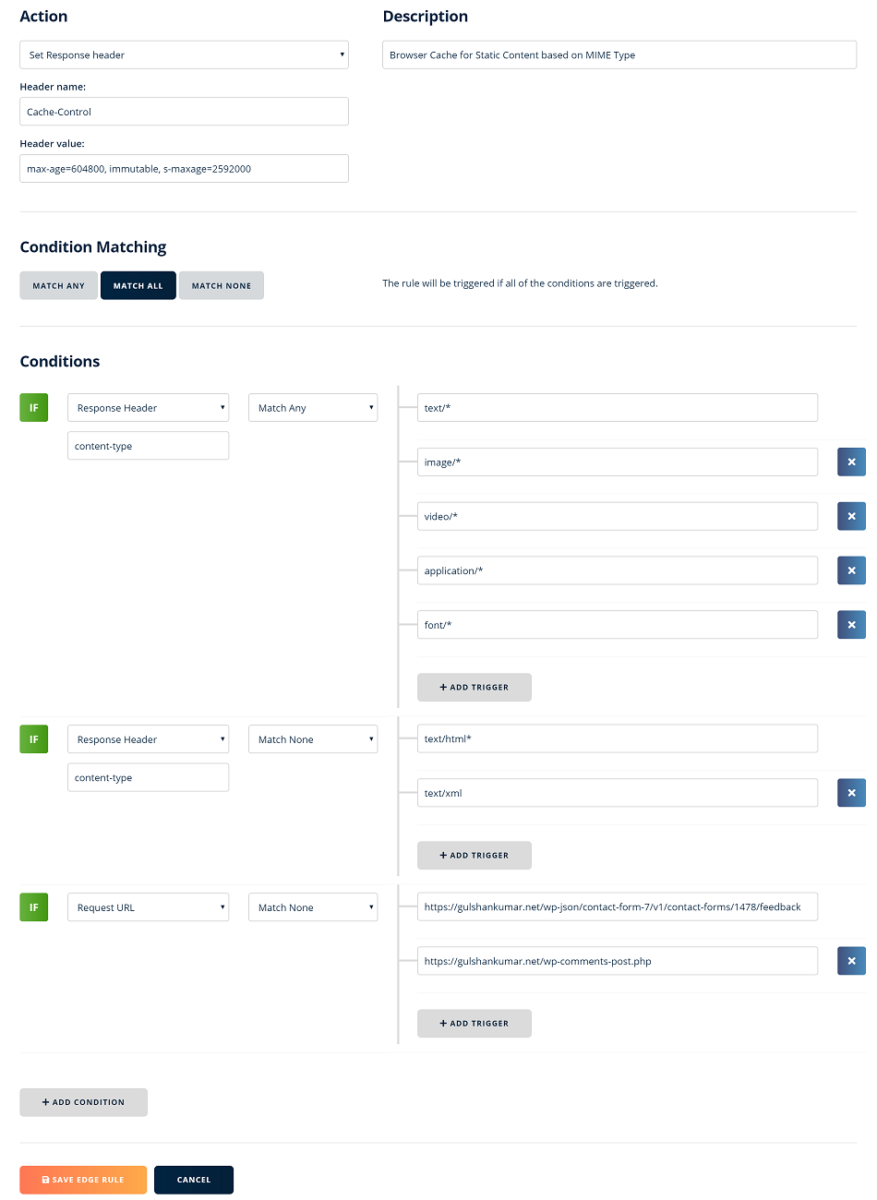
Case 7. Setup Browser Caching
Static file such as CSS, JS, Images, etc doesn’t change often over time. It doesn’t mean, you should set 1 year cache. 7-8 days is enough. Also, there is one more reason why you should avoid 1 year caching.
- In previous step (Pull zone Cache settings), concerning HTML document query string like
fbclid,utm,q, etc – we have setup BunnyCDN to serve cache by ignoring all query string. - However, for “static content” respecting Query String is better to invalidate cache as per WordPress fundamental thing.
- Unfortunately, this is currently not possible with BunnyCDN to deliver different response as per Query String specifically for static content. Therefore, I feel it’s better to set short term caching for static content.
- Don’t worry about tool. The truth is quoted below.
Facebook study found that in 42% of cases, a cache is no more than 47 hours old.
code.fb.com
So, here we go.
Case 8. Enable HSTS
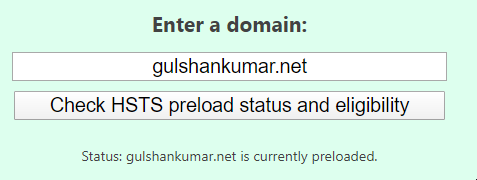
If previously you were using HSTS, you should continue over BunnyCDN as well. HSTS header instruct browser to always load request from the HTTPS path only. You can setup it this way for the text/html request. There is no need to do this for static resources.
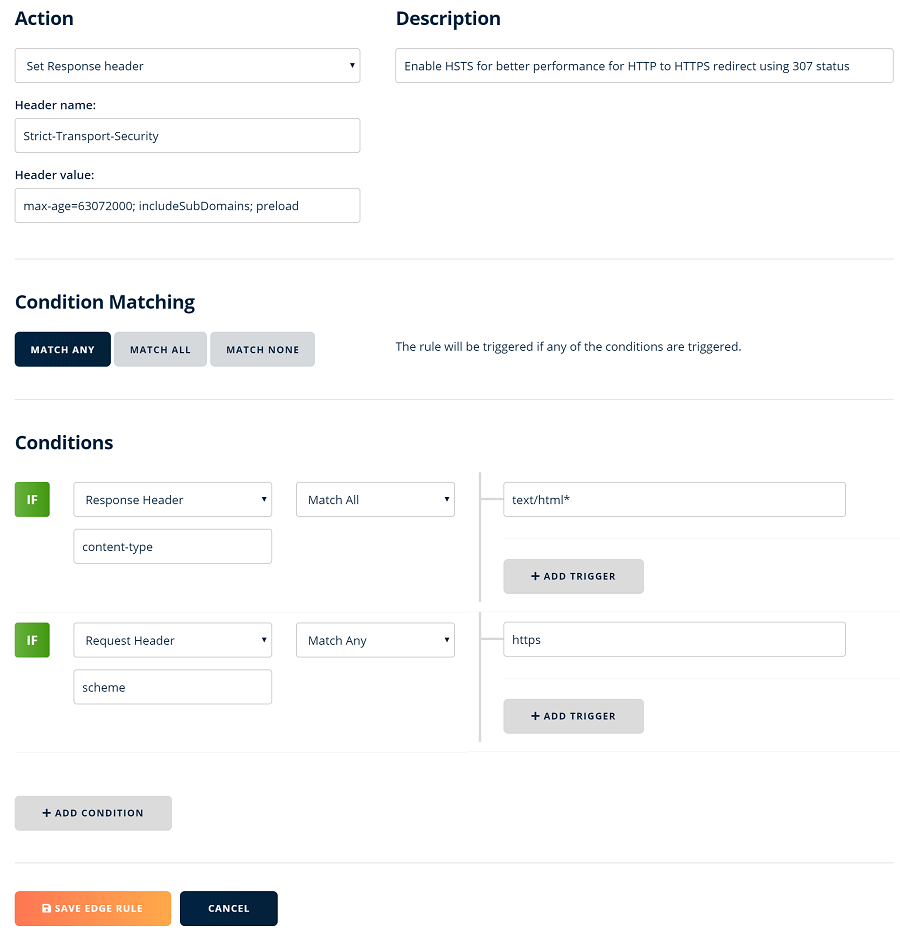
- Set a response header
Strict-Transport-Security:max-age=63072000; includeSubDomains; preloadfor HTML requests only.
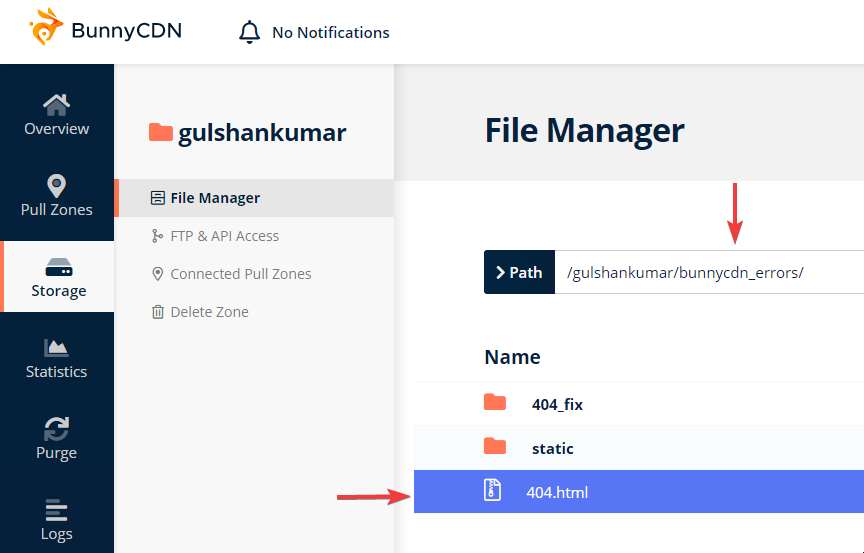
Case 9. Set Custom 404 page
- Go to Storage zone
- Create a new Directory called
bunnycdn_errorsand add a404.htmlpage inside it. Source: Official Documentation
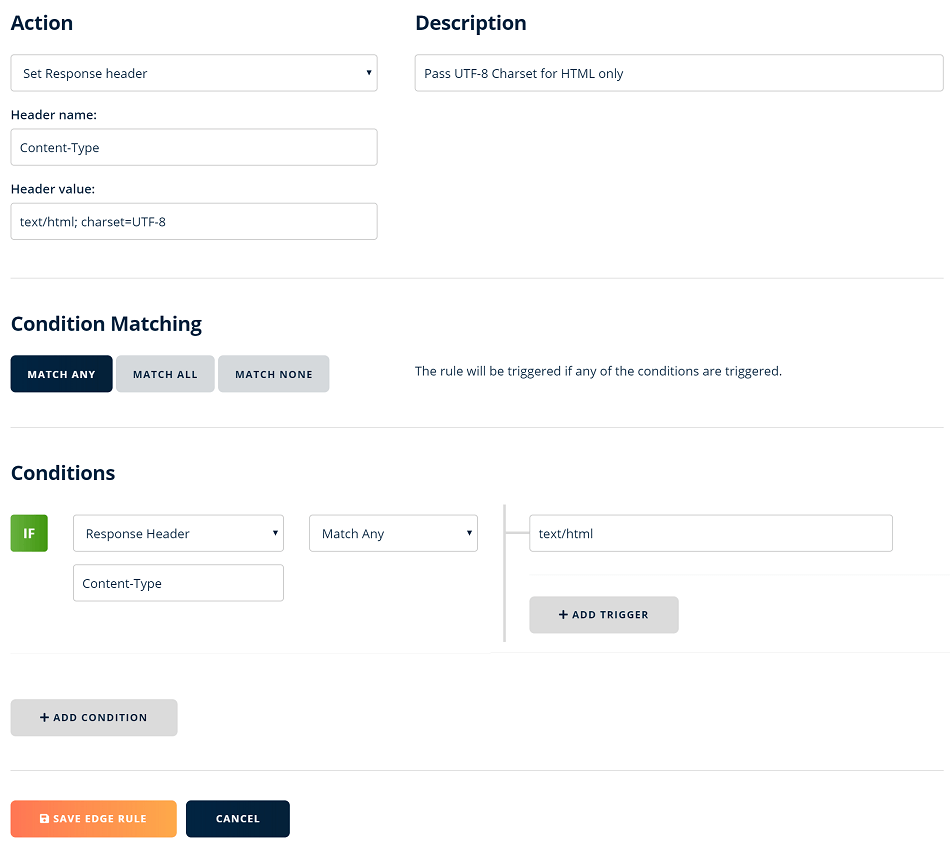
Case 10. Enforce UTF-8 Charset
For some reason, BunnyCDN serve HTML content without any charset information. It’s better to pass UTF-8 Character for the HTML content.
Case 11. Serve WebP images
There are two simple ways.
- The easiest way would be using BunnyCDN Optimizer in few clicks.
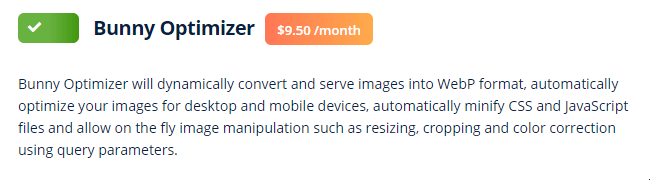
- Using EWWW Image Optimizer plugin with JS rewrite.
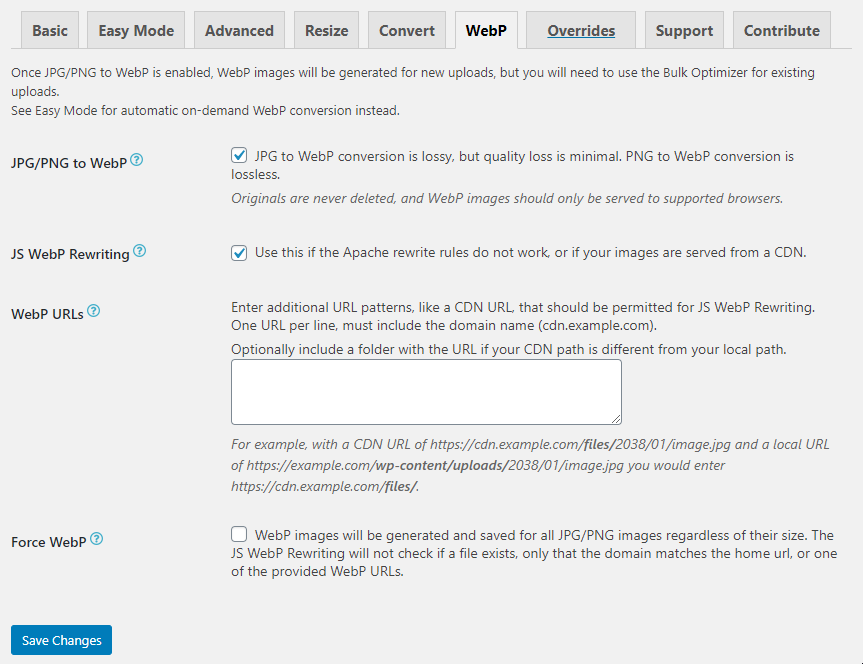
- Then run Bulk Optimization. You may skip compression and only attempt WebP conversion.
- Check Network Console to find if your site is serving WebP images or not.
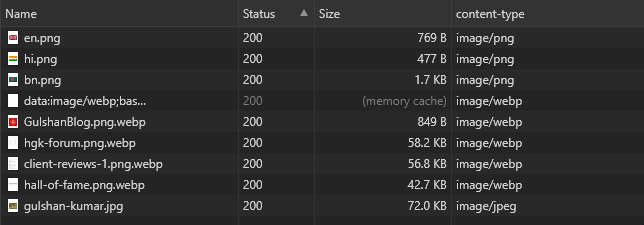
Do not enable Vary Cache by WebP in Pull Zone settings. It’s not required. Because, everything happens at client side.
Deploy Static WordPress to BunnyCDN Storage via WP2Static

How to download?
- Go to Static HTML Output site > Click on download link
- Make a donation or click already donated link to get download link.
This plugin will export your WordPress in “Static version” to BunnyCDN Storage, and linked pull zone will serve it to your anonymous visitors.
This plugin works well in Linux environment and has ability of post-processing for optimized deployment.
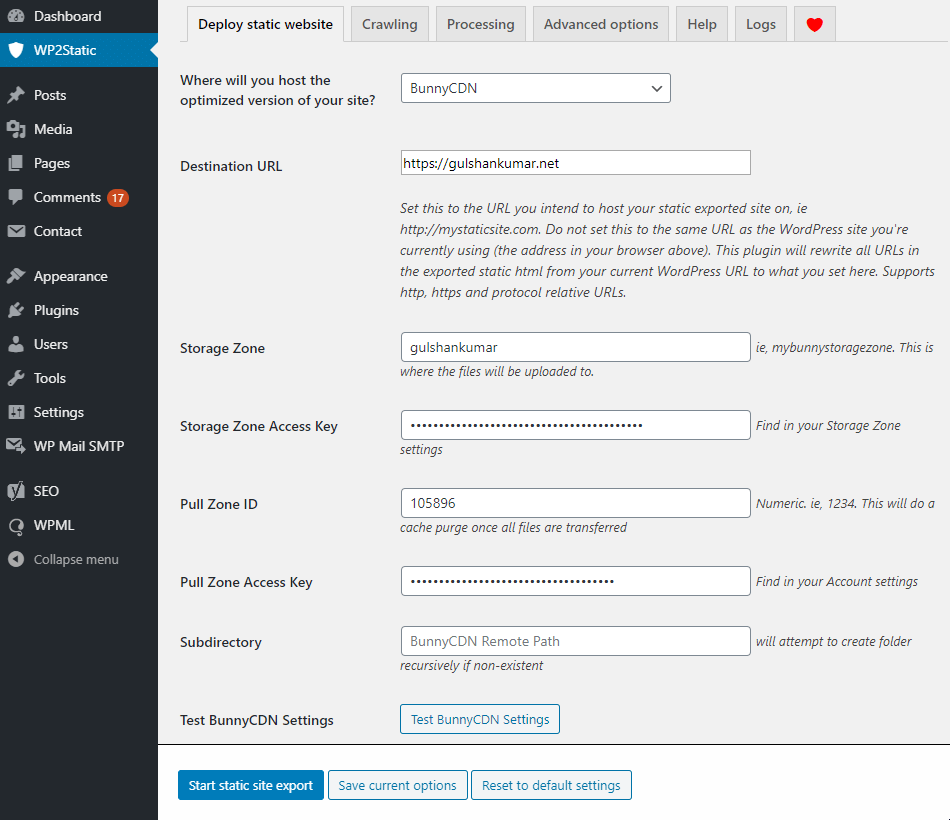
Setup Guide
Follow below deployment configuration to BunnyCDN as shown below in the screenshot
- Where will you host the optimized version of your site? Choose BunnyCDN
- Destination URL: Set
https://example.comas your primary WordPress domain
Tip: Keep your WordPress Profile username different than BunnyCDN Storage Zone name to prevent Chrome Auto-fill causing bad credential error for BunnyCDN. I learned this hard way.
Crawling
You need to enter HTTP auth credential as we have setup in previous step while configuring NGINX server block.
- My WP site requires Basic Auth to access
- Basic auth user: Enter HTTP Auth username
- Basic auth password: Enter auth password
- Exclude certain URLs (optional): I prefer to exlcude following uneccessary path as per my requirement.
/gp_elements/
/elements/
/go/
/feed/
/sitemap.xml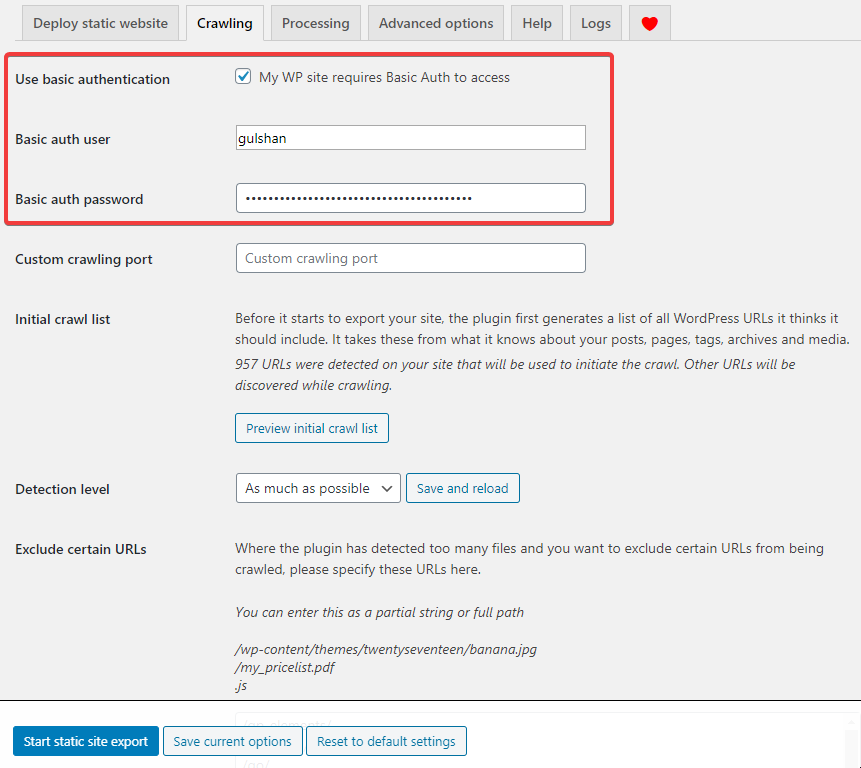
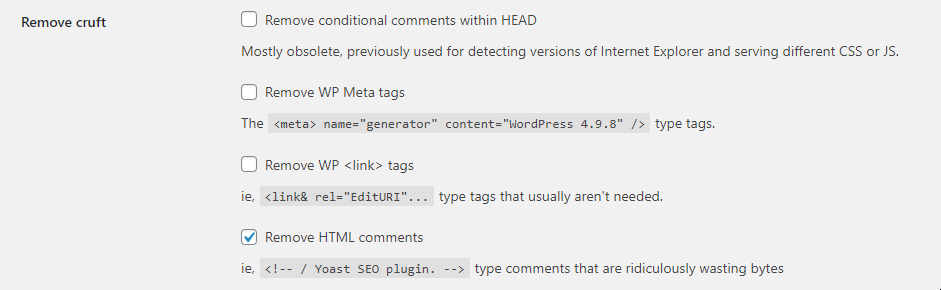
Processing
In processing tab, set as following
- Relative URLs: It’s not important to enable it.
- Base HREF: You do not need to enable this.
- Remove cruft: Don’t remove WP <link> tags.
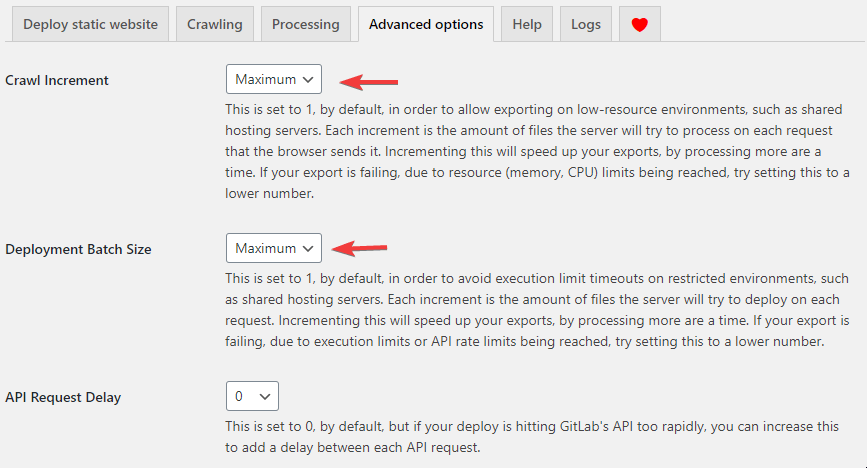
Advanced
You can keep maximum level crawling and deployment speed.
Now, we are almost ready to deploy our first site. Before that, you need to understand that WP2Static uses WP_SITE_URL for crawling and deploy at BunnyCDN at storage.bunny.net API hostname.
Your domain example.com, www.example.com or dev.example.com might be pointing somewhere. For smooth deployment, manually define LEMP server IP address in DNS hosts file. It can be public or private IP.
sudo -s
nano /etc/hosts
Point your Domain to LEMP Server IP
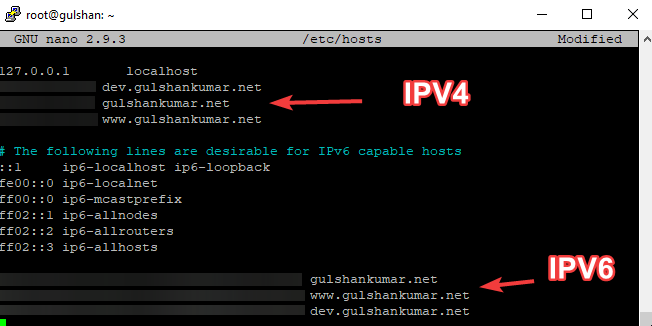
This little hack will speed up the process of crawling.
Deploy WordPress as Static to BunnyCDN Storage
Click on start static site export for the first deployment
Upon successful deployment, you will see “Process completed” message.

Next what? You can visit example.com, www.example.com to check your live site over CDN.
Disclaimer: This article was written two years ago. Some information may need update.
Is Static WordPress recommended for Dynamic site?
Not at all.
Read more tutorials related to BunnyCDN
- Cache WordPress HTML at BunnyCDN
- BunnyCDN Review 🚀Fastest, Affordable CDN
- bunny.net vs Cloudflare: Which one is Best?
- bunny.net DNS – 5 Amazing Features Spotted

That’s really nice post absolutely fabulous I really liked it and thanks for sharing the information
Hi Gulshan,
thanks for the guidance. I have three questions.
Where do you get the Pull Zone ID from? Is it just any number?
Currently I have enabled CDN via BunnyCDN-Pull-Zone and their plugin (URL = cdn.example.com) on my WordPress-Site (without storage zone).
So my URLs get rewritten to cdn.example.com (I have a CNAME in Cloudflare: cdn => example.b-cdn.net).
The question now is: Do I need to disable the CDN-behaviour in my WordPress before exporting my Site as Static?
And finally. Do I need to delete the A-Records (example.com => LEMP, http://www.example.com => LEMP) in Cloudflare to be able to add the CNAME-Records (example.com => example.b-cdn.net, http://www.example.com => example.b-cdn.net)? Will this missing A-Records do any damage?
Thanks in advance.
Best.
Stefan.
1. To fine PullZone ID, go to Bunny Dashboard, copy link of PullZone.
https://panel.bunny.net/pullzones/edit/HERE_IS_PULLZONE_ID2. Currently, the
cdn.example.commethod is a traditional way of using CDN (<--Read here). Please stick to this method. 3. If your site is working, you do not need delete A record or make any changes in DNS.Thanks for your quick response, Gulshan.
You mean I can leave everything as set up (classic CDN active, example.com pointing to LEMP) and still deploy a static version to my Storage Zone. And after the deployment I can access the site example.com and everything will be served from the BunnyCdn-Storage zone?
Thanks again for your very appreciated help.
Best.
Stefan.
In case of static deployment, you can use CNAME method as suggested in the article. You need to remove A record for @ or root domain then implement it via Cloudflare DNS which is easiest.
Many thanks Gulshan,
everything worked as you described.
One last question:
Would it be faster to use a VPS to host the static site instead of the Bunny-Cdn-Storage-Zone?
Thanks in advance.
Best.
S.
Hi Stefan, A VPS can be faster in one region where it is located. Bunny.net (Formerly, BunnyCDN) Cloud Edge Storage can be faster in all regions when linked with CDN and GEO-Replication enabled. Thanks!
Hi Gulshan,
thanks for the great tutorial. Will try to do this. Two questions:
1. First I backup my running LAMP-Site with Updraft. Then I import this backup into my LEMP-Wordpress via Updraft. This will work, right?
2. Am I able to use a service-worker with this LEMP-Server and Static BunnyCDN setup?
Thanks for the help.
Best regards.
Christoph
Hi Christoph,
1. Yes.
2. No idea.
Thanks
Static HTML Output does not crawl my webp images. Once I upload them manually to folder in BunnyCDN, they’ll get loaded. How to fix that?
Thanks
Hi Chris,
I think, That should work perfectly fine. Make sure to enable Pull Zone > Caching > Browser WebP support else it can end up serving in the unsupported browser.
Another option to get WebP is using BunnyCDN Optimizer.
Thanks & Regards,
Gulshan
It seems that EWWW has changed their plan: “WebP conversion requires an API key or Easy IO subscription.”
Any other recommendations? WebP express seems to be a solid option.
No need to add API key in EWWW. It’s optional.
Hi, Gulshan Kumar Ji,
I am Suresh , planning to buy a bunnycdn storage for start a large video streaming based website. Presently I am using cloud hosting…is there any difficulty to connect between bunnycdn storage to my hosting via API or any code because I don’t have much Knowledge on coding……
Could you please suggest me to handle this….
Thank you
Hi Suresh, There is one unofficial solution available for WordPress, I have not tried that way.
Thanks Gulshan for detailed article.
It’s time to give this a try. I have been sitting on the fence for too long thinking about this. Just that Gravity Forms are not supported!
Hi, Good to see you there! I will try to figure out solution for Gravity Form as well. For now, you can use Contact Form 7.
It’s very helpful, good job
I will definitely try this