Che cos’è il WebP?
WebP è un formato moderno per servire le immagini più velocemente che mai. Se utilizzate WordPress, potete facilmente servire tutte le immagini in WebP con alcune modifiche di base.
La maggior parte dei browser supporta WebP
- Secondo i dati di Caniuse, WebP è attualmente supportato dal 94% dei browser, tra cui Apple Safari, Google Chrome, Opera, Mozilla Firefox, Microsoft Edge e i browser Android.
- YÈ comunque possibile utilizzare JPEG/PNG come fallback per i browser non supportati.
I principali vantaggi dell’utilizzo di immagini in formato WebP
- Rispetto alle dimensioni delle normali immagini JPG o PNG, le immagini WebP della stessa dimensione possono essere utilizzate in pochi byte. Di conseguenza, le immagini si caricano più velocemente. Sarà utile soprattutto per gli utenti mobili.
- Offre immagini di qualità in pochi byte, risparmiando drasticamente la larghezza di banda.
- Mantenete il vostro sito web aggiornato con le ultime tendenze. Non perdete le conversazioni a causa della lentezza di caricamento di bull-cart.
- WebP è raccomandato dagli sviluppatori di Google. Aiuta a superare la raccomandazione “servire le immagini in formato next-gen” di Google PageSpeed Insight.
Ecco come si può servire WebP per un sito WordPress.
Utilizzo del plugin WebP Express in NGINX
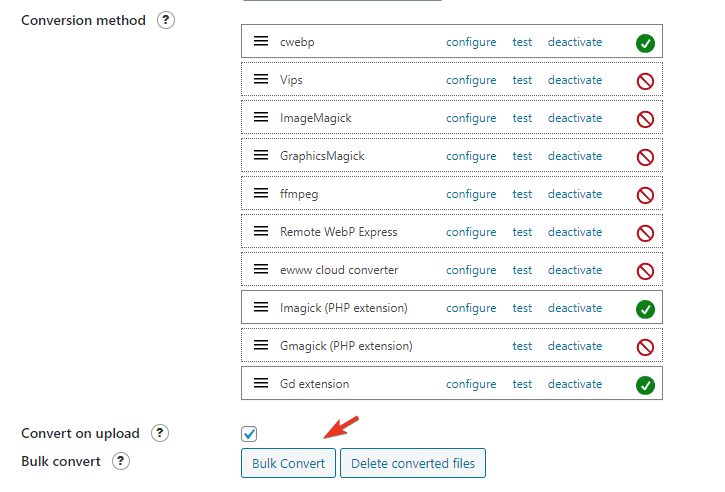
- Installare e attivare WebP Express, plugin gratuito. Un enorme ringraziamento a Dev.
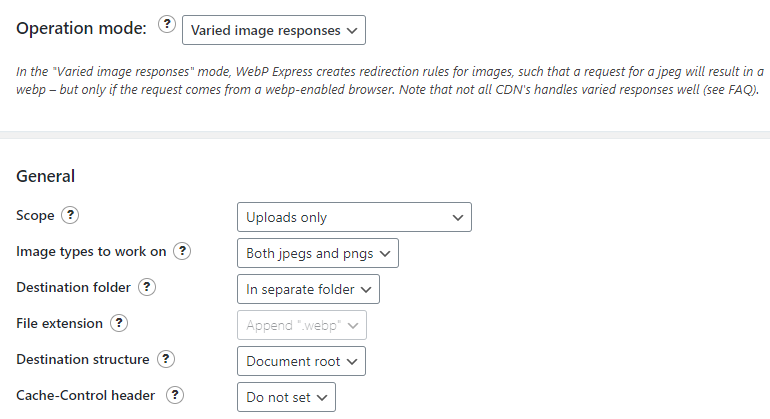
- Modalità di funzionamento: Risposte di immagine variate.
- Ambito di applicazione: Solo upload.
- Run Bulk Convert
- Per gli utenti di Apache, non è necessaria alcuna configurazione, poiché .htaccess fa tutte le magie.
- L’utente del server NGINX deve modificare il file di configurazione con accesso root.
Per una migliore organizzazione del codice, consiglierei di inserirlo prima nella directory /etc/nginx/ con il nome webp.conf e poi di includerlo nel blocco principale del server.
Immettere il comando seguente
cd /etc/nginx/ && nano webp.conf- Incollare il codice sottostante facendo clic con il tasto destro del mouse all’interno dell’editor nano nel terminale SSH.
# WebP Express rules
# --------------------
location ~* ^/?wp-content/.*\.(png|jpe?g)$ {
  add_header Vary Accept;
  expires 365d;
  if ($http_accept !~* "webp"){
    break;
  }
  try_files
    /wp-content/webp-express/webp-images/doc-root/$uri.webp
    $uri.webp
    /wp-content/plugins/webp-express/wod/webp-on-demand.php?xsource=x$request_filename&wp-content=wp-content
    ;
}

# Route requests for non-existing webps to the converter
location ~* ^/?wp-content/.*\.(png|jpe?g)\.webp$ {
    try_files
      $uri
      /wp-content/plugins/webp-express/wod/webp-realizer.php?wp-content=wp-content
      ;
}
# ------------------- (WebP Express rules ends here)
- Premere CTRL+O e Invio per salvare..
Ora visitate il blocco del server principale.
cd /etc/nginx/sites-available && lsSi consiglia vivamente: Imparare a installare WordPress su NGINX (in tre semplici passi)
Modificare il file di configurazione e inserire include webp.conf; come mostrato di seguito.
# General
server {
    listen         80;
    server_tokens off;
    return 301 https://$host$request_uri;
}
server {
server_tokens off;
root /var/www/html;
index index.php index.html index.htm;
server_name .gulshankumar.net;
client_max_body_size 0;

    listen [::]:443 ssl http2 ipv6only=on;
    listen 443 ssl http2;
        ssl_protocols TLSv1.1 TLSv1.2 TLSv1.3;
        ssl_certificate /etc/comodo/cert.pem;
        ssl_certificate_key /etc/comodo/private.pem;
        ssl_prefer_server_ciphers on;
        ssl_session_cache   shared:SSL:20m;
        ssl_session_timeout 20m;
        ssl_ciphers 'TLS13+AESGCM+AES128:EECDH+AES128';

error_page 404 /404.html;
error_page 500 502 503 504 /50x.html;


# WebP Express rule goes here

include webp.conf;

# WebP Rule end

location / {
    try_files $uri $uri/ /index.php$is_args$args;
}
Ricaricare o riavviare NGINX.
service nginx reloadCose da notare
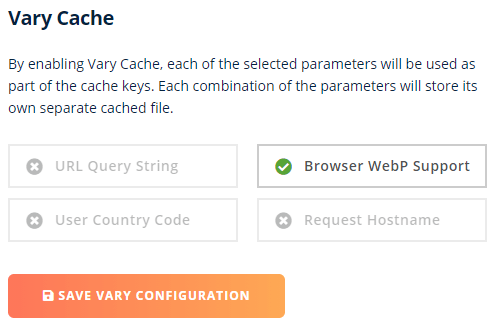
- Se si utilizza BunnyCDN, è necessario abilitare la Cache Vary.
- Cloudflare non supporta Vary Cache. Provare il seguente approccio alternativo.
Utilizzare WebP con Cloudflare CDN (senza plugin)
Se siete utenti di Cloudflare Pro, potete semplicemente abilitare WebP con un clic dalla scheda Velocità.
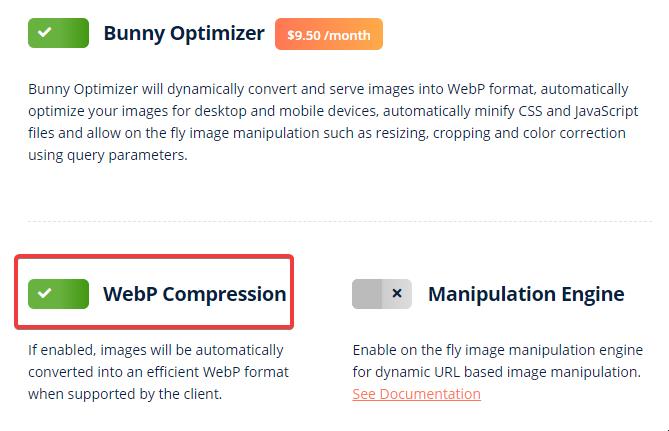
Servire WebP con BunnyCDN Optimizer (senza plugin)
BunnyCDN offre i servizi Optimizer, che vengono forniti con la soluzione di servizio WebP al volo. Si tratta di una soluzione con un solo clic per un costo aggiuntivo di 9,5 $/mo.
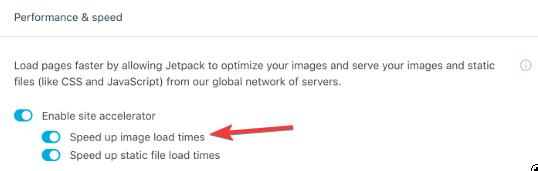
Servire WebP usando il plugin JetPack
- Basta installare e attivare il plugin JetPack
- Attivare l’acceleratore di siti.
È possibile notare un peggioramento della qualità dell’immagine che può essere risolto utilizzando il filtro sottostante.
add_filter('jetpack_photon_pre_args', 'jetpackme_custom_photon_compression' );
function jetpackme_custom_photon_compression( $args ) {
    $args['quality'] = 100;
    $args['strip'] = 'all';
    return $args;
}
Servire WebP in NGINX usando il plugin ShortPixel
Il plugin ShortPixel può aiutare a ottimizzare le immagini in blocco con la conversione WebP e a servirle secondo il supporto del browser. La cosa migliore è che questo plugin esegue l’elaborazione sul proprio server, quindi non rallenta il vostro sito.
- Se siete utenti del server web Apache, potete usare la riscrittura .htaccess. È semplice.
- Nel caso di NGINX è possibile utilizzare la seguente regola di riscrittura con l’aiuto del supporto dell’hosting
- Questo plugin è supportato anche dal plugin WP Rocket cache.
Per prima cosa, aggiungere questo blocco prima della direttiva server:
map $http_accept $webp_suffix {
    default "";
    "~*webp" ".webp";
}
Aggiungere questo blocco all’interno della direttiva server:
location ~* ^(/wp-content/.+)\.(png|jpe?g)$ {
    set $base $1;
    set $webp_uri $base$webp_suffix;
    set $webp_old_uri $base.$2$webp_suffix;
    set $root "<<FULL PATH OF wp-content PARENT>>";
    root $root;
    add_header Vary Accept;
    if ( !-f $root$webp_uri ) {
        add_header X_WebP_SP_Miss $root$webp_uri;
    }
    try_files $webp_uri $webp_old_uri $uri =404;
}
La collocazione è importante. Quindi aggiungetelo con attenzione.
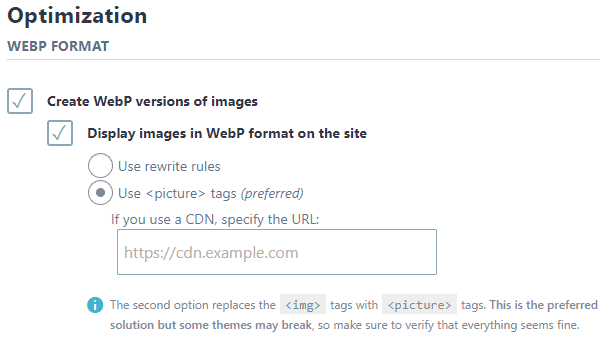
Servire WebP utilizzando Imagify
Imagify è un plugin per l’ottimizzazione delle immagini offerto da WP Media, i responsabili di WP Rocket.
- Installare e attivare il plugin Imagify
- Inserire la chiave API
- Nelle impostazioni, scegliere la modalità Tag immagine per un’impostazione rapida.
- In alternativa, è possibile utilizzare le regole di riscrittura con alcune configurazioni del server, come descritto qui. Con Apache, il processo di aggiunta del codice .htaccess sarà automatico, ma con NGINX è necessario farlo manualmente.
Da WebP a JPG
In alcuni casi WebP può degradare un po’ la qualità dell’immagine. Se si desidera tornare da WebP a JPG, è sufficiente seguire questi passaggi.
- Disattivare ed eliminare il plugin relativo a WebP.
- Rimuovere la relativa impostazione dal file di configurazione (.htaccess)
- Eliminare in blocco i file .webp e risparmiare spazio su disco.
find . -type f -name "*.webp*" -deleteSe si desidera convertire un file WebP in JPG, è possibile utilizzare lo strumento disponibile su CloudConvert.
Metodo manuale senza plugin
Questa sezione è solo a scopo informativo.
Passo 1: Aggiunta del formato WebP al documento HTML
Per prima cosa, è necessario convertire tutte le immagini in WebP e mantenere il formato precedente come ripiego. Esistono alcuni plugin come Optimus che possono svolgere questo lavoro automaticamente. Tuttavia, vi mostrerò un altro modo semplice per farlo manualmente.
- Andare a questo sito web image.online-convert.com/convert-to-webp
- Incollare il link all’immagine e fare clic su converti. Le immagini in formato WebP verranno scaricate
- Ora modificate il codice HTML grezzo dove appare l’immagine normale.
Supponiamo che all’inizio il codice HTML della vostra immagine fosse come questo
<img src="https://www.gulshankumar.net/wp-content/uploads/2016/09/webplogo.png" alt="gulshan kumar" width="186" height="66" />È necessario avvolgere il codice di cui sopra con un po’ più di marcatura HTML.
<picture>
	<source srcset="https://www.gulshankumar.net/wp-content/uploads/2016/09/webplogo.webp" type="image/webp" />
	<img src="https://www.gulshankumar.net/wp-content/uploads/2016/09/webplogo.png" alt="gulshan kumar" width="186" height="66" />
</picture>
Ora il documento HTML è pronto per servire immagini in formato WebP.
Passo 2: Configurazione delle impostazioni del server
È necessario configurare alcune impostazioni del server Web Apache tramite .htacccess, in modo che il browser e il server Web possano trattarlo correttamente come tutte le altre immagini.
Il server di Web Hosting potrebbe non sapere quale tipo di mime deve servire questo tipo di immagini. È quindi necessario aggiungere il tipo di mime appropriato. Inoltre, sarebbe opportuno impostare l’intestazione di scadenza per la cache.
# Serve Images with correct Mime Type
AddType image/webp .webp

# Setup Cache
ExpiresActive On
ExpiresByType image/webp A2592000
Nota bene: assicuratevi di utilizzare WordPress 5.8 o versioni successive.
Se si utilizza WordPress prima della versione 5.8, non supporta il caricamento di immagini in formato WebP. Potreste ricevere l’errore “Questo tipo di file purtroppo non è consentito per motivi di sicurezza” durante il caricamento di immagini .webp.
Quindi, è necessario risolvere questo problema aggiungendo questo codice nel functions.php del tema. Sarebbe utile se si caricassero le immagini direttamente dalla dashboard di WordPress > opzione Media.
function webp_upload_mimes( $existing_mimes ) {
	// add webp to the list of mime types
	$existing_mimes['webp'] = 'image/webp';

	// return the array back to the function with our added mime type
	return $existing_mimes;
}
add_filter( 'mime_types', 'webp_upload_mimes' );
Fatto.
Se avete bisogno di aiuto, consultate la sezione dei commenti o iscrivetevi al mio forum. Sarà un piacere aiutarvi.
Note aggiuntive
- Se siete utenti di Cloudways, non potete fornire WebP con la riscrittura .htaccess perché utilizzano NGINX specificamente per i file statici. In questo caso avete due possibilità. Chiedere al team di hosting di modificare il file di configurazione per voi o utilizzare JavaScript o una soluzione basata su CDN di terze parti, come Bunny o CF.
Altre letture
Se siete curiosi di saperne di più su WebP, consultate questi link.
Grazie.
I didn’t try the webp format as of now in WordPress. But now after reading this post I will try to implement it. I will compare the image quality from other formats as well. Thank you for sharing this article.
Have you experienced the WebP format causing problems for seo? is it better to use it as jpg or this way?
Google officially recommends using WebP format images along with JPG as fallback.
How to remove hyperlink for the webp image format?
I guess you want to remove .webp extension from URL. You need to try rewrite approach.
I have a question about ShortPixel method.
I use Plesk panel with NGINX
There is a section called Additional nginx directives
Here you can specify the settings for the nginx reverse proxy server that runs in front of Apache. Your directives will override the server-wide nginx configuration. For example, you may want to change the connection timeout or to pack requests with gzip. Use the same syntax as you use for nginx.conf. For example, if you want to pack all the proxied requests with gzip, add the line: ‘gzip_proxied any;’.
https://i.imgur.com/OLWu9bJ.png
can i add codes there i dont know?
map $http_accept $webp_suffix {
default “”;
“~*webp” “.webp”;
}
location ~* ^(/wp-content/.+).(png|jpe?g)$ {
set $base $1;
set $webp_uri $base$webp_suffix;
set $webp_old_uri $base.$2$webp_suffix;
set $root “<>”;
root $root;
add_header Vary Accept;
if ( !-f $root$webp_uri ) {
add_header X_WebP_SP_Miss $root$webp_uri;
}
try_files $webp_uri $webp_old_uri $uri =404;
You used these sentences!
before the server directive and inside directive.
I read your Installing WordPress at NGINX topic so
If i try to add these from codes is this right?
map $http_accept $webp_suffix {
default “”;
“~*webp” “.webp”;
}
server {
listen 80;
return 301 https://$host$request_uri;
}
server {
location ~* ^(/wp-content/.+).(png|jpe?g)$ {
set $base $1;
set $webp_uri $base$webp_suffix;
set $webp_old_uri $base.$2$webp_suffix;
set $root “<>”;
root $root;
add_header Vary Accept;
if ( !-f $root$webp_uri ) {
add_header X_WebP_SP_Miss $root$webp_uri;
}
try_files $webp_uri $webp_old_uri $uri =404;
}
# Document Root
root /var/www/html;
index index.php index.html index.htm;
server_name .example.com;
client_max_body_size 0;
listen [::]:443 ssl http2 ipv6only=on;
listen 443 ssl http2;
ssl_protocols TLSv1.1 TLSv1.2 TLSv1.3;
ssl_certificate /etc/letsencrypt/live/example.com/fullchain.pem;
ssl_certificate_key /etc/letsencrypt/live/example.com/privkey.pem;
ssl_prefer_server_ciphers on;
ssl_session_cache shared:SSL:20m;
ssl_session_timeout 20m;
ssl_ciphers ‘TLS13+AESGCM+AES128:EECDH+AES128’;
error_page 404 /404.html;
error_page 500 502 503 504 /50x.html;
location / {
try_files $uri $uri/ /index.php$is_args$args;
}
location ~* .php$ {
if ($uri !~ “^/uploads/”) {
fastcgi_pass unix:/run/php/php7.4-fpm.sock;
}
include fastcgi_params;
fastcgi_param SCRIPT_FILENAME $document_root$fastcgi_script_name;
fastcgi_param SCRIPT_NAME $fastcgi_script_name;
}
location = /favicon.ico {
log_not_found off;
access_log off;
}
location = /robots.txt {
log_not_found off;
access_log off;
allow all;
}
location ~* .(css|gif|svg|ico|jpeg|jpg|js|png)$ {
expires 1y;
log_not_found off;
}
# Enable Gzip compression.
gzip on;
# Disable Gzip on IE6.
gzip_disable “msie6”;
# Allow proxies to cache both compressed and regular version of file.
# Avoids clients that don’t support Gzip outputting gibberish.
gzip_vary on;
# Compress data, even when the client connects through a proxy.
gzip_proxied any;
# The level of compression to apply to files. A higher compression level increases
# CPU usage. Level 5 is a happy medium resulting in roughly 75% compression.
gzip_comp_level 5;
# Compress the following MIME types.
gzip_types
application/atom+xml
application/javascript
application/json
application/ld+json
application/manifest+json
application/rss+xml
application/vnd.geo+json
application/vnd.ms-fontobject
application/x-font-ttf
application/x-web-app-manifest+json
application/xhtml+xml
application/xml
font/opentype
image/bmp
image/svg+xml
image/x-icon
text/cache-manifest
text/css
text/plain
text/vcard
text/vnd.rim.location.xloc
text/vtt
text/x-component
text/x-cross-domain-policy;
}
Is this right?
And what do you think about plesk how i use webp at plesk?
Thanks
Please consult a freelancer. It is out of scope to guide here.
Hi, this is a good article, but
It is better to install the plugin or put the code directly for webp
This way, each image does not create two urls. Does it cause a problem in the SEO site?
Dynamic rewriting from Server side doesn’t create two URLs instead it servers same just by changing response as per browser support.
A plugin is recommended way.
Hi Gulshan. Any free plugin(totally free) for converting jpg to webp format. God Bless you.
First option which is WebP Express.
Thank You! Gulshan
Hey Gulshan Kumar ,
Awesome post with good information. It is my first time commenting on your blog post and am glad to say that you have done a fabulous work and provided helpful & easy tips to serve webp format images in WordPress. I really like and appreciate the way you have explained the things in such a step-by-step process making the concept very clear and easy to understand. while scrolling through your blog post i have noticed that you have also discussed about the major benefits of using webp format image that are also providing good understanding. You have explained all the vital things in an easy language that are true enough to understand and educate the readers.
After going through this complete guide i really gain ideas and am sure that this post is definitely going to help lots of people & especially WordPress-users to sort out their query. Good work and keep sharing more similar post.
Eventually thanks for sharing your knowledge, ideas and such an informative post.
Regards
-Aadarsh
Hi Adarsh, Thanks for your kind words. It really means a lot to me.
Hello. Please check Hiwebp plugin wordpress.
https://wordpress.org/plugins/hiwebp/
Works a treat, thanks!
If you disable copy function then it’s better to not include any code reference. okay?
Thanks for notifying. I have allowed copying function for snippet in this article.
I have tried this method to enable WebP format images on my site, but I am encountering some unknown error. My site showing a low score on google page speed insight.
May I know please which specific method you have tried? Also, please share the screenshot of error. I will try my best to help you.
Why is not wordpress supporting WEBP format by default?Its high time now.
It works great in Chrome and Firefox on the PC/Laptop. BUT, the webp images are not displayed on iPhone (Chrome and Safari)
Safari is not supporting webP. Chrome on iOS is based on Safari, too. So webP won‘t work on iOS at all and you have to serve a fallback image.
Works a treat, thanks!
Hi,
I am not quite clear on where this needs to be inserted. I am looking to Optimise my header image to Webp. Is there a video or screenshot based write up on how I can include this?
Would really appreciate the help
Regards
Shwetha
Hello Gulshan,
Thanks for sharing this article.
I did follow the steps mentioned in here in this format.
But the image is not appearing on Firfox, and IE. Did I miss any thing in here.
Please suggest.
This code no longer works. He’s not loading. I don’t know why it doesn’t work.
It should work fine. Please share your site URL so I can check.
Hi..Just wondering if i need to edit each image tag or is there somewhere in my theme templates this could be done.
Any guidence would be great.
Thanks
Mark
Do I need to edit all the image tags one by one now? Isn’t there another way to do that?
Hi Gulshan,
Even after putting the code snippet in the function.php file.
I still have the same error message when I try to upload webp format. The message is “sorry this file type is not permitted for security reasons”.
Can you help fix this?
Thanks.
Martin
Hello Martin,
At my end it’s working fine. For a demo, I have sent a quick video on your email. Please check and revert back if I can help with any thing else.
Thanks
I haven’t added anything except the last code from your post in function.php to support Webp format on all of future media uploads. Do I need to add any thing else ? or will it create any kind of issue for users whose browsers are yet unsupported to this format?
anyway keep up the good work 😉
That’s all. Now you can easily upload webp directly in your WordPress Dashboard. No extra things to do. Just feel free to use it with picture HTML tag. So, it will support for all browsers, without any issues. Thanks
The problem with the suggested HTML implementation is that Chrome will make two requests, one for WEBP and another one for JPEG resulting in double requests and increasing the page load time.
Hey dear,
It doesn’t create two requests(as you are saying) instead it automatically serve only one type image format either WebP or JPEG according to HTTP accept type.
I’d suggest please try one more time and look carefully at Network Timeline in the browser console. If you see there are double requests, please email me your HTML code and timeline screenshot also. I’d love to review it. I believe it should work fine for you too.
Thanks & Regards,
Gulshan
I installed the code into the functions.php. And as you said it did allow me to upload in my WP theme. The problem is that the image doesn’t allow cropping so it won’t allow me to use it on the site.