WebP to format plików dla obrazów, który zapewnia bezstratną i stratną kompresję. Jeśli używasz WordPress, możesz łatwo serwować wszystkie obrazy w WebP z kilkoma podstawowymi tweakami.
Większość przeglądarek obsługuje WebP
- Według danych Caniuse, WebP jest obecnie obsługiwany w 94% przeglądarek, w tym Apple Safari, Google Chrome, Opera, Mozilla Firefox, Microsoft Edge i przeglądarki Android.
- Nadal możesz serwować JPEG/PNG jako fallback dla nieobsługiwanej przeglądarki.
Główne korzyści z używania obrazu w formacie WebP
- W porównaniu z wielkością normalnego obrazu JPG lub PNG, ten sam wymiar obrazu WebP może służyć w małych bajtach. Dzięki temu obrazy będą ładować się szybciej. Będzie to pomocne zwłaszcza dla użytkowników mobilnych.
- Serwowanie obrazów wysokiej jakości w kilku bajtach, drastycznie zaoszczędzić przepustowość.
- Zachowaj swoją stronę internetową zaktualizowaną z najnowszym trendem. Nie trać konwersacji z powodu problemu powolnego ładowania bull-cart.
- WebP jest zalecany przez programistów Google. Pomaga w przejściu zalecenia „serwuj obrazy w formacie next-gen” Google PageSpeed Insight.
W ten sposób można serwować WebP dla witryny WordPress.
Obsługa WebP w NGINX za pomocą ShortPixel Plugin
Wtyczka ShortPixel może pomóc w masowej optymalizacji obrazu z konwersją WebP i obsługą zgodnie z obsługą przeglądarki. Najlepszą częścią tej wtyczki jest przetwarzanie na ich serwerze, więc nie spowolni to Twojej witryny.
- Jeśli Twój WordPress jest hostowany na serwerze Apache użytkownik może skorzystać z przepisywania .htaccess.
- W przypadku NGINX możesz użyć poniższej reguły przepisywania z pomocą wsparcia hostingu
- Ta wtyczka jest obsługiwana również z wtyczką WP Rocket cache.
Po pierwsze, dodaj ten blok przed dyrektywą o serwerze:
map $http_accept $webp_suffix {
    default "";
    "~*webp" ".webp";
}
Dodaj ten blok inside dyrektywy serwera:
location ~* ^(/wp-content/.+)\.(png|jpe?g)$ {
    set $base $1;
    set $webp_uri $base$webp_suffix;
    set $webp_old_uri $base.$2$webp_suffix;
    set $root "<<FULL PATH OF wp-content PARENT>>";
    root $root;
    add_header Vary Accept;
    if ( !-f $root$webp_uri ) {
        add_header X_WebP_SP_Miss $root$webp_uri;
    }
    try_files $webp_uri $webp_old_uri $uri =404;
}
Umieszczenie ma znaczenie. Więc dodaj go ostrożnie.
Używanie wtyczki WebP Express w NGINX
- Zainstaluj i aktywuj WebP Express, darmowy plugin. Ogromne podziękowania dla dewelopera.
- Tryb pracy: Zróżnicowane reakcje na obraz.
- Zakres: Tylko przesyłanie danych.
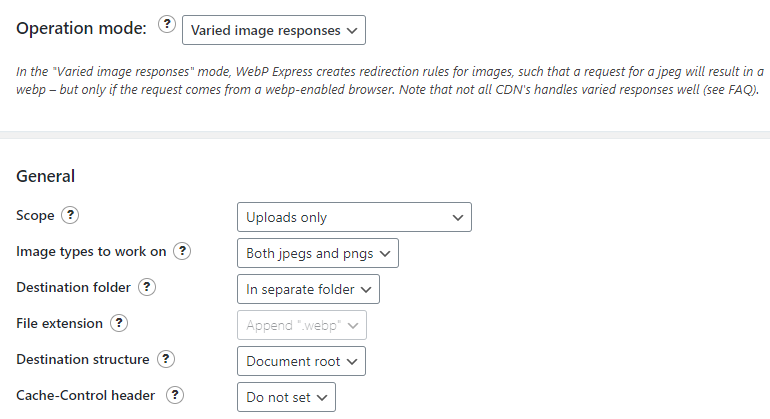
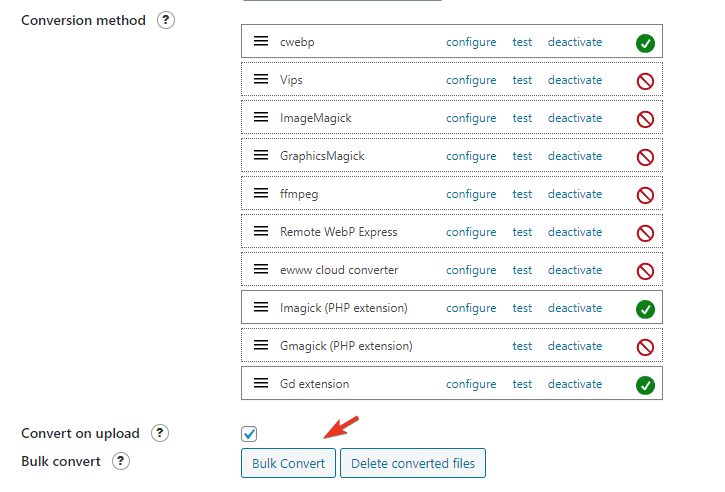
- Run Bulk Convert
- Dla WordPress hostowanego na serwerze Apache nie jest wymagany żaden config, ponieważ .htaccess robi wszystkie magie.
- Użytkownik serwera NGINX musi zmodyfikować plik konfiguracyjny z dostępem do roota.
Dla lepszej organizacji kodu zalecałbym umieszczenie go najpierw w katalogu /etc/nginx/ z nazwą webp.conf, a następnie włączenie do głównego bloku serwera.
Wpisz poniższe polecenie
cd /etc/nginx/ && nano webp.conf- Wklej poniższy kod używając prawego przycisku myszy wewnątrz edytora nano w Terminalu SSH.
# WebP Express rules
# --------------------
location ~* ^/?wp-content/.*\.(png|jpe?g)$ {
  add_header Vary Accept;
  expires 365d;
  if ($http_accept !~* "webp"){
    break;
  }
  try_files
    /wp-content/webp-express/webp-images/doc-root/$uri.webp
    $uri.webp
    /wp-content/plugins/webp-express/wod/webp-on-demand.php?xsource=x$request_filename&wp-content=wp-content
    ;
}

# Route requests for non-existing webps to the converter
location ~* ^/?wp-content/.*\.(png|jpe?g)\.webp$ {
    try_files
      $uri
      /wp-content/plugins/webp-express/wod/webp-realizer.php?wp-content=wp-content
      ;
}
# ------------------- (WebP Express rules ends here)
- Naciśnij CTRL+O i klawisz Enter, aby zapisać.
Teraz odwiedź główny blok serwera.
cd /etc/nginx/sites-available && lsEdytuj swój plik konfiguracyjny, i umieść w nim include webp.conf; jak pokazano poniżej.
# General
server {
    listen         80;
    server_tokens off;
    return 301 https://$host$request_uri;
}
server {
server_tokens off;
root /var/www/html;
index index.php index.html index.htm;
server_name .gulshankumar.net;
client_max_body_size 0;

    listen [::]:443 ssl http2 ipv6only=on;
    listen 443 ssl http2;
        ssl_protocols TLSv1.1 TLSv1.2 TLSv1.3;
        ssl_certificate /etc/comodo/cert.pem;
        ssl_certificate_key /etc/comodo/private.pem;
        ssl_prefer_server_ciphers on;
        ssl_session_cache   shared:SSL:20m;
        ssl_session_timeout 20m;
        ssl_ciphers 'TLS13+AESGCM+AES128:EECDH+AES128';

error_page 404 /404.html;
error_page 500 502 503 504 /50x.html;


# WebP Express rule goes here

include webp.conf;

# WebP Rule end

location / {
    try_files $uri $uri/ /index.php$is_args$args;
}
Przeładuj lub zrestartuj NGINX.
service nginx reloadSprawy do odnotowania
- Jeśli używasz BunnyCDN, musisz włączyć Vary Cache.
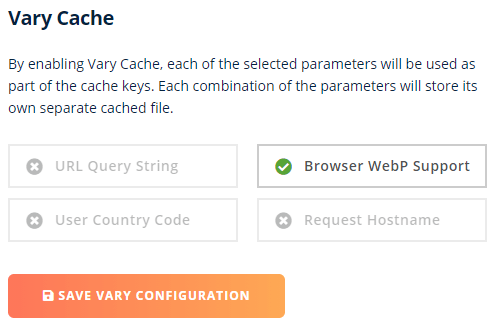
- Cloudflare nie obsługuje Vary Cache. Spróbuj poniżej alternatywnego podejścia.
Użyj WebP używając Cloudflare CDN (bez wtyczki)
Jeśli jesteś użytkownikiem Cloudflare Pro, możesz po prostu włączyć WebP jednym kliknięciem z zakładki Speed.
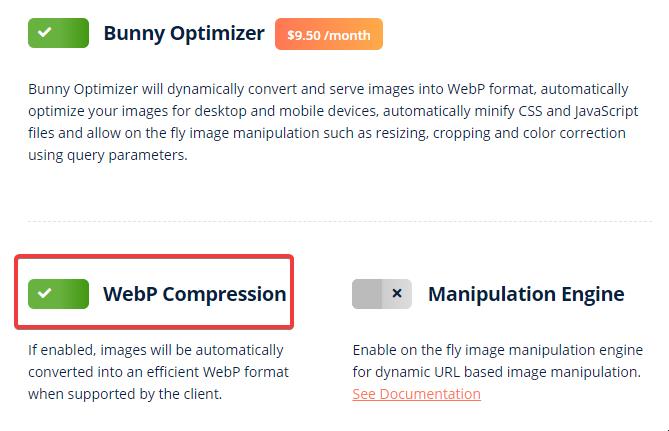
Serwowanie WebP przy użyciu BunnyCDN Optimizer (bez wtyczki)
BunnyCDN oferuje usługę Optimizer, która zawiera rozwiązanie do serwowania WebP w locie. Jest to rozwiązanie typu one-click za dodatkową opłatą 9,5$/mo.
Obsługa WebP za pomocą wtyczki JetPack
- Wystarczy zainstalować i aktywować wtyczkę JetPack
- Włącz Akcelerator Witryny.
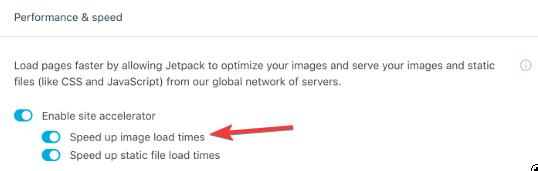
Można zauważyć pogorszenie jakości obrazu, które można naprawić stosując poniższy filtr.
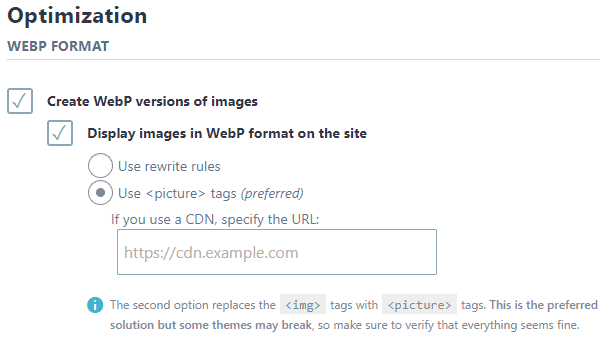
Obsługuj WebP za pomocą Imagify
Imagify to wtyczka optymalizacji obrazu oferowana przez WP Media, ludzi za WP Rocket.
- Zainstaluj i aktywuj wtyczkę Imagify
- Wprowadź klucz API
- W ustawieniach wybierz tryb Picture tags dla szybkiej konfiguracji.
- Alternatywnie możesz użyć reguły rewrite z pewną konfiguracją serwera, jak opisano tutaj. W przypadku Apache proces dodawania kodu .htaccess będzie automatyczny, ale w przypadku NGINX musisz to zrobić ręcznie.
WebP do JPG
WebP może w niektórych przypadkach nieco pogorszyć jakość obrazu. Jeśli chcesz powrócić z WebP do JPG, po prostu wykonaj te kroki.
- Dezaktywuj i usuń wtyczkę związaną z WebP.
- Usuń jego ustawienia z pliku konfiguracyjnego (.htaccess)
- Masowo usuwaj pliki .webp i oszczędzaj miejsce na dysku.
find . -type f -name "*.webp*" -deleteJeśli chcesz przekonwertować plik WebP na JPG, możesz użyć narzędzia dostępnego na stronie CloudConvert.
Metoda ręczna bez wtyczki
Ta część ma charakter wyłącznie informacyjny.
Krok 1: Dodanie formatu WebP do dokumentu HTML
Po pierwsze, musisz konwertować swoje wszystkie obrazy w WebP i wraz z poprzednim formatem obrazu jako awaryjnym. Jest jakiś plugin jak Optimus, który może wykonać tę pracę automatycznie. Ale, pokażę inny łatwy do zrobienia to ręcznie.
- Przejdź do tej strony image.online-convert.com/convert-to-webp
- Wklej swój link do obrazu i kliknij na convert. Twoje obrazy w formacie WebP zostaną pobrane.
- Teraz edytuj surowy kod HTML, w którym pojawia się twój normalny Obraz.
Powiedzmy, że na początku Twój kod HTML obrazu wyglądał tak
<img src="https://www.gulshankumar.net/wp-content/uploads/2016/09/webplogo.png" alt="gulshan kumar" width="186" height="66" />Musisz zawinąć powyższy kod z nieco większą ilością znaczników HTML.
<picture>
	<source srcset="https://www.gulshankumar.net/wp-content/uploads/2016/09/webplogo.webp" type="image/webp" />
	<img src="https://www.gulshankumar.net/wp-content/uploads/2016/09/webplogo.png" alt="gulshan kumar" width="186" height="66" />
</picture>
Teraz Twój dokument HTML jest gotowy do obsługi obrazów w formacie WebP.
Krok 2: Konfiguracja ustawień serwera
Jeszcze tylko jeden krok, musisz skonfigurować niektóre ustawienia serwera Apache poprzez .htacccess, aby przeglądarka i serwer internetowy mogły traktować go prawidłowo jak wszystkie inne obrazy.
Twój serwer Web Hosting może nie wiedzieć, z którego typu mime tego rodzaju obrazy mają być obsługiwane. Należy więc dodać odpowiedni typ mime. Warto również ustawić nagłówek expiry dla cachowania.
# Serve Images with correct Mime Type
AddType image/webp .webp

# Setup Cache
ExpiresActive On
ExpiresByType image/webp A2592000
Uprzejma uwaga: Upewnij się, że używasz WordPress 5.8 lub nowszego.
Jeśli używasz WordPress starszego niż wersja 5.8, nie obsługuje on przesyłania obrazów w formacie WebP. Możesz otrzymać błąd „Ten typ pliku jest niestety niedozwolony ze względów bezpieczeństwa” podczas wgrywania obrazów .webp.
Więc musi naprawić ten problem, dodając ten kod w swoim motywie functions.php Byłoby to pomocne w przypadku, gdy będziesz przesyłać swoje obrazy bezpośrednio z WordPress Dashboard > Media opcja.
function webp_upload_mimes( $existing_mimes ) {
	// add webp to the list of mime types
	$existing_mimes['webp'] = 'image/webp';

	// return the array back to the function with our added mime type
	return $existing_mimes;
}
add_filter( 'mime_types', 'webp_upload_mimes' );
Gotowe.
Jeśli potrzebujesz pomocy, zajrzyj do działu komentarzy. Z przyjemnością pomogę.
Uwagi dodatkowe
- Jeśli jesteś użytkownikiem Cloudways, nie możesz dostarczyć WebP z .htaccess rewrite, ponieważ używają NGINX specjalnie dla plików statycznych. W tym przypadku masz dwa wyjścia. Poprosić zespół hostingowy o edycję pliku konfiguracyjnego dla Ciebie lub użyć JavaScript lub rozwiązania opartego na CDN innej firmy, takiego jak Bunny lub CF.
Dalsze lektury
Jeśli chcesz dowiedzieć się więcej o WebP, zapoznaj się z tymi linkami.
Dzięki.
I didn’t try the webp format as of now in WordPress. But now after reading this post I will try to implement it. I will compare the image quality from other formats as well. Thank you for sharing this article.
Have you experienced the WebP format causing problems for seo? is it better to use it as jpg or this way?
Google officially recommends using WebP format images along with JPG as fallback.
How to remove hyperlink for the webp image format?
I guess you want to remove .webp extension from URL. You need to try rewrite approach.
I have a question about ShortPixel method.
I use Plesk panel with NGINX
There is a section called Additional nginx directives
Here you can specify the settings for the nginx reverse proxy server that runs in front of Apache. Your directives will override the server-wide nginx configuration. For example, you may want to change the connection timeout or to pack requests with gzip. Use the same syntax as you use for nginx.conf. For example, if you want to pack all the proxied requests with gzip, add the line: 'gzip_proxied any;’.
https://i.imgur.com/OLWu9bJ.png
can i add codes there i dont know?
map $http_accept $webp_suffix {
default „”;
„~*webp” „.webp”;
}
location ~* ^(/wp-content/.+).(png|jpe?g)$ {
set $base $1;
set $webp_uri $base$webp_suffix;
set $webp_old_uri $base.$2$webp_suffix;
set $root „<>”;
root $root;
add_header Vary Accept;
if ( !-f $root$webp_uri ) {
add_header X_WebP_SP_Miss $root$webp_uri;
}
try_files $webp_uri $webp_old_uri $uri =404;
You used these sentences!
before the server directive and inside directive.
I read your Installing WordPress at NGINX topic so
If i try to add these from codes is this right?
map $http_accept $webp_suffix {
default „”;
„~*webp” „.webp”;
}
server {
listen 80;
return 301 https://$host$request_uri;
}
server {
location ~* ^(/wp-content/.+).(png|jpe?g)$ {
set $base $1;
set $webp_uri $base$webp_suffix;
set $webp_old_uri $base.$2$webp_suffix;
set $root „<>”;
root $root;
add_header Vary Accept;
if ( !-f $root$webp_uri ) {
add_header X_WebP_SP_Miss $root$webp_uri;
}
try_files $webp_uri $webp_old_uri $uri =404;
}
# Document Root
root /var/www/html;
index index.php index.html index.htm;
server_name .example.com;
client_max_body_size 0;
listen [::]:443 ssl http2 ipv6only=on;
listen 443 ssl http2;
ssl_protocols TLSv1.1 TLSv1.2 TLSv1.3;
ssl_certificate /etc/letsencrypt/live/example.com/fullchain.pem;
ssl_certificate_key /etc/letsencrypt/live/example.com/privkey.pem;
ssl_prefer_server_ciphers on;
ssl_session_cache shared:SSL:20m;
ssl_session_timeout 20m;
ssl_ciphers 'TLS13+AESGCM+AES128:EECDH+AES128′;
error_page 404 /404.html;
error_page 500 502 503 504 /50x.html;
location / {
try_files $uri $uri/ /index.php$is_args$args;
}
location ~* .php$ {
if ($uri !~ „^/uploads/”) {
fastcgi_pass unix:/run/php/php7.4-fpm.sock;
}
include fastcgi_params;
fastcgi_param SCRIPT_FILENAME $document_root$fastcgi_script_name;
fastcgi_param SCRIPT_NAME $fastcgi_script_name;
}
location = /favicon.ico {
log_not_found off;
access_log off;
}
location = /robots.txt {
log_not_found off;
access_log off;
allow all;
}
location ~* .(css|gif|svg|ico|jpeg|jpg|js|png)$ {
expires 1y;
log_not_found off;
}
# Enable Gzip compression.
gzip on;
# Disable Gzip on IE6.
gzip_disable „msie6”;
# Allow proxies to cache both compressed and regular version of file.
# Avoids clients that don’t support Gzip outputting gibberish.
gzip_vary on;
# Compress data, even when the client connects through a proxy.
gzip_proxied any;
# The level of compression to apply to files. A higher compression level increases
# CPU usage. Level 5 is a happy medium resulting in roughly 75% compression.
gzip_comp_level 5;
# Compress the following MIME types.
gzip_types
application/atom+xml
application/javascript
application/json
application/ld+json
application/manifest+json
application/rss+xml
application/vnd.geo+json
application/vnd.ms-fontobject
application/x-font-ttf
application/x-web-app-manifest+json
application/xhtml+xml
application/xml
font/opentype
image/bmp
image/svg+xml
image/x-icon
text/cache-manifest
text/css
text/plain
text/vcard
text/vnd.rim.location.xloc
text/vtt
text/x-component
text/x-cross-domain-policy;
}
Is this right?
And what do you think about plesk how i use webp at plesk?
Thanks
Please consult a freelancer. It is out of scope to guide here.
Hi, this is a good article, but
It is better to install the plugin or put the code directly for webp
This way, each image does not create two urls. Does it cause a problem in the SEO site?
Dynamic rewriting from Server side doesn’t create two URLs instead it servers same just by changing response as per browser support.
A plugin is recommended way.
Hi Gulshan. Any free plugin(totally free) for converting jpg to webp format. God Bless you.
First option which is WebP Express.
Thank You! Gulshan
Hey Gulshan Kumar ,
Awesome post with good information. It is my first time commenting on your blog post and am glad to say that you have done a fabulous work and provided helpful & easy tips to serve webp format images in WordPress. I really like and appreciate the way you have explained the things in such a step-by-step process making the concept very clear and easy to understand. while scrolling through your blog post i have noticed that you have also discussed about the major benefits of using webp format image that are also providing good understanding. You have explained all the vital things in an easy language that are true enough to understand and educate the readers.
After going through this complete guide i really gain ideas and am sure that this post is definitely going to help lots of people & especially WordPress-users to sort out their query. Good work and keep sharing more similar post.
Eventually thanks for sharing your knowledge, ideas and such an informative post.
Regards
-Aadarsh
Hi Adarsh, Thanks for your kind words. It really means a lot to me.
Hello. Please check Hiwebp plugin wordpress.
https://wordpress.org/plugins/hiwebp/
Works a treat, thanks!
If you disable copy function then it’s better to not include any code reference. okay?
Thanks for notifying. I have allowed copying function for snippet in this article.
I have tried this method to enable WebP format images on my site, but I am encountering some unknown error. My site showing a low score on google page speed insight.
May I know please which specific method you have tried? Also, please share the screenshot of error. I will try my best to help you.
Why is not wordpress supporting WEBP format by default?Its high time now.
It works great in Chrome and Firefox on the PC/Laptop. BUT, the webp images are not displayed on iPhone (Chrome and Safari)
Safari is not supporting webP. Chrome on iOS is based on Safari, too. So webP won‘t work on iOS at all and you have to serve a fallback image.
Works a treat, thanks!
Hi,
I am not quite clear on where this needs to be inserted. I am looking to Optimise my header image to Webp. Is there a video or screenshot based write up on how I can include this?
Would really appreciate the help
Regards
Shwetha
Hello Gulshan,
Thanks for sharing this article.
I did follow the steps mentioned in here in this format.
But the image is not appearing on Firfox, and IE. Did I miss any thing in here.
Please suggest.
This code no longer works. He’s not loading. I don’t know why it doesn’t work.
It should work fine. Please share your site URL so I can check.
Hi..Just wondering if i need to edit each image tag or is there somewhere in my theme templates this could be done.
Any guidence would be great.
Thanks
Mark
Do I need to edit all the image tags one by one now? Isn’t there another way to do that?
Hi Gulshan,
Even after putting the code snippet in the function.php file.
I still have the same error message when I try to upload webp format. The message is „sorry this file type is not permitted for security reasons”.
Can you help fix this?
Thanks.
Martin
Hello Martin,
At my end it’s working fine. For a demo, I have sent a quick video on your email. Please check and revert back if I can help with any thing else.
Thanks
I haven’t added anything except the last code from your post in function.php to support Webp format on all of future media uploads. Do I need to add any thing else ? or will it create any kind of issue for users whose browsers are yet unsupported to this format?
anyway keep up the good work 😉
That’s all. Now you can easily upload webp directly in your WordPress Dashboard. No extra things to do. Just feel free to use it with picture HTML tag. So, it will support for all browsers, without any issues. Thanks
The problem with the suggested HTML implementation is that Chrome will make two requests, one for WEBP and another one for JPEG resulting in double requests and increasing the page load time.
Hey dear,
It doesn’t create two requests(as you are saying) instead it automatically serve only one type image format either WebP or JPEG according to HTTP accept type.
I’d suggest please try one more time and look carefully at Network Timeline in the browser console. If you see there are double requests, please email me your HTML code and timeline screenshot also. I’d love to review it. I believe it should work fine for you too.
Thanks & Regards,
Gulshan
I installed the code into the functions.php. And as you said it did allow me to upload in my WP theme. The problem is that the image doesn’t allow cropping so it won’t allow me to use it on the site.