Hvad er WebP?
WebP er et moderne format, der gør det muligt at levere billeder hurtigere end nogensinde før. Hvis du bruger WordPress, kan du nemt servere alle billeder i WebP med nogle grundlæggende justeringer.
Få mere at vide om
De fleste browsere understøtter WebP
- Ifølge Caniuse-data understøttes WebP i øjeblikket af 94 % af browserne, herunder Apple Safari, Google Chrome, Opera, Mozilla Firefox, Microsoft Edge og Android-browsere.
- You can still serve JPEG/PNG as fallback for unsupported browser.
Store fordele ved at bruge billeder i WebP-format
- Sammenlignet med størrelsen af et normalt JPG- eller PNG-billede kan WebP-billeder af samme størrelse bruges i små bytes. Derfor indlæses billederne hurtigere. Det vil især være nyttigt for mobilbrugere.
- Servering af kvalitetsbilleder i få bytes, hvilket sparer dramatisk båndbredde.
- Hold dit websted opdateret med de nyeste tendenser. Du må ikke miste samtalen på grund af bull-cart langsom indlæsningsproblem.
- WebP anbefales af Google Developers. Hjælper dig med at bestå anbefalingen “server billeder i næste generations format” i Google PageSpeed Insight.
Sådan kan du servere WebP til et WordPress-websted.
Brug af WebP Express-plugin i NGINX
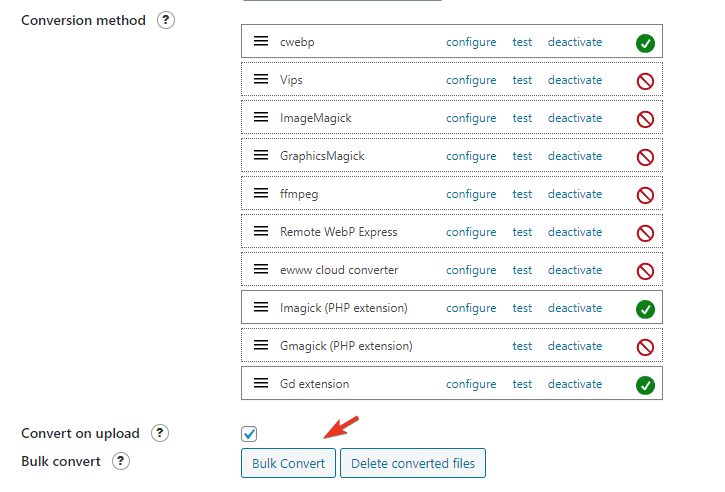
- Installere og aktivere WebP Express, gratis plugin. En stor tak til Dev.
- Driftstilstand: Forskellige billedreaktioner.
- Anvendelsesområde: Kun upload.
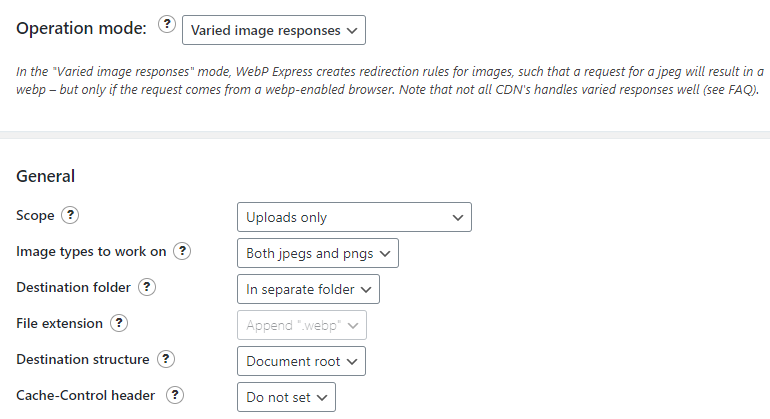
- Kør Bulk-konvertering
- For Apache-brugere kræves der ingen konfiguration, da .htaccess klarer alt magi.
- NGINX-serverbrugeren skal ændre konfigurationsfilen med root-adgang.
For at organisere koden bedre vil jeg anbefale at placere den først i mappen /etc/nginx/ med navnet webp.conf og derefter inkludere den i den primære serverblok.
Indtast nedenstående kommando
cd /etc/nginx/ && nano webp.conf- Indsæt nedenstående kode ved at højreklikke i nano editor i SSH-terminalen.
# WebP Express rules
# --------------------
location ~* ^/?wp-content/.*\.(png|jpe?g)$ {
  add_header Vary Accept;
  expires 365d;
  if ($http_accept !~* "webp"){
    break;
  }
  try_files
    /wp-content/webp-express/webp-images/doc-root/$uri.webp
    $uri.webp
    /wp-content/plugins/webp-express/wod/webp-on-demand.php?xsource=x$request_filename&wp-content=wp-content
    ;
}

# Route requests for non-existing webps to the converter
location ~* ^/?wp-content/.*\.(png|jpe?g)\.webp$ {
    try_files
      $uri
      /wp-content/plugins/webp-express/wod/webp-realizer.php?wp-content=wp-content
      ;
}
# ------------------- (WebP Express rules ends here)
- Tryk på CTRL+O og Enter-tasten for at gemme.
Besøg nu hovedserverblokken.
cd /etc/nginx/sites-available && lsKan varmt anbefales: Lær at installere WordPress på NGINX (i tre enkle trin)
Rediger din konfigurationsfil, og indsæt include webp.conf; som vist nedenfor.
# General
server {
    listen         80;
    server_tokens off;
    return 301 https://$host$request_uri;
}
server {
server_tokens off;
root /var/www/html;
index index.php index.html index.htm;
server_name .gulshankumar.net;
client_max_body_size 0;

    listen [::]:443 ssl http2 ipv6only=on;
    listen 443 ssl http2;
        ssl_protocols TLSv1.1 TLSv1.2 TLSv1.3;
        ssl_certificate /etc/comodo/cert.pem;
        ssl_certificate_key /etc/comodo/private.pem;
        ssl_prefer_server_ciphers on;
        ssl_session_cache   shared:SSL:20m;
        ssl_session_timeout 20m;
        ssl_ciphers 'TLS13+AESGCM+AES128:EECDH+AES128';

error_page 404 /404.html;
error_page 500 502 503 504 /50x.html;


# WebP Express rule goes here

include webp.conf;

# WebP Rule end

location / {
    try_files $uri $uri/ /index.php$is_args$args;
}
Genindlæs eller genstart NGINX.
service nginx reloadVærd at bemærke
- Hvis du bruger BunnyCDN, skal du aktivere Vary Cache.
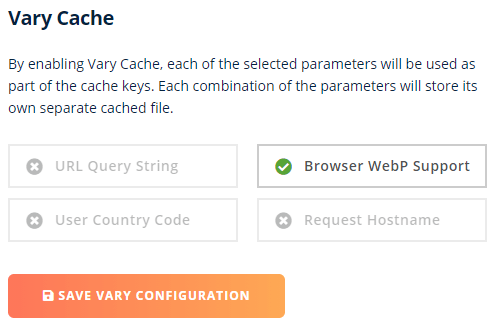
- Cloudflare understøtter ikke Vary Cache. Prøv nedenstående alternative fremgangsmåde.
Brug WebP ved hjælp af Cloudflare CDN (uden plugin)
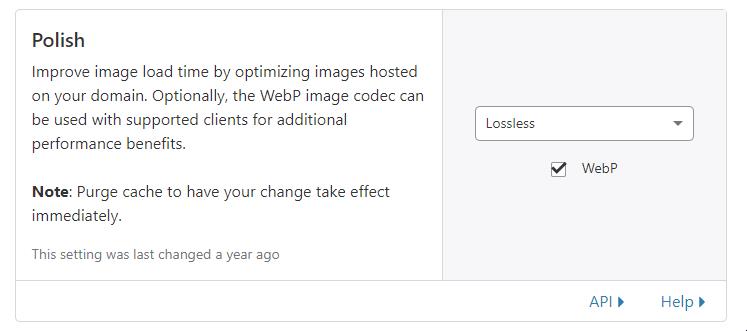
Hvis du er Cloudflare Pro-bruger, kan du blot aktivere WebP med et enkelt klik fra fanen Hastighed.
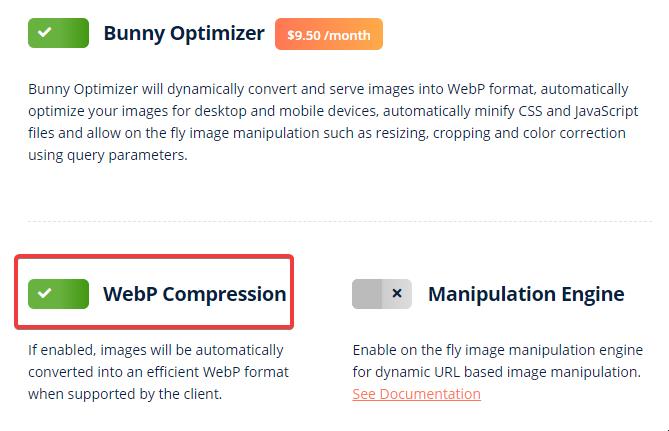
Servere WebP ved hjælp af BunnyCDN Optimizer (uden plugin)
BunnyCDN tilbyder Optimizer-tjenester, som leveres med On-the-fly WebP-serveringsløsning. Det er en one-click-løsning for $9,5/måned ekstra omkostninger.
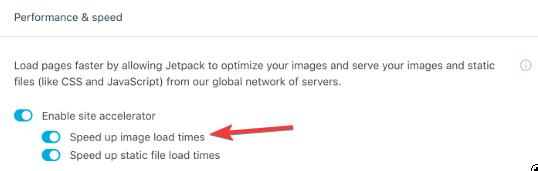
Servere WebP ved hjælp af JetPack-plugin
- Du skal blot installere og aktivere JetPack-plugin
- Aktiver Site Accelerator.
Du kan bemærke en forringelse af billedkvaliteten, som du kan rette ved hjælp af nedenstående filter.
add_filter('jetpack_photon_pre_args', 'jetpackme_custom_photon_compression' );
function jetpackme_custom_photon_compression( $args ) {
    $args['quality'] = 100;
    $args['strip'] = 'all';
    return $args;
}
Serve WebP in NGINX using ShortPixel Plugin
ShortPixel-plugin kan hjælpe med optimering af bulkbilleder med WebP-konvertering og servering som pr. Browser-understøttelse. Det bedste ved dette plugin er, at det behandler billederne på deres server, så det vil ikke gøre dit websted langsommere.
- Hvis du bruger Apache-webserveren, kan du bruge .htaccess-rewriting. Det er ganske enkelt.
- I tilfælde af NGINX kan du bruge nedenstående omskrivningsregel med hjælp fra hosting-support
- Dette plugin er også understøttet af WP Rocket cache plugin.
Først skal du tilføje denne blok før serverdirektivet:
map $http_accept $webp_suffix {
    default "";
    "~*webp" ".webp";
}
Tilføj denne blok inden for serverdirektivet:
location ~* ^(/wp-content/.+)\.(png|jpe?g)$ {
    set $base $1;
    set $webp_uri $base$webp_suffix;
    set $webp_old_uri $base.$2$webp_suffix;
    set $root "<<FULL PATH OF wp-content PARENT>>";
    root $root;
    add_header Vary Accept;
    if ( !-f $root$webp_uri ) {
        add_header X_WebP_SP_Miss $root$webp_uri;
    }
    try_files $webp_uri $webp_old_uri $uri =404;
}
Placering er vigtig. Så tilføj den omhyggeligt.
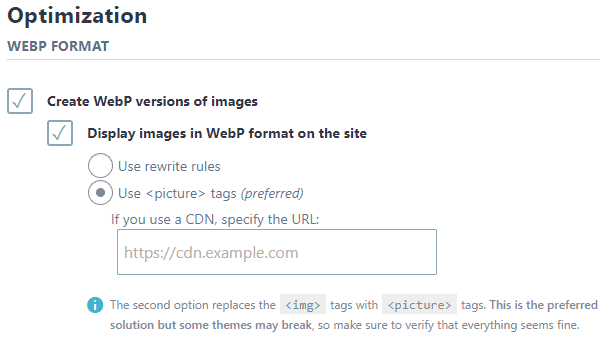
Servere WebP ved hjælp af Imagify
Imagify er et plugin til billedoptimering, der tilbydes af WP Media, folkene bag WP Rocket.
- Installer og aktivér Imagify-plugin
- Indtast API-nøglen
- Vælg Picture tags-tilstand i indstillingerne for hurtig opsætning.
- Alternativt kan du bruge en omskrivningsregel med en vis serverkonfiguration som beskrevet her. Med Apache vil tilføjelsen af .htaccess-kode ske automatisk, men med NGINX skal du gøre det manuelt.
WebP til JPG
WebP kan i nogle tilfælde forringe billedkvaliteten en smule. Hvis du vil vende tilbage fra WebP til JPG, skal du blot følge disse trin.
- Deaktivere og slette WebP-relateret plugin.
- Fjern dens relaterede opsætning fra konfigurationsfilen (.htaccess)
- Slet .webp-filer i store mængder, og spar diskplads.
find . -type f -name "*.webp*" -deleteHvis du vil konvertere en WebP-fil til JPG, kan du bruge et værktøj, der er tilgængeligt på CloudConvert.
Manuel metode uden plugin
Dette afsnit er kun til orientering.
Trin 1 : Tilføjelse af WebP-format i HTML-dokumentet
Først skal du konvertere alle dine billeder i WebP og sammen med dit tidligere billedformat som reserve. Der er nogle plugin som Optimus, der kan gøre dette arbejde automatisk. Men jeg vil vise en anden nem måde at gøre det manuelt på.
- Gå til dette websted image.online-convert.com/convert-to-webp
- Indsæt dit billedlink, og klik på konverter. Dine billeder i WebP-format vil blive downloadet
- Rediger nu den rå HTML-kode, hvor dit normale billede vises.
Lad os sige, at din Image HTML-kode i begyndelsen var som følger
<img src="https://www.gulshankumar.net/wp-content/uploads/2016/09/webplogo.png" alt="gulshan kumar" width="186" height="66" />Du skal omvikle ovenstående kode med lidt mere HTML-markup.
<picture>
	<source srcset="https://www.gulshankumar.net/wp-content/uploads/2016/09/webplogo.webp" type="image/webp" />
	<img src="https://www.gulshankumar.net/wp-content/uploads/2016/09/webplogo.png" alt="gulshan kumar" width="186" height="66" />
</picture>
Nu er dit HTML-dokument klar til at vise billeder i WebP-format.
Trin 2 : Konfigurer serverindstillingerne
Du skal konfigurere nogle Apache Webserver-indstillinger via .htacccess, så browser og webserver kan behandle det korrekt som alle andre billeder.
Din webhosting-server ved måske ikke, fra hvilken mime-type denne form for formatbilleder de skal servere. Så du skal tilføje den rigtige mime-type. Det ville også være værd at opsætte en udløbsheader til caching.
# Serve Images with correct Mime Type
AddType image/webp .webp

# Setup Cache
ExpiresActive On
ExpiresByType image/webp A2592000
Bemærk venligst: Sørg for, at du bruger WordPress 5.8 eller nyere.
Hvis du bruger WordPress ældre end version 5.8, understøtter det ikke upload af billeder i WebP-format. Du kan få fejlen “Denne filtype er desværre ikke tilladt af sikkerhedsmæssige årsager“, mens du uploader .webp-billeder.
Så du skal løse dette problem ved at tilføje denne kode i dit tema functions.php Det ville være nyttigt, hvis du vil uploade dine billeder direkte fra WordPress Dashboard > Medieindstilling.
function webp_upload_mimes( $existing_mimes ) {
	// add webp to the list of mime types
	$existing_mimes['webp'] = 'image/webp';

	// return the array back to the function with our added mime type
	return $existing_mimes;
}
add_filter( 'mime_types', 'webp_upload_mimes' );
Færdig.
Hvis du har brug for hjælp, kan du kigge i kommentarfeltet eller deltage i mit forum. Det ville være mig en fornøjelse at hjælpe dig.
Yderligere bemærkninger
- Hvis du er Cloudways-bruger, kan du ikke levere WebP med .htaccess-rewrite, fordi de bruger NGINX specifikt til statiske filer. I dette tilfælde har du to valgmuligheder. Bed hostingteamet om at redigere konfigurationsfilen for dig, eller brug JavaScript eller en tredjeparts CDN-baseret løsning som Bunny eller CF.
Yderligere læsning
Hvis du er nysgerrig efter at få mere at vide om WebP, kan du se disse links.
Tak.
I didn’t try the webp format as of now in WordPress. But now after reading this post I will try to implement it. I will compare the image quality from other formats as well. Thank you for sharing this article.
Have you experienced the WebP format causing problems for seo? is it better to use it as jpg or this way?
Google officially recommends using WebP format images along with JPG as fallback.
How to remove hyperlink for the webp image format?
I guess you want to remove .webp extension from URL. You need to try rewrite approach.
I have a question about ShortPixel method.
I use Plesk panel with NGINX
There is a section called Additional nginx directives
Here you can specify the settings for the nginx reverse proxy server that runs in front of Apache. Your directives will override the server-wide nginx configuration. For example, you may want to change the connection timeout or to pack requests with gzip. Use the same syntax as you use for nginx.conf. For example, if you want to pack all the proxied requests with gzip, add the line: ‘gzip_proxied any;’.
https://i.imgur.com/OLWu9bJ.png
can i add codes there i dont know?
map $http_accept $webp_suffix {
default “”;
“~*webp” “.webp”;
}
location ~* ^(/wp-content/.+).(png|jpe?g)$ {
set $base $1;
set $webp_uri $base$webp_suffix;
set $webp_old_uri $base.$2$webp_suffix;
set $root “<>”;
root $root;
add_header Vary Accept;
if ( !-f $root$webp_uri ) {
add_header X_WebP_SP_Miss $root$webp_uri;
}
try_files $webp_uri $webp_old_uri $uri =404;
You used these sentences!
before the server directive and inside directive.
I read your Installing WordPress at NGINX topic so
If i try to add these from codes is this right?
map $http_accept $webp_suffix {
default “”;
“~*webp” “.webp”;
}
server {
listen 80;
return 301 https://$host$request_uri;
}
server {
location ~* ^(/wp-content/.+).(png|jpe?g)$ {
set $base $1;
set $webp_uri $base$webp_suffix;
set $webp_old_uri $base.$2$webp_suffix;
set $root “<>”;
root $root;
add_header Vary Accept;
if ( !-f $root$webp_uri ) {
add_header X_WebP_SP_Miss $root$webp_uri;
}
try_files $webp_uri $webp_old_uri $uri =404;
}
# Document Root
root /var/www/html;
index index.php index.html index.htm;
server_name .example.com;
client_max_body_size 0;
listen [::]:443 ssl http2 ipv6only=on;
listen 443 ssl http2;
ssl_protocols TLSv1.1 TLSv1.2 TLSv1.3;
ssl_certificate /etc/letsencrypt/live/example.com/fullchain.pem;
ssl_certificate_key /etc/letsencrypt/live/example.com/privkey.pem;
ssl_prefer_server_ciphers on;
ssl_session_cache shared:SSL:20m;
ssl_session_timeout 20m;
ssl_ciphers ‘TLS13+AESGCM+AES128:EECDH+AES128’;
error_page 404 /404.html;
error_page 500 502 503 504 /50x.html;
location / {
try_files $uri $uri/ /index.php$is_args$args;
}
location ~* .php$ {
if ($uri !~ “^/uploads/”) {
fastcgi_pass unix:/run/php/php7.4-fpm.sock;
}
include fastcgi_params;
fastcgi_param SCRIPT_FILENAME $document_root$fastcgi_script_name;
fastcgi_param SCRIPT_NAME $fastcgi_script_name;
}
location = /favicon.ico {
log_not_found off;
access_log off;
}
location = /robots.txt {
log_not_found off;
access_log off;
allow all;
}
location ~* .(css|gif|svg|ico|jpeg|jpg|js|png)$ {
expires 1y;
log_not_found off;
}
# Enable Gzip compression.
gzip on;
# Disable Gzip on IE6.
gzip_disable “msie6”;
# Allow proxies to cache both compressed and regular version of file.
# Avoids clients that don’t support Gzip outputting gibberish.
gzip_vary on;
# Compress data, even when the client connects through a proxy.
gzip_proxied any;
# The level of compression to apply to files. A higher compression level increases
# CPU usage. Level 5 is a happy medium resulting in roughly 75% compression.
gzip_comp_level 5;
# Compress the following MIME types.
gzip_types
application/atom+xml
application/javascript
application/json
application/ld+json
application/manifest+json
application/rss+xml
application/vnd.geo+json
application/vnd.ms-fontobject
application/x-font-ttf
application/x-web-app-manifest+json
application/xhtml+xml
application/xml
font/opentype
image/bmp
image/svg+xml
image/x-icon
text/cache-manifest
text/css
text/plain
text/vcard
text/vnd.rim.location.xloc
text/vtt
text/x-component
text/x-cross-domain-policy;
}
Is this right?
And what do you think about plesk how i use webp at plesk?
Thanks
Please consult a freelancer. It is out of scope to guide here.
Hi, this is a good article, but
It is better to install the plugin or put the code directly for webp
This way, each image does not create two urls. Does it cause a problem in the SEO site?
Dynamic rewriting from Server side doesn’t create two URLs instead it servers same just by changing response as per browser support.
A plugin is recommended way.
Hi Gulshan. Any free plugin(totally free) for converting jpg to webp format. God Bless you.
First option which is WebP Express.
Thank You! Gulshan
Hey Gulshan Kumar ,
Awesome post with good information. It is my first time commenting on your blog post and am glad to say that you have done a fabulous work and provided helpful & easy tips to serve webp format images in WordPress. I really like and appreciate the way you have explained the things in such a step-by-step process making the concept very clear and easy to understand. while scrolling through your blog post i have noticed that you have also discussed about the major benefits of using webp format image that are also providing good understanding. You have explained all the vital things in an easy language that are true enough to understand and educate the readers.
After going through this complete guide i really gain ideas and am sure that this post is definitely going to help lots of people & especially WordPress-users to sort out their query. Good work and keep sharing more similar post.
Eventually thanks for sharing your knowledge, ideas and such an informative post.
Regards
-Aadarsh
Hi Adarsh, Thanks for your kind words. It really means a lot to me.
Hello. Please check Hiwebp plugin wordpress.
https://wordpress.org/plugins/hiwebp/
Works a treat, thanks!
If you disable copy function then it’s better to not include any code reference. okay?
Thanks for notifying. I have allowed copying function for snippet in this article.
I have tried this method to enable WebP format images on my site, but I am encountering some unknown error. My site showing a low score on google page speed insight.
May I know please which specific method you have tried? Also, please share the screenshot of error. I will try my best to help you.
Why is not wordpress supporting WEBP format by default?Its high time now.
It works great in Chrome and Firefox on the PC/Laptop. BUT, the webp images are not displayed on iPhone (Chrome and Safari)
Safari is not supporting webP. Chrome on iOS is based on Safari, too. So webP won‘t work on iOS at all and you have to serve a fallback image.
Works a treat, thanks!
Hi,
I am not quite clear on where this needs to be inserted. I am looking to Optimise my header image to Webp. Is there a video or screenshot based write up on how I can include this?
Would really appreciate the help
Regards
Shwetha
Hello Gulshan,
Thanks for sharing this article.
I did follow the steps mentioned in here in this format.
But the image is not appearing on Firfox, and IE. Did I miss any thing in here.
Please suggest.
This code no longer works. He’s not loading. I don’t know why it doesn’t work.
It should work fine. Please share your site URL so I can check.
Hi..Just wondering if i need to edit each image tag or is there somewhere in my theme templates this could be done.
Any guidence would be great.
Thanks
Mark
Do I need to edit all the image tags one by one now? Isn’t there another way to do that?
Hi Gulshan,
Even after putting the code snippet in the function.php file.
I still have the same error message when I try to upload webp format. The message is “sorry this file type is not permitted for security reasons”.
Can you help fix this?
Thanks.
Martin
Hello Martin,
At my end it’s working fine. For a demo, I have sent a quick video on your email. Please check and revert back if I can help with any thing else.
Thanks
I haven’t added anything except the last code from your post in function.php to support Webp format on all of future media uploads. Do I need to add any thing else ? or will it create any kind of issue for users whose browsers are yet unsupported to this format?
anyway keep up the good work 😉
That’s all. Now you can easily upload webp directly in your WordPress Dashboard. No extra things to do. Just feel free to use it with picture HTML tag. So, it will support for all browsers, without any issues. Thanks
The problem with the suggested HTML implementation is that Chrome will make two requests, one for WEBP and another one for JPEG resulting in double requests and increasing the page load time.
Hey dear,
It doesn’t create two requests(as you are saying) instead it automatically serve only one type image format either WebP or JPEG according to HTTP accept type.
I’d suggest please try one more time and look carefully at Network Timeline in the browser console. If you see there are double requests, please email me your HTML code and timeline screenshot also. I’d love to review it. I believe it should work fine for you too.
Thanks & Regards,
Gulshan
I installed the code into the functions.php. And as you said it did allow me to upload in my WP theme. The problem is that the image doesn’t allow cropping so it won’t allow me to use it on the site.