WebP je formát souborů pro obrázky, který umožňuje bezeztrátovou a ztrátovou kompresi. Pokud používáte WordPress, můžete snadno zobrazit všechny obrázky ve formátu WebP s několika základními úpravami..
Most Browsers support WebP
- Podle údajů společnosti Caniuse je WebP v současné době podporován v následujících zařízeních. 94% browsers zahrnout Apple Safari, Google Chrome, Opera, Mozilla Firefox, Microsoft Edge and Android browsers.
- Pro nepodporované prohlížeče můžete stále používat JPEG/PNG jako nouzovou variantu.
Major Benefits používání WebP format Image
- V porovnání s velikostí běžného obrázku JPG nebo PNG může obrázek WebP stejného rozměru obsloužit malé množství bajtů. Obrázky se tedy načítají rychleji. To bude užitečné zejména pro uživatele mobilních zařízení.
- Podávání kvalitních obrázků v několika málo bajtech výrazně šetří šířku pásma.
- Udržujte své webové stránky aktualizované podle nejnovějších trendů. Neztrácejte konverzaci kvůli pomalému načítání.
- WebP je doporučován společností Google Developers. Pomáhá vám při průchodu „serve images in next-gen format“ doporučení služby Google PageSpeed Insight.
Takto můžete pro web WordPress použít formát WebP.
Serve WebP in NGINX using ShortPixel Plugin
ShortPixel plugin může pomoci při hromadné optimalizaci obrázků s konverzí WebP a podáváním podle podpory prohlížeče. Nejlepší je, že tento plugin zpracovává data na svém serveru, takže nezpomaluje vaše stránky.
- If your WordPress is hosted at Apache server uživatele můžete použít .htaccess rewriting.
- In case of NGINX můžete použít níže uvedené pravidlo přepisu s pomocí podpory hostingu
- Tento plugin je podporován také pluginem WP Rocket cache.
Nejprve přidejte tento blok before směrnice serveru:
map $http_accept $webp_suffix {
    default "";
    "~*webp" ".webp";
}
Přidejte tento blok inside the server directive:
location ~* ^(/wp-content/.+)\.(png|jpe?g)$ {
    set $base $1;
    set $webp_uri $base$webp_suffix;
    set $webp_old_uri $base.$2$webp_suffix;
    set $root "<<FULL PATH OF wp-content PARENT>>";
    root $root;
    add_header Vary Accept;
    if ( !-f $root$webp_uri ) {
        add_header X_WebP_SP_Miss $root$webp_uri;
    }
    try_files $webp_uri $webp_old_uri $uri =404;
}
Na umístění záleží. Proto jej přidávejte opatrně.
Použití pluginu WebP Express v NGINX
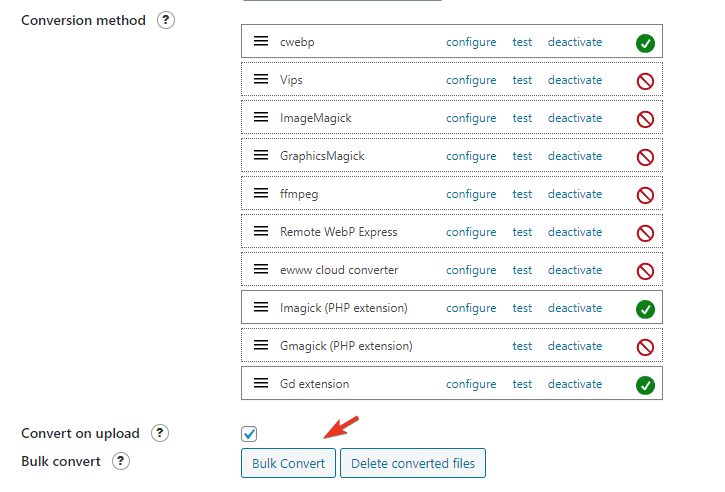
- Install & Activate WebP Express, free plugin. Obrovský dík patří vývojáři.
- Operation mode: Varied image responses.
- Scope: Upload only.
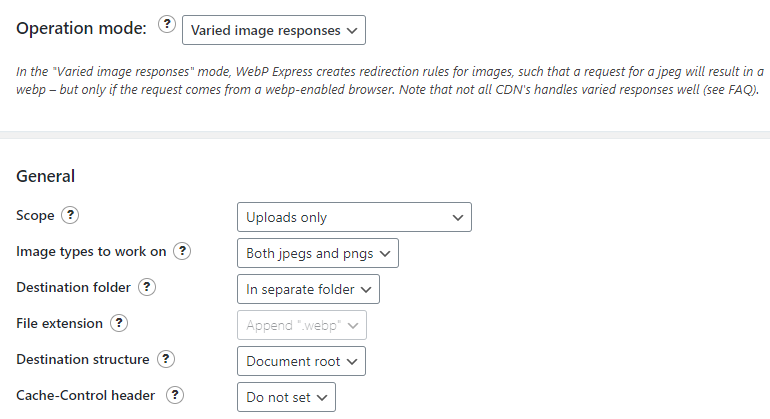
- Run Bulk Convert
- For WordPress hosted at Apache server, no config is required as .htaccess does all magics.
- NGINX server uživatel musí upravit konfigurační soubor s přístupem root..
Pro lepší organizaci kódu, Doporučuji umístit nejprve dovnitř /etc/nginx/ directory with name webp.conf then include in main server block.
Zadejte následující příkaz
cd /etc/nginx/ && nano webp.conf- Paste below code using right click inside nano editor in SSH Terminal.
# WebP Express rules
# --------------------
location ~* ^/?wp-content/.*\.(png|jpe?g)$ {
  add_header Vary Accept;
  expires 365d;
  if ($http_accept !~* "webp"){
    break;
  }
  try_files
    /wp-content/webp-express/webp-images/doc-root/$uri.webp
    $uri.webp
    /wp-content/plugins/webp-express/wod/webp-on-demand.php?xsource=x$request_filename&wp-content=wp-content
    ;
}

# Route requests for non-existing webps to the converter
location ~* ^/?wp-content/.*\.(png|jpe?g)\.webp$ {
    try_files
      $uri
      /wp-content/plugins/webp-express/wod/webp-realizer.php?wp-content=wp-content
      ;
}
# ------------------- (WebP Express rules ends here)
- Press CTRL+O and Enter key to save.
Nyní navštivte hlavní blok serveru.
cd /etc/nginx/sites-available && lsEdit your configuration file, a vložte include webp.conf; jak je uvedeno níže.
# General
server {
    listen         80;
    server_tokens off;
    return 301 https://$host$request_uri;
}
server {
server_tokens off;
root /var/www/html;
index index.php index.html index.htm;
server_name .gulshankumar.net;
client_max_body_size 0;

    listen [::]:443 ssl http2 ipv6only=on;
    listen 443 ssl http2;
        ssl_protocols TLSv1.1 TLSv1.2 TLSv1.3;
        ssl_certificate /etc/comodo/cert.pem;
        ssl_certificate_key /etc/comodo/private.pem;
        ssl_prefer_server_ciphers on;
        ssl_session_cache   shared:SSL:20m;
        ssl_session_timeout 20m;
        ssl_ciphers 'TLS13+AESGCM+AES128:EECDH+AES128';

error_page 404 /404.html;
error_page 500 502 503 504 /50x.html;


# WebP Express rule goes here

include webp.conf;

# WebP Rule end

location / {
    try_files $uri $uri/ /index.php$is_args$args;
}
Znovu načtěte nebo restartujte NGINX.
service nginx reloadCo je třeba vzít na vědomí
- Pokud používáte BunnyCDN, musí umožňovat Vary Cache.
- Cloudflare nepodporuje Vary Cache. Zkuste níže uvedený alternativní přístup.
Použití WebP pomocí Cloudflare CDN (bez pluginu)
Pokud jste Cloudflare Pro uživatele můžete jednoduše povolit WebP in one-click from Speed Tab.
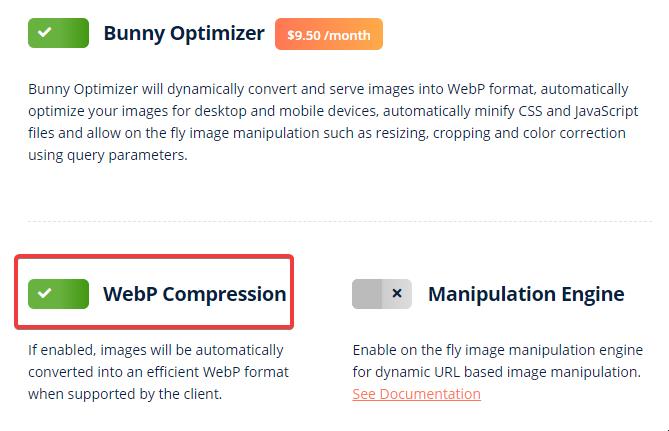
Podávání WebP pomocí optimalizátoru BunnyCDN (bez zásuvného modulu)
BunnyCDN nabízí služby Optimizer, které zahrnují On-the-fly WebP serving solution. Je to řešení na jedno kliknutí pro $9.5/mo additional cost.
Serve WebP pomocí JetPack Plugin
- Stačí nainstalovat a aktivovat JetPack plugin
- Enable the Site Accelerator.
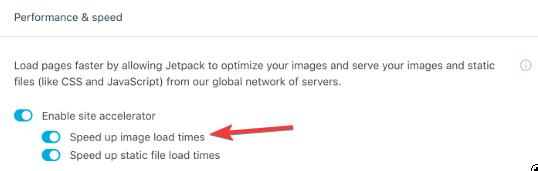
Můžete zaznamenat snížení kvality obrazu, které lze napravit pomocí níže uvedeného filtru.
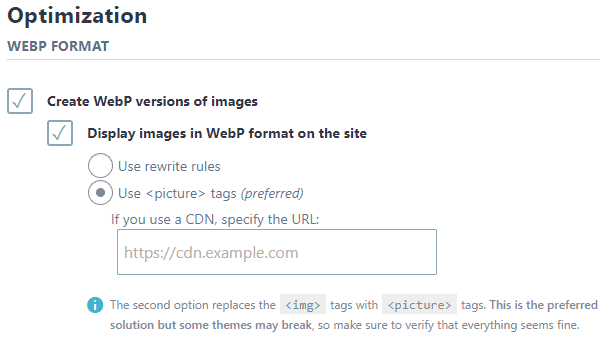
Serve WebP pomocí Imagify
Imagify is an Image Optimization plugin offered by WP Media, the folks behind WP Rocket.
- Install and activate Imagify plugin
- Enter the API Key
- V nastavení vyberte režim Obrázkové značky pro rychlé nastavení.
- Případně můžete použít pravidlo přepisu s určitou konfigurací serveru jako. described zde. With Apache, the .htaccess code addition process will be automatic but with NGINX you need to do manually.
WebP to JPG
WebP may degrade image quality a bit in some cases. Pokud se chcete vrátit zpět z WebP to JPG, jednoduše postupujte podle následujících kroků.
- Deactivate & Delete WebP related plugin.
- Remove its related setup from configuration file (.htaccess)
- Bulk delete .webp files and save disk space.
find . -type f -name "*.webp*" -deletePokud chcete převést WebP file to JPG, můžete použít nástroj dostupný na adrese CloudConvert.
Ruční metoda bez pluginu
Tento oddíl je pouze informativní.
Krok 1 : Adding WebP format in HTML Document
Nejprve je třeba convert your all images in WebP a spolu s vaším předchozím formátem obrázku jako záložním formátem. Existuje nějaký zásuvný modul, jako je Optimus který tuto práci zvládne automaticky. Ukážu vám však další snadný způsob, jak to udělat ručně.
- Přejděte na tyto webové stránky image.online-convert.com/convert-to-webp
- Paste your Image Link and click on convert. Your WebP format images bude stažen
- Now edit the raw HTML code where your normal Image is appearing.
Řekněme, že na začátku svého Image HTML kód byl následující
<img src="https://www.gulshankumar.net/wp-content/uploads/2016/09/webplogo.png" alt="gulshan kumar" width="186" height="66" />Výše uvedený kód je třeba obalit trochou více HTML markup.
<picture>
	<source srcset="https://www.gulshankumar.net/wp-content/uploads/2016/09/webplogo.webp" type="image/webp" />
	<img src="https://www.gulshankumar.net/wp-content/uploads/2016/09/webplogo.png" alt="gulshan kumar" width="186" height="66" />
</picture>
Nyní, Your HTML dokument je připraven k podávání obrázků v WebP format.
Krok 2 : Configure server settings
Ještě jeden krok, je třeba nakonfigurovat některé Apache Webserver settings via .htacccess aby s ním prohlížeč a webový server mohly správně zacházet jako s ostatními obrázky..
Vaše Web Hosting server nemusí vědět, z jakého typu mime tento druh formátů obrázků potřebují obsluhovat. Proto je nutné přidat správný typ mime. Také by stálo za to nastavit hlavičku o vypršení platnosti pro ukládání do mezipaměti.
# Serve Images with correct Mime Type
AddType image/webp .webp

# Setup Cache
ExpiresActive On
ExpiresByType image/webp A2592000
Vezměte laskavě na vědomí: Ujistěte se, že používáte WordPress 5.8 nebo později.
Pokud používáte WordPress starší než verze 5.8, nepodporuje nahrávání obrázků ve formátu WebP. Může dojít k chybě „Tento typ souboru bohužel není z bezpečnostních důvodů povolen.“ při nahrávání .webp images.
Tento problém musíte vyřešit přidáním tohoto kódu do svého tématu functions.php Bylo by užitečné, kdybyste své obrázky nahrávali přímo ze stránek WordPress Dashboard > Media option.
function webp_upload_mimes( $existing_mimes ) {
	// add webp to the list of mime types
	$existing_mimes['webp'] = 'image/webp';

	// return the array back to the function with our added mime type
	return $existing_mimes;
}
add_filter( 'mime_types', 'webp_upload_mimes' );
Hotovo.
Pokud potřebujete pomoc, podívejte se na comment section. Bude mi potěšením vám pomoci.
Další poznámky
- Pokud jste uživatelem služby Cloudways, nemůžete WebP doručovat pomocí přepisu .htaccess, protože NGINX se používá speciálně pro statické soubory. V tomto případě máte dvě možnosti. Požádat hostingový tým, aby pro vás upravil konfigurační soubor, nebo použít JavaScript nebo řešení založené na CDN třetí strany, jako je Bunny nebo CF.
Další literatura
Pokud se chcete o WebP dozvědět více, podívejte se na tyto odkazy.
Děkuji.
The problem with the suggested HTML implementation is that Chrome will make two requests, one for WEBP and another one for JPEG resulting in double requests and increasing the page load time.
Hey dear,
It doesn’t create two requests(as you are saying) instead it automatically serve only one type image format either WebP or JPEG according to HTTP accept type.
I’d suggest please try one more time and look carefully at Network Timeline in the browser console. If you see there are double requests, please email me your HTML code and timeline screenshot also. I’d love to review it. I believe it should work fine for you too.
Thanks & Regards,
Gulshan
I installed the code into the functions.php. And as you said it did allow me to upload in my WP theme. The problem is that the image doesn’t allow cropping so it won’t allow me to use it on the site.
I haven’t added anything except the last code from your post in function.php to support Webp format on all of future media uploads. Do I need to add any thing else ? or will it create any kind of issue for users whose browsers are yet unsupported to this format?
anyway keep up the good work 😉
That’s all. Now you can easily upload webp directly in your WordPress Dashboard. No extra things to do. Just feel free to use it with picture HTML tag. So, it will support for all browsers, without any issues. Thanks
Hi Gulshan,
Even after putting the code snippet in the function.php file.
I still have the same error message when I try to upload webp format. The message is „sorry this file type is not permitted for security reasons“.
Can you help fix this?
Thanks.
Martin
Hello Martin,
At my end it’s working fine. For a demo, I have sent a quick video on your email. Please check and revert back if I can help with any thing else.
Thanks
Do I need to edit all the image tags one by one now? Isn’t there another way to do that?
Hi..Just wondering if i need to edit each image tag or is there somewhere in my theme templates this could be done.
Any guidence would be great.
Thanks
Mark
This code no longer works. He’s not loading. I don’t know why it doesn’t work.
It should work fine. Please share your site URL so I can check.
Hello Gulshan,
Thanks for sharing this article.
I did follow the steps mentioned in here in this format.
But the image is not appearing on Firfox, and IE. Did I miss any thing in here.
Please suggest.
Hi,
I am not quite clear on where this needs to be inserted. I am looking to Optimise my header image to Webp. Is there a video or screenshot based write up on how I can include this?
Would really appreciate the help
Regards
Shwetha
Works a treat, thanks!
It works great in Chrome and Firefox on the PC/Laptop. BUT, the webp images are not displayed on iPhone (Chrome and Safari)
Safari is not supporting webP. Chrome on iOS is based on Safari, too. So webP won‘t work on iOS at all and you have to serve a fallback image.
Why is not wordpress supporting WEBP format by default?Its high time now.
I have tried this method to enable WebP format images on my site, but I am encountering some unknown error. My site showing a low score on google page speed insight.
May I know please which specific method you have tried? Also, please share the screenshot of error. I will try my best to help you.
If you disable copy function then it’s better to not include any code reference. okay?
Thanks for notifying. I have allowed copying function for snippet in this article.
Works a treat, thanks!
Hello. Please check Hiwebp plugin wordpress.
https://wordpress.org/plugins/hiwebp/
Hey Gulshan Kumar ,
Awesome post with good information. It is my first time commenting on your blog post and am glad to say that you have done a fabulous work and provided helpful & easy tips to serve webp format images in WordPress. I really like and appreciate the way you have explained the things in such a step-by-step process making the concept very clear and easy to understand. while scrolling through your blog post i have noticed that you have also discussed about the major benefits of using webp format image that are also providing good understanding. You have explained all the vital things in an easy language that are true enough to understand and educate the readers.
After going through this complete guide i really gain ideas and am sure that this post is definitely going to help lots of people & especially WordPress-users to sort out their query. Good work and keep sharing more similar post.
Eventually thanks for sharing your knowledge, ideas and such an informative post.
Regards
-Aadarsh
Hi Adarsh, Thanks for your kind words. It really means a lot to me.
Hi Gulshan. Any free plugin(totally free) for converting jpg to webp format. God Bless you.
First option which is WebP Express.
Thank You! Gulshan
Hi, this is a good article, but
It is better to install the plugin or put the code directly for webp
This way, each image does not create two urls. Does it cause a problem in the SEO site?
Dynamic rewriting from Server side doesn’t create two URLs instead it servers same just by changing response as per browser support.
A plugin is recommended way.
I have a question about ShortPixel method.
I use Plesk panel with NGINX
There is a section called Additional nginx directives
Here you can specify the settings for the nginx reverse proxy server that runs in front of Apache. Your directives will override the server-wide nginx configuration. For example, you may want to change the connection timeout or to pack requests with gzip. Use the same syntax as you use for nginx.conf. For example, if you want to pack all the proxied requests with gzip, add the line: ‚gzip_proxied any;‘.
https://i.imgur.com/OLWu9bJ.png
can i add codes there i dont know?
map $http_accept $webp_suffix {
default „“;
„~*webp“ „.webp“;
}
location ~* ^(/wp-content/.+).(png|jpe?g)$ {
set $base $1;
set $webp_uri $base$webp_suffix;
set $webp_old_uri $base.$2$webp_suffix;
set $root „<>“;
root $root;
add_header Vary Accept;
if ( !-f $root$webp_uri ) {
add_header X_WebP_SP_Miss $root$webp_uri;
}
try_files $webp_uri $webp_old_uri $uri =404;
You used these sentences!
before the server directive and inside directive.
I read your Installing WordPress at NGINX topic so
If i try to add these from codes is this right?
map $http_accept $webp_suffix {
default „“;
„~*webp“ „.webp“;
}
server {
listen 80;
return 301 https://$host$request_uri;
}
server {
location ~* ^(/wp-content/.+).(png|jpe?g)$ {
set $base $1;
set $webp_uri $base$webp_suffix;
set $webp_old_uri $base.$2$webp_suffix;
set $root „<>“;
root $root;
add_header Vary Accept;
if ( !-f $root$webp_uri ) {
add_header X_WebP_SP_Miss $root$webp_uri;
}
try_files $webp_uri $webp_old_uri $uri =404;
}
# Document Root
root /var/www/html;
index index.php index.html index.htm;
server_name .example.com;
client_max_body_size 0;
listen [::]:443 ssl http2 ipv6only=on;
listen 443 ssl http2;
ssl_protocols TLSv1.1 TLSv1.2 TLSv1.3;
ssl_certificate /etc/letsencrypt/live/example.com/fullchain.pem;
ssl_certificate_key /etc/letsencrypt/live/example.com/privkey.pem;
ssl_prefer_server_ciphers on;
ssl_session_cache shared:SSL:20m;
ssl_session_timeout 20m;
ssl_ciphers ‚TLS13+AESGCM+AES128:EECDH+AES128‘;
error_page 404 /404.html;
error_page 500 502 503 504 /50x.html;
location / {
try_files $uri $uri/ /index.php$is_args$args;
}
location ~* .php$ {
if ($uri !~ „^/uploads/“) {
fastcgi_pass unix:/run/php/php7.4-fpm.sock;
}
include fastcgi_params;
fastcgi_param SCRIPT_FILENAME $document_root$fastcgi_script_name;
fastcgi_param SCRIPT_NAME $fastcgi_script_name;
}
location = /favicon.ico {
log_not_found off;
access_log off;
}
location = /robots.txt {
log_not_found off;
access_log off;
allow all;
}
location ~* .(css|gif|svg|ico|jpeg|jpg|js|png)$ {
expires 1y;
log_not_found off;
}
# Enable Gzip compression.
gzip on;
# Disable Gzip on IE6.
gzip_disable „msie6“;
# Allow proxies to cache both compressed and regular version of file.
# Avoids clients that don’t support Gzip outputting gibberish.
gzip_vary on;
# Compress data, even when the client connects through a proxy.
gzip_proxied any;
# The level of compression to apply to files. A higher compression level increases
# CPU usage. Level 5 is a happy medium resulting in roughly 75% compression.
gzip_comp_level 5;
# Compress the following MIME types.
gzip_types
application/atom+xml
application/javascript
application/json
application/ld+json
application/manifest+json
application/rss+xml
application/vnd.geo+json
application/vnd.ms-fontobject
application/x-font-ttf
application/x-web-app-manifest+json
application/xhtml+xml
application/xml
font/opentype
image/bmp
image/svg+xml
image/x-icon
text/cache-manifest
text/css
text/plain
text/vcard
text/vnd.rim.location.xloc
text/vtt
text/x-component
text/x-cross-domain-policy;
}
Is this right?
And what do you think about plesk how i use webp at plesk?
Thanks
Please consult a freelancer. It is out of scope to guide here.
How to remove hyperlink for the webp image format?
I guess you want to remove .webp extension from URL. You need to try rewrite approach.
Have you experienced the WebP format causing problems for seo? is it better to use it as jpg or this way?
Google officially recommends using WebP format images along with JPG as fallback.
I didn’t try the webp format as of now in WordPress. But now after reading this post I will try to implement it. I will compare the image quality from other formats as well. Thank you for sharing this article.