Vad är WebP?
WebP är ett modernt format för att visa bilder snabbare än någonsin. Om du använder WordPress kan du enkelt visa alla bilder i WebP med några grundläggande ändringar.
Läs om
De flesta webbläsare stöder WebP
- Enligt aaauppgifter från Caniuse stöds WebP för närvarande av 94 % av webbläsarna, däribland Apple Safari, Google Chrome, Opera, Mozilla Firefox, Microsoft Edge och Android-webbläsare.
- Du kan fortfarande använda JPEG/PNG som reserv för webbläsare som inte stöds.
Stora fördelar med att använda bilder i WebP-format
- Jämfört med storleken på en vanlig JPG- eller PNG-bild kan en bild av samma storlek som WebP användas i små bytes. Därför laddas bilderna snabbare. Det kommer att vara till hjälp särskilt för mobilanvändare.
- Du kan leverera kvalitetsbilder på några få bytes, vilket sparar bandbredd på ett dramatiskt sätt.
- Håll din webbplats uppdaterad med de senaste trenderna. Förlora inte konversationen på grund av långsam laddning.
- WebP rekommenderas av Google Developers. Det hjälper dig att klara rekommendationen ”servera bilder i nästa generations format” i Google PageSpeed Insight.
Så här kan du använda WebP på en WordPress-webbplats.
Använda WebP Express-plugin i NGINX
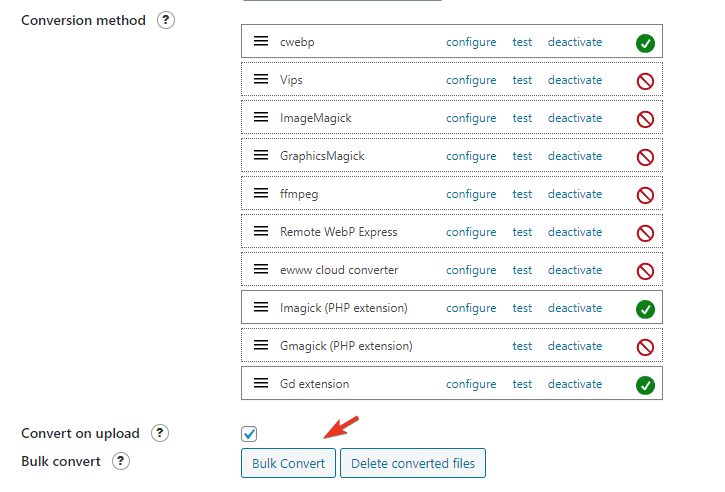
- Installera och aktivera WebP Express, ett gratis insticksprogram. Ett stort tack till Dev.
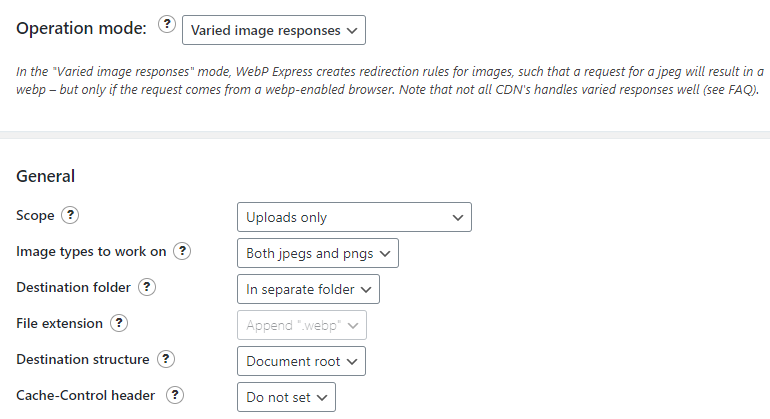
- Driftsätt: Olika bildreaktioner.
- Scope: Endast uppladdning.
- Kör Bulk-konvertering
- För Apache-användare krävs ingen konfiguration eftersom .htaccess gör alla trollkonster.
- NGINX-serverns användare måste ändra konfigurationsfilen med rotåtkomst.
För att organisera koden bättre rekommenderar jag att den först placeras i katalogen /etc/nginx/ med namnet webp.conf och sedan inkluderas i huvudserverblocket.
Ange nedanstående kommando
cd /etc/nginx/ && nano webp.conf- Klistra in koden nedan genom att högerklicka i nanoeditorn i SSH-terminalen.
# WebP Express regler
# --------------------
location ~* ^/?wp-content/.*\.(png|jpe?g)$ {
  add_header Vary Accept;
  expires 365d;
  if ($http_accept !~* "webp"){
    break;
  }
  try_files
    /wp-content/webp-express/webp-images/doc-root/$uri.webp
    $uri.webp
    /wp-content/plugins/webp-express/wod/webp-on-demand.php?xsource=x$request_filename&wp-content=wp-content
    ;
}

# Route requests for non-existing webps to the converter
location ~* ^/?wp-content/.*\.(png|jpe?g)\.webp$ {
    try_files
      $uri
      /wp-content/plugins/webp-express/wod/webp-realizer.php?wp-content=wp-content
      ;
}
# ------------------- (WebP Express reglerna slutar här)
- Tryck på CTRL+O och Enter för att spara.
Besök nu huvudserverblocket.
cd /etc/nginx/sites-available && lsRekommenderas starkt: Lär dig att installera WordPress på NGINX (i tre enkla steg)
Redigera konfigurationsfilen och include webp.conf; enligt nedan.
# General
server {
    listen         80;
    server_tokens off;
    return 301 https://$host$request_uri;
}
server {
server_tokens off;
root /var/www/html;
index index.php index.html index.htm;
server_name .gulshankumar.net;
client_max_body_size 0;

    listen [::]:443 ssl http2 ipv6only=on;
    listen 443 ssl http2;
        ssl_protocols TLSv1.1 TLSv1.2 TLSv1.3;
        ssl_certificate /etc/comodo/cert.pem;
        ssl_certificate_key /etc/comodo/private.pem;
        ssl_prefer_server_ciphers on;
        ssl_session_cache   shared:SSL:20m;
        ssl_session_timeout 20m;
        ssl_ciphers 'TLS13+AESGCM+AES128:EECDH+AES128';

error_page 404 /404.html;
error_page 500 502 503 504 /50x.html;


# WebP Express regeln går här

include webp.conf;

# WebP Slut på regeln

location / {
    try_files $uri $uri/ /index.php$is_args$args;
}
Ladda om eller starta om NGINX.
service nginx reloadAtt notera
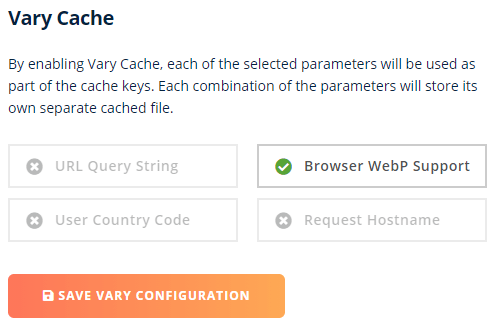
- Om du använder BunnyCDN måste du aktivera Vary Cache.
- Cloudflare stöder inte Vary Cache. Försök med nedanstående alternativt tillvägagångssätt.
Använd WebP med Cloudflare CDN (utan plugin)
Om du är Cloudflare Pro-användare kan du helt enkelt aktivera WebP med ett klick från fliken Hastighet.
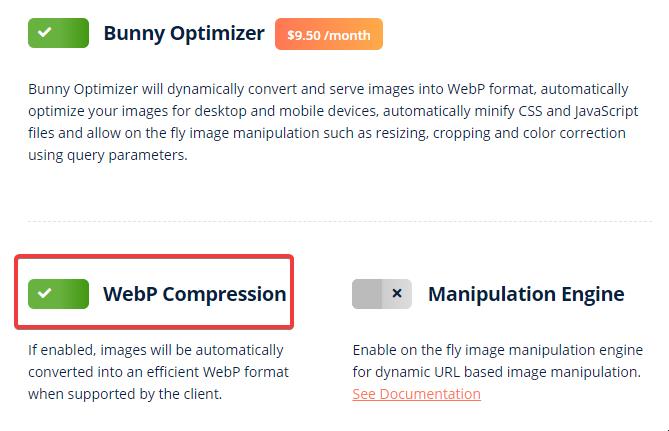
Servera WebP med BunnyCDN Optimizer (utan plugin)
BunnyCDN erbjuder Optimizer-tjänster som levereras med en lösning för WebP-servering i farten. Det är en lösning med ett klick för 9,5 dollar/månad som tilläggskostnad.
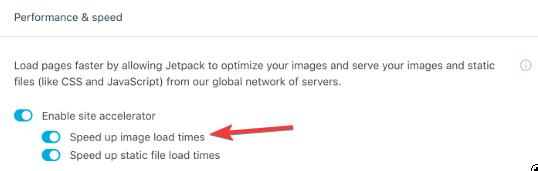
Servera WebP med JetPack-plugin
- Installera och aktivera JetPack-plugin
- Aktivera Site Accelerator.
Du kan märka en försämring av bildkvaliteten som kan åtgärdas med hjälp av nedanstående filter.
add_filter('jetpack_photon_pre_args', 'jetpackme_custom_photon_compression' );
function jetpackme_custom_photon_compression( $args ) {
$args['quality'] = 100;
$args['strip'] = 'all';
return $args;
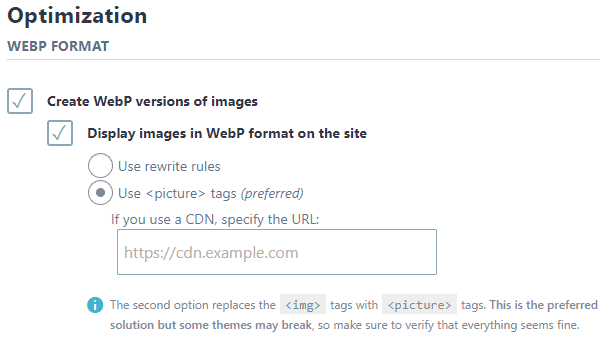
}Servera WebP i NGINX med hjälp av ShortPixel-plugin
ShortPixel-plugin kan hjälpa till med optimering av stora mängder bilder med WebP-konvertering och servering enligt webbläsarstöd. Det bästa är att detta plugin bearbetar bilderna på deras server, så det kommer inte att sakta ner din webbplats.
- Om du använder Apache-webbservern kan du använda .htaccess-rewriting. Det är enkelt.
- När det gäller NGINX kan du använda nedanstående omskrivningsregel med hjälp av värdestödet.
- Det här insticksprogrammet stöds även av WP Rocket cache-plugin.
Lägg först till det här blocket före serverdirektivet:
map $http_accept $webp_suffix {
    default "";
    "~*webp" ".webp";
}
Lägg till det här blocket i serverdirektivet:
location ~* ^(/wp-content/.+)\.(png|jpe?g)$ {
    set $base $1;
    set $webp_uri $base$webp_suffix;
    set $webp_old_uri $base.$2$webp_suffix;
    set $root "<<FULL PATH OF wp-content PARENT>>";
    root $root;
    add_header Vary Accept;
    if ( !-f $root$webp_uri ) {
        add_header X_WebP_SP_Miss $root$webp_uri;
    }
    try_files $webp_uri $webp_old_uri $uri =404;
}
Placeringen är viktig. Lägg därför till den noggrant.
Servera WebP med Imagify
Imagify är ett plugin för bildoptimering som erbjuds av WP Media, folket bakom WP Rocket.
- Installera och aktivera Imagify-plugin
- Ange API-nyckeln
- I inställningar väljer du Bildmarkeringsläge för snabb inställning.
- Alternativt kan du använda omskrivningsregeln med viss serverkonfiguration enligt beskrivningen här. Med Apache kommer .htaccess-koden att läggas till automatiskt, men med NGINX måste du göra det manuellt.
WebP till JPG
WebP kan försämra bildkvaliteten lite i vissa fall. Om du vill återgå från WebP till JPG följer du de här stegen.
- Deaktivera och ta bort WebP-relaterade insticksprogram.
- Ta bort dess relaterade inställningar från konfigurationsfilen (.htaccess)
- Massradera .webp-filer och spara diskutrymme.
find . -type f -name "*.webp*" -deleteOm du vill konvertera en WebP-fil till JPG kan du använda det verktyg som finns på CloudConvert.
Manuell metod utan plugin
Detta avsnitt är endast avsett som information.
Steg 1 : Lägg till WebP-formatet i HTML-dokumentet
Först måste du konvertera alla dina bilder till WebP och använda ditt tidigare bildformat som reserv. Det finns ett plugin som Optimus som kan göra detta automatiskt. Men jag kommer att visa en annan enkel metod för att göra detta manuellt.
- Gå till den här webbplatsen image.online-convert.com/convert-to-webp
- Klistra in din bildlänk och klicka på konvertera. Dina bilder i WebP-format kommer att laddas ner
- Redigera nu den råa HTML-koden där din normala bild visas.
Låt oss säga att HTML-koden för din bild i början såg ut så här
<img src="https://www.gulshankumar.net/wp-content/uploads/2016/09/webplogo.png" alt="gulshan kumar" width="186" height="66" />Du måste omsluta ovanstående kod med lite mer HTML-markering.
<picture>
	<source srcset="https://www.gulshankumar.net/wp-content/uploads/2016/09/webplogo.webp" type="image/webp" />
	<img src="https://www.gulshankumar.net/wp-content/uploads/2016/09/webplogo.png" alt="gulshan kumar" width="186" height="66" />
</picture>
Nu är ditt HTML-dokument redo för bilder i WebP-format.
Steg 2 : Konfigurera serverinställningar
Det är bara ett steg till, du måste konfigurera några inställningar för Apache-webbservern via .htacccess så att webbläsaren och webbservern kan behandla den korrekt som alla andra bilder.
Din webbhotellsserver kanske inte vet från vilken mime-typ de behöver visa bilder i detta format. Därför måste du lägga till rätt mime-typ. Det skulle också vara värt att ställa in expiry-huvudet för caching.
# Serve Images with correct Mime Type
AddType image/webp .webp

# Setup Cache
ExpiresActive On
ExpiresByType image/webp A2592000
Observera följande: Se till att du använder WordPress 5.8 eller senare.
Om du använder WordPress äldre än version 5.8 har du inte stöd för uppladdning av bilder i WebP-format. Du kan få felmeddelandet ”Den här filtypen är tyvärr inte tillåten av säkerhetsskäl” när du laddar upp .webp-bilder.
Så du måste åtgärda problemet genom att lägga till den här koden i temats functions.php Det skulle vara till hjälp om du laddar upp dina bilder direkt från WordPress Dashboard > Media-alternativet.
function webp_upload_mimes( $existing_mimes ) {
	// add webp to the list of mime types
	$existing_mimes['webp'] = 'image/webp';

	// return the array back to the function with our added mime type
	return $existing_mimes;
}
add_filter( 'mime_types', 'webp_upload_mimes' );
Uppfyllt.
Om du behöver hjälp kan du titta på kommentarsfältet eller gå med i mitt forum. Det skulle vara ett nöje att hjälpa dig.
Ytterligare anteckningar
- Om du använder Cloudways kan du inte leverera WebP med .htaccess-rewrite eftersom de använder NGINX specifikt för statiska filer. I det här fallet har du två alternativ. Be hostingteamet att redigera konfigurationsfilen åt dig eller använd JavaScript eller en tredjeparts CDN-baserad lösning som Bunny eller CF.
Ytterligare läsning
Om du är nyfiken på att lära dig mer om WebP kan du läsa de här länkarna.
Tack.
I didn’t try the webp format as of now in WordPress. But now after reading this post I will try to implement it. I will compare the image quality from other formats as well. Thank you for sharing this article.
Have you experienced the WebP format causing problems for seo? is it better to use it as jpg or this way?
Google officially recommends using WebP format images along with JPG as fallback.
How to remove hyperlink for the webp image format?
I guess you want to remove .webp extension from URL. You need to try rewrite approach.
I have a question about ShortPixel method.
I use Plesk panel with NGINX
There is a section called Additional nginx directives
Here you can specify the settings for the nginx reverse proxy server that runs in front of Apache. Your directives will override the server-wide nginx configuration. For example, you may want to change the connection timeout or to pack requests with gzip. Use the same syntax as you use for nginx.conf. For example, if you want to pack all the proxied requests with gzip, add the line: ’gzip_proxied any;’.
https://i.imgur.com/OLWu9bJ.png
can i add codes there i dont know?
map $http_accept $webp_suffix {
default ””;
”~*webp” ”.webp”;
}
location ~* ^(/wp-content/.+).(png|jpe?g)$ {
set $base $1;
set $webp_uri $base$webp_suffix;
set $webp_old_uri $base.$2$webp_suffix;
set $root ”<>”;
root $root;
add_header Vary Accept;
if ( !-f $root$webp_uri ) {
add_header X_WebP_SP_Miss $root$webp_uri;
}
try_files $webp_uri $webp_old_uri $uri =404;
You used these sentences!
before the server directive and inside directive.
I read your Installing WordPress at NGINX topic so
If i try to add these from codes is this right?
map $http_accept $webp_suffix {
default ””;
”~*webp” ”.webp”;
}
server {
listen 80;
return 301 https://$host$request_uri;
}
server {
location ~* ^(/wp-content/.+).(png|jpe?g)$ {
set $base $1;
set $webp_uri $base$webp_suffix;
set $webp_old_uri $base.$2$webp_suffix;
set $root ”<>”;
root $root;
add_header Vary Accept;
if ( !-f $root$webp_uri ) {
add_header X_WebP_SP_Miss $root$webp_uri;
}
try_files $webp_uri $webp_old_uri $uri =404;
}
# Document Root
root /var/www/html;
index index.php index.html index.htm;
server_name .example.com;
client_max_body_size 0;
listen [::]:443 ssl http2 ipv6only=on;
listen 443 ssl http2;
ssl_protocols TLSv1.1 TLSv1.2 TLSv1.3;
ssl_certificate /etc/letsencrypt/live/example.com/fullchain.pem;
ssl_certificate_key /etc/letsencrypt/live/example.com/privkey.pem;
ssl_prefer_server_ciphers on;
ssl_session_cache shared:SSL:20m;
ssl_session_timeout 20m;
ssl_ciphers ’TLS13+AESGCM+AES128:EECDH+AES128’;
error_page 404 /404.html;
error_page 500 502 503 504 /50x.html;
location / {
try_files $uri $uri/ /index.php$is_args$args;
}
location ~* .php$ {
if ($uri !~ ”^/uploads/”) {
fastcgi_pass unix:/run/php/php7.4-fpm.sock;
}
include fastcgi_params;
fastcgi_param SCRIPT_FILENAME $document_root$fastcgi_script_name;
fastcgi_param SCRIPT_NAME $fastcgi_script_name;
}
location = /favicon.ico {
log_not_found off;
access_log off;
}
location = /robots.txt {
log_not_found off;
access_log off;
allow all;
}
location ~* .(css|gif|svg|ico|jpeg|jpg|js|png)$ {
expires 1y;
log_not_found off;
}
# Enable Gzip compression.
gzip on;
# Disable Gzip on IE6.
gzip_disable ”msie6”;
# Allow proxies to cache both compressed and regular version of file.
# Avoids clients that don’t support Gzip outputting gibberish.
gzip_vary on;
# Compress data, even when the client connects through a proxy.
gzip_proxied any;
# The level of compression to apply to files. A higher compression level increases
# CPU usage. Level 5 is a happy medium resulting in roughly 75% compression.
gzip_comp_level 5;
# Compress the following MIME types.
gzip_types
application/atom+xml
application/javascript
application/json
application/ld+json
application/manifest+json
application/rss+xml
application/vnd.geo+json
application/vnd.ms-fontobject
application/x-font-ttf
application/x-web-app-manifest+json
application/xhtml+xml
application/xml
font/opentype
image/bmp
image/svg+xml
image/x-icon
text/cache-manifest
text/css
text/plain
text/vcard
text/vnd.rim.location.xloc
text/vtt
text/x-component
text/x-cross-domain-policy;
}
Is this right?
And what do you think about plesk how i use webp at plesk?
Thanks
Please consult a freelancer. It is out of scope to guide here.
Hi, this is a good article, but
It is better to install the plugin or put the code directly for webp
This way, each image does not create two urls. Does it cause a problem in the SEO site?
Dynamic rewriting from Server side doesn’t create two URLs instead it servers same just by changing response as per browser support.
A plugin is recommended way.
Hi Gulshan. Any free plugin(totally free) for converting jpg to webp format. God Bless you.
First option which is WebP Express.
Thank You! Gulshan
Hey Gulshan Kumar ,
Awesome post with good information. It is my first time commenting on your blog post and am glad to say that you have done a fabulous work and provided helpful & easy tips to serve webp format images in WordPress. I really like and appreciate the way you have explained the things in such a step-by-step process making the concept very clear and easy to understand. while scrolling through your blog post i have noticed that you have also discussed about the major benefits of using webp format image that are also providing good understanding. You have explained all the vital things in an easy language that are true enough to understand and educate the readers.
After going through this complete guide i really gain ideas and am sure that this post is definitely going to help lots of people & especially WordPress-users to sort out their query. Good work and keep sharing more similar post.
Eventually thanks for sharing your knowledge, ideas and such an informative post.
Regards
-Aadarsh
Hi Adarsh, Thanks for your kind words. It really means a lot to me.
Hello. Please check Hiwebp plugin wordpress.
https://wordpress.org/plugins/hiwebp/
Works a treat, thanks!
If you disable copy function then it’s better to not include any code reference. okay?
Thanks for notifying. I have allowed copying function for snippet in this article.
I have tried this method to enable WebP format images on my site, but I am encountering some unknown error. My site showing a low score on google page speed insight.
May I know please which specific method you have tried? Also, please share the screenshot of error. I will try my best to help you.
Why is not wordpress supporting WEBP format by default?Its high time now.
It works great in Chrome and Firefox on the PC/Laptop. BUT, the webp images are not displayed on iPhone (Chrome and Safari)
Safari is not supporting webP. Chrome on iOS is based on Safari, too. So webP won‘t work on iOS at all and you have to serve a fallback image.
Works a treat, thanks!
Hi,
I am not quite clear on where this needs to be inserted. I am looking to Optimise my header image to Webp. Is there a video or screenshot based write up on how I can include this?
Would really appreciate the help
Regards
Shwetha
Hello Gulshan,
Thanks for sharing this article.
I did follow the steps mentioned in here in this format.
But the image is not appearing on Firfox, and IE. Did I miss any thing in here.
Please suggest.
This code no longer works. He’s not loading. I don’t know why it doesn’t work.
It should work fine. Please share your site URL so I can check.
Hi..Just wondering if i need to edit each image tag or is there somewhere in my theme templates this could be done.
Any guidence would be great.
Thanks
Mark
Do I need to edit all the image tags one by one now? Isn’t there another way to do that?
Hi Gulshan,
Even after putting the code snippet in the function.php file.
I still have the same error message when I try to upload webp format. The message is ”sorry this file type is not permitted for security reasons”.
Can you help fix this?
Thanks.
Martin
Hello Martin,
At my end it’s working fine. For a demo, I have sent a quick video on your email. Please check and revert back if I can help with any thing else.
Thanks
I haven’t added anything except the last code from your post in function.php to support Webp format on all of future media uploads. Do I need to add any thing else ? or will it create any kind of issue for users whose browsers are yet unsupported to this format?
anyway keep up the good work 😉
That’s all. Now you can easily upload webp directly in your WordPress Dashboard. No extra things to do. Just feel free to use it with picture HTML tag. So, it will support for all browsers, without any issues. Thanks
The problem with the suggested HTML implementation is that Chrome will make two requests, one for WEBP and another one for JPEG resulting in double requests and increasing the page load time.
Hey dear,
It doesn’t create two requests(as you are saying) instead it automatically serve only one type image format either WebP or JPEG according to HTTP accept type.
I’d suggest please try one more time and look carefully at Network Timeline in the browser console. If you see there are double requests, please email me your HTML code and timeline screenshot also. I’d love to review it. I believe it should work fine for you too.
Thanks & Regards,
Gulshan
I installed the code into the functions.php. And as you said it did allow me to upload in my WP theme. The problem is that the image doesn’t allow cropping so it won’t allow me to use it on the site.