O que é WebP?
O WebP é um formato moderno para servir imagens mais rápido do que nunca. Se estiver a usar WordPress, pode facilmente servir todas as imagens no WebP com algumas afinações básicas.
A maioria dos Browsers suporta WebP
- De acordo com os dados do Caniuse, WebP é actualmente suportado em 94% dos navegadores incluem Apple Safari, Google Chrome, Opera, Mozilla Firefox, Microsoft Edge e navegadores Android.
- Pode ainda servir o JPEG/PNG como recurso para o browser não suportado.
Principais benefícios da utilização de imagem em formato WebP
- Em comparação com o tamanho da imagem normal JPG ou PNG, a mesma dimensão de imagem WebP pode servir em pequenos bytes. Assim, as imagens serão carregadas mais rapidamente. Será especialmente útil para utilizadores móveis.
- Servir imagens de qualidade em poucos bytes, poupa drasticamente largura de banda.
- Mantenha o seu sítio web actualizado com as últimas tendências. Não perca a conversa devido ao problema do carregamento lento do carro de bois.
- WebP é recomendado pelo Google Developers. Ajuda-o a passar “serve images in next-gen format“recomendação do Google PageSpeed Insight.
É assim que se pode servir WebP para um site WordPress.
Utilização de WebP Express Plugin em NGINX
- Instalar & Activar WebP Express, plugin gratuito. Um enorme agradecimento ao Dev.
- Modo de funcionamento: Várias respostas de imagem.
- Âmbito de aplicação: Apenas Upload.
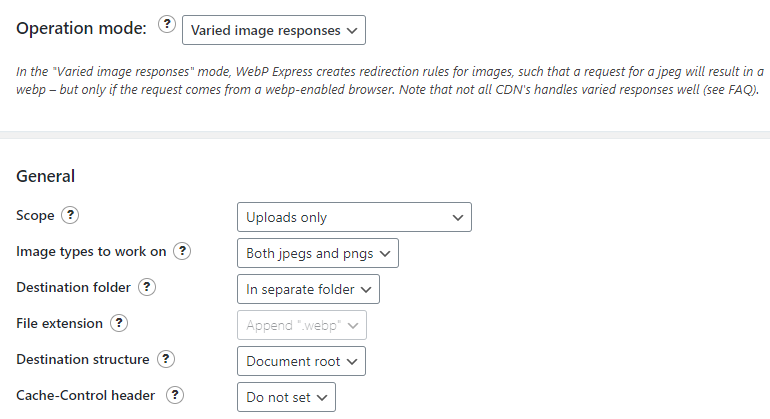
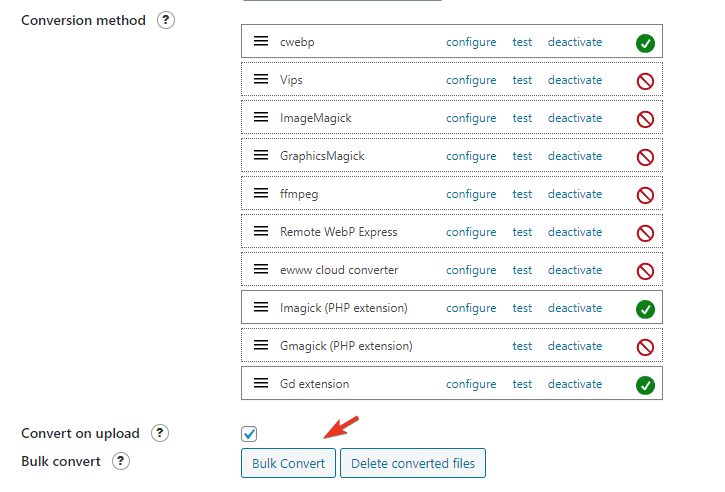
- Executar Bulk Convert
- Para utilizadores Apache, nenhuma configuração requer como .htaccess faz todas as magias.
- O utilizador do servidor NGINX precisa de modificar o ficheiro de configuração com acesso à raiz.
Para melhor organização do código, eu recomendaria colocar primeiro dentro do directório /etc/nginx/ com nome webp.conf e depois incluir no bloco do servidor principal.
Entrar abaixo comando
cd /etc/nginx/ && nano webp.conf- Colar o código abaixo usando o botão direito do rato dentro do nano editor no terminal SSH.
# WebP Express rules
# --------------------
location ~* ^/?wp-content/.*\.(png|jpe?g)$ {
  add_header Vary Accept;
  expires 365d;
  if ($http_accept !~* "webp"){
    break;
  }
  try_files
    /wp-content/webp-express/webp-images/doc-root/$uri.webp
    $uri.webp
    /wp-content/plugins/webp-express/wod/webp-on-demand.php?xsource=x$request_filename&wp-content=wp-content
    ;
}

# Route requests for non-existing webps to the converter
location ~* ^/?wp-content/.*\.(png|jpe?g)\.webp$ {
    try_files
      $uri
      /wp-content/plugins/webp-express/wod/webp-realizer.php?wp-content=wp-content
      ;
}
# ------------------- (WebP Express rules ends here)
- Prima CTRL+O e a tecla Enter para guardar.
Agora visite o bloco do servidor principal.
cd /etc/nginx/sites-available && lsAltamente recomendável: Aprenda Instalando WordPress na NGINX (Em três passos simples)
Edite o seu ficheiro de configuração, e coloque include webp.conf; como se mostra abaixo.
# General
server {
    listen         80;
    server_tokens off;
    return 301 https://$host$request_uri;
}
server {
server_tokens off;
root /var/www/html;
index index.php index.html index.htm;
server_name .gulshankumar.net;
client_max_body_size 0;

    listen [::]:443 ssl http2 ipv6only=on;
    listen 443 ssl http2;
        ssl_protocols TLSv1.1 TLSv1.2 TLSv1.3;
        ssl_certificate /etc/comodo/cert.pem;
        ssl_certificate_key /etc/comodo/private.pem;
        ssl_prefer_server_ciphers on;
        ssl_session_cache   shared:SSL:20m;
        ssl_session_timeout 20m;
        ssl_ciphers 'TLS13+AESGCM+AES128:EECDH+AES128';

error_page 404 /404.html;
error_page 500 502 503 504 /50x.html;


# WebP Express rule goes here

include webp.conf;

# WebP Rule end

location / {
    try_files $uri $uri/ /index.php$is_args$args;
}
Recarregar ou reiniciar o NGINX.
service nginx reloadCoisas a notar
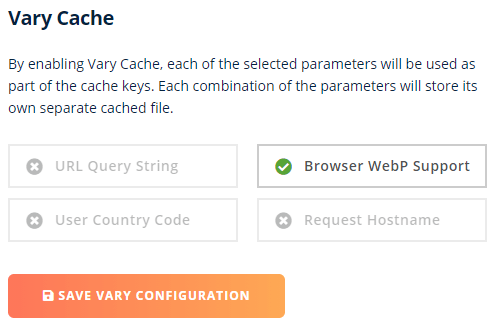
- Se utilizar BunnyCDN, deve activar Vary Cache.
- O Cloudflare não suporta Vary Cache. Tente abaixo uma abordagem alternativa.
Usar WebP usando o CDN Cloudflare (Sem Plugin)
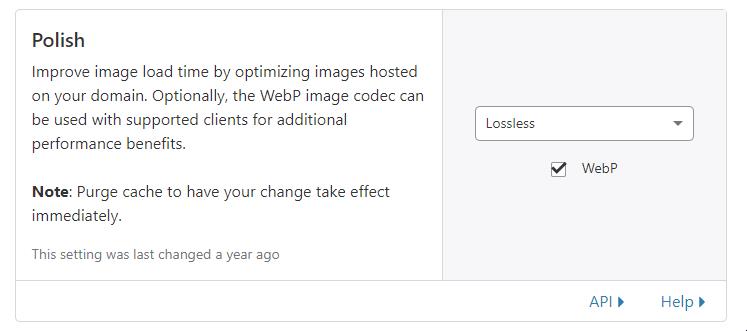
Se for um utilizador Cloudflare Pro pode simplesmente activar o WebP com um clique a partir do separador Speed.
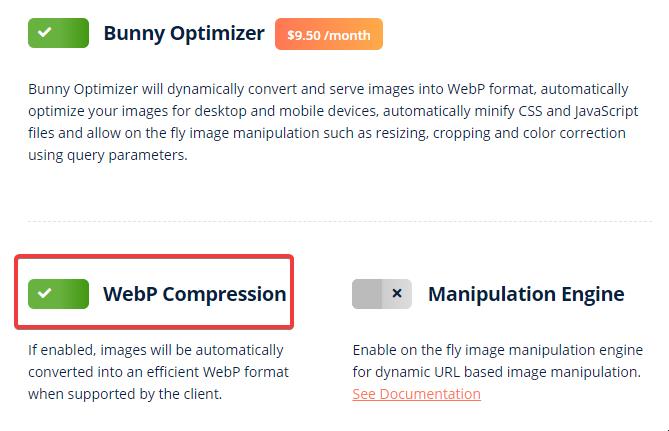
Servir WebP usando BunnyCDN Optimizer (Sem Plugin)
BunnyCDN oferece serviços Optimizer que vêm com solução de serviço On-the-fly WebP. É uma solução de um clique por $9,5/mês de custo adicional.
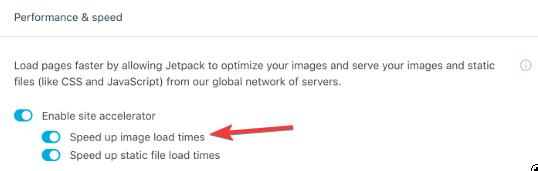
Servir WebP usando JetPack Plugin
- Basta instalar e activar o plugin JetPack
- Activar o Acelerador do Sítio.
Poderá notar uma degradação na qualidade da imagem que pode ser corrigida utilizando o filtro abaixo.
add_filter('jetpack_photon_pre_args', 'jetpackme_custom_photon_compression' );
function jetpackme_custom_photon_compression( $args ) {
    $args['quality'] = 100;
    $args['strip'] = 'all';
    return $args;
}
Servir WebP em NGINX usando ShortPixel Plugin
O plugin ShortPixel pode ajudar na optimização de imagens em massa com conversão WebP e servir como suporte por Browser. A melhor parte deste plugin faz o processamento no seu servidor para não atrasar o seu site.
- Se for utilizador do servidor web Apache pode utilizar a reescrita .htaccess. Isso é simples.
- No caso do NGINX pode utilizar a regra de reescrita abaixo com a ajuda de apoio de alojamento
- Este plugin também é suportado com WP Rocket cache plugin.
Primeiro, acrescentar este bloco antes da directiva do servidor:
map $http_accept $webp_suffix {
    default "";
    "~*webp" ".webp";
}
Acrescentar este bloco no interior da directiva do servidor:
location ~* ^(/wp-content/.+)\.(png|jpe?g)$ {
    set $base $1;
    set $webp_uri $base$webp_suffix;
    set $webp_old_uri $base.$2$webp_suffix;
    set $root "<<FULL PATH OF wp-content PARENT>>";
    root $root;
    add_header Vary Accept;
    if ( !-f $root$webp_uri ) {
        add_header X_WebP_SP_Miss $root$webp_uri;
    }
    try_files $webp_uri $webp_old_uri $uri =404;
}
A colocação é importante. Por isso, acrescente-o cuidadosamente.
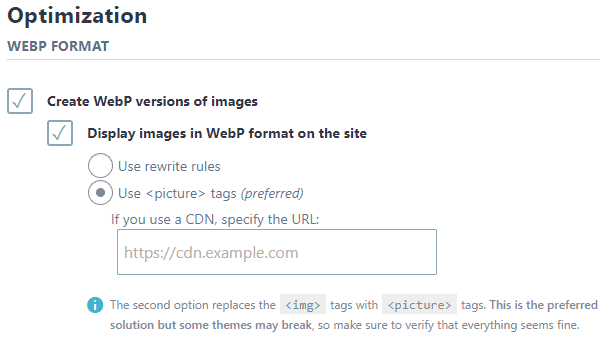
Servir WebP usando Imagify
Imagify é um plugin de Optimização de Imagem oferecido pela WP Media, o pessoal por detrás da WP Rocket.
- Instalar e activar Imagify plugin
- Introduza a chave API
- Em definições, escolher o modo de etiquetas de imagem para uma configuração rápida.
- Em alternativa, pode usar a regra de reescrita com alguma configuração de servidor como descrito aqui. Com o Apache, o processo de adição de código .htaccess será automático mas com o NGINX terá de ser feito manualmente.
WebP para JPG
A WebP pode degradar um pouco a qualidade da imagem em alguns casos. Se quiser reverter da WebP para JPG, basta seguir estes passos.
- Desactivar & Apagar plugin relacionado com WebP.
- Remover a sua configuração relacionada do ficheiro de configuração (.htaccess)
- Apagar ficheiros .webp em massa e guardar espaço em disco.
find . -type f -name "*.webp*" -deleteSe quiser converter o ficheiro WebP para JPG, pode utilizar a ferramenta disponível no CloudConvert.
Método manual sem Plugin
Esta secção é apenas para fins informativos.
Passo 1 : Adição do formato WebP em documento HTML
Primeiro, precisa de converter todas as suas imagens em WebP e juntamente com o seu formato de imagem anterior como o fall-back. Há alguns plugin como Optimus que podem fazer este trabalho automaticamente. Mas, mostrarei um outro fácil de fazer isto manualmente.
- Ir a este sítio web image.online-convert.com/convert-to-webp
- Cole o seu link de imagem e clique em converter. As suas imagens em formato WebP serão descarregadas
- Agora edite o código HTML em bruto onde a sua Imagem normal está a aparecer.
Digamos que, no início, o código HTML da sua imagem era assim
<img src="https://www.gulshankumar.net/wp-content/uploads/2016/09/webplogo.png" alt="gulshan kumar" width="186" height="66" />É necessário embrulhar acima do código com um pouco mais de marcação HTML.
<picture>
	<source srcset="https://www.gulshankumar.net/wp-content/uploads/2016/09/webplogo.webp" type="image/webp" />
	<img src="https://www.gulshankumar.net/wp-content/uploads/2016/09/webplogo.png" alt="gulshan kumar" width="186" height="66" />
</picture>
Agora, o seu documento HTML está pronto para servir imagens em formato WebP.
Passo 2 : Configurar as configurações do servidor
Apenas mais um passo, é necessário configurar algumas definições do Apache Webserver via .htacccess para que o browser e o servidor web possam tratá-lo correctamente como todas as outras imagens.
O seu servidor Web Hosting pode não saber a partir de que tipo de mímica é que este tipo de imagens de formato necessitam para servir. Por isso, devem adicionar o tipo de mímica adequado. Além disso, valeria a pena configurar o cabeçalho de validade para caching.
# Serve Images with correct Mime Type
AddType image/webp .webp

# Setup Cache
ExpiresActive On
ExpiresByType image/webp A2592000Atenção: Certifique-se de que está a utilizar o WordPress 5.8 ou posterior.
Se estiver a utilizar WordPress mais antigo que a versão 5.8 não suporta o carregamento de imagem em formato WebP. Pode receber erro “Este tipo de ficheiro infelizmente não é permitido por razões de segurança “ enquanto carrega imagens em formato .webp.
Portanto, deve corrigir este problema adicionando este código nas suas funções temáticas.php Seria útil no caso de carregar as suas imagens directamente do Painel WordPress > opção Media.
function webp_upload_mimes( $existing_mimes ) {
	// add webp to the list of mime types
	$existing_mimes['webp'] = 'image/webp';

	// return the array back to the function with our added mime type
	return $existing_mimes;
}
add_filter( 'mime_types', 'webp_upload_mimes' );
Feito.
Se precisar de ajuda, por favor consulte a secção comentário ou junte-se ao meu fórum. Terei todo o prazer em ajudá-lo.
Notas adicionais
- If you’re a Cloudways user, you cannot deliver WebP with .htaccess rewrite because they use NGINX specifically for static files. In this case you have two choices. Ask hosting team to edit configuration file for you or use JavaScript or 3rd-party CDN based solution such as Bunny or CF.
Leituras adicionais
Se estiver curioso para saber mais sobre o WebP, por favor consulte estes links.
Obrigado.
I didn’t try the webp format as of now in WordPress. But now after reading this post I will try to implement it. I will compare the image quality from other formats as well. Thank you for sharing this article.
Have you experienced the WebP format causing problems for seo? is it better to use it as jpg or this way?
Google officially recommends using WebP format images along with JPG as fallback.
How to remove hyperlink for the webp image format?
I guess you want to remove .webp extension from URL. You need to try rewrite approach.
I have a question about ShortPixel method.
I use Plesk panel with NGINX
There is a section called Additional nginx directives
Here you can specify the settings for the nginx reverse proxy server that runs in front of Apache. Your directives will override the server-wide nginx configuration. For example, you may want to change the connection timeout or to pack requests with gzip. Use the same syntax as you use for nginx.conf. For example, if you want to pack all the proxied requests with gzip, add the line: ‘gzip_proxied any;’.
https://i.imgur.com/OLWu9bJ.png
can i add codes there i dont know?
map $http_accept $webp_suffix {
default “”;
“~*webp” “.webp”;
}
location ~* ^(/wp-content/.+).(png|jpe?g)$ {
set $base $1;
set $webp_uri $base$webp_suffix;
set $webp_old_uri $base.$2$webp_suffix;
set $root “<>”;
root $root;
add_header Vary Accept;
if ( !-f $root$webp_uri ) {
add_header X_WebP_SP_Miss $root$webp_uri;
}
try_files $webp_uri $webp_old_uri $uri =404;
You used these sentences!
before the server directive and inside directive.
I read your Installing WordPress at NGINX topic so
If i try to add these from codes is this right?
map $http_accept $webp_suffix {
default “”;
“~*webp” “.webp”;
}
server {
listen 80;
return 301 https://$host$request_uri;
}
server {
location ~* ^(/wp-content/.+).(png|jpe?g)$ {
set $base $1;
set $webp_uri $base$webp_suffix;
set $webp_old_uri $base.$2$webp_suffix;
set $root “<>”;
root $root;
add_header Vary Accept;
if ( !-f $root$webp_uri ) {
add_header X_WebP_SP_Miss $root$webp_uri;
}
try_files $webp_uri $webp_old_uri $uri =404;
}
# Document Root
root /var/www/html;
index index.php index.html index.htm;
server_name .example.com;
client_max_body_size 0;
listen [::]:443 ssl http2 ipv6only=on;
listen 443 ssl http2;
ssl_protocols TLSv1.1 TLSv1.2 TLSv1.3;
ssl_certificate /etc/letsencrypt/live/example.com/fullchain.pem;
ssl_certificate_key /etc/letsencrypt/live/example.com/privkey.pem;
ssl_prefer_server_ciphers on;
ssl_session_cache shared:SSL:20m;
ssl_session_timeout 20m;
ssl_ciphers ‘TLS13+AESGCM+AES128:EECDH+AES128′;
error_page 404 /404.html;
error_page 500 502 503 504 /50x.html;
location / {
try_files $uri $uri/ /index.php$is_args$args;
}
location ~* .php$ {
if ($uri !~ “^/uploads/”) {
fastcgi_pass unix:/run/php/php7.4-fpm.sock;
}
include fastcgi_params;
fastcgi_param SCRIPT_FILENAME $document_root$fastcgi_script_name;
fastcgi_param SCRIPT_NAME $fastcgi_script_name;
}
location = /favicon.ico {
log_not_found off;
access_log off;
}
location = /robots.txt {
log_not_found off;
access_log off;
allow all;
}
location ~* .(css|gif|svg|ico|jpeg|jpg|js|png)$ {
expires 1y;
log_not_found off;
}
# Enable Gzip compression.
gzip on;
# Disable Gzip on IE6.
gzip_disable “msie6”;
# Allow proxies to cache both compressed and regular version of file.
# Avoids clients that don’t support Gzip outputting gibberish.
gzip_vary on;
# Compress data, even when the client connects through a proxy.
gzip_proxied any;
# The level of compression to apply to files. A higher compression level increases
# CPU usage. Level 5 is a happy medium resulting in roughly 75% compression.
gzip_comp_level 5;
# Compress the following MIME types.
gzip_types
application/atom+xml
application/javascript
application/json
application/ld+json
application/manifest+json
application/rss+xml
application/vnd.geo+json
application/vnd.ms-fontobject
application/x-font-ttf
application/x-web-app-manifest+json
application/xhtml+xml
application/xml
font/opentype
image/bmp
image/svg+xml
image/x-icon
text/cache-manifest
text/css
text/plain
text/vcard
text/vnd.rim.location.xloc
text/vtt
text/x-component
text/x-cross-domain-policy;
}
Is this right?
And what do you think about plesk how i use webp at plesk?
Thanks
Please consult a freelancer. It is out of scope to guide here.
Hi, this is a good article, but
It is better to install the plugin or put the code directly for webp
This way, each image does not create two urls. Does it cause a problem in the SEO site?
Dynamic rewriting from Server side doesn’t create two URLs instead it servers same just by changing response as per browser support.
A plugin is recommended way.
Hi Gulshan. Any free plugin(totally free) for converting jpg to webp format. God Bless you.
First option which is WebP Express.
Thank You! Gulshan
Hey Gulshan Kumar ,
Awesome post with good information. It is my first time commenting on your blog post and am glad to say that you have done a fabulous work and provided helpful & easy tips to serve webp format images in WordPress. I really like and appreciate the way you have explained the things in such a step-by-step process making the concept very clear and easy to understand. while scrolling through your blog post i have noticed that you have also discussed about the major benefits of using webp format image that are also providing good understanding. You have explained all the vital things in an easy language that are true enough to understand and educate the readers.
After going through this complete guide i really gain ideas and am sure that this post is definitely going to help lots of people & especially WordPress-users to sort out their query. Good work and keep sharing more similar post.
Eventually thanks for sharing your knowledge, ideas and such an informative post.
Regards
-Aadarsh
Hi Adarsh, Thanks for your kind words. It really means a lot to me.
Hello. Please check Hiwebp plugin wordpress.
https://wordpress.org/plugins/hiwebp/
Works a treat, thanks!
If you disable copy function then it’s better to not include any code reference. okay?
Thanks for notifying. I have allowed copying function for snippet in this article.
I have tried this method to enable WebP format images on my site, but I am encountering some unknown error. My site showing a low score on google page speed insight.
May I know please which specific method you have tried? Also, please share the screenshot of error. I will try my best to help you.
Why is not wordpress supporting WEBP format by default?Its high time now.
It works great in Chrome and Firefox on the PC/Laptop. BUT, the webp images are not displayed on iPhone (Chrome and Safari)
Safari is not supporting webP. Chrome on iOS is based on Safari, too. So webP won‘t work on iOS at all and you have to serve a fallback image.
Works a treat, thanks!
Hi,
I am not quite clear on where this needs to be inserted. I am looking to Optimise my header image to Webp. Is there a video or screenshot based write up on how I can include this?
Would really appreciate the help
Regards
Shwetha
Hello Gulshan,
Thanks for sharing this article.
I did follow the steps mentioned in here in this format.
But the image is not appearing on Firfox, and IE. Did I miss any thing in here.
Please suggest.
This code no longer works. He’s not loading. I don’t know why it doesn’t work.
It should work fine. Please share your site URL so I can check.
Hi..Just wondering if i need to edit each image tag or is there somewhere in my theme templates this could be done.
Any guidence would be great.
Thanks
Mark
Do I need to edit all the image tags one by one now? Isn’t there another way to do that?
Hi Gulshan,
Even after putting the code snippet in the function.php file.
I still have the same error message when I try to upload webp format. The message is “sorry this file type is not permitted for security reasons”.
Can you help fix this?
Thanks.
Martin
Hello Martin,
At my end it’s working fine. For a demo, I have sent a quick video on your email. Please check and revert back if I can help with any thing else.
Thanks
I haven’t added anything except the last code from your post in function.php to support Webp format on all of future media uploads. Do I need to add any thing else ? or will it create any kind of issue for users whose browsers are yet unsupported to this format?
anyway keep up the good work 😉
That’s all. Now you can easily upload webp directly in your WordPress Dashboard. No extra things to do. Just feel free to use it with picture HTML tag. So, it will support for all browsers, without any issues. Thanks
The problem with the suggested HTML implementation is that Chrome will make two requests, one for WEBP and another one for JPEG resulting in double requests and increasing the page load time.
Hey dear,
It doesn’t create two requests(as you are saying) instead it automatically serve only one type image format either WebP or JPEG according to HTTP accept type.
I’d suggest please try one more time and look carefully at Network Timeline in the browser console. If you see there are double requests, please email me your HTML code and timeline screenshot also. I’d love to review it. I believe it should work fine for you too.
Thanks & Regards,
Gulshan
I installed the code into the functions.php. And as you said it did allow me to upload in my WP theme. The problem is that the image doesn’t allow cropping so it won’t allow me to use it on the site.