WebPとは?
WebPは、画像をより速く提供するための最新のフォーマットです。WordPressを使用している場合、いくつかの基本的な調整を行えば、すべての画像を簡単にWebPで提供することができます。
について知る
ほとんどのブラウザがWebPをサポート
- Caniuseのデータによると、WebPは現在、Apple Safari、Google Chrome、Opera、Mozilla Firefox、Microsoft Edge、Androidブラウザを含む97%のブラウザでサポートされています。
- 未対応のブラウザのフォールバックとしてJPEG/PNGを提供することは可能です。
WebP形式の画像を使用する主な利点
- 通常のJPGやPNG画像のサイズと比較すると、同じ寸法の画像であれば、WebPは小さなバイトで提供することができます。したがって、画像の読み込みが速くなります。これは、特にモバイルユーザーにとって便利です。
- 少ないバイト数で高品質な画像を提供し、帯域を大幅に節約します。
- あなたのウェブサイトを最新のトレンドに更新してください。ブルカートの遅い読み込みの問題で会話を失わないようにしましょう。
- WebPは、Googleの開発者が推奨しています。Google PageSpeed Insightの「次世代フォーマットで画像を提供する」推奨をクリアするために役立ちます。
WordPressサイトにWebPを配信する方法はこの通りです。
NGINXでWebP Expressプラグインを使用する
- 無料のプラグイン、WebP Expressをインストール&有効化する。Dev.S.A.に大感謝です。
- Operation mode: Varied image responses.
- Scope: Upload only.

- Run Bulk Convert

- Apacheの場合は、.htaccessが全ての魔法を使うので、設定は必要ありません。
- NGINXサーバーのユーザーは、root権限で設定ファイルを変更する必要があります。
コードの整理のために、まず /etc/nginx/ ディレクトリに webp.conf という名前で配置し、その後メインサーバーのブロックにインクルードすることをお勧めします。
以下のコマンドを入力します。
cd /etc/nginx/ && nano webp.conf- SSH端末のnanoエディタ上で右クリックし、以下のコードを貼り付けてください。
# WebP Express rules
# --------------------
location ~* ^/?wp-content/.*\.(png|jpe?g)$ {
  add_header Vary Accept;
  expires 365d;
  if ($http_accept !~* "webp"){
    break;
  }
  try_files
    /wp-content/webp-express/webp-images/doc-root/$uri.webp
    $uri.webp
    /wp-content/plugins/webp-express/wod/webp-on-demand.php?xsource=x$request_filename&wp-content=wp-content
    ;
}

# Route requests for non-existing webps to the converter
location ~* ^/?wp-content/.*\.(png|jpe?g)\.webp$ {
    try_files
      $uri
      /wp-content/plugins/webp-express/wod/webp-realizer.php?wp-content=wp-content
      ;
}
# ------------------- (WebP Express rules ends here)
- CTRL+OキーとEnterキーを押して保存します。
次に、メインサーバーブロックにアクセスします。
cd /etc/nginx/sites-available && ls強くお勧めします。NGINXでWordPressのインストールを学ぶ(簡単3ステップ)
設定ファイルを編集し、以下のようにinclude webp.confを記述してください。
# General
server {
    listen         80;
    server_tokens off;
    return 301 https://$host$request_uri;
}
server {
server_tokens off;
root /var/www/html;
index index.php index.html index.htm;
server_name .gulshankumar.net;
client_max_body_size 0;

    listen [::]:443 ssl http2 ipv6only=on;
    listen 443 ssl http2;
        ssl_protocols TLSv1.1 TLSv1.2 TLSv1.3;
        ssl_certificate /etc/comodo/cert.pem;
        ssl_certificate_key /etc/comodo/private.pem;
        ssl_prefer_server_ciphers on;
        ssl_session_cache   shared:SSL:20m;
        ssl_session_timeout 20m;
        ssl_ciphers 'TLS13+AESGCM+AES128:EECDH+AES128';

error_page 404 /404.html;
error_page 500 502 503 504 /50x.html;


# WebP Express rule goes here

include webp.conf;

# WebP Rule end

location / {
    try_files $uri $uri/ /index.php$is_args$args;
}
NGINXを再読み込みまたは再起動します。
service nginx reload注意事項
- BunnyCDNを使用する場合は、Vary Cacheを有効にする必要があります。
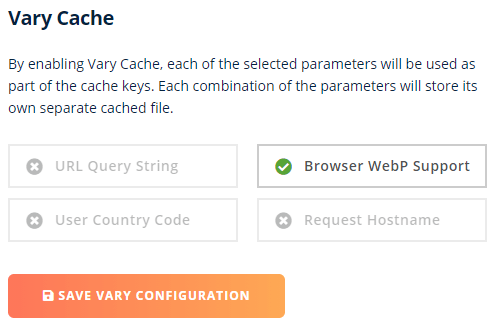
- CloudflareはVary Cacheをサポートしていません。以下の代替方法をお試しください。
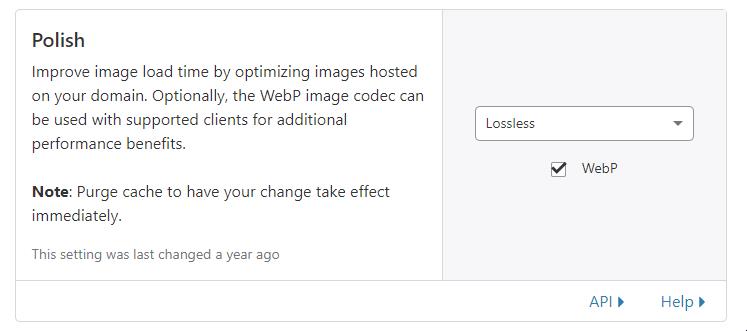
Cloudflare CDNを利用したWebPの利用(プラグインなし)
Cloudflare Proユーザーであれば、Speed TabからワンクリックでWebPを有効にすることができます。
BunnyCDN Optimizerを使ったWebP配信(プラグインなし)
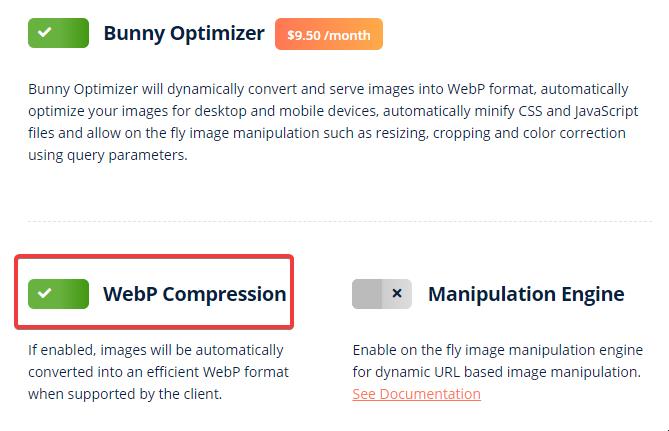
BunnyCDNは、オンザフライのWebP配信ソリューションが付属しているオプティマイザーサービスを提供しています。これは、$ 9.5/月の追加コストでワンクリックソリューションです。
JetPackプラグインを使ったWebPの配信
- JetPackプラグインをインストールし、有効化するだけです。
- Site Acceleratorを有効にします。

画質が低下することがありますが、下記のフィルターを使用することで改善されます。
add_filter('jetpack_photon_pre_args', 'jetpackme_custom_photon_compression' );
function jetpackme_custom_photon_compression( $args ) {
    $args['quality'] = 100;
    $args['strip'] = 'all';
    return $args;
}
ShortPixel プラグインを使用して NGINX で WebP を配信する
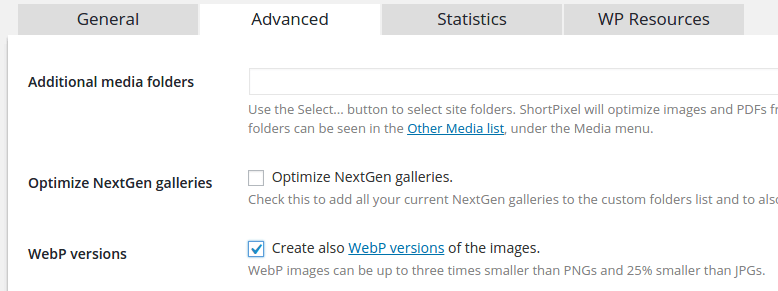
ShortPixelプラグインは、WebP変換とブラウザのサポートごとに提供することで一括画像の最適化に役立つことができます. このプラグインの最良の部分は、それがあなたのサイトを遅くすることはありませんので、彼らのサーバー上で処理を行います.
- Apacheのウェブサーバーユーザーなら、.htaccessの書き換えを利用することができます。これは簡単です。
- NGINXの場合、ホスティングサポートの助けを借りて、以下の書き換えルールを使用することができます。
- このプラグインは、WP Rocket cacheプラグインにも対応しています。
まず、serverディレクティブの前にこのブロックを追加します。
map $http_accept $webp_suffix {
    default "";
    "~*webp" ".webp";
}
nginxを再起動します。
service nginx restartそれから。このブロックをserverディレクティブの中に追加します。
location ~* ^(/wp-content/.+)\.(png|jpe?g)$ {
    set $base $1;
    set $webp_uri $base$webp_suffix;
    set $webp_old_uri $base.$2$webp_suffix;
    set $root "<<FULL PATH OF wp-content PARENT>>";
    root $root;
    add_header Vary Accept;
    if ( !-f $root$webp_uri ) {
        add_header X_WebP_SP_Miss $root$webp_uri;
    }
    try_files $webp_uri $webp_old_uri $uri =404;
}
配置が重要です。だから、慎重に追加してください。
Imagifyを使ったWebPの配信
Imagifyは、WP Rocketの開発元であるWP Mediaが提供する画像最適化プラグインです。
- Imagifyプラグインをインストールし、有効化します。
- APIキーの入力
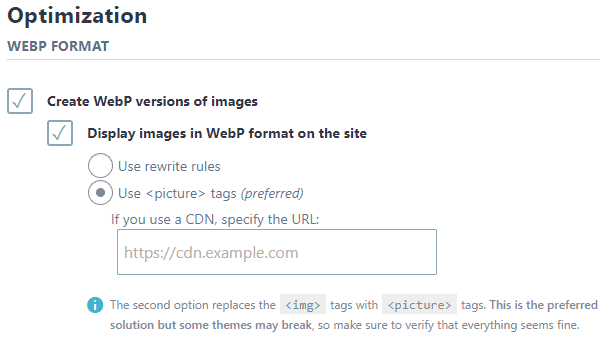
- 設定で、ピクチャータグモードを選ぶと、素早く設定できます。
- また、こちらのページで紹介されているように、サーバーの設定によって書き換えルールを使用することも可能です。Apacheの場合、.htaccessのコード追加作業は自動で行われますが、NGINXの場合は手動で行う必要があります。
WebPからJPGへ
WebPは、場合によっては画質を少し劣化させることがあります。WebPからJPGに戻したい場合は、以下の手順で簡単に戻せます。
- WebP関連プラグインを無効化&削除する。
- 設定ファイル(.htaccess)から関連する設定を削除する。
- .webpファイルを一括削除し、ディスクスペースを節約します。
find . -type f -name "*.webp*" -deleteWebPファイルをJPGに変換したい場合は、CloudConvertで利用可能なツールを使用することができます。
プラグインを使用しない手動方式
このセクションは、情報提供のみを目的としています。
ステップ1:HTML文書にWebP形式を追加する
まず、すべての画像をWebPに変換し、フォールバックとして以前の画像形式と一緒に変換する必要があります。この仕事を自動的に行うことができますOptimusのようないくつかのプラグインがあります. しかし、私は手動でこれを行う別の簡単な方法を紹介します。
- このサイトへ image.online-convert.com/convert-to-webp
- 画像のリンクを貼り付け、変換をクリックします。WebP形式の画像がダウンロードされます。
- 次に、通常の画像が表示されている HTML コードを編集してください。
例えば、最初にあなたの画像のHTMLコードは次のようなものだったとしましょう。
<img src="https://www.gulshankumar.net/wp-content/uploads/2016/09/webplogo.png" alt="gulshan kumar" width="186" height="66" />上記のコードをもう少しHTMLマークアップで包む必要があります。
<picture>
	<source srcset="https://www.gulshankumar.net/wp-content/uploads/2016/09/webplogo.webp" type="image/webp" />
	<img src="https://www.gulshankumar.net/wp-content/uploads/2016/09/webplogo.png" alt="gulshan kumar" width="186" height="66" />
</picture>これで、HTML文書がWebP形式の画像を提供する準備が整いました。
Step 2 : Configure server settings
もう1つ、ブラウザとウェブサーバが他の画像と同様に正しく扱えるように、.htaccessを介してApacheウェブサーバの設定を行う必要があります。
あなたのウェブホスティングサーバーは、この種のフォーマットの画像がどのMIMEタイプから提供される必要があるかを知らないかもしれません。だから、適切なMIMEタイプを追加する必要があります。また、それはキャッシュのための有効期限ヘッダを設定する価値があるだろう。
# Serve Images with correct Mime Type
AddType image/webp .webp

# Setup Cache
ExpiresActive On
ExpiresByType image/webp A2592000注意:WordPress 5.8以降を使用していることを確認してください。
WordPress のバージョン 5.8 より古いバージョンを使用している場合、WebP 形式の画像のアップロードはサポートされていません。.webp画像をアップロードする際に、「このファイル形式はセキュリティ上の理由で残念ながら許可されていません」というエラーが表示される場合があります。
そこで、テーマのfunctions.phpにこのコードを追加して、この問題を解決する必要があります。 あなたがWordPressダッシュボード>メディアオプションから直接画像をアップロードする場合、それは場合に便利でしょう。
function webp_upload_mimes( $existing_mimes ) {
	// add webp to the list of mime types
	$existing_mimes['webp'] = 'image/webp';

	// return the array back to the function with our added mime type
	return $existing_mimes;
}
add_filter( 'mime_types', 'webp_upload_mimes' );
完了.
何かお困りのことがあれば、コメント欄を見ていただくか、私のフォーラムにご参加ください。喜んでお手伝いさせていただきます。
補足説明
- Cloudwaysのユーザーの場合、静的ファイル専用のNGINXを使用しているため、.htaccess rewriteでWebPを配信することはできません。この場合、2つの選択肢があります。ホスティングチームに設定ファイルの編集を依頼するか、JavaScriptまたはBunnyやCFなどのサードパーティのCDNベースのソリューションを使用することです。
その他の資料
WebPについてもっと知りたい方は、以下のリンクをご参照ください。
感謝.
I didn’t try the webp format as of now in WordPress. But now after reading this post I will try to implement it. I will compare the image quality from other formats as well. Thank you for sharing this article.
Have you experienced the WebP format causing problems for seo? is it better to use it as jpg or this way?
Google officially recommends using WebP format images along with JPG as fallback.
How to remove hyperlink for the webp image format?
I guess you want to remove .webp extension from URL. You need to try rewrite approach.
I have a question about ShortPixel method.
I use Plesk panel with NGINX
There is a section called Additional nginx directives
Here you can specify the settings for the nginx reverse proxy server that runs in front of Apache. Your directives will override the server-wide nginx configuration. For example, you may want to change the connection timeout or to pack requests with gzip. Use the same syntax as you use for nginx.conf. For example, if you want to pack all the proxied requests with gzip, add the line: ‘gzip_proxied any;’.
https://i.imgur.com/OLWu9bJ.png
can i add codes there i dont know?
map $http_accept $webp_suffix {
default “”;
“~*webp” “.webp”;
}
location ~* ^(/wp-content/.+).(png|jpe?g)$ {
set $base $1;
set $webp_uri $base$webp_suffix;
set $webp_old_uri $base.$2$webp_suffix;
set $root “<>”;
root $root;
add_header Vary Accept;
if ( !-f $root$webp_uri ) {
add_header X_WebP_SP_Miss $root$webp_uri;
}
try_files $webp_uri $webp_old_uri $uri =404;
You used these sentences!
before the server directive and inside directive.
I read your Installing WordPress at NGINX topic so
If i try to add these from codes is this right?
map $http_accept $webp_suffix {
default “”;
“~*webp” “.webp”;
}
server {
listen 80;
return 301 https://$host$request_uri;
}
server {
location ~* ^(/wp-content/.+).(png|jpe?g)$ {
set $base $1;
set $webp_uri $base$webp_suffix;
set $webp_old_uri $base.$2$webp_suffix;
set $root “<>”;
root $root;
add_header Vary Accept;
if ( !-f $root$webp_uri ) {
add_header X_WebP_SP_Miss $root$webp_uri;
}
try_files $webp_uri $webp_old_uri $uri =404;
}
# Document Root
root /var/www/html;
index index.php index.html index.htm;
server_name .example.com;
client_max_body_size 0;
listen [::]:443 ssl http2 ipv6only=on;
listen 443 ssl http2;
ssl_protocols TLSv1.1 TLSv1.2 TLSv1.3;
ssl_certificate /etc/letsencrypt/live/example.com/fullchain.pem;
ssl_certificate_key /etc/letsencrypt/live/example.com/privkey.pem;
ssl_prefer_server_ciphers on;
ssl_session_cache shared:SSL:20m;
ssl_session_timeout 20m;
ssl_ciphers ‘TLS13+AESGCM+AES128:EECDH+AES128’;
error_page 404 /404.html;
error_page 500 502 503 504 /50x.html;
location / {
try_files $uri $uri/ /index.php$is_args$args;
}
location ~* .php$ {
if ($uri !~ “^/uploads/”) {
fastcgi_pass unix:/run/php/php7.4-fpm.sock;
}
include fastcgi_params;
fastcgi_param SCRIPT_FILENAME $document_root$fastcgi_script_name;
fastcgi_param SCRIPT_NAME $fastcgi_script_name;
}
location = /favicon.ico {
log_not_found off;
access_log off;
}
location = /robots.txt {
log_not_found off;
access_log off;
allow all;
}
location ~* .(css|gif|svg|ico|jpeg|jpg|js|png)$ {
expires 1y;
log_not_found off;
}
# Enable Gzip compression.
gzip on;
# Disable Gzip on IE6.
gzip_disable “msie6”;
# Allow proxies to cache both compressed and regular version of file.
# Avoids clients that don’t support Gzip outputting gibberish.
gzip_vary on;
# Compress data, even when the client connects through a proxy.
gzip_proxied any;
# The level of compression to apply to files. A higher compression level increases
# CPU usage. Level 5 is a happy medium resulting in roughly 75% compression.
gzip_comp_level 5;
# Compress the following MIME types.
gzip_types
application/atom+xml
application/javascript
application/json
application/ld+json
application/manifest+json
application/rss+xml
application/vnd.geo+json
application/vnd.ms-fontobject
application/x-font-ttf
application/x-web-app-manifest+json
application/xhtml+xml
application/xml
font/opentype
image/bmp
image/svg+xml
image/x-icon
text/cache-manifest
text/css
text/plain
text/vcard
text/vnd.rim.location.xloc
text/vtt
text/x-component
text/x-cross-domain-policy;
}
Is this right?
And what do you think about plesk how i use webp at plesk?
Thanks
Please consult a freelancer. It is out of scope to guide here.
Hi, this is a good article, but
It is better to install the plugin or put the code directly for webp
This way, each image does not create two urls. Does it cause a problem in the SEO site?
Dynamic rewriting from Server side doesn’t create two URLs instead it servers same just by changing response as per browser support.
A plugin is recommended way.
Hi Gulshan. Any free plugin(totally free) for converting jpg to webp format. God Bless you.
First option which is WebP Express.
Thank You! Gulshan
Hey Gulshan Kumar ,
Awesome post with good information. It is my first time commenting on your blog post and am glad to say that you have done a fabulous work and provided helpful & easy tips to serve webp format images in WordPress. I really like and appreciate the way you have explained the things in such a step-by-step process making the concept very clear and easy to understand. while scrolling through your blog post i have noticed that you have also discussed about the major benefits of using webp format image that are also providing good understanding. You have explained all the vital things in an easy language that are true enough to understand and educate the readers.
After going through this complete guide i really gain ideas and am sure that this post is definitely going to help lots of people & especially WordPress-users to sort out their query. Good work and keep sharing more similar post.
Eventually thanks for sharing your knowledge, ideas and such an informative post.
Regards
-Aadarsh
Hi Adarsh, Thanks for your kind words. It really means a lot to me.
Hello. Please check Hiwebp plugin wordpress.
https://wordpress.org/plugins/hiwebp/
Works a treat, thanks!
If you disable copy function then it’s better to not include any code reference. okay?
Thanks for notifying. I have allowed copying function for snippet in this article.
I have tried this method to enable WebP format images on my site, but I am encountering some unknown error. My site showing a low score on google page speed insight.
May I know please which specific method you have tried? Also, please share the screenshot of error. I will try my best to help you.
Why is not wordpress supporting WEBP format by default?Its high time now.
It works great in Chrome and Firefox on the PC/Laptop. BUT, the webp images are not displayed on iPhone (Chrome and Safari)
Safari is not supporting webP. Chrome on iOS is based on Safari, too. So webP won‘t work on iOS at all and you have to serve a fallback image.
Works a treat, thanks!
Hi,
I am not quite clear on where this needs to be inserted. I am looking to Optimise my header image to Webp. Is there a video or screenshot based write up on how I can include this?
Would really appreciate the help
Regards
Shwetha
Hello Gulshan,
Thanks for sharing this article.
I did follow the steps mentioned in here in this format.
But the image is not appearing on Firfox, and IE. Did I miss any thing in here.
Please suggest.
This code no longer works. He’s not loading. I don’t know why it doesn’t work.
It should work fine. Please share your site URL so I can check.
Hi..Just wondering if i need to edit each image tag or is there somewhere in my theme templates this could be done.
Any guidence would be great.
Thanks
Mark
Do I need to edit all the image tags one by one now? Isn’t there another way to do that?
Hi Gulshan,
Even after putting the code snippet in the function.php file.
I still have the same error message when I try to upload webp format. The message is “sorry this file type is not permitted for security reasons”.
Can you help fix this?
Thanks.
Martin
Hello Martin,
At my end it’s working fine. For a demo, I have sent a quick video on your email. Please check and revert back if I can help with any thing else.
Thanks
I haven’t added anything except the last code from your post in function.php to support Webp format on all of future media uploads. Do I need to add any thing else ? or will it create any kind of issue for users whose browsers are yet unsupported to this format?
anyway keep up the good work 😉
That’s all. Now you can easily upload webp directly in your WordPress Dashboard. No extra things to do. Just feel free to use it with picture HTML tag. So, it will support for all browsers, without any issues. Thanks
The problem with the suggested HTML implementation is that Chrome will make two requests, one for WEBP and another one for JPEG resulting in double requests and increasing the page load time.
Hey dear,
It doesn’t create two requests(as you are saying) instead it automatically serve only one type image format either WebP or JPEG according to HTTP accept type.
I’d suggest please try one more time and look carefully at Network Timeline in the browser console. If you see there are double requests, please email me your HTML code and timeline screenshot also. I’d love to review it. I believe it should work fine for you too.
Thanks & Regards,
Gulshan
I installed the code into the functions.php. And as you said it did allow me to upload in my WP theme. The problem is that the image doesn’t allow cropping so it won’t allow me to use it on the site.