V tomto článku se seznámíte s postupem ruční instalace WordPressu na server Ubuntu 22.04 pomocí NGINX, MariaDB a PHP 8.2. Tyto zásobníky vám poskytnou výkonnou a efektivní platformu pro provoz vašich webových stránek WordPress s úžasnou rychlostí.
Postupujte podle těchto 3 kroků a podívejte se na video. Potřebujete pomoc? kontaktujte mě. 😊
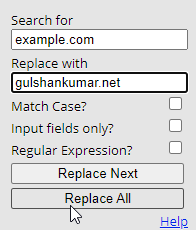
Než se pustíte do práce, přinášíme vám krátkou radu.. Use Search and Replace Extension hromadně změnit example.com na vlastní doménu na této webové stránce.
Tip pro uživatele prohlížeče Google Chrome, který šetří čas.
Část A: Zachovat službu Cloudflare Nameservers active
Budeme používat Cloudflare DNS pro získání Let’s Encrypt Wildcard SSL certifikát. Tento krok dokončete jako první, abyste si mohli vychutnat migraci bez prostojů.
Zkontrolujte aktuální stav Nameservers
- Vyhledejte své aktivní jmenné servery na adrese https://www.whatsmydns.net/#NS/example.com.
- Pokud vidíte, že používáte výchozí NS svého předchozího hostingu nebo registrátora domény, musíte jej nahradit službou Cloudflare.
- Naučte se how to use Cloudflare DNS
Část B: Get a Ubuntu Server 22.04 LTS Server ready

1. Zaregistrujte se Vultr získat 100 dolarů kreditů zdarma (Platnost 30 dní)
Jako člověk, který vyzkoušel mnoho společností poskytujících cloudové servery, mám zkušenost, že se společností Vultr nemůžete udělat chybu. Tito lidé jsou upřímní a starostliví, pokud jde o podporu a služby.
⚡ Výkon
- NVME / SSD
- 3.7 GHz CPU
- Up to 5Gbps Network Speed
- Datacenter in America, Europe, Asia, Austraillia
- IPV6 ready
💡 Funkce
- Beginner-Friendly Dashboard
- One-click to Snapshot
- Automtatic Backup (Paid)
- Free Cloud Firewall
- DDoS protection (Paid)
- 100% KVM Virtualization
⚙ Podpora
- PayPal/Card
- 24/7 Ticket Support
- Documentation
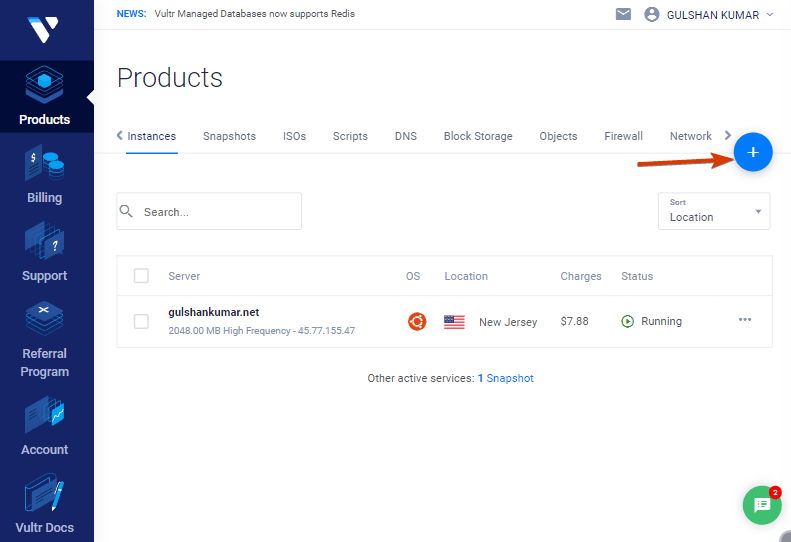
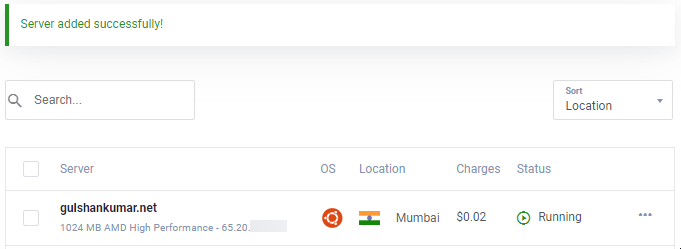
2. Vytvořit new VPS Server
Jednoduše klikněte na tlačítko plus a začněte.
3. Vyberte typ serveru
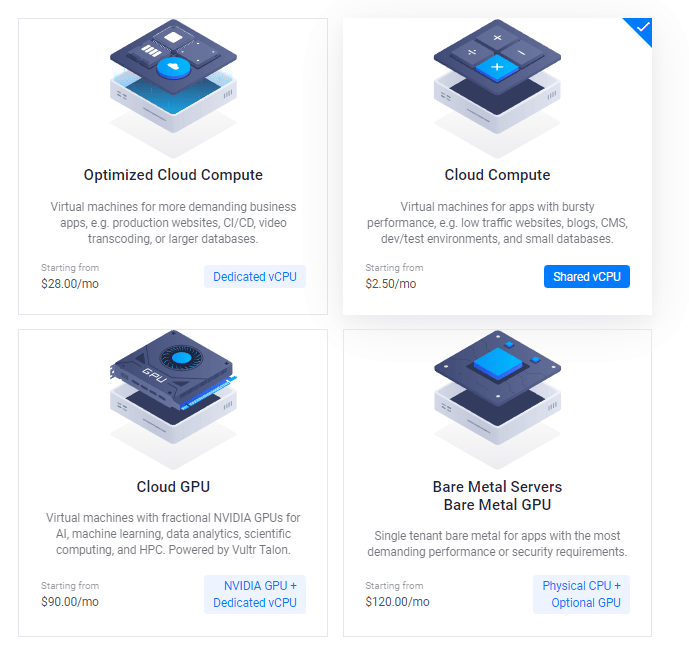
Poté můžete v části Technologie procesoru a úložiště vybrat možnost AMD High Performance nebo Intel High Frequency. Má nejrychlejší procesor a disk NVMe vůbec. Pokud je rozpočet nižší, zvolte plán Regular s procesorem Intel, ve kterém získáte disk SSD.

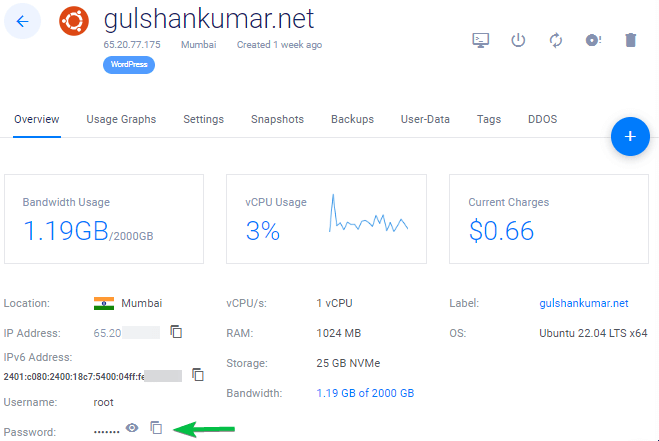
4. Vyberte si Server Location
Vyberte si umístění serveru, které je blízko cílové skupiny.
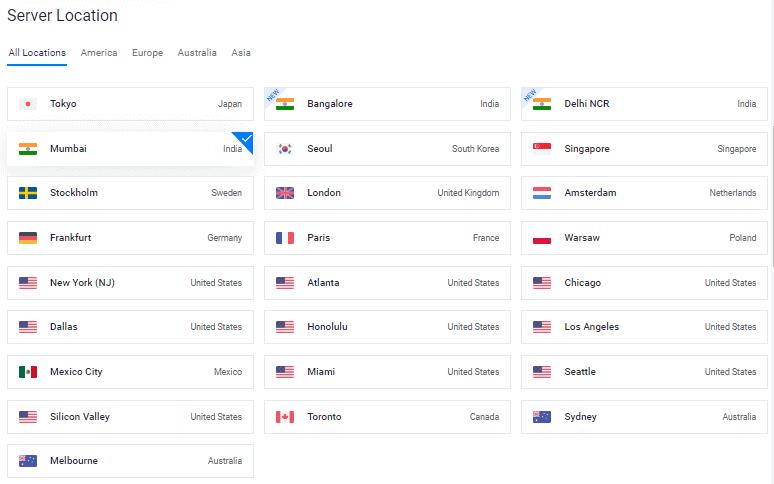
Pokud například 99 % vašeho provozu pochází z Evropy, vyberte nejbližší region – Německo.
5. Vyberte Ubuntu 22.04 x64 OS
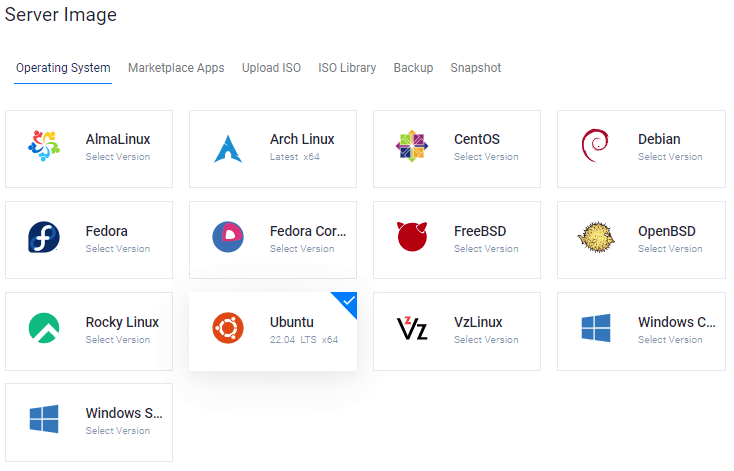
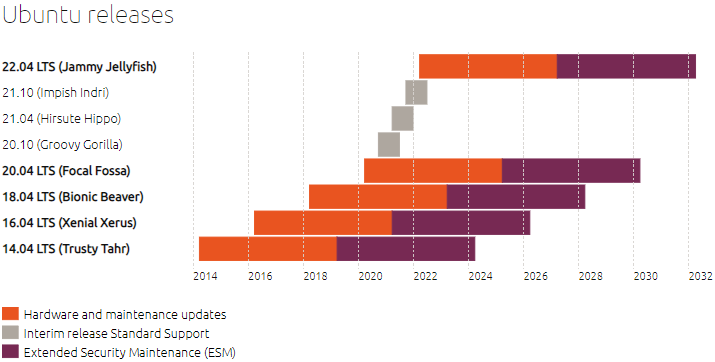
V současné době jsou Ubuntu 20.04×64 i 22.04×64 verze LTS (Long Term Supported) kompatibilní s většinou balíčků, které budeme instalovat.
6. Vyberte si Server Size
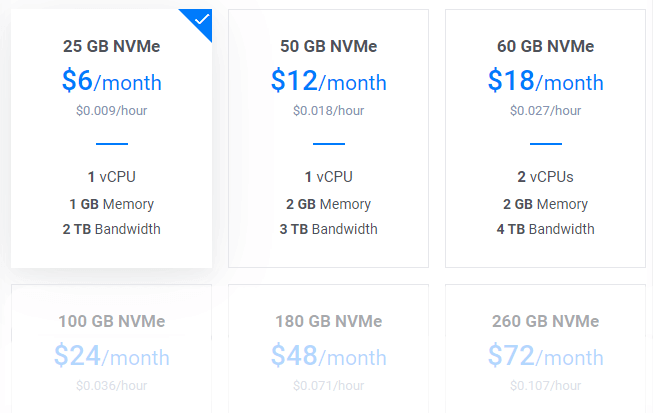
Plán 6 dolarů za měsíc by byl skvělým výchozím bodem pro nový blog. Kdykoli můžete upgradovat podle potřeby.
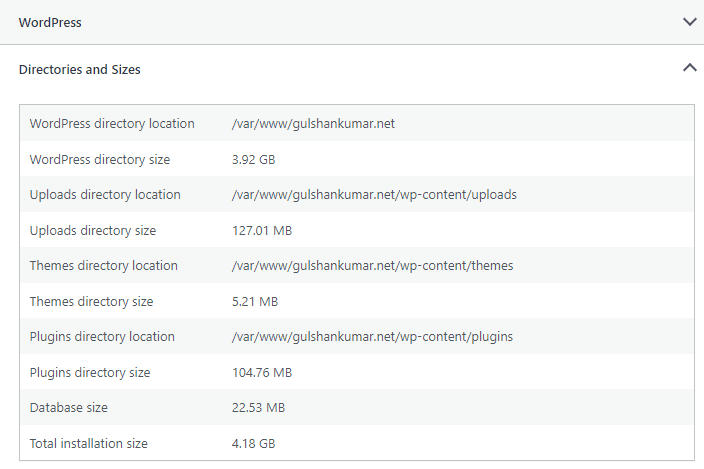
Tip: Pokud migrujete, zkontrolujte celkovou velikost instalace v položce Site health info.
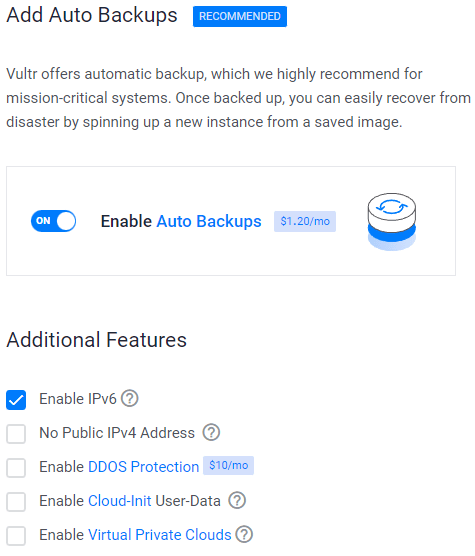
7. Povolit IPV6, Backup
8. Add a SSH key
Jedná se o doporučený, volitelný krok pro enhanced security.
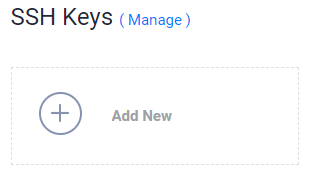
- Klikněte na Add New tlačítko pro přidání nového SSH key odeslat své 🔒Public key.
- Generujte klíče pomocí níže uvedené metody podle vašeho operačního systému.

- Stáhnout PuTTy application.
- Vyhledávání PuTTygen in the Start menu
- Klikněte na tlačítko Generovat a najeďte kurzorem myši
- Copy Public key and provide to Vultr
- Enter key passphrase
- Save 🔑Private Key at the safest location.
- To lze použít pro přihlášení k SSH nebo SFTP.

- Run:
ssh-keygen -t rsa. For a more secure 4096-bit key, run:ssh-keygen -t rsa -b 4096 - Press enter when asked where you want to save the key (this will use the default location).
- Enter a passphrase for your key.
- Run
cat ~/.ssh/id_rsa.pub– this will give you the key in the proper format to paste into the control panel. - Ujistěte se, že zálohujetethe
~/.ssh/id_rsafile. V případě ztráty ji nelze obnovit.
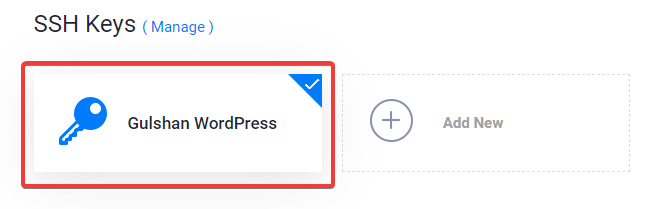
Vyberte si svůj SSH key
Po provedení těchto kroků připojíte public key to your new Instance. Poté se budete moci přihlásit do SSH using Plain Text password and SSH key both.
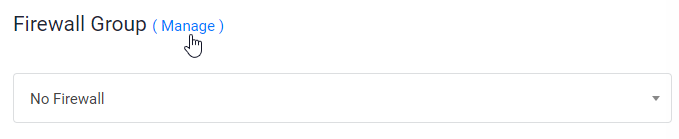
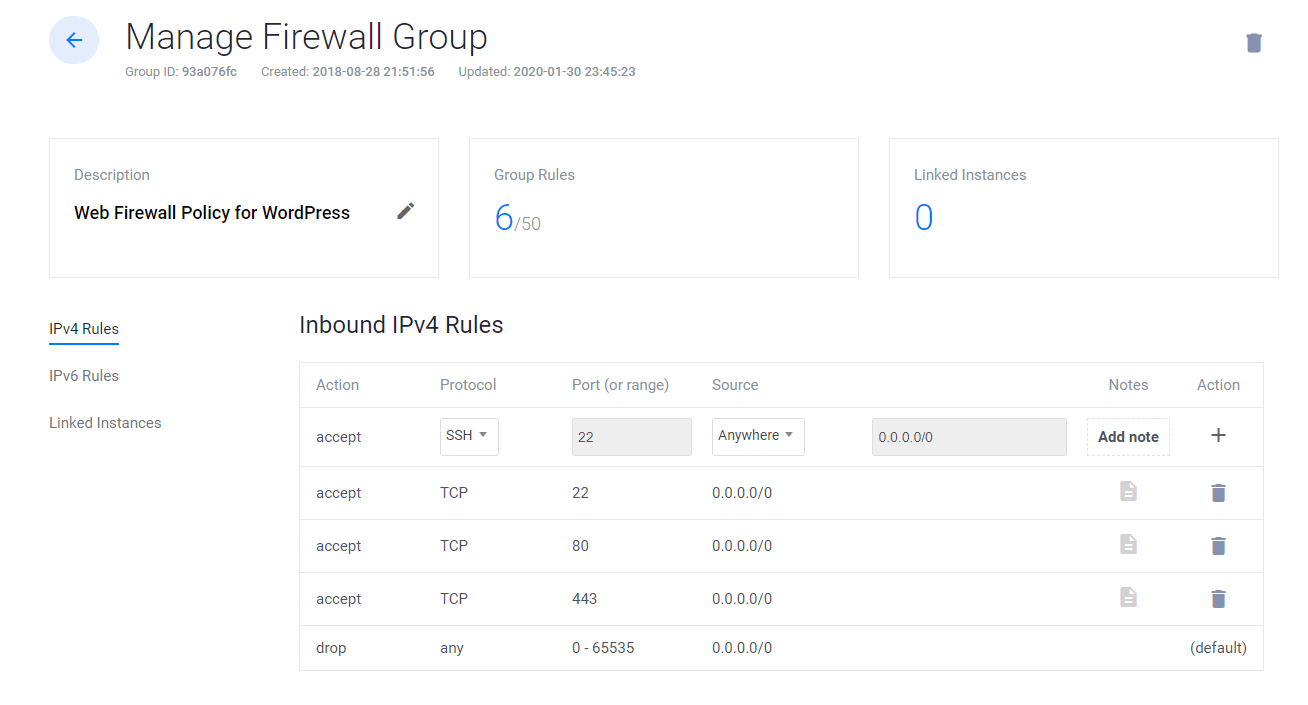
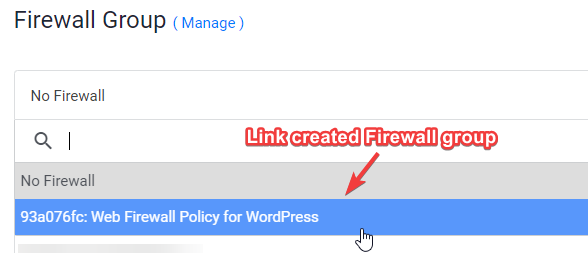
9. Link Web Firewall rule na Server Instance
- Klikněte na Spravovat a vytvořit nový Firewall Group.
- Allow TCP port 22 for SSH. 80 for HTTP and 443 HTTPS for IPV4 and IPV6 rules both.
- Po dokončení propojte Firewall skupiny k vaší instanci.
10. Enter Hostname a label click Deploy Now
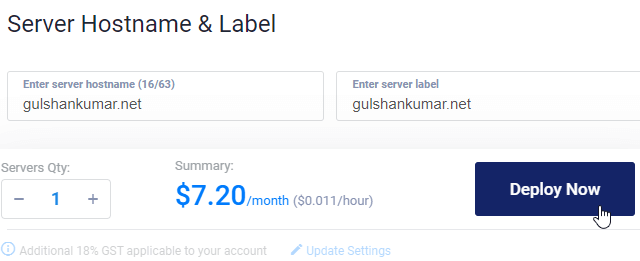
Now, you will see installing in the progress
11. Go to New Instance page
Copy IP address, username and password. Your default port is 22.
12. Disable Password Login
Z bezpečnostních důvodů se doporučuje zakázat ověřování heslem a povolit pouze ověřování pomocí klíče.
- Úprava konfigurace file
nano /etc/ssh/sshd_config - Find (CTRL + W) and search
PasswordAuthentication - Change value from yes to no
- To save type, CTRL + O
- Restart the SSH service using command
sudo service ssh restart
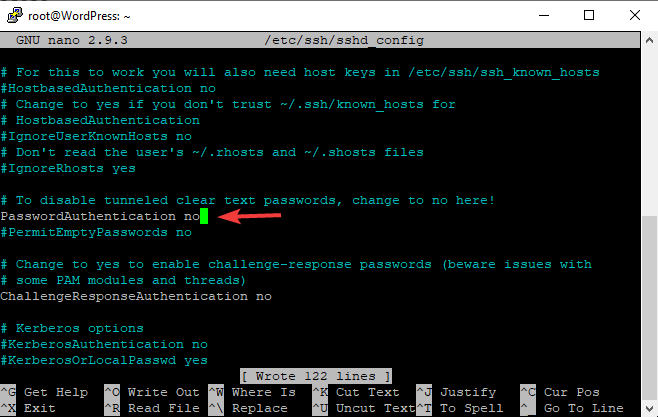
Od příště můžete používat SSH pouze prostřednictvím klíče, jak je ukázáno ve videu.
V systému Linux nebo Mac použijte Terminál s tímto příkazem
ssh [email protected] -p 22 -i id_rsa
Krok 13. Disable UFW
Když nasadíte novou instanci ve VULTR, je v ní povolen UFW (Uncomplicated Firewall), který udržuje všechny porty zablokované kromě portu SSH 22. To může v prohlížeči vrátit chybu ERR_CONNECTION_REFUSED. Chcete-li to napravit, doporučuji mít UFW vypnutý.
ufw disableDost vysvětlení pro základní věci. Nyní urychlím původní proces nasazení WordPressu na stoh LEMP.
Část C. Deploy WordPress on LEMP Stack
1. Update repositories
Type below command and press enter key
sudo -sapt update && apt upgrade -y && apt dist-upgrade && apt autoclean && apt autoremove -y && rebootnebo
wget -qO update https://dl.gulshankumar.net/update && chmod +x updatePříště vždy použijte níže uvedený příkaz pro aktualizaci.
./update2. Install MariaDB with security
Znovu se přihlaste a zadejte následující příkaz
sudo apt install mariadb-server -y && sudo mysql_secure_installationOdpovězte na níže uvedené otázky
- Enter current password for root (enter for none): Stiskněte klávesu Enter
- Switch to unix_socket authentication [Y/n]: n
- Set root password? [Y/n]: Stiskněte klávesu Enter.
- New password: Zadejte heslo, které můžete vygenerovat pomocí služby Dashlane. Klikněte pravým tlačítkem myši na možnost vložit.
- Re-enter new password: Znovu zadejte heslo.
Po úspěšném nastavení hesla se zobrazí
Password updated successfully!
Reloading privilege tables..
... Success!
Dále je třeba odpovědět na následující otázky.
- Remove anonymous users? [Y/n]: Stiskněte klávesu Enter.
- Disallow root login remotely? [Y/n]: Stiskněte klávesu Enter.
- Remove test database and access to it? [Y/n]: Stiskněte klávesu Enter.
- Reload privilege tables now? [Y/n]: Stiskněte klávesu Enter.
3. Create a new Database for WordPress
Login to MySQL, stiskněte klávesu enter, když se zobrazí výzva k zadání hesla.
mysql -u root -pVytvoření nového Database, and Grant Privileges to use its user with password. Zde je uložen WordPress all post, pages, themes, plugin, etc information.
create database wordpress;
grant all on wordpress.* to gulshan@localhost identified by '5pY8CKJxDRJEGQNkX7';
flush privileges;
exit;
Where your …
database is wordpress
username is gulshan
password is 5pY8CKJxDRJEGQNkX7
Tip: Zvažte použití jedinečného přihlašovacího pověření
4. Instalace PHP 8.2, NGINX and set Permission
sudo add-apt-repository ppa:ondrej/php -y && apt update && apt install php8.2-fpm php8.2-common php8.2-mysql php8.2-xml php8.2-xmlrpc php8.2-curl php8.2-gd php8.2-imagick php8.2-cli php8.2-dev php8.2-imap php8.2-mbstring php8.2-soap php8.2-zip php8.2-bcmath -y && sed -i 's/;cgi.fix_pathinfo=1/cgi.fix_pathinfo=0/g' /etc/php/8.2/fpm/php.ini && service php8.2-fpm restart && apt install nginx -y && chown -R www-data:www-data /var/www/ && chmod -R 755 /var/wwwTweak PHP Configuration
Většina efektních témat a zásuvných modulů vyžaduje pro svůj běh špičkovou konfiguraci PHP. Proto bychom měli provést tyto změny.
sed -i 's/memory_limit = 128M/memory_limit = 512M/g' /etc/php/8.2/fpm/php.ini
sed -i 's/post_max_size = 8M/post_max_size = 128M/g' /etc/php/8.2/fpm/php.ini
sed -i 's/max_file_uploads = 20/max_file_uploads = 30/g' /etc/php/8.2/fpm/php.ini
sed -i 's/max_execution_time = 30/max_execution_time = 900/g' /etc/php/8.2/fpm/php.ini
sed -i 's/max_input_time = 60/max_input_time = 3000/g' /etc/php/8.2/fpm/php.ini
sed -i 's/upload_max_filesize = 2M/upload_max_filesize = 128M/g' /etc/php/8.2/fpm/php.ini
service php8.2-fpm restart
5. Install Wildcard Let’s Encrypt SSL Certificate
Vytvořit cloudflare.ini file inside /root/.secrets/ directory.
mkdir -p /root/.secrets/ && cd /root/.secrets/ && nano cloudflare.iniPřidejte níže uvedený kód a uložte jej pomocí CTRL+O a ukončit pomocí CTRL+X
dns_cloudflare_email = "[email protected]"
dns_cloudflare_api_key = "XXXXXXXXXXXXXXXXX"
Najděte svůj e-mail Cloudflare a Global API key at „My Profile“ > API Tokens > Global API Key
chmod 0400 /root/.secrets/cloudflare.iniInstall Certbot and DNS Authenticator podle OS and HTTP web server
snap install --beta --classic certbot
snap set certbot trust-plugin-with-root=ok
snap install --beta certbot-dns-cloudflare
snap connect certbot:plugin certbot-dns-cloudflare
Get Wildcard SSL Certificate
certbot certonly --dns-cloudflare --dns-cloudflare-credentials /root/.secrets/cloudflare.ini -d example.com,*.example.com --preferred-challenges dns-01Set Automatic Renewal using Cron Job
- Type
crontab -e - Type 1 for nano editor
- Enter below command and save
0 0 * * * /etc/init.d/nginx reload >/dev/null 2>&1Test renewal
certbot renew --dry-run6. Configure Nginx Server Block
To je důležité, pokud potřebujete nakonfigurovat doménu, jak má NGINX zpracovávat požadavky HTTP.
Delete default server blocks.
rm /etc/nginx/sites-available/default && rm /etc/nginx/sites-enabled/defaultCreate a new server block
cd /etc/nginx/sites-available/
nano example.com- Replace
example.comwith own domain - Enter below code and Press ctrl+o to save and ctrl+x to exit.
General
server {
    listen         80;
    return 301 https://$host$request_uri;
}
server {
# Document Root
root /var/www/html;
index index.php index.html index.htm;
server_name .example.com;
client_max_body_size 0;

    listen [::]:443 ssl http2 ipv6only=on;
    listen 443 ssl http2;
        ssl_protocols TLSv1.1 TLSv1.2 TLSv1.3;
        ssl_certificate /etc/letsencrypt/live/example.com/fullchain.pem;
        ssl_certificate_key /etc/letsencrypt/live/example.com/privkey.pem;
        ssl_prefer_server_ciphers on;
        ssl_session_cache   shared:SSL:20m;
        ssl_session_timeout 20m;
        ssl_ciphers 'TLS13+AESGCM+AES128:EECDH+AES128';


error_page 404 /404.html;
error_page 500 502 503 504 /50x.html;

# Block XMLRPC
location = /xmlrpc.php {
    deny all;
}

location / {
    try_files $uri $uri/ /index.php$is_args$args;
}

location ~* \.php$ {
if ($uri !~ "^/uploads/") {
fastcgi_pass unix:/run/php/php8.2-fpm.sock;
}
include fastcgi_params;
fastcgi_param SCRIPT_FILENAME $document_root$fastcgi_script_name;
fastcgi_param SCRIPT_NAME $fastcgi_script_name;
}
location = /favicon.ico {
log_not_found off;
access_log off;
}

location = /robots.txt {
log_not_found off;
access_log off;
allow all;
}

location ~* .(css|gif|svg|ico|woff2|eot|jpeg|webp|jpg|js|png)$ {
expires 1y;
log_not_found off;
}

# Enable Gzip compression.
gzip on;

# Disable Gzip on IE6.
gzip_disable "msie6";

# Allow proxies to cache both compressed and regular version of file.
# Avoids clients that don't support Gzip outputting gibberish.
gzip_vary on;

# Compress data, even when the client connects through a proxy.
gzip_proxied any;

# The level of compression to apply to files. A higher compression level increases
# CPU usage. Level 5 is a happy medium resulting in roughly 75% compression.
gzip_comp_level 5;

# Compress the following MIME types.
gzip_types
 application/atom+xml
 application/javascript
 application/json
 application/ld+json
 application/manifest+json
 application/rss+xml
 application/vnd.geo+json
 application/vnd.ms-fontobject
 application/x-font-ttf
 application/x-web-app-manifest+json
 application/xhtml+xml
 application/xml
 font/opentype
 image/bmp
 image/svg+xml
 image/x-icon
 text/cache-manifest
 text/css
 text/plain
 text/vcard
 text/vnd.rim.location.xloc
 text/vtt
 text/x-component
 text/x-cross-domain-policy;
}
For cache Enabler
server {
    listen         80;
    return 301 https://$host$request_uri;
}
server {
# Document Root
root /var/www/html;
index index.php index.html index.htm;
server_name .example.com;
client_max_body_size 0;

    listen [::]:443 ssl http2 ipv6only=on;
    listen 443 ssl http2;
        ssl_protocols TLSv1.1 TLSv1.2 TLSv1.3;
        ssl_certificate /etc/letsencrypt/live/example.com/fullchain.pem;
        ssl_certificate_key /etc/letsencrypt/live/example.com/privkey.pem;
        ssl_prefer_server_ciphers on;
        ssl_session_cache   shared:SSL:20m;
        ssl_session_timeout 20m;
        ssl_ciphers 'TLS13+AESGCM+AES128:EECDH+AES128';


error_page 404 /404.html;
error_page 500 502 503 504 /50x.html;


# Block XMLRPC
location = /xmlrpc.php {
    deny all;
}


# Rules for Cache Enabler Plugin - Static File Serving

    set $cache_uri $request_uri;

    # bypass cache if POST requests or URLs with a query string
    if ($request_method = POST) {
    set $cache_uri 'nullcache';
    }

    if ($query_string != '') {
    set $cache_uri 'nullcache';
    }

    # bypass cache if URLs containing the following strings
    if ($request_uri ~* '(/wp-admin/|/xmlrpc.php|/wp-(app|cron|login|register|mail).php|wp-.*.php|/feed/|index.php|wp-comments-popup.php|wp-links-opml.php|wp-locations.php|sitemap(index)?.xml|[a-z0-9-]+-sitemap([0-9]+)?.xml)') {
    set $cache_uri 'nullcache';
    }

    # bypass cache if cookies contain the following strings
    if ($http_cookie ~* '(wp-postpass|wordpress_logged_in|comment_author)_') {
    set $cache_uri 'nullcache';
    }

    # custom installation subdirectory
    set $custom_subdir '';

    # default HTML file
    set $cache_enabler_uri '${custom_subdir}/wp-content/cache/cache-enabler/${http_host}${cache_uri}${scheme}-index.html';

    # WebP HTML file
    if ($http_accept ~* 'image/webp') {
    set $cache_enabler_uri '${custom_subdir}/wp-content/cache/cache-enabler/${http_host}${cache_uri}${scheme}-index-webp.html';
    }

    location / {
    gzip_static on; # this directive is not required but recommended
    try_files $cache_enabler_uri $uri $uri/ $custom_subdir/index.php?$args;
    }

location ~* \.php$ {
if ($uri !~ "^/uploads/") {
fastcgi_pass unix:/run/php/php8.2-fpm.sock;
}
include fastcgi_params;
fastcgi_param SCRIPT_FILENAME $document_root$fastcgi_script_name;
fastcgi_param SCRIPT_NAME $fastcgi_script_name;
}
location = /favicon.ico {
log_not_found off;
access_log off;
}

location = /robots.txt {
log_not_found off;
access_log off;
allow all;
}

location ~* .(css|gif|svg|ico|jpeg|webp|woff2|eot|jpg|js|png)$ {
expires 1y;
log_not_found off;
}

# Enable Gzip compression.
gzip on;

# Disable Gzip on IE6.
gzip_disable "msie6";

# Allow proxies to cache both compressed and regular version of file.
# Avoids clients that don't support Gzip outputting gibberish.
gzip_vary on;

# Compress data, even when the client connects through a proxy.
gzip_proxied any;

# The level of compression to apply to files. A higher compression level increases
# CPU usage. Level 5 is a happy medium resulting in roughly 75% compression.
gzip_comp_level 5;

# Compress the following MIME types.
gzip_types
 application/atom+xml
 application/javascript
 application/json
 application/ld+json
 application/manifest+json
 application/rss+xml
 application/vnd.geo+json
 application/vnd.ms-fontobject
 application/x-font-ttf
 application/x-web-app-manifest+json
 application/xhtml+xml
 application/xml
 font/opentype
 image/bmp
 image/svg+xml
 image/x-icon
 text/cache-manifest
 text/css
 text/plain
 text/vcard
 text/vnd.rim.location.xloc
 text/vtt
 text/x-component
 text/x-cross-domain-policy;
}- Je třeba nainstalovat Cache Enabler plugin využívat výhod keše.
FastCGI
Pokud chcete použít FastCGI Cache, implementujte místo toho níže uvedený blok serveru.
# NGINX Cache path
fastcgi_cache_path /var/run/nginx-cache levels=1:2 keys_zone=WORDPRESS:100m inactive=6h;
fastcgi_cache_key "$scheme$request_method$host$request_uri";
fastcgi_cache_use_stale error timeout invalid_header http_500;
fastcgi_ignore_headers Cache-Control Expires Set-Cookie;

server {
    listen         80;
    return 301 https://$host$request_uri;
}
server {
root /var/www/html;
index index.php index.html index.htm;
server_name .example.com;
client_max_body_size 0;

    listen [::]:443 ssl http2 ipv6only=on;
    listen 443 ssl http2;
        ssl_protocols TLSv1.1 TLSv1.2 TLSv1.3;
        ssl_certificate /etc/letsencrypt/live/example.com/fullchain.pem;
        ssl_certificate_key /etc/letsencrypt/live/example.com/privkey.pem;
        ssl_prefer_server_ciphers on;
        ssl_session_cache   shared:SSL:20m;
        ssl_session_timeout 20m;
        ssl_ciphers 'TLS13+AESGCM+AES128:EECDH+AES128';

error_page 404 /404.html;
error_page 500 502 503 504 /50x.html;


set $skip_cache 0;
    if ($request_method = POST) {set $skip_cache 1;}
    if ($request_uri ~* "/wp-admin/|/xmlrpc.php|/wp-.*.php|index.php|sitemap") {set $skip_cache 1;}
    if ($http_cookie ~* "comment_author|wordpress_[a-f0-9]+|wp-postpass|wordpress_no_cache|wordpress_logged_in") {set $skip_cache 1;}
    if ($query_string = "unapproved*") {set $skip_cache 1;}
    if ($cookie_woocommerce_items_in_cart = "1" ){ set $skip_cache 1;}
    if ($request_uri ~* "/(cart|checkout|my-account)/*$") {set $skip_cache 1;}

# Block XMLRPC
location = /xmlrpc.php {
    deny all;
}

location / {
try_files $uri $uri/ /index.php$is_args$args;
}

location ~* \.php$ {

 if ($uri !~ "^/uploads/") {
        fastcgi_pass unix:/run/php/php8.2-fpm.sock;
        }

        try_files                       $uri =404;
        include                         /etc/nginx/fastcgi_params;
        fastcgi_param                   SCRIPT_FILENAME $document_root$fastcgi_script_name;
        fastcgi_pass                    unix:/run/php/php8.2-fpm.sock;
        fastcgi_index                   index.php;
                fastcgi_cache_bypass $skip_cache;
                fastcgi_no_cache $skip_cache;
                fastcgi_cache WORDPRESS;
                fastcgi_cache_valid 200 30d;
                fastcgi_cache_valid 301 302 303 307 308 404 410 451 1m;
                add_header X-Cache $upstream_cache_status;

}

location = /favicon.ico {
log_not_found off;
access_log off;
}

location = /robots.txt {
log_not_found off;
access_log off;
allow all;
}

location ~* .(css|gif|ico|svg|webp|woff2|eot|jpeg|jpg|js|png)$ {
expires 1y;
log_not_found off;
}

# Enable Gzip compression.
gzip on;

# Disable Gzip on IE6.
gzip_disable "msie6";

# Allow proxies to cache both compressed and regular version of file.
# Avoids clients that don't support Gzip outputting gibberish.
gzip_vary on;

# Compress data, even when the client connects through a proxy.
gzip_proxied any;

# The level of compression to apply to files. A higher compression level increases
# CPU usage. Level 5 is a happy medium resulting in roughly 75% compression.
gzip_comp_level 5;

# Compress the following MIME types.
gzip_types
 application/atom+xml
 application/javascript
 application/json
 application/ld+json
 application/manifest+json
 application/rss+xml
 application/vnd.geo+json
 application/vnd.ms-fontobject
 application/x-font-ttf
 application/x-web-app-manifest+json
 application/xhtml+xml
 application/xml
 font/opentype
 image/bmp
 image/svg+xml
 image/x-icon
 text/cache-manifest
 text/css
 text/plain
 text/vcard
 text/vnd.rim.location.xloc
 text/vtt
 text/x-component
 text/x-cross-domain-policy;
}
To save, press CTRL+O and Enter key. Then, exit nano editor using command CTRL+X.
V případě FastCGI je třeba použít NGINX Helper plugin. Funguje i s adresami URL kódovanými v hindštině. Mějte na paměti, že nepodporuje AMP. Já osobně don’t use AMP. (Doporučené stránky)
Alternativou je mezipaměť NGINX, která funguje pro čištění adres URL AMP, ale nepodporuje adresy URL kódované v hindštině. V nastavení byste měli zachovat cestu ke cache /var/run/nginx-cache/.
Upozornění!
- Například, Pokud používáte téma novin a slouží oddělené mobilní téma, držte se bez metody FastCGI a použijte plugin WP Rocket, protože může sloužit oddělené mobilní cache z krabice.
7. Create Symbolic links between two directories
Pokud tento krok vynecháte, můžete získat ERR_CONNECTION_REFUSED
Chcete-li aktivovat blok serveru, vytvořte symbolický odkaz na váš NGINX Server Block file from directory /etc/nginx/sites-available/ to /etc/nginx/sites-enabled
Před spuštěním níže uvedeného příkazu nahraďte doménu example.com vlastní doménou.
ln -s /etc/nginx/sites-available/example.com /etc/nginx/sites-enabled/Test configuration
nginx -tRestart a aktualizace
service nginx restart && service php8.2-fpm restart && service mysql restart && apt-get update && apt upgrade -y8. Instalace WordPress
Stáhnout WordPress files in /var/www/html directory and set permission.
cd /var/www/html && wget https://wordpress.org/latest.tar.gz && tar -xvzf latest.tar.gz && mv -v wordpress/* /var/www/html && rm -rf index.nginx-debian.html latest.tar.gz wordpress && chown -R www-data:www-data /var/www/ && sudo chmod -R 755 /var/wwwChcete-li v budoucnu aktualizovat oprávnění, použijte následující příkaz
chown -R www-data:www-data /var/www/ && sudo chmod -R 755 /var/www9. Updating DNS
Pokud hostujete WordPress lokálně, chcete obejít proxy server nebo chcete provést migraci bez prostojů, je tento krok užitečný. Obecně dávám přednost v případě Static WordPress Dev area. 😉
- Existují dva způsoby, jak nasměrovat DNS. Pokud migrujete stránky na Vultr a chcete je nejprve otestovat lokálně, upravte soubor hosts a nasměrujte jej tam.
For systém Windows
- Přejděte do vlastností
C:\Windows\System32\drivers\etc\hosts - Změňte oprávnění „Zabezpečení“ na plné ovládání pro vaše aktuální uživatelské jméno.
- Nyní můžete libovolně upravovat hosts pod svým systémovým uživatelem a uložte jej.
# For same machine you can have localhost address else public IP
127.0.0.1 example.com
127.0.0.1 www.example.com
Takto by to mělo vypadat.
For Mac or Linux
Soubor hosts můžete upravit pomocí následujícího příkazu
sudo nano /etc/hostsUpdating DNS with Cloudflare
- Pokud je vše v pořádku a chcete svůj web spustit, přihlaste se do aplikace Cloudflare DNS and update new IP
| A | @ | IPV4 address |
| AAAA | @ | IPV6 address |
| CNAME | www | example.com |
where @ denotes naked domain example.com
9. Visit your domain name to setup WordPress
Pokud chcete pro svůj WordPress zachovat doménu s jinou než www verzí, navštivte jinou než www verzi.
https://example.com- Zajistit Database login credential to begin WordPress Setup
- Run Installation
- Vyplňte základní údaje o svém novém webu a nainstalujte WordPress.
- Přihlášení k WordPress
- Pokud jste použili blok serveru FastCGI, pak byste měli nejprve nainstalovat plugin NGINX Cache a nakonfigurovat /var/www/cache jako cestu ke cache.
Další nezbytné věci
Použijte plugin SMTP Služby pro odesílání odchozího e-mailu WordPress jinak nebudete moci přijímat odkaz na reset hesla, kontaktní formulář 7 zprávy.
Konečně byla dokončena instalace WordPressu. Vždy si uchovejte zálohu.
Velmi si vážím vašeho drahocenného času, který jste věnovali čtení tohoto článku. Uvidíme se v dalším tutoriálu!
Thanks a lot Gulshan. You save my breath
I search everywhere but not find any good article
You explained very well along with security concern
well done
Finally I loved this step by step tutorial with proper images.
Thanks Bhaiya you are awesome
Hi,
Thank you for this awesome guide.
How can I install WordPress multisite on Ubuntu 18.04 with Nginx?
Thanks Gulshan, Finally I moved to NGINX server. You have created a great tutorial for beginners.
You’re welcome bro 🙂
Thank you for your tutorial, its the first one that actually showed me the wordpress setup page.
When I went to upload a plugin I received this message. „The uploaded file exceeds the upload_max_filesize directive in php.ini“
How do I increase the max filesize?
Please see the step 33.5
Thanks sos un groso, very well tutorial
How to auto-renew SSL?
Add below cron job
crontab -eAdd below command and save.
15 3 * * 7 certbot renew --post-hook "service nginx restart"Very well. thank you so much
Hello Gulshan Bro, First i want to say you that this is very beautiful and required post. I am really appreciating your work. but i have a problem can you please tell me
i have a droplet with digitalocean ($5/month plan) and i want to host multiple wordpress sites only with nginx(lemp ubuntu 18.04).
In simple i mean that this tutorial is complete to install a single wordpress and i did it but tell host it in some other sites
Hey Rohit,
Assuming, second site is example2.org
You need to follow steps this way.
1. create a new directory and add WordPress (Ref: steps 31)
cd /var/www/mkdir example2
wget https://wordpress.org/latest.tar.gz
tar -xvzf latest.tar.gz
mv -v wordpress/* /var/www/example2
rm -rf index.nginx-debian.html latest.tar.gz wordpress
chown -R www-data:www-data /var/www/
sudo chmod -R 755 /var/www
2. Create a new Server block with root path located to new directory as created in step 1.
cd /etc/nginx/sites-available/

nano gulshankumar-org
server {listen 80;
root /var/www/example2;
index index.php index.html index.htm;
server_name example2.org www.example2.org;
...
3. Point your example2.org domain to DNS, then install SSL
certbot --nginx -d example2.org -d www.example2.org4. Create new MySQL database
sudo mysql -u root -pcreate database example2;
grant all on example2.* to example2@localhost identified by 'TYPE HERE PASSWORD';
flush privileges;
exit;
5. Proceed to Installation by visiting your site
https://example2.orgLet me know if you have any additional question. You can always visit our forum for quick assistance.
Thanks & Regards,
Gulshan
It Really Works Gulshan Bro. Thanks Really dear You are awesome…
Hello Gulshan you written a comprehensive guide i highly appreciate your work. Can you help me with an error? Actually i have two websites the first website i have already hosted on Vultr following the above guide.
But when try to host a another WordPress website iam getting error. I followed the above steps you mentioned in comments. But still not able to fix it. The error is my website not working after hosting another WordPress website.
If possible please guide me step by step instructions. It will help me alot. Thanks in advance.
Consider checking log available at
/var/log/nginx/directory. Usenginx -tcommand to see what mistake causing issue.It Really Works Gulshan Bro. Thanks Really dear You are awesome…
i want redirect too www plz help me urgent
If your WordPress General Settings has www version, server will do automatically. No additional action is required. In case you started WordPress installation at non-www version, then you need to migrate by changing at Database level.
You may use Better Search Replce plugin to perform this changes.
How Can I setup FastCGI on my ngnix server guided by you….
I have updated my article.
Wonderful tutorial just complete solution for Nginx Fast CGI
Thanks Wasim for your kind feedback.
Hi would like to know after configuring Fastcgi do we still need other caching plugin to speed up WordPress site?
Hey Gulshan,
In the 7th step while texting ngnix I got
nginx: [emerg] open() „/etc/nginx/sites-enabled/example.com“ failed (2: No such file or directory) in /etc/nginx/nginx.conf:62
nginx: configuration file /etc/nginx/nginx.conf test failed
This error. How I can solve it? also what the error.
Please delete your existing server block and create again at sites-available and symlink at sites-enabled directory. The step 6 and 7 cover that clearly. Consider following patiently without any error. If you still face any problem, do let me know. Thanks for taking to leave your valuable comment.
How to check if fastcgi cache is working or not? while running sudo
curl -I https://example.comit is not showing x-cache parameterI am facing problem of infinite loop redirects. I had use fastcache code. how to fix it
Please try Full SSL mode of Cloudflare. Then check again!
Hi Gulshan, I am also receiving the test failed error on step 7. I have tried several times now on different setup and still stuck here. Please could you help?
Please carefully read the post and then copy-paste code in Terminal. Sometime you need to replace with your own domain. Doing mistake can return error. Else, no wise. I use this guide everyday for myself. I am not aware about any problem.
In case of trouble
1. Run test using
nginx -t2. Check logs to get proper hint
tail -f /var/log/nginx/error.log3. Delete existing or earlier created virtualhost
rm /etc/nginx/sites-available/default && rm /etc/nginx/sites-enabled/default4. Make sure to replace example.com at all places, a) when you create conf file, its naming. b) when you add conf file and c) when you create symlink, check your command its conf file name must match with first process.
I feel in most cases, chances are you did not replaced
server_name .example.com;to own domain, or you did not obtained SSL. All steps are written in serial order as it should be.This article is like Life-Saver for one of my website. I was about to move from Google Cloud to Digital Ocean because the trial was expired and I also wanted to use DigitaOcean because it is in-expensive yet powerful and gives great experience.
Previously, I used webinoly stack which was straightforward for installing WordPress but later on I got to know from Gulshan that there are so many issues with that stack so, this time I was going to do it manually. I checked the official guide by Digital ocean but end up with many confusion and issues. Then, I fortunately asked Gulshan for help and he recommended this article for me.
I installed WordPress easily and very fast even fast that Webinoly stack. Thanks a lot Gulshan for writing this amazing article. Hats off to you bro!!🎩
hi, Gulshan thanks for sharing.
can u please share how to install wp on subfoler?
I alwyas keep this guide bookmarket to my web browser! You never know when I would need to setup a new LEMP server ! Thanks Gulshan
Thanks for your comment.
Nice tutorial. Does it come with email hosting? Looking to make a small site in Singapore using VultrHF
E-mail is a different thing. G Suite by Google services is specialized in this segment.
What are the differences if any between doing this method and using the vultr 1 click install? I have also read about centminmod. Is that somrthing u will recommend for having a fast LEMP stack? Tnx
It was a good article
Thanks for your comment.
The FastCGI server block config throws 404 Errors.
fastcgi_pass unix:/run/php/php7.4-fpm-example.sock;
should be:
fastcgi_pass unix:/run/php/php7.4-fpm.sock;
And it is missing config for location /
This config must be defined:
location / {
try_files $uri $uri/ /index.php$is_args$args;
}
I see, it was intended for seperate user. But, to keep generic I have corrected. Thanks for pointing out.
Without the location / block only the home page was accessible.
When I added the below block i was able to access the post and pages.
location / {
try_files $uri $uri/ /index.php$is_args$args;
}
Hello Alpesh, Corrected. Thanks again for your tip.
Hey bro what is your thoughts on EasyEngine and SlickStack etc or one click app instead to automate? what is your favorite and will you make any tut bro
Sure, there is one. I will post about it. Thanks for your feedback.
hello gulshanji i wanted to use cloudflare ssl direct from thier website and not thru api with fast cgi then what would the config
Do all commands work for Centos 8?
Sorry, this is for Ubuntu OS only not for Centos 8.
What do you think about Plesk Panel?
It is easy to install plesk and create a wordpress site.
Easy to find trial keys and we can use it unlimited.
If it expires sites goes on ftp works and only plesk panel does not work but there are too much trial keys
It has nginx cache.
Do you recommend why and why not?
Thanks
I do not trust 3rd-parties installers.
Can we create multi wordpress sites on different domain in the same machine with this
method?
I think only changement is in the FastCGI?
server {
root /var/www/aaa.com/wordpress;
index index.php index.html index.htm;
server_name .aaa.com;
client_max_body_size 0;
server {
root /var/www/bbb.com/wordpress;
index index.php index.html index.htm;
server_name .bbb.com;
client_max_body_size 0;
server {
root /var/www/ccc.com/wordpress;
index index.php index.html index.htm;
server_name .ccc.com;
client_max_body_size 0;
is this make a problem cache path is the same path for 3 web site? /var/www/cache
Is this method works?
1 machine 3 different domain and wordpress?
Thanks
Not for multiple sites.
I have 2 questions
1) What if i have 2 domains on different cloudflare accounts?
Create a cloudflare.ini file inside /root/.secrets/ directory.
mkdir -p /root/.secrets/ && cd /root/.secrets/ && nano cloudflare.ini
Add below code and save using CTRL+O and exit using CTRL+X
dns_cloudflare_email = „[email protected]“
dns_cloudflare_api_key = „XXXXXXXXXXXXXXXXX“
/root/.secrets/1domaincloudfare.ini
/root/.secrets/2domaincloudfare.ini
certbot certonly –dns-cloudflare –dns-cloudflare-credentials 1domaincloudfare.ini -d example.com,*.1domain.com –preferred-challenges dns-01
certbot certonly –dns-cloudflare –dns-cloudflare-credentials 2domaincloudfare.ini -d example.com,*.2domain.com –preferred-challenges dns-01
Do this work?
2) If we have 2 domains in the same account on cloudflare can we use 1 cloudflare.ini
certbot certonly –dns-cloudflare –dns-cloudflare-credentials /root/.secrets/cloudflare.ini -d 1domain.com,*.example.com –preferred-challenges dns-01
certbot certonly –dns-cloudflare –dns-cloudflare-credentials /root/.secrets/cloudflare.ini -d 2domain.com,*.example.com –preferred-challenges
dns-01
3) If we dont use cloudflare what will our ns for domain?
CLoud VPNs IP?
ns1= 68.28.65.84
ns2= 68.28.65.84
Is this right?
thanks for your replies
1. True
2. True
3. I have no idea about it. I prefer using CF DNS.
which is the best & compatible server side cache plugin If I use FastCGI server block code along with Nginx Cache plugin..
W3 Total Cache or WP Rocket
I finally installed wordpress with this guide. But I see only www version but not the non-www version. Is there any changes that I need to do.
Redirects to www version even If I enter non-www version.
You need to point DNS records for both hostnames. Second, make sure dot is not missing from the beginning of example.com in this code –
server_name .example.com;in the NGINX connfig at step 6. Another thing, Redirect from www to non-www or vice-versa (as neccessary) is taken care automatically from WordPress. You do not need to put any extra code for it.For Nginx cache helper (I take this info from offical site
There’s a ‘purge all’ button? Does it purge the whole site?
Yes, it does. It physically empties the cache directory. It is set by default to /var/run/nginx-cache/.
So the default is /var/run/nginx-cache/
can we change fastcgi_cache_path /var/www/cache to /var/run/nginx-cache/ ?
Thanks
Pokud je váš adresář cache jiný, můžete to přepsat v souboru
wp-config.phppřidáním.define('RT_WP_NGINX_HELPER_CACHE_PATH','/var/www/nginx-cache/')location ~* .(css|gif|ico|svg|jpeg|jpg|js|png)$ {
expires 1y;
log_not_found off;
}
is this code for page caching?
I use cloudflare so it has page cache too.
If i use that can i remove it from codes?
Can you please explain what is this code for?
Thanks
That code is for setting up 1 year browser caching for static files. You may use Cloudflare Page caching as normally you do. There shouldn’t be any problem.
Can you explain me what is the difference between inactive and fastcgi_cache_valid values? Can you explain them please? Thanks
Exactly followed the same steps, but at the end i am getting 502 bad gateway. I built some sites with the same steps before, however i don’t know what changed now.
Consider checking the error log using command
tail -f /var/log/nginx/error.logto get a hint about exact issue.getting this
tail: cannot open ‚/var/log/error.log‘ for reading: No such file or directory
tail: no files remaining
Sorry, there was a typo in my previous comment. Try below command
tail -f /var/log/nginx/error.logSuccessfully install wordpres for a single site and do the same i mean for another domain on the same instance but after creating server blocks get „nginx: (emerg) duplicate listen options for (::):443 in /etc/nginx/sites-enabled“ on nginx -t
How Can i solve this?