I denne artikel vil du lære at installere WordPress manuelt på en Ubuntu 22.04-server ved hjælp af NGINX, MariaDB og PHP 8.2. Disse stakke vil give en kraftfuld og effektiv platform til at køre dit WordPress-websted med en fantastisk hastighed.
Følg disse 3 trin, og se videoen. Har du brug for hjælp? kontakt mig. 😊
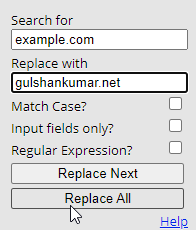
Før du går i gang, har du et hurtigt tip. Brug Udvidelsen Søg og erstat til at ændre
Et tidsbesparende tip til Google Chrome-brugere.example.comtil dit eget domæne på denne webside.
Del A: Hold Cloudflare-nameservere aktive
Vi vil bruge Cloudflare DNS til at få Let’s Encrypt Wildcard SSL-certifikat. Gennemfør dette trin først for at få glæde af nul-downtime-migration.
Tjek aktuelle navneservere
- Find dine aktive navneservere på https://www.whatsmydns.net/#NS/example.com
- Hvis du kan se, at du bruger din tidligere Hosting- eller domæneregistrator som standard NS, skal du erstatte den med Cloudflare.
- Lær hvordan du bruger Cloudflare DNS
Del B: Gør en Ubuntu Server 22.04 LTS Server klar

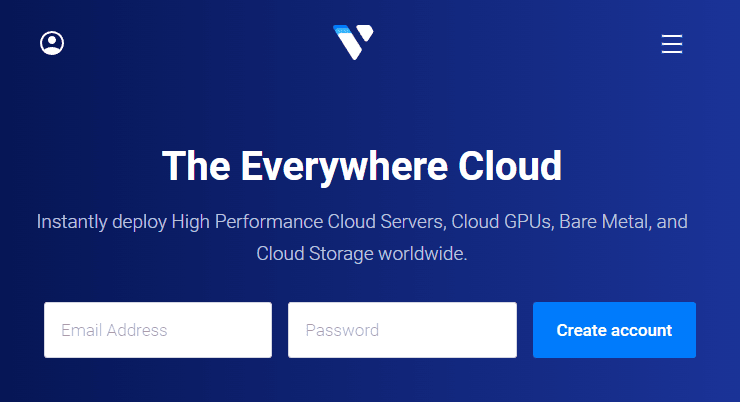
1. Tilmeld dig Vultr for at få $100 Gratis kreditter (Gyldig i 30 dage)
Som en person, der har prøvet så mange Cloud-serverfirmaer, siger min erfaring, at du ikke kan gå galt i byen med Vultr. Disse fyre er ægte og omsorgsfulde, når det kommer til support og service.
⚡ Ydelse
- NVME / SSD
- 3.7 GHz CPU
- Op til 5 Gbps netværkshastighed
- Datacenter i America, Europe, Asia, Austraillia
- IPV6 klar
💡 Funktioner
- Begyndervenligt instrumentbræt
- Et klik til snapshot
- Automtatic Backup (Betalt)
- Gratis cloud-brandmur
- DDoS-beskyttelse (Betalt)
- 100% KVM Virtualisering
⚙ Støtte
- PayPal/Card
- 24/7 Support af billetter
- Dokumentation
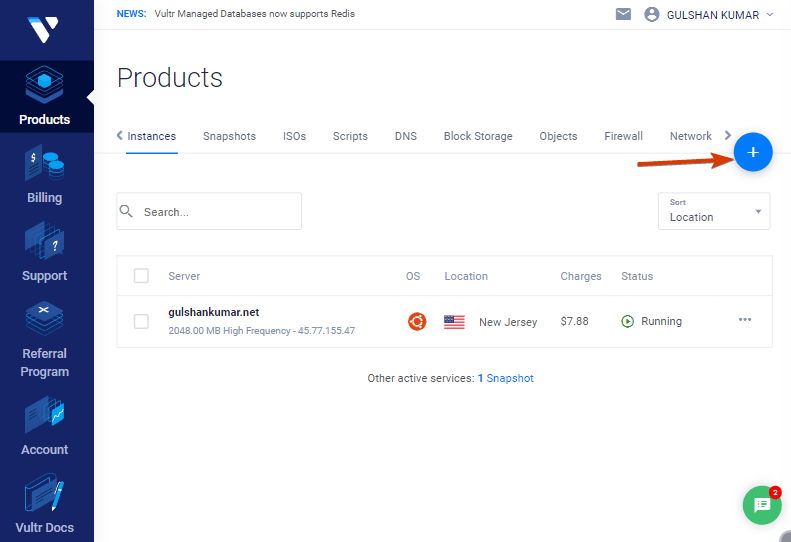
2. Opret en ny VPS-server
Du skal blot klikke på plus-knappen for at komme i gang
3. Vælg servertype
Vælg Cloud Compute for delt CPU til overkommelige priser.
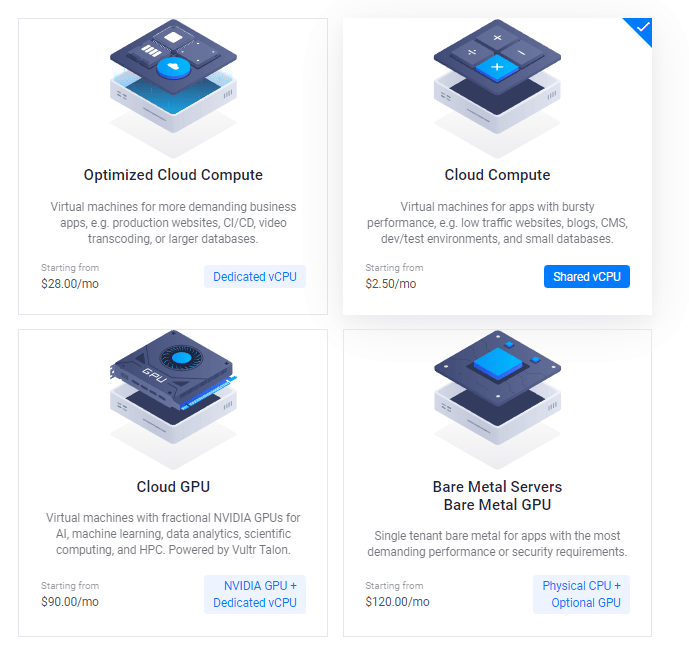
Herefter kan du vælge AMD High Performance eller Intel High Frequency i CPU & Storage Technology. Den har den hurtigste CPU og NVMe-disk nogensinde. Hvis budgettet er mindre, skal du vælge Regular-planen med Intel CPU, hvor du får SSD-disk.

4. Vælg en serverplacering
Vælg en serverplacering, der er tæt på din målgruppe.
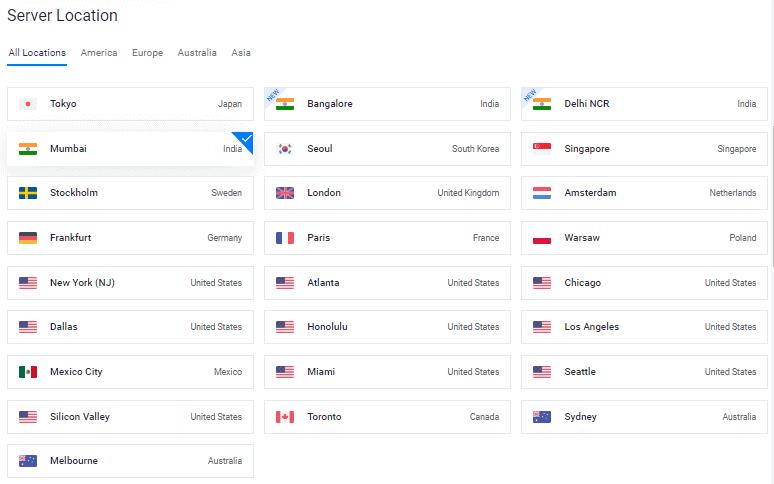
Hvis f.eks. 99 % af din trafik kommer fra Danmark, skal du vælge den nærmeste region – Frankfurt, Tyskland.
Asien
- Mumbai, Indien
- Delhi NCR, Indien
- Bengaluru, Indien
- Singapore, Singapore
- Tokyo, Japan
- Seoul, Sydkorea
Amerika
- Miami, USA
- Atlanta, USA
- Chicago, USA
- Dallas, USA
- Honolulu, USA
- Los Angeles, USA
- Mexico City, Mexico
- New York (NJ), USA
- Seattle, USA
- Silicon Valley, USA
- Toronto, Canada, São Paulo
Europa
- Stockholm, Sverige
- London, Det Forenede Kongerige
- Amsterdam, Nederlandene
- Frankfurt, Tyskland
- Madrid, Spanien
- Paris, Frankrig
- Warszawa, Polen
Australlia
- Sydney, Australien
- Melbourne, Australien
5. Vælg Ubuntu 22.04 x64 OS
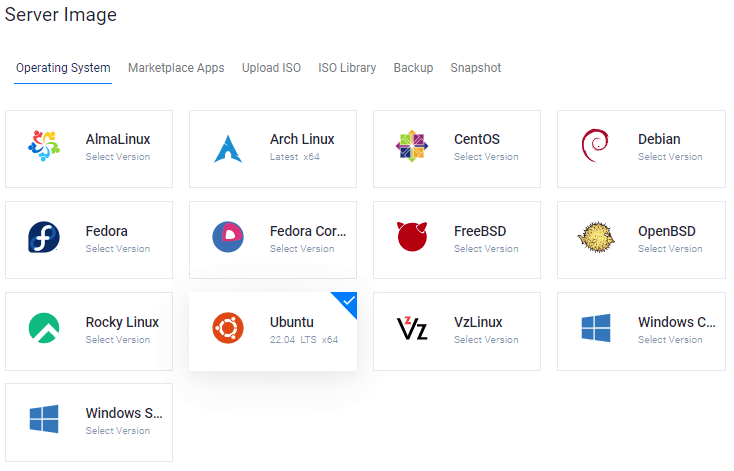
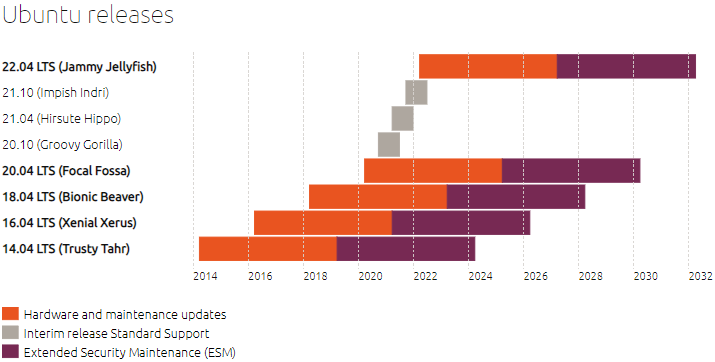
I øjeblikket er Ubuntu 20.04×64 og 22.04×64 begge LTS-versioner (Long Term Supported) kompatible med de fleste af de pakker, som vi vil installere.
6. Vælg en serverstørrelse
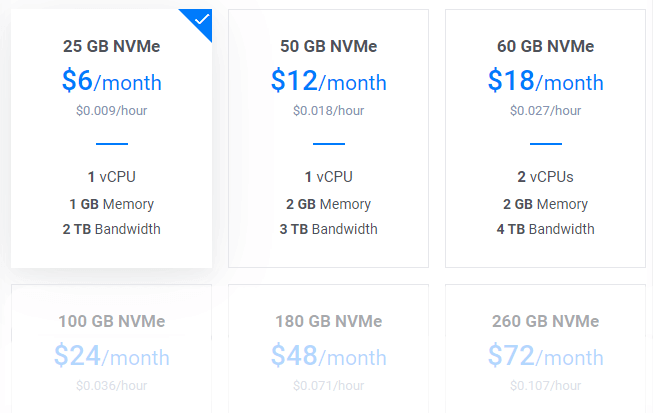
Et abonnement til $6/måned ville være et godt udgangspunkt for en ny blog. Du kan opgradere når som helst efter behov.
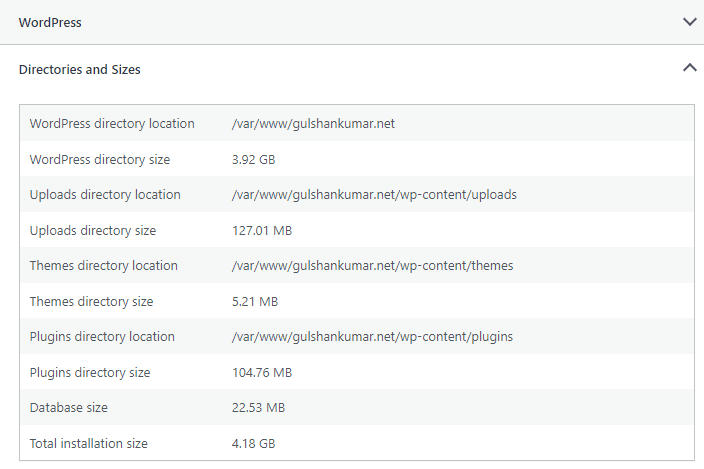
Tip: Hvis du migrerer, skal du kontrollere Samlet installationsstørrelse i Site health info.
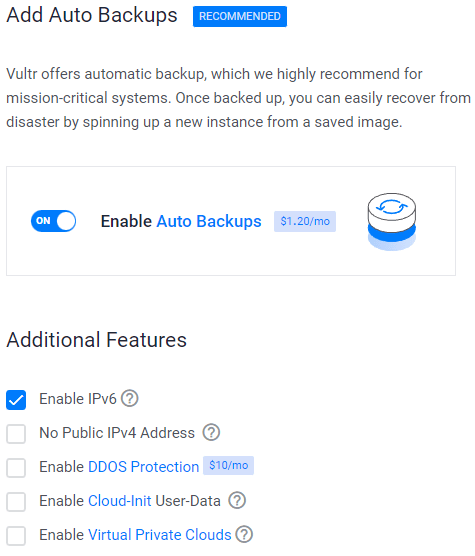
7. Aktiver IPV6, sikkerhedskopi
8. Tilføj en SSH-nøgle
Dette er et anbefalet, valgfrit trin for at øge sikkerheden.
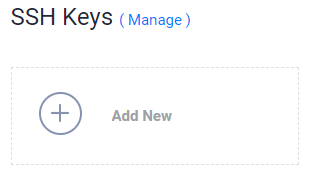
- Klik på knappen Tilføj ny for at tilføje en ny SSH-nøgle for at indsende din 🔒offentlige nøgle.
- Generer nøgler ved hjælp af nedenstående metode i overensstemmelse med dit operativsystem.

- Download PuTTy application.
- Søg efter PuTTygen i menuen Start
- Klik på knappen Generer, og hold musemarkøren over skærmen
- Kopier den offentlige nøgle, og giv den til Vultr
- Indtast nøglepassfrasen
- Gem 🔑Private Key på det mest sikre sted.
- Dette kan bruges til login til SSH eller SFTP.

- Kør:
ssh-keygen -t rsa. For at få en mere sikker 4096-bit nøgle skal du køre:ssh-keygen -t rsa -b 4096 - Tryk på enter, når du bliver spurgt om, hvor du vil gemme nøglen (dette vil bruge standardplaceringen).
- Indtast en adgangsfrase for din nøgle.
- Kør
cat ~/.ssh/id_rsa.pub– dette vil give dig nøglen i det korrekte format, som du kan indsætte i kontrolpanelet. - Sørg for at tage en sikkerhedskopi af filen
~/.ssh/id_rsa. Den kan ikke genoprettes, hvis den går tabt.
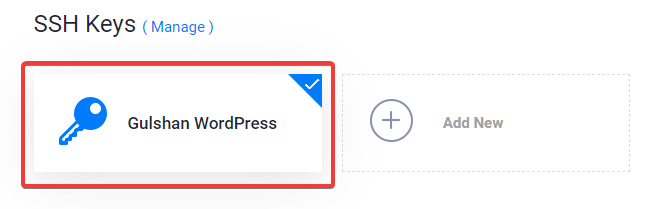
Vælg din SSH-nøgle
Når du følger disse trin, knyttes din offentlige nøgle til din nye instans. Derefter vil du kunne logge ind på SSH ved hjælp af både almindelig tekstadgangskode og SSH-nøgle.
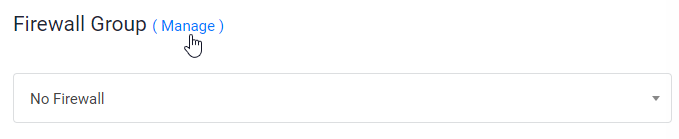
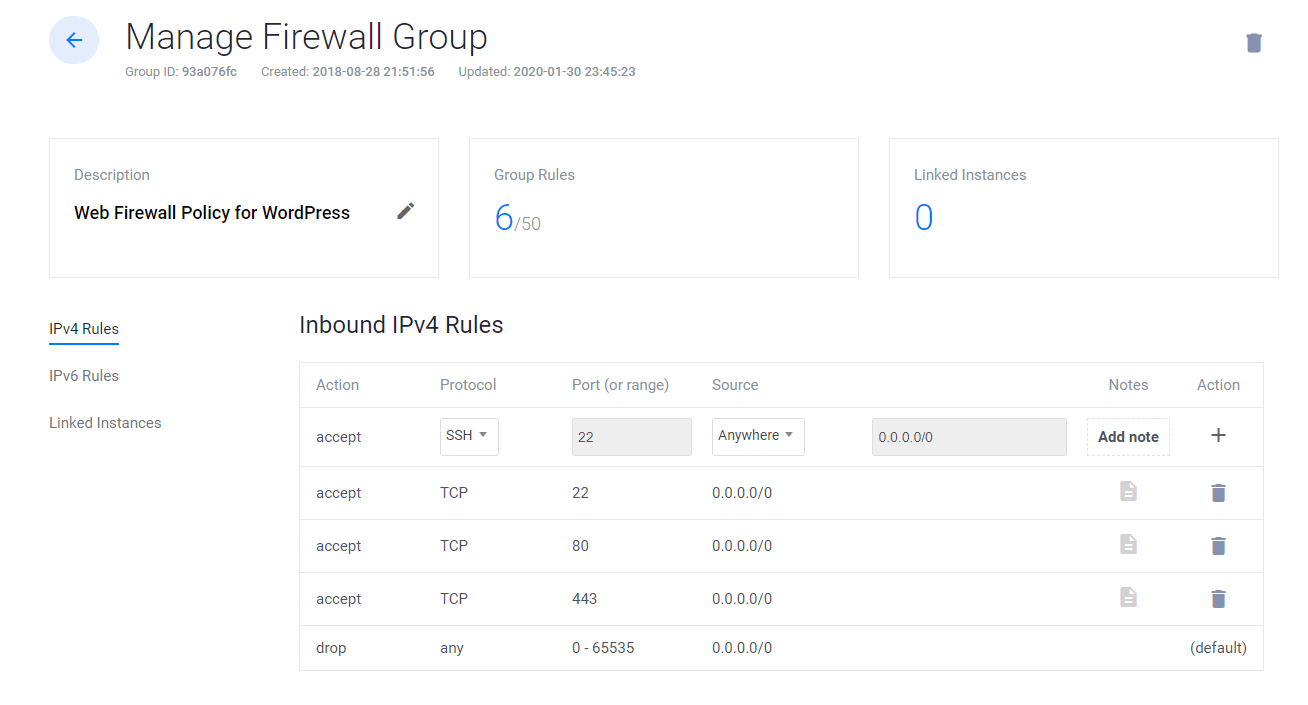
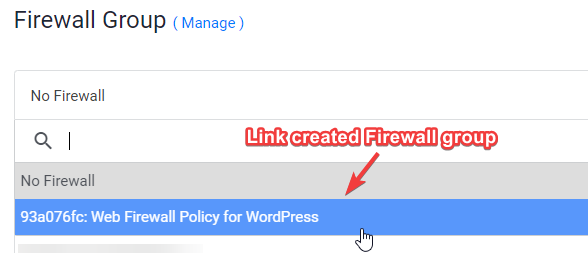
9. Link Web Firewall-regel til serverinstans (valgfrit)
- Klik på Administrer, og opret en ny firewallgruppe.
- Tillad TCP-port 22 til SSH. 80 for HTTP og 443 HTTPS for både IPV4- og IPV6-regler.
- Når det er gjort, skal du knytte firewallgruppen til din instans.
10. Indtast værtsnavn og etiket og klik på Implementer nu
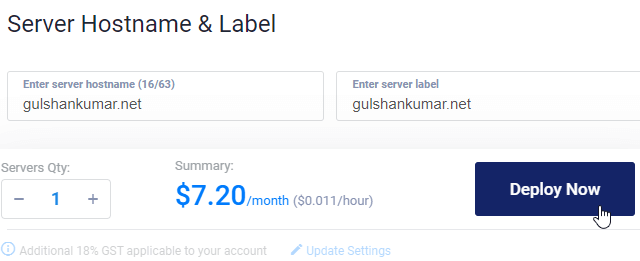
Nu vil du se installation i forløbet
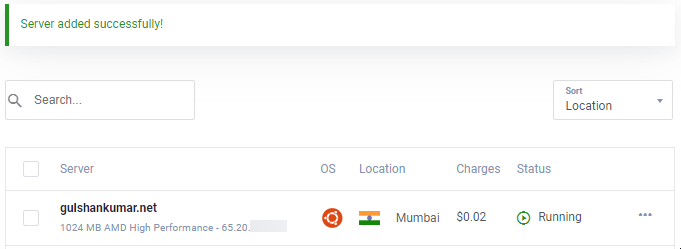
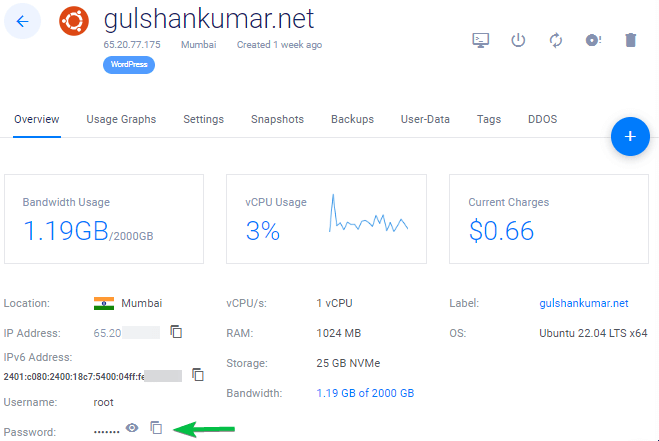
11. Gå til siden Ny instans
Kopier IP-adresse, brugernavn og adgangskode. Din standardport er 22.
12. Deaktivere login med adgangskode
Af sikkerhedsmæssige årsager anbefales det at deaktivere adgangskodegodkendelse og kun tillade nøglebaseret godkendelse.
- Rediger konfigurationsfilen
nano /etc/ssh/sshd_config - Find (CTRL + W) og søg
PasswordAuthentication - Ændre værdien fra ja til nej
- For at gemme typen CTRL + O
- Genstart SSH-tjenesten ved hjælp af kommandoen
sudo service ssh restart
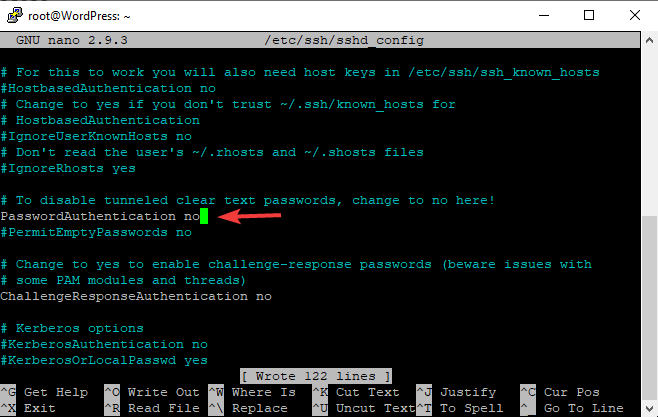
Fra næste gang kan du kun bruge SSH via nøgle, som vist i videoen.
Til Linux eller Mac skal du bruge Terminal med kommandoen som denne
ssh [email protected] -p 22 -i id_rsa
Trin 13. Deaktiver UFW
Når du implementerer en ny instans på VULTR, er UFW (Uncomplicated Firewall) aktiveret, så alle porte er blokeret undtagen SSH-port 22. Dette kan returnere ERR_CONNECTION_REFUSED-fejl i browseren. For at løse dette vil jeg foreslå at holde UFW deaktiveret.
ufw disableDet er nok forklaring på de grundlæggende ting. Nu vil jeg fremskynde den oprindelige proces til implementering af WordPress på LEMP-stakken.
Del C. Implementer WordPress på LEMP Stack
1. Opdatere repositories
Indtast nedenstående kommando, og tryk på enter-tasten
sudo -sapt update && apt upgrade -y && apt dist-upgrade && apt autoclean && apt autoremove -y && rebooteller
wget -qO update https://dl.gulshankumar.net/update && chmod +x updateNæste gang skal du altid bruge nedenstående genvejskommando til at opdatere.
./update2. Installer MariaDB med sikkerhed
Log ind igen, og indtast følgende kommando
sudo apt install mariadb-server -y && sudo mysql_secure_installationSvar på nedenstående spørgsmål
- Enter current password for root (enter for none): Tryk på Enter-tasten
- Switch to unix_socket authentication [Y/n]: Type n and Press the Enter key.
- Set root password? [Y/n]: Tryk på Enter-tasten
- New password: Copy a strong password from Dashlane Password Generator. To paste a password in the SSH console, right-click and press the Enter key. The password will not be visible on the screen.
- Re-enter new password: Højreklik, og tryk på Enter-tasten igen.
Når du har fået indstillet en adgangskode, vil du se
Password updated successfully!
Reloading privilege tables..
... Success!
Du skal også besvare følgende spørgsmål.
- Remove anonymous users? [Y/n]: Tryk på Enter-tasten
- Disallow root login remotely? [Y/n]: Tryk på Enter-tasten
- Remove test database and access to it? [Y/n]: Tryk på Enter-tasten
- Reload privilege tables now? [Y/n]: Tryk på Enter-tasten
3. Opret en ny database til WordPress
Log ind på MySQL, tryk på enter-tasten, når der bliver spurgt om adgangskode.
mysql -u root -pOpret en ny database, og giv rettigheder til at bruge dens bruger med adgangskode. Det er her WordPress gemmer alle indlæg, sider, temaer, plugin osv. oplysninger.
create database wordpress;
grant all on wordpress.* to gulshan@localhost identified by '5pY8CKJxDRJEGQNkX7';
flush privileges;
exit;
Hvor din …
database er wordpress
brugernavn er gulshan
adgangskoden er 5pY8CKJxDRJEGJEGQNkX7
Tip: Overvej at bruge unikke loginoplysninger
4. Installer PHP 8.2, NGINX og indstil tilladelser
sudo add-apt-repository ppa:ondrej/php -y && apt update && apt install php8.2-fpm php8.2-common php8.2-mysql php8.2-xml php8.2-xmlrpc php8.2-curl php8.2-gd php8.2-imagick php8.2-cli php8.2-dev php8.2-imap php8.2-mbstring php8.2-soap php8.2-zip php8.2-bcmath -y && sed -i 's/;cgi.fix_pathinfo=1/cgi.fix_pathinfo=0/g' /etc/php/8.2/fpm/php.ini && service php8.2-fpm restart && apt install nginx -y && chown -R www-data:www-data /var/www/ && chmod -R 755 /var/wwwJustere PHP-konfiguration
De fleste smarte temaer og plugins kræver en avanceret PHP-konfiguration for at kunne køre. Derfor bør vi foretage disse ændringer.
sed -i 's/memory_limit = 128M/memory_limit = 512M/g' /etc/php/8.2/fpm/php.ini
sed -i 's/post_max_size = 8M/post_max_size = 128M/g' /etc/php/8.2/fpm/php.ini
sed -i 's/max_file_uploads = 20/max_file_uploads = 30/g' /etc/php/8.2/fpm/php.ini
sed -i 's/max_execution_time = 30/max_execution_time = 900/g' /etc/php/8.2/fpm/php.ini
sed -i 's/max_input_time = 60/max_input_time = 3000/g' /etc/php/8.2/fpm/php.ini
sed -i 's/upload_max_filesize = 2M/upload_max_filesize = 128M/g' /etc/php/8.2/fpm/php.ini
service php8.2-fpm restart
5. Installer Wildcard Let’s Encrypt SSL-certifikat
Opret en cloudflare.ini-fil i mappen /root/.secrets/.
mkdir -p /root/.secrets/ && cd /root/.secrets/ && nano cloudflare.iniTilføj nedenstående kode og gem ved hjælp af CTRL+O og afslut med CTRL+X
dns_cloudflare_email = "[email protected]"
dns_cloudflare_api_key = "XXXXXXXXXXXXXXXXX"
Find din Cloudflare e-mail og globale API-nøgle på “Min profil” > API-tokens > Global API-nøgle
chmod 0400 /root/.secrets/cloudflare.iniInstaller Certbot og DNS Authenticator i overensstemmelse med OS og HTTP-webserver
snap install --beta --classic certbot
snap set certbot trust-plugin-with-root=ok
snap install --beta certbot-dns-cloudflare
snap connect certbot:plugin certbot-dns-cloudflare
Få Wildcard SSL-certifikat
certbot certonly --dns-cloudflare --dns-cloudflare-credentials /root/.secrets/cloudflare.ini -d example.com,*.example.com --preferred-challenges dns-01Indstil automatisk fornyelse ved hjælp af Cron Job
- Type
crontab -e - Type 1 til nano editor
- Indtast nedenstående kommando, og gem
0 0 * * * /etc/init.d/nginx reload >/dev/null 2>&1Fornyelse af prøven
certbot renew --dry-run6. Konfigurer Nginx-serverblok
Dette er vigtigt, når du skal konfigurere dit domæne, og hvordan NGINX skal håndtere dine HTTP-forespørgsler.
Slet standardserverblokke.
rm /etc/nginx/sites-available/default && rm /etc/nginx/sites-enabled/defaultOpret en ny serverblok
cd /etc/nginx/sites-available/
nano example.com- Udskift
example.commed eget domæne - Indtast nedenstående kode, og tryk på ctrl+o for at gemme og ctrl+x for at afslutte.
Generelt
server {
    listen         80;
    return 301 https://$host$request_uri;
}
server {
# Document Root
root /var/www/html;
index index.php index.html index.htm;
server_name .example.com;
client_max_body_size 0;

    listen [::]:443 ssl http2 ipv6only=on;
    listen 443 ssl http2;
        ssl_protocols TLSv1.1 TLSv1.2 TLSv1.3;
        ssl_certificate /etc/letsencrypt/live/example.com/fullchain.pem;
        ssl_certificate_key /etc/letsencrypt/live/example.com/privkey.pem;
        ssl_prefer_server_ciphers on;
        ssl_session_cache   shared:SSL:20m;
        ssl_session_timeout 20m;
        ssl_ciphers 'TLS13+AESGCM+AES128:EECDH+AES128';


error_page 404 /404.html;
error_page 500 502 503 504 /50x.html;

# Block XMLRPC
location = /xmlrpc.php {
    deny all;
}

location / {
    try_files $uri $uri/ /index.php$is_args$args;
}

location ~* \.php$ {
if ($uri !~ "^/uploads/") {
fastcgi_pass unix:/run/php/php8.2-fpm.sock;
}
include fastcgi_params;
fastcgi_param SCRIPT_FILENAME $document_root$fastcgi_script_name;
fastcgi_param SCRIPT_NAME $fastcgi_script_name;
}
location = /favicon.ico {
log_not_found off;
access_log off;
}

location = /robots.txt {
log_not_found off;
access_log off;
allow all;
}

location ~* .(css|gif|svg|ico|woff2|eot|jpeg|webp|jpg|js|png)$ {
expires 1y;
log_not_found off;
}

# Enable Gzip compression.
gzip on;

# Disable Gzip on IE6.
gzip_disable "msie6";

# Allow proxies to cache both compressed and regular version of file.
# Avoids clients that don't support Gzip outputting gibberish.
gzip_vary on;

# Compress data, even when the client connects through a proxy.
gzip_proxied any;

# The level of compression to apply to files. A higher compression level increases
# CPU usage. Level 5 is a happy medium resulting in roughly 75% compression.
gzip_comp_level 5;

# Compress the following MIME types.
gzip_types
 application/atom+xml
 application/javascript
 application/json
 application/ld+json
 application/manifest+json
 application/rss+xml
 application/vnd.geo+json
 application/vnd.ms-fontobject
 application/x-font-ttf
 application/x-web-app-manifest+json
 application/xhtml+xml
 application/xml
 font/opentype
 image/bmp
 image/svg+xml
 image/x-icon
 text/cache-manifest
 text/css
 text/plain
 text/vcard
 text/vnd.rim.location.xloc
 text/vtt
 text/x-component
 text/x-cross-domain-policy;
}
Til cache Enabler
server {
    listen         80;
    return 301 https://$host$request_uri;
}
server {
# Document Root
root /var/www/html;
index index.php index.html index.htm;
server_name .example.com;
client_max_body_size 0;

    listen [::]:443 ssl http2 ipv6only=on;
    listen 443 ssl http2;
        ssl_protocols TLSv1.1 TLSv1.2 TLSv1.3;
        ssl_certificate /etc/letsencrypt/live/example.com/fullchain.pem;
        ssl_certificate_key /etc/letsencrypt/live/example.com/privkey.pem;
        ssl_prefer_server_ciphers on;
        ssl_session_cache   shared:SSL:20m;
        ssl_session_timeout 20m;
        ssl_ciphers 'TLS13+AESGCM+AES128:EECDH+AES128';


error_page 404 /404.html;
error_page 500 502 503 504 /50x.html;


# Block XMLRPC
location = /xmlrpc.php {
    deny all;
}


# Rules for Cache Enabler Plugin - Static File Serving

    set $cache_uri $request_uri;

    # bypass cache if POST requests or URLs with a query string
    if ($request_method = POST) {
    set $cache_uri 'nullcache';
    }

    if ($query_string != '') {
    set $cache_uri 'nullcache';
    }

    # bypass cache if URLs containing the following strings
    if ($request_uri ~* '(/wp-admin/|/xmlrpc.php|/wp-(app|cron|login|register|mail).php|wp-.*.php|/feed/|index.php|wp-comments-popup.php|wp-links-opml.php|wp-locations.php|sitemap(index)?.xml|[a-z0-9-]+-sitemap([0-9]+)?.xml)') {
    set $cache_uri 'nullcache';
    }

    # bypass cache if cookies contain the following strings
    if ($http_cookie ~* '(wp-postpass|wordpress_logged_in|comment_author)_') {
    set $cache_uri 'nullcache';
    }

    # custom installation subdirectory
    set $custom_subdir '';

    # default HTML file
    set $cache_enabler_uri '${custom_subdir}/wp-content/cache/cache-enabler/${http_host}${cache_uri}${scheme}-index.html';

    # WebP HTML file
    if ($http_accept ~* 'image/webp') {
    set $cache_enabler_uri '${custom_subdir}/wp-content/cache/cache-enabler/${http_host}${cache_uri}${scheme}-index-webp.html';
    }

    location / {
    gzip_static on; # this directive is not required but recommended
    try_files $cache_enabler_uri $uri $uri/ $custom_subdir/index.php?$args;
    }

location ~* \.php$ {
if ($uri !~ "^/uploads/") {
fastcgi_pass unix:/run/php/php8.2-fpm.sock;
}
include fastcgi_params;
fastcgi_param SCRIPT_FILENAME $document_root$fastcgi_script_name;
fastcgi_param SCRIPT_NAME $fastcgi_script_name;
}
location = /favicon.ico {
log_not_found off;
access_log off;
}

location = /robots.txt {
log_not_found off;
access_log off;
allow all;
}

location ~* .(css|gif|svg|ico|jpeg|webp|woff2|eot|jpg|js|png)$ {
expires 1y;
log_not_found off;
}

# Enable Gzip compression.
gzip on;

# Disable Gzip on IE6.
gzip_disable "msie6";

# Allow proxies to cache both compressed and regular version of file.
# Avoids clients that don't support Gzip outputting gibberish.
gzip_vary on;

# Compress data, even when the client connects through a proxy.
gzip_proxied any;

# The level of compression to apply to files. A higher compression level increases
# CPU usage. Level 5 is a happy medium resulting in roughly 75% compression.
gzip_comp_level 5;

# Compress the following MIME types.
gzip_types
 application/atom+xml
 application/javascript
 application/json
 application/ld+json
 application/manifest+json
 application/rss+xml
 application/vnd.geo+json
 application/vnd.ms-fontobject
 application/x-font-ttf
 application/x-web-app-manifest+json
 application/xhtml+xml
 application/xml
 font/opentype
 image/bmp
 image/svg+xml
 image/x-icon
 text/cache-manifest
 text/css
 text/plain
 text/vcard
 text/vnd.rim.location.xloc
 text/vtt
 text/x-component
 text/x-cross-domain-policy;
}- Du skal installere Cache Enabler-plugin for at nyde godt af cachefordelen.
FastCGI
Hvis du ønsker at bruge FastCGI Cache, skal du i stedet implementere nedenstående Server Block.
# NGINX Cache path
fastcgi_cache_path /var/run/nginx-cache levels=1:2 keys_zone=WORDPRESS:100m inactive=6h;
fastcgi_cache_key "$scheme$request_method$host$request_uri";
fastcgi_cache_use_stale error timeout invalid_header http_500;
fastcgi_ignore_headers Cache-Control Expires Set-Cookie;

server {
    listen         80;
    return 301 https://$host$request_uri;
}
server {
root /var/www/html;
index index.php index.html index.htm;
server_name .example.com;
client_max_body_size 0;

    listen [::]:443 ssl http2 ipv6only=on;
    listen 443 ssl http2;
        ssl_protocols TLSv1.1 TLSv1.2 TLSv1.3;
        ssl_certificate /etc/letsencrypt/live/example.com/fullchain.pem;
        ssl_certificate_key /etc/letsencrypt/live/example.com/privkey.pem;
        ssl_prefer_server_ciphers on;
        ssl_session_cache   shared:SSL:20m;
        ssl_session_timeout 20m;
        ssl_ciphers 'TLS13+AESGCM+AES128:EECDH+AES128';

error_page 404 /404.html;
error_page 500 502 503 504 /50x.html;


set $skip_cache 0;
    if ($request_method = POST) {set $skip_cache 1;}
    if ($request_uri ~* "/wp-admin/|/xmlrpc.php|/wp-.*.php|index.php|sitemap") {set $skip_cache 1;}
    if ($http_cookie ~* "comment_author|wordpress_[a-f0-9]+|wp-postpass|wordpress_no_cache|wordpress_logged_in") {set $skip_cache 1;}
    if ($query_string = "unapproved*") {set $skip_cache 1;}
    if ($cookie_woocommerce_items_in_cart = "1" ){ set $skip_cache 1;}
    if ($request_uri ~* "/(cart|checkout|my-account)/*$") {set $skip_cache 1;}

# Block XMLRPC
location = /xmlrpc.php {
    deny all;
}

location / {
try_files $uri $uri/ /index.php$is_args$args;
}

location ~* \.php$ {

 if ($uri !~ "^/uploads/") {
        fastcgi_pass unix:/run/php/php8.2-fpm.sock;
        }

        try_files                       $uri =404;
        include                         /etc/nginx/fastcgi_params;
        fastcgi_param                   SCRIPT_FILENAME $document_root$fastcgi_script_name;
        fastcgi_pass                    unix:/run/php/php8.2-fpm.sock;
        fastcgi_index                   index.php;
                fastcgi_cache_bypass $skip_cache;
                fastcgi_no_cache $skip_cache;
                fastcgi_cache WORDPRESS;
                fastcgi_cache_valid 200 30d;
                fastcgi_cache_valid 301 302 303 307 308 404 410 451 1m;
                add_header X-Cache $upstream_cache_status;

}

location = /favicon.ico {
log_not_found off;
access_log off;
}

location = /robots.txt {
log_not_found off;
access_log off;
allow all;
}

location ~* .(css|gif|ico|svg|webp|woff2|eot|jpeg|jpg|js|png)$ {
expires 1y;
log_not_found off;
}

# Enable Gzip compression.
gzip on;

# Disable Gzip on IE6.
gzip_disable "msie6";

# Allow proxies to cache both compressed and regular version of file.
# Avoids clients that don't support Gzip outputting gibberish.
gzip_vary on;

# Compress data, even when the client connects through a proxy.
gzip_proxied any;

# The level of compression to apply to files. A higher compression level increases
# CPU usage. Level 5 is a happy medium resulting in roughly 75% compression.
gzip_comp_level 5;

# Compress the following MIME types.
gzip_types
 application/atom+xml
 application/javascript
 application/json
 application/ld+json
 application/manifest+json
 application/rss+xml
 application/vnd.geo+json
 application/vnd.ms-fontobject
 application/x-font-ttf
 application/x-web-app-manifest+json
 application/xhtml+xml
 application/xml
 font/opentype
 image/bmp
 image/svg+xml
 image/x-icon
 text/cache-manifest
 text/css
 text/plain
 text/vcard
 text/vnd.rim.location.xloc
 text/vtt
 text/x-component
 text/x-cross-domain-policy;
}
To save, press CTRL+O and Enter key. Then, exit nano editor using command CTRL+X.
I tilfælde af FastCGI skal du bruge NGINX Helper-plugin. Det fungerer også med Hindi-kodede URL’er. Husk på, at det ikke understøtter AMP. Jeg bruger personligt ikke AMP. (Anbefalet)
Alternativt fungerer NGINX cache til rensning af AMP-URL’er, men den understøtter ikke Hindi-kodede URL’er. I indstillingerne skal du beholde cachestien /var/run/nginx-cache/
Forsigtig!
- Hvis du f.eks. bruger Newspaper-tema og serverer separat Mobile-tema, skal du holde dig uden FastCGI-metoden og bruge et plugin WP Rocket, fordi det kan servere separat mobilcache ud af boksen.
7. Opret symbolske links mellem to mapper
Hvis du glemmer dette trin, kan du få ERR_CONNECTION_REFUSED
For at aktivere serverblokken skal du oprette et symbolsk link til din NGINX Server Block-fil fra mappen /etc/nginx/sites-available/ til /etc/nginx/sites-enabled
Før du kører nedenstående kommando, skal du erstatte example.com med dit eget domæne.
ln -s /etc/nginx/sites-available/example.com /etc/nginx/sites-enabled/Testkonfiguration
nginx -tGenstart og opdatering
service nginx restart && service php8.2-fpm restart && service mysql restart && apt-get update && apt upgrade -y8. Installer WordPress
Download WordPress-filer i mappen /var/www/html, og indstil tilladelser.
cd /var/www/html && wget https://da.wordpress.org/latest-da_DK.tar.gz && tar -xvzf latest-da_DK.tar.gz && mv -v wordpress/* /var/www/html && rm -rf index.nginx-debian.html latest-da_DK.tar.gz wordpress && chown -R www-data:www-data /var/www/ && sudo chmod -R 755 /var/wwwFor at opdatere tilladelsen i fremtiden skal du bruge nedenstående kommando
chown -R www-data:www-data /var/www/ && sudo chmod -R 755 /var/www9. Opdatering af DNS
Hvis du hoster WordPress lokalt, ønsker at omgå proxy eller ønsker at udføre nul nedetidsmigrering, er dette trin nyttigt. Jeg foretrækker generelt i tilfælde af Static WordPress Dev-området. 😉
- Der er to måder at pege på DNS på. Hvis du migrerer webstedet til Vultr og først vil teste lokalt, skal du redigere din hosts-fil og pege der.
Til Windows
- Gå til egenskaberne for C:\Windows\System32\drivers\etc\hosts
- Ændre tilladelsen “Sikkerhed” til fuld kontrol for dit nuværende brugernavn
- Nu kan du frit redigere hosts-filen under din System-bruger og gemme den.
# For same machine you can have localhost address else public IP
127.0.0.1 example.com
127.0.0.1 www.example.com
Sådan skal det se ud.
Til Mac eller Linux
Du kan redigere hosts-filen ved hjælp af nedenstående kommando
sudo nano /etc/hostsOpdatering af DNS med Cloudflare
- Hvis alt er perfekt, og du ønsker at gøre dit websted live, skal du logge ind på Cloudflare DNS og opdatere den nye IP
| A | @ | IPV4 address |
| AAAA | @ | IPV6 address |
| CNAME | www | example.com |
hvor @ betegner det nøgne domæne example.com
9. Visit your domain name to setup WordPress
Hvis du ønsker at beholde domænet for din WordPress-version uden for www, skal du besøge ikke-www-versionen ellers www.
https://example.com- Angiv loginoplysninger til databasen for at begynde WordPress-opsætning
- Kør installation
- Udfyld de grundlæggende oplysninger om dit nye websted, og installer WordPress.
- Log ind på WordPress
- Hvis du har brugt FastCGI-serverblokken, er det første du skal gøre at installere NGINX Cache-plugin og konfigurere
/var/www/cachesom cache-sti.
Andre nødvendige ting
Brug SMTP-plugin Tjenester til at sende udgående e-mail fra WordPress, ellers kan du ikke modtage meddelelser om nulstilling af adgangskode, kontaktformular 7-meddelelser.
Endelig er WordPress-installationen afsluttet. Opbevar altid en sikkerhedskopi.
Jeg sætter stor pris på din værdifulde tid til at læse denne artikel. Vi ses i den næste vejledning!
Exactly followed the same steps, but at the end i am getting 502 bad gateway. I built some sites with the same steps before, however i don’t know what changed now.
Consider checking the error log using command
tail -f /var/log/nginx/error.logto get a hint about exact issue.getting this
tail: cannot open ‘/var/log/error.log’ for reading: No such file or directory
tail: no files remaining
Sorry, there was a typo in my previous comment. Try below command
tail -f /var/log/nginx/error.logCan you explain me what is the difference between inactive and fastcgi_cache_valid values? Can you explain them please? Thanks
location ~* .(css|gif|ico|svg|jpeg|jpg|js|png)$ {
expires 1y;
log_not_found off;
}
is this code for page caching?
I use cloudflare so it has page cache too.
If i use that can i remove it from codes?
Can you please explain what is this code for?
Thanks
That code is for setting up 1 year browser caching for static files. You may use Cloudflare Page caching as normally you do. There shouldn’t be any problem.
For Nginx cache helper (I take this info from offical site
There’s a ‘purge all’ button? Does it purge the whole site?
Yes, it does. It physically empties the cache directory. It is set by default to /var/run/nginx-cache/.
So the default is /var/run/nginx-cache/
can we change fastcgi_cache_path /var/www/cache to /var/run/nginx-cache/ ?
Thanks
I finally installed wordpress with this guide. But I see only www version but not the non-www version. Is there any changes that I need to do.
Redirects to www version even If I enter non-www version.
You need to point DNS records for both hostnames. Second, make sure dot is not missing from the beginning of example.com in this code –
server_name .example.com;in the NGINX connfig at step 6. Another thing, Redirect from www to non-www or vice-versa (as neccessary) is taken care automatically from WordPress. You do not need to put any extra code for it.which is the best & compatible server side cache plugin If I use FastCGI server block code along with Nginx Cache plugin..
W3 Total Cache or WP Rocket
I have 2 questions
1) What if i have 2 domains on different cloudflare accounts?
Create a cloudflare.ini file inside /root/.secrets/ directory.
mkdir -p /root/.secrets/ && cd /root/.secrets/ && nano cloudflare.ini
Add below code and save using CTRL+O and exit using CTRL+X
dns_cloudflare_email = “[email protected]”
dns_cloudflare_api_key = “XXXXXXXXXXXXXXXXX”
/root/.secrets/1domaincloudfare.ini
/root/.secrets/2domaincloudfare.ini
certbot certonly –dns-cloudflare –dns-cloudflare-credentials 1domaincloudfare.ini -d example.com,*.1domain.com –preferred-challenges dns-01
certbot certonly –dns-cloudflare –dns-cloudflare-credentials 2domaincloudfare.ini -d example.com,*.2domain.com –preferred-challenges dns-01
Do this work?
2) If we have 2 domains in the same account on cloudflare can we use 1 cloudflare.ini
certbot certonly –dns-cloudflare –dns-cloudflare-credentials /root/.secrets/cloudflare.ini -d 1domain.com,*.example.com –preferred-challenges dns-01
certbot certonly –dns-cloudflare –dns-cloudflare-credentials /root/.secrets/cloudflare.ini -d 2domain.com,*.example.com –preferred-challenges
dns-01
3) If we dont use cloudflare what will our ns for domain?
CLoud VPNs IP?
ns1= 68.28.65.84
ns2= 68.28.65.84
Is this right?
thanks for your replies
1. True
2. True
3. I have no idea about it. I prefer using CF DNS.
Can we create multi wordpress sites on different domain in the same machine with this
method?
I think only changement is in the FastCGI?
server {
root /var/www/aaa.com/wordpress;
index index.php index.html index.htm;
server_name .aaa.com;
client_max_body_size 0;
server {
root /var/www/bbb.com/wordpress;
index index.php index.html index.htm;
server_name .bbb.com;
client_max_body_size 0;
server {
root /var/www/ccc.com/wordpress;
index index.php index.html index.htm;
server_name .ccc.com;
client_max_body_size 0;
is this make a problem cache path is the same path for 3 web site? /var/www/cache
Is this method works?
1 machine 3 different domain and wordpress?
Thanks
Not for multiple sites.
What do you think about Plesk Panel?
It is easy to install plesk and create a wordpress site.
Easy to find trial keys and we can use it unlimited.
If it expires sites goes on ftp works and only plesk panel does not work but there are too much trial keys
It has nginx cache.
Do you recommend why and why not?
Thanks
I do not trust 3rd-parties installers.
Do all commands work for Centos 8?
Sorry, this is for Ubuntu OS only not for Centos 8.
hello gulshanji i wanted to use cloudflare ssl direct from thier website and not thru api with fast cgi then what would the config
Hey bro what is your thoughts on EasyEngine and SlickStack etc or one click app instead to automate? what is your favorite and will you make any tut bro
Sure, there is one. I will post about it. Thanks for your feedback.
The FastCGI server block config throws 404 Errors.
fastcgi_pass unix:/run/php/php7.4-fpm-example.sock;
should be:
fastcgi_pass unix:/run/php/php7.4-fpm.sock;
And it is missing config for location /
This config must be defined:
location / {
try_files $uri $uri/ /index.php$is_args$args;
}
I see, it was intended for seperate user. But, to keep generic I have corrected. Thanks for pointing out.
Without the location / block only the home page was accessible.
When I added the below block i was able to access the post and pages.
location / {
try_files $uri $uri/ /index.php$is_args$args;
}
Hello Alpesh, Corrected. Thanks again for your tip.
It was a good article
Thanks for your comment.
Nice tutorial. Does it come with email hosting? Looking to make a small site in Singapore using VultrHF
E-mail is a different thing. G Suite by Google services is specialized in this segment.
What are the differences if any between doing this method and using the vultr 1 click install? I have also read about centminmod. Is that somrthing u will recommend for having a fast LEMP stack? Tnx
I alwyas keep this guide bookmarket to my web browser! You never know when I would need to setup a new LEMP server ! Thanks Gulshan
Thanks for your comment.
hi, Gulshan thanks for sharing.
can u please share how to install wp on subfoler?
This article is like Life-Saver for one of my website. I was about to move from Google Cloud to Digital Ocean because the trial was expired and I also wanted to use DigitaOcean because it is in-expensive yet powerful and gives great experience.
Previously, I used webinoly stack which was straightforward for installing WordPress but later on I got to know from Gulshan that there are so many issues with that stack so, this time I was going to do it manually. I checked the official guide by Digital ocean but end up with many confusion and issues. Then, I fortunately asked Gulshan for help and he recommended this article for me.
I installed WordPress easily and very fast even fast that Webinoly stack. Thanks a lot Gulshan for writing this amazing article. Hats off to you bro!!🎩
Hi Gulshan, I am also receiving the test failed error on step 7. I have tried several times now on different setup and still stuck here. Please could you help?
Please carefully read the post and then copy-paste code in Terminal. Sometime you need to replace with your own domain. Doing mistake can return error. Else, no wise. I use this guide everyday for myself. I am not aware about any problem.
In case of trouble
1. Run test using
nginx -t2. Check logs to get proper hint
tail -f /var/log/nginx/error.log3. Delete existing or earlier created virtualhost
rm /etc/nginx/sites-available/default && rm /etc/nginx/sites-enabled/default4. Make sure to replace example.com at all places, a) when you create conf file, its naming. b) when you add conf file and c) when you create symlink, check your command its conf file name must match with first process.
I feel in most cases, chances are you did not replaced
server_name .example.com;to own domain, or you did not obtained SSL. All steps are written in serial order as it should be.I am facing problem of infinite loop redirects. I had use fastcache code. how to fix it
Please try Full SSL mode of Cloudflare. Then check again!
How to check if fastcgi cache is working or not? while running sudo
curl -I https://example.comit is not showing x-cache parameterHey Gulshan,
In the 7th step while texting ngnix I got
nginx: [emerg] open() “/etc/nginx/sites-enabled/example.com” failed (2: No such file or directory) in /etc/nginx/nginx.conf:62
nginx: configuration file /etc/nginx/nginx.conf test failed
This error. How I can solve it? also what the error.
Please delete your existing server block and create again at sites-available and symlink at sites-enabled directory. The step 6 and 7 cover that clearly. Consider following patiently without any error. If you still face any problem, do let me know. Thanks for taking to leave your valuable comment.
Hi would like to know after configuring Fastcgi do we still need other caching plugin to speed up WordPress site?
Wonderful tutorial just complete solution for Nginx Fast CGI
Thanks Wasim for your kind feedback.
How Can I setup FastCGI on my ngnix server guided by you….
I have updated my article.
i want redirect too www plz help me urgent
If your WordPress General Settings has www version, server will do automatically. No additional action is required. In case you started WordPress installation at non-www version, then you need to migrate by changing at Database level.
You may use Better Search Replce plugin to perform this changes.
It Really Works Gulshan Bro. Thanks Really dear You are awesome…
Hello Gulshan Bro, First i want to say you that this is very beautiful and required post. I am really appreciating your work. but i have a problem can you please tell me
i have a droplet with digitalocean ($5/month plan) and i want to host multiple wordpress sites only with nginx(lemp ubuntu 18.04).
In simple i mean that this tutorial is complete to install a single wordpress and i did it but tell host it in some other sites
Hey Rohit,
Assuming, second site is example2.org
You need to follow steps this way.
1. create a new directory and add WordPress (Ref: steps 31)
cd /var/www/mkdir example2
wget https://wordpress.org/latest.tar.gz
tar -xvzf latest.tar.gz
mv -v wordpress/* /var/www/example2
rm -rf index.nginx-debian.html latest.tar.gz wordpress
chown -R www-data:www-data /var/www/
sudo chmod -R 755 /var/www
2. Create a new Server block with root path located to new directory as created in step 1.
cd /etc/nginx/sites-available/

nano gulshankumar-org
server {listen 80;
root /var/www/example2;
index index.php index.html index.htm;
server_name example2.org www.example2.org;
...
3. Point your example2.org domain to DNS, then install SSL
certbot --nginx -d example2.org -d www.example2.org4. Create new MySQL database
sudo mysql -u root -pcreate database example2;
grant all on example2.* to example2@localhost identified by 'TYPE HERE PASSWORD';
flush privileges;
exit;
5. Proceed to Installation by visiting your site
https://example2.orgLet me know if you have any additional question. You can always visit our forum for quick assistance.
Thanks & Regards,
Gulshan
It Really Works Gulshan Bro. Thanks Really dear You are awesome…
Hello Gulshan you written a comprehensive guide i highly appreciate your work. Can you help me with an error? Actually i have two websites the first website i have already hosted on Vultr following the above guide.
But when try to host a another WordPress website iam getting error. I followed the above steps you mentioned in comments. But still not able to fix it. The error is my website not working after hosting another WordPress website.
If possible please guide me step by step instructions. It will help me alot. Thanks in advance.
Consider checking log available at
/var/log/nginx/directory. Usenginx -tcommand to see what mistake causing issue.Very well. thank you so much
How to auto-renew SSL?
Add below cron job
crontab -eAdd below command and save.
15 3 * * 7 certbot renew --post-hook "service nginx restart"Thanks sos un groso, very well tutorial
Thank you for your tutorial, its the first one that actually showed me the wordpress setup page.
When I went to upload a plugin I received this message. “The uploaded file exceeds the upload_max_filesize directive in php.ini”
How do I increase the max filesize?
Please see the step 33.5
Thanks Gulshan, Finally I moved to NGINX server. You have created a great tutorial for beginners.
You’re welcome bro 🙂
Hi,
Thank you for this awesome guide.
How can I install WordPress multisite on Ubuntu 18.04 with Nginx?
Finally I loved this step by step tutorial with proper images.
Thanks Bhaiya you are awesome
Thanks a lot Gulshan. You save my breath
I search everywhere but not find any good article
You explained very well along with security concern
well done