Neste artigo, vai aprender através do processo de instalação manual do WordPress num servidor Ubuntu 22.04 usando NGINX, MariaDB, e PHP 8.2. Estas pilhas irão fornecer uma plataforma poderosa e eficiente para executar o seu site WordPress com uma velocidade surpreendente.
Siga estes 3 passos e veja o vídeo. Precisa de ajuda? Contacte-me.😊
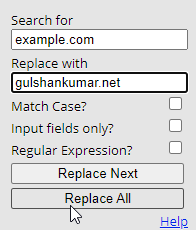
Agora antes de começar, aqui vai uma dica rápida. Use Search and Replace Extension para mudar em massa o exemplo.com para o seu próprio domínio nesta página web.
Dica de poupança de tempo para os utilizadores do Google Chrome.
Parte A: Manter os Nameservers activos
Vamos utilizar Cloudflare DNS para obter o certificado Let’s Encrypt Wildcard SSL. Complete este passo primeiro para desfrutar de migração de tempo zero.
Verificar Nameservers actuais
- Encontre os seus Nameservers activos em https://www.whatsmydns.net/#NS/example.com
- Se vir que utiliza o seu anterior Hosting ou Domain registrar NS por defeito, então deve substituir por Cloudflare.
- Aprenda a utilizar o DNS Cloudflare
Parte B: Preparar um servidor Ubuntu 22.04 LTS Server

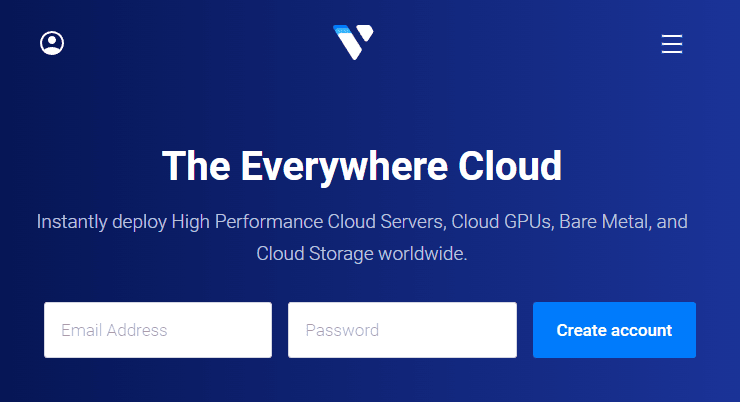
1. Inscreva-se na Vultr para obter $100 Créditos grátis (Válido por 30 dias)
Como alguém que já experimentou tantas empresas de servidores Cloud, a minha experiência diz que não se pode errar com a Vultr. Estes tipos são genuínos e atenciosos quando se trata de apoio e serviços.
⚡ Desempenho
- NVME / SSD
- 3.7 GHz CPU
- Velocidade de rede até 5Gbps
- Datacenter na América, Europe, Asia, Austraillia
- IPV6 pronto
💡 Características
- Iniciante – Painel Amigável
- Um clique para Snapshot
- Cópias de segurança automáticas (pagas)
- Firewall Nuvem Livre
- Protecção DDoS (Paid)
- Virtualização a 100% KVM
⚙ Apoio
- PayPal/Cartão
- Suporte de bilhetes 24/7
- Documentação
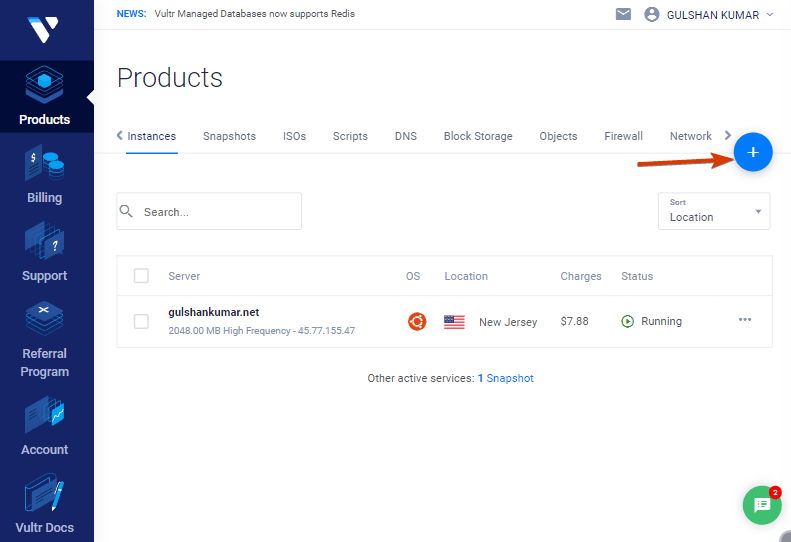
Criar um novo Servidor VPS
Basta clicar no botão “mais” para começar
3. Escolher Servidor de Alta Frequência
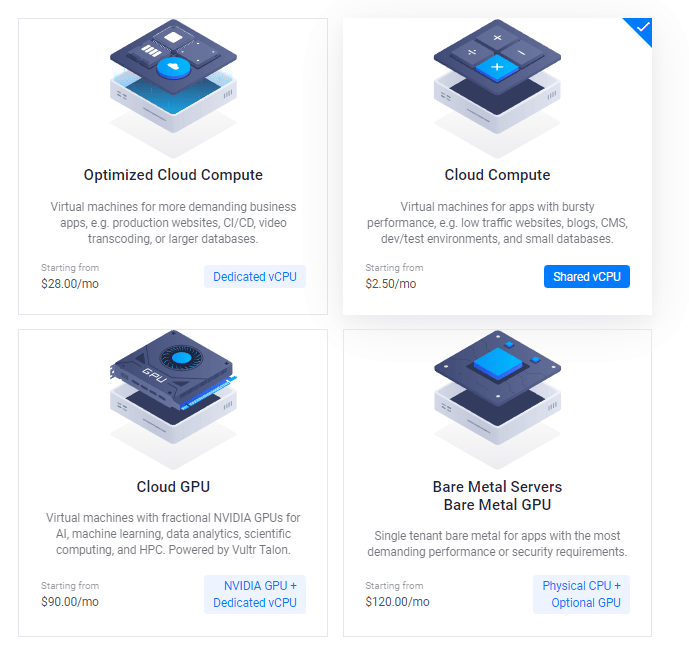
Depois disto, pode seleccionar a opção AMD High Performance ou Intel High Frequency em Tecnologia de CPU & Armazenamento. Tem o CPU e o Disco NVMe mais rápido de sempre. Se o orçamento for menor, então vá com o plano Regular com CPU Intel, no qual obterá o disco SSD.
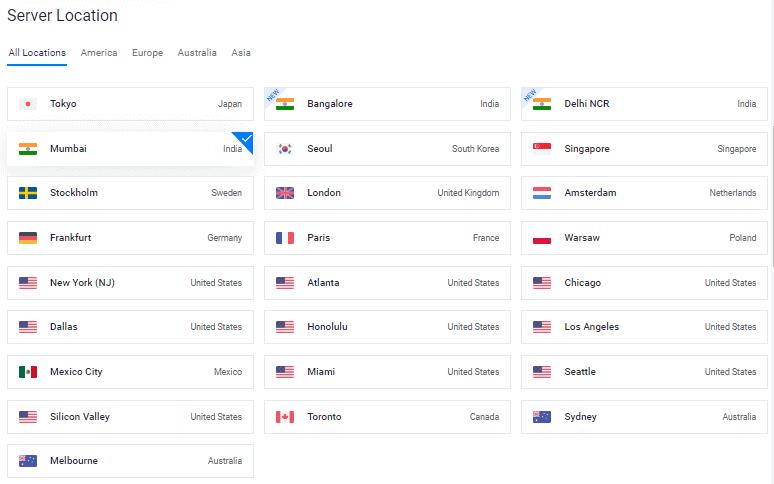
4. Escolha uma localização de servidor
Escolha uma localização de servidor que esteja próxima ao seu público-alvo.
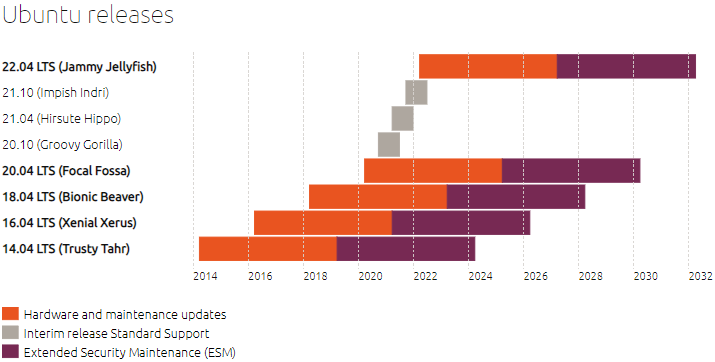
5. Selecione o sistema operacional Ubuntu 22.04 x64
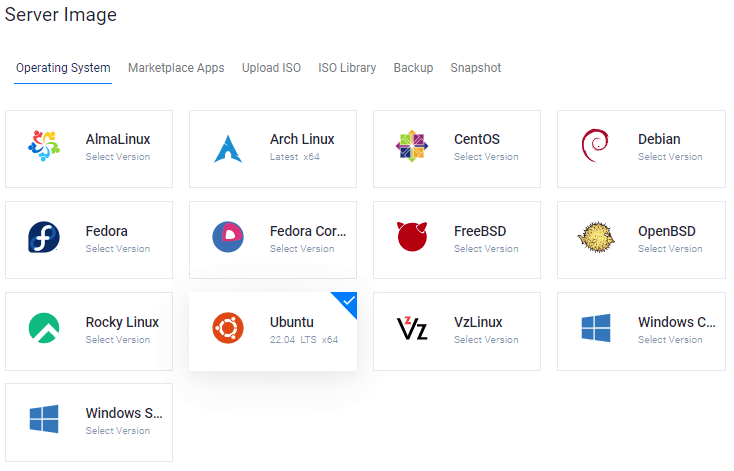
Long Term Support (LTS) is a product lifecycle management policy in which a stable version of computer software is maintained for a longer period of time than the standard edition.
6. Escolha um tamanho de servidor
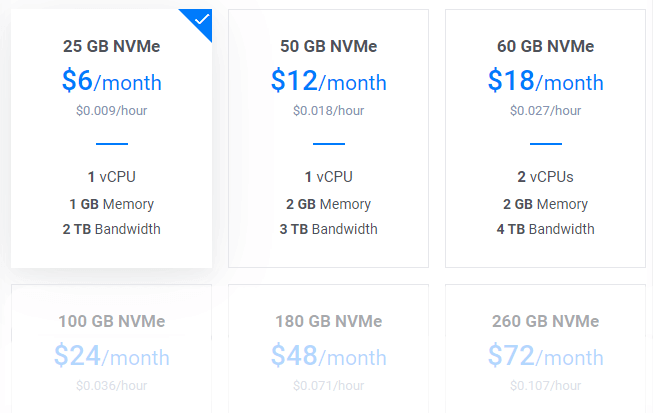
O plano de $6/mo seria um óptimo ponto de partida para um novo blogue. Pode actualizar a qualquer momento, de acordo com os requisitos.
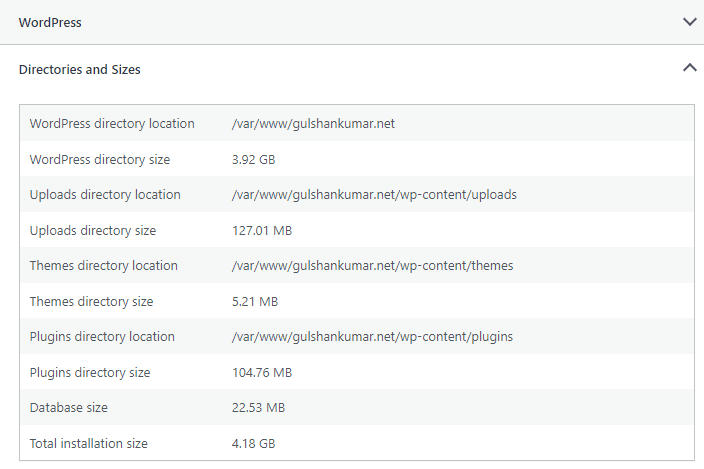
Dica: Se estiver a migrar, verifique o tamanho total da instalação em Informação sobre saúde do Sítio.
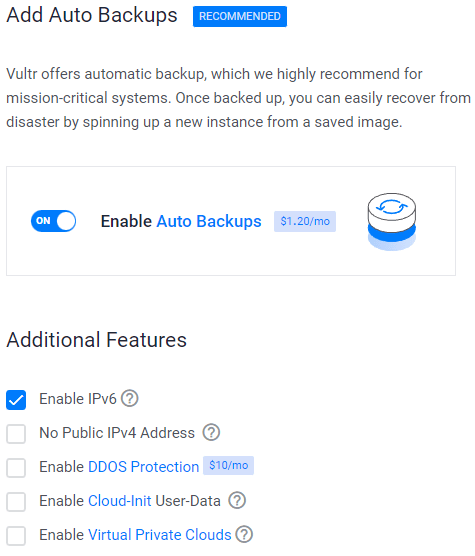
Habilitar IPV6, Backup
8. Acrescentar uma chave SSH
Este é um passo recomendado e opcional para o reforço da segurança.
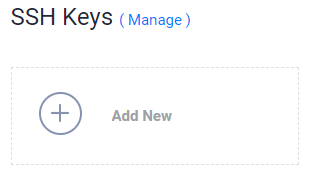
- Clique em Adicionar novo botão para adicionar uma nova chave SSH para submeter a sua chave 🔒Public.
- Gerar Chaves usando o método abaixo conforme o seu SO.

- Descarregar a aplicação PuTTy.
- Procura de PuTTygen no menu Iniciar
- Clique em Gerar botão e passe o ponteiro do rato
- Copiar chave pública e fornecer à Vultr
- Introduza a frase-chave
- Guardar 🔑Private Chave no local mais seguro.
- Isto pode ser usado para login no SSH ou SFTP.

- Executar: ssh-keygen -t rsa. Para uma chave mais segura 4096-bit, correr: ssh-keygen -t rsa -b 4096
- Prima enter quando lhe for perguntado onde pretende guardar a chave (isto irá utilizar a localização predefinida).
- Introduza uma frase-chave para a sua chave.
- Run
cat ~/.ssh/id_rsa.pub– isto dar-lhe-á a chave no formato adequado para colar no painel de controlo. - Certifique-se de que faz cópias de segurança do ficheiro
~/.ssh/id_rsa. Isto não pode ser recuperado se for perdido.
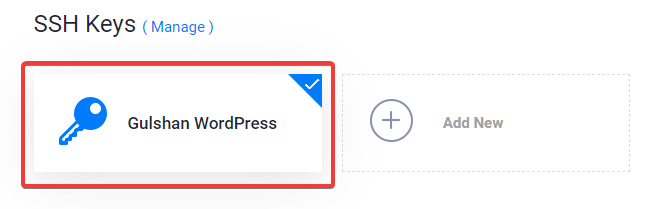
Seleccione a sua chave SSH
Seguindo estas etapas, anexará a sua chave pública à sua nova Instância. Depois, poderá iniciar sessão no SSH utilizando a palavra-passe de texto simples e a chave SSH ambas.
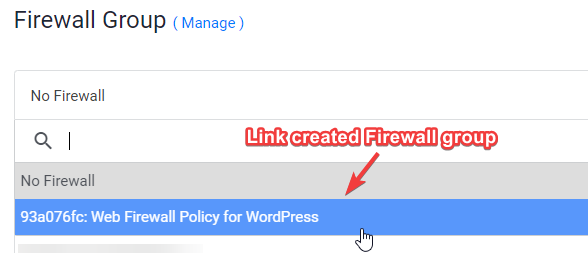
9. Ligar a regra da Firewall Web à Instância do Servidor
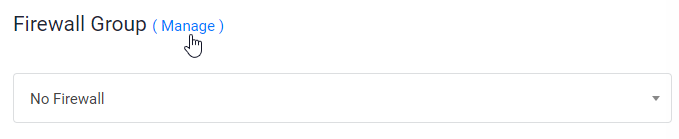
- Clique em Gerir e criar um novo Grupo Firewall.
- Permitir a porta TCP 22 para SSH. 80 para HTTP e 443 HTTPS para IPV4 e IPV6, ambas as regras.
- Uma vez feito, ligue o grupo Firewall à sua Instância.
10. Digite Hostname e clique em Deploy Now
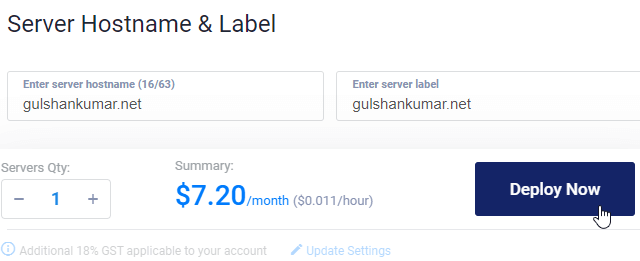
Verá agora a instalação em curso
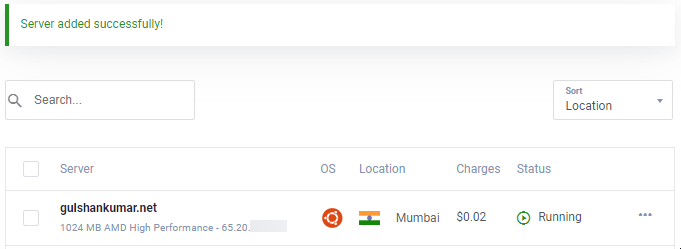
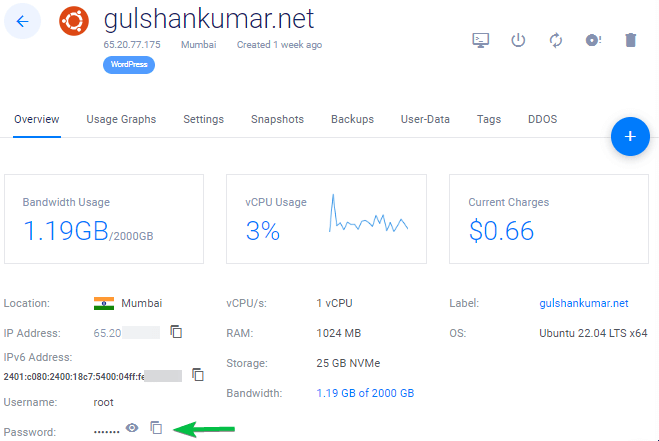
Ir para a página de Nova Instância
Copiar endereço IP, nome de utilizador e palavra-passe. A sua porta padrão é 22.
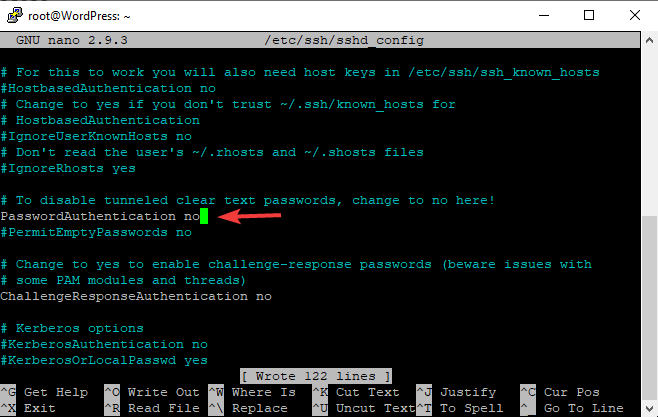
12. Desactivar Password Login
Por razões de segurança, recomenda-se desactivar a autenticação por senha e permitir apenas a autenticação com base em chaves.
- Editar o ficheiro de configuração
nano /etc/ssh/sshd_config - Encontrar (CTRL + W) e pesquisar
PasswordAuthentication - Mudança de valor de sim para não
- Para salvar o tipo, CTRL + O
- Reiniciar o serviço SSH usando o comando
sudo service ssh restart
A partir da próxima vez, só poderá usar SSH através da chave, conforme mostrado no vídeo.
Para Linux ou Mac, utilizar Terminal com comando como este
ssh [email protected] -p 22 -i id_rsa
Passo 13. Desactivar o UFW
Quando se implementa uma nova instância na VULTR, esta vem com a UFW (Uncomplicated Firewall) activada que mantém todas as portas bloqueadas excepto a porta SSH 22. Isto pode retornar ERR_CONNECTION_REFUSED Error no navegador. Para corrigir isto, eu sugeriria manter o UFW desactivado.
ufw disableExplicação suficiente para as coisas básicas. Agora, vou acelerar o processo original para a instalação do WordPress na pilha de LEMP.
Parte C. Implantar WordPress no LEMP Stack
1. Actualização de repositórios
Digite abaixo o comando e prima a tecla enter
sudo -sapt update && apt upgrade -y && apt dist-upgrade && apt autoclean && apt autoremove -y && rebootou
wget -qO update https://dl.gulshankumar.net/update && chmod +x updateDa próxima vez, usar sempre abaixo o comando de atalho para actualizar.
./update2. Instalar o MariaDB com segurança
Faça novamente login e entre com o seguinte comando
sudo apt install mariadb-server -y && sudo mysql_secure_installationResponder às perguntas abaixo
- Enter current password for root (enter for none): Prima a tecla Enter
- Switch to unix_socket authentication [Y/n]: Prima N e entre
- Set root password? [Y/n]: Prima a tecla Enter.
- New password: Digite a sua palavra-passe, pode usar Dashlane para gerar. Direito de clicar em colar.
- Re-enter new password: Digite novamente a sua palavra-passe.
Após a definição bem sucedida da senha, verá
Password updated successfully!
Reloading privilege tables..
... Success!
Além disso, é necessário responder às seguintes perguntas.
- Remove anonymous users? [Y/n]: Prima Y e entre
- Disallow root login remotely? [Y/n]: Prima Y e entre
- Remove test database and access to it? [Y/n]: Prima Y e entre
- Reload privilege tables now? [Y/n]: Prima Y e entre
3. Criar uma nova base de dados para WordPress
Inicie sessão no MySQL, prima a tecla enter quando pedir a palavra-passe.
mysql -u root -pCriar uma nova base de dados, e conceder privilégios para utilizar o seu utilizador com palavra-passe. É aqui que o WordPress armazena toda a informação de correio, páginas, temas, plugin, etc.
create database wordpress;
grant all on wordpress.* to gulshan@localhost identified by '5pY8CKJxDRJEGQNkX7';
flush privileges;
exit;
Onde o seu …
database is wordpress
username is gulshan
password is 5pY8CKJxDRJEGQNkX7
Dica: Considere o uso de credencial de login única
4. Instalar PHP 8.2, NGINX e definir Permissão
sudo add-apt-repository ppa:ondrej/php -y && apt update && apt install php8.2-fpm php8.2-common php8.2-mysql php8.2-xml php8.2-xmlrpc php8.2-curl php8.2-gd php8.2-imagick php8.2-cli php8.2-dev php8.2-imap php8.2-mbstring php8.2-soap php8.2-zip php8.2-bcmath -y && sed -i 's/;cgi.fix_pathinfo=1/cgi.fix_pathinfo=0/g' /etc/php/8.2/fpm/php.ini && service php8.2-fpm restart && apt install nginx -y && chown -R www-data:www-data /var/www/ && chmod -R 755 /var/wwwAjustar a configuração PHP
A maioria dos temas e plugins extravagantes requer uma configuração PHP de alta qualidade para funcionar. Por conseguinte, devemos fazer estas alterações.
sed -i 's/memory_limit = 128M/memory_limit = 512M/g' /etc/php/8.2/fpm/php.ini
sed -i 's/post_max_size = 8M/post_max_size = 128M/g' /etc/php/8.2/fpm/php.ini
sed -i 's/max_file_uploads = 20/max_file_uploads = 30/g' /etc/php/8.2/fpm/php.ini
sed -i 's/max_execution_time = 30/max_execution_time = 900/g' /etc/php/8.2/fpm/php.ini
sed -i 's/max_input_time = 60/max_input_time = 3000/g' /etc/php/8.2/fpm/php.ini
sed -i 's/upload_max_filesize = 2M/upload_max_filesize = 128M/g' /etc/php/8.2/fpm/php.ini
service php8.2-fpm restart
5. Instalar Wildcard Let’s Encrypt SSL Certificate
Criar um ficheiro cloudflare.ini dentro de /root/.secrets/directório.
mkdir -p /root/.secrets/ && cd /root/.secrets/ && nano cloudflare.iniAdicionar código abaixo e guardar usando CTRL+O e sair usando CTRL+X
dns_cloudflare_email = "[email protected]"
dns_cloudflare_api_key = "XXXXXXXXXXXXXXXXX"
Encontre o seu e-mail Cloudflare e chave API Global em “O Meu Perfil” > Tokens API > Chave API Global
chmod 0400 /root/.secrets/cloudflare.iniInstalar Certbot e DNS Authenticator de acordo com OS e servidor web HTTP
snap install --beta --classic certbot
snap set certbot trust-plugin-with-root=ok
snap install --beta certbot-dns-cloudflare
snap connect certbot:plugin certbot-dns-cloudflare
Obter Certificado SSL Wildcard
certbot certonly --dns-cloudflare --dns-cloudflare-credentials /root/.secrets/cloudflare.ini -d example.com,*.example.com --preferred-challenges dns-01Definir Renovação Automática usando Cron Job
- Type
crontab -e - Type 1 for nano editor
- Enter below command and save
0 0 * * * /etc/init.d/nginx reload >/dev/null 2>&1Renovação de testes
certbot renew --dry-run6. Configurar bloco de servidor Nginx
Isto é importante onde precisa de configurar o seu domínio, como NGINX deve tratar os seus pedidos HTTP.
Eliminar blocos de servidores predefinidos.
rm /etc/nginx/sites-available/default && rm /etc/nginx/sites-enabled/defaultCriar um novo bloco de servidor
cd /etc/nginx/sites-available/
nano example.com- Substituir exemplo.com por domínio próprio
- Introduza o código abaixo e prima CTRL+O para guardar e CTRL+X para sair.
Geral (Sem Caching de Página)
server {
    listen         80;
    return 301 https://$host$request_uri;
}
server {
# Document Root
root /var/www/html;
index index.php index.html index.htm;
server_name .example.com;
client_max_body_size 0;

    listen [::]:443 ssl http2 ipv6only=on;
    listen 443 ssl http2;
        ssl_protocols TLSv1.1 TLSv1.2 TLSv1.3;
        ssl_certificate /etc/letsencrypt/live/example.com/fullchain.pem;
        ssl_certificate_key /etc/letsencrypt/live/example.com/privkey.pem;
        ssl_prefer_server_ciphers on;
        ssl_session_cache   shared:SSL:20m;
        ssl_session_timeout 20m;
        ssl_ciphers 'TLS13+AESGCM+AES128:EECDH+AES128';


error_page 404 /404.html;
error_page 500 502 503 504 /50x.html;

# Block XMLRPC
location = /xmlrpc.php {
    deny all;
}

location / {
    try_files $uri $uri/ /index.php$is_args$args;
}

location ~* \.php$ {
if ($uri !~ "^/uploads/") {
fastcgi_pass unix:/run/php/php8.2-fpm.sock;
}
include fastcgi_params;
fastcgi_param SCRIPT_FILENAME $document_root$fastcgi_script_name;
fastcgi_param SCRIPT_NAME $fastcgi_script_name;
}
location = /favicon.ico {
log_not_found off;
access_log off;
}

location = /robots.txt {
log_not_found off;
access_log off;
allow all;
}

location ~* .(css|gif|svg|ico|woff2|eot|jpeg|webp|jpg|js|png)$ {
expires 1y;
log_not_found off;
}

# Enable Gzip compression.
gzip on;

# Disable Gzip on IE6.
gzip_disable "msie6";

# Allow proxies to cache both compressed and regular version of file.
# Avoids clients that don't support Gzip outputting gibberish.
gzip_vary on;

# Compress data, even when the client connects through a proxy.
gzip_proxied any;

# The level of compression to apply to files. A higher compression level increases
# CPU usage. Level 5 is a happy medium resulting in roughly 75% compression.
gzip_comp_level 5;

# Compress the following MIME types.
gzip_types
 application/atom+xml
 application/javascript
 application/json
 application/ld+json
 application/manifest+json
 application/rss+xml
 application/vnd.geo+json
 application/vnd.ms-fontobject
 application/x-font-ttf
 application/x-web-app-manifest+json
 application/xhtml+xml
 application/xml
 font/opentype
 image/bmp
 image/svg+xml
 image/x-icon
 text/cache-manifest
 text/css
 text/plain
 text/vcard
 text/vnd.rim.location.xloc
 text/vtt
 text/x-component
 text/x-cross-domain-policy;
}
Para o facilitador de cache
server {
    listen         80;
    return 301 https://$host$request_uri;
}
server {
# Document Root
root /var/www/html;
index index.php index.html index.htm;
server_name .example.com;
client_max_body_size 0;

    listen [::]:443 ssl http2 ipv6only=on;
    listen 443 ssl http2;
        ssl_protocols TLSv1.1 TLSv1.2 TLSv1.3;
        ssl_certificate /etc/letsencrypt/live/example.com/fullchain.pem;
        ssl_certificate_key /etc/letsencrypt/live/example.com/privkey.pem;
        ssl_prefer_server_ciphers on;
        ssl_session_cache   shared:SSL:20m;
        ssl_session_timeout 20m;
        ssl_ciphers 'TLS13+AESGCM+AES128:EECDH+AES128';


error_page 404 /404.html;
error_page 500 502 503 504 /50x.html;


# Block XMLRPC
location = /xmlrpc.php {
    deny all;
}


# Rules for Cache Enabler Plugin - Static File Serving

    set $cache_uri $request_uri;

    # bypass cache if POST requests or URLs with a query string
    if ($request_method = POST) {
    set $cache_uri 'nullcache';
    }

    if ($query_string != '') {
    set $cache_uri 'nullcache';
    }

    # bypass cache if URLs containing the following strings
    if ($request_uri ~* '(/wp-admin/|/xmlrpc.php|/wp-(app|cron|login|register|mail).php|wp-.*.php|/feed/|index.php|wp-comments-popup.php|wp-links-opml.php|wp-locations.php|sitemap(index)?.xml|[a-z0-9-]+-sitemap([0-9]+)?.xml)') {
    set $cache_uri 'nullcache';
    }

    # bypass cache if cookies contain the following strings
    if ($http_cookie ~* '(wp-postpass|wordpress_logged_in|comment_author)_') {
    set $cache_uri 'nullcache';
    }

    # custom installation subdirectory
    set $custom_subdir '';

    # default HTML file
    set $cache_enabler_uri '${custom_subdir}/wp-content/cache/cache-enabler/${http_host}${cache_uri}${scheme}-index.html';

    # WebP HTML file
    if ($http_accept ~* 'image/webp') {
    set $cache_enabler_uri '${custom_subdir}/wp-content/cache/cache-enabler/${http_host}${cache_uri}${scheme}-index-webp.html';
    }

    location / {
    gzip_static on; # this directive is not required but recommended
    try_files $cache_enabler_uri $uri $uri/ $custom_subdir/index.php?$args;
    }

location ~* \.php$ {
if ($uri !~ "^/uploads/") {
fastcgi_pass unix:/run/php/php8.2-fpm.sock;
}
include fastcgi_params;
fastcgi_param SCRIPT_FILENAME $document_root$fastcgi_script_name;
fastcgi_param SCRIPT_NAME $fastcgi_script_name;
}
location = /favicon.ico {
log_not_found off;
access_log off;
}

location = /robots.txt {
log_not_found off;
access_log off;
allow all;
}

location ~* .(css|gif|svg|ico|jpeg|webp|woff2|eot|jpg|js|png)$ {
expires 1y;
log_not_found off;
}

# Enable Gzip compression.
gzip on;

# Disable Gzip on IE6.
gzip_disable "msie6";

# Allow proxies to cache both compressed and regular version of file.
# Avoids clients that don't support Gzip outputting gibberish.
gzip_vary on;

# Compress data, even when the client connects through a proxy.
gzip_proxied any;

# The level of compression to apply to files. A higher compression level increases
# CPU usage. Level 5 is a happy medium resulting in roughly 75% compression.
gzip_comp_level 5;

# Compress the following MIME types.
gzip_types
 application/atom+xml
 application/javascript
 application/json
 application/ld+json
 application/manifest+json
 application/rss+xml
 application/vnd.geo+json
 application/vnd.ms-fontobject
 application/x-font-ttf
 application/x-web-app-manifest+json
 application/xhtml+xml
 application/xml
 font/opentype
 image/bmp
 image/svg+xml
 image/x-icon
 text/cache-manifest
 text/css
 text/plain
 text/vcard
 text/vnd.rim.location.xloc
 text/vtt
 text/x-component
 text/x-cross-domain-policy;
}- É necessário instalar o plugin Cache Enabler para usufruir dos benefícios da cache.
FastCGI (Recomendado)
Se quiser usar FastCGI Cache, em vez disso implemente abaixo o Bloco de Servidor.
# NGINX Cache path
fastcgi_cache_path /var/run/nginx-cache levels=1:2 keys_zone=WORDPRESS:100m inactive=6h;
fastcgi_cache_key "$scheme$request_method$host$request_uri";
fastcgi_cache_use_stale error timeout invalid_header http_500;
fastcgi_ignore_headers Cache-Control Expires Set-Cookie;

server {
    listen         80;
    return 301 https://$host$request_uri;
}
server {
root /var/www/html;
index index.php index.html index.htm;
server_name .example.com;
client_max_body_size 0;

    listen [::]:443 ssl http2 ipv6only=on;
    listen 443 ssl http2;
        ssl_protocols TLSv1.1 TLSv1.2 TLSv1.3;
        ssl_certificate /etc/letsencrypt/live/example.com/fullchain.pem;
        ssl_certificate_key /etc/letsencrypt/live/example.com/privkey.pem;
        ssl_prefer_server_ciphers on;
        ssl_session_cache   shared:SSL:20m;
        ssl_session_timeout 20m;
        ssl_ciphers 'TLS13+AESGCM+AES128:EECDH+AES128';

error_page 404 /404.html;
error_page 500 502 503 504 /50x.html;


set $skip_cache 0;
    if ($request_method = POST) {set $skip_cache 1;}
    if ($request_uri ~* "/wp-admin/|/xmlrpc.php|/wp-.*.php|index.php|sitemap") {set $skip_cache 1;}
    if ($http_cookie ~* "comment_author|wordpress_[a-f0-9]+|wp-postpass|wordpress_no_cache|wordpress_logged_in") {set $skip_cache 1;}
    if ($query_string = "unapproved*") {set $skip_cache 1;}
    if ($cookie_woocommerce_items_in_cart = "1" ){ set $skip_cache 1;}
    if ($request_uri ~* "/(cart|checkout|my-account)/*$") {set $skip_cache 1;}

# Block XMLRPC
location = /xmlrpc.php {
    deny all;
}

location / {
try_files $uri $uri/ /index.php$is_args$args;
}

location ~* \.php$ {

 if ($uri !~ "^/uploads/") {
        fastcgi_pass unix:/run/php/php8.2-fpm.sock;
        }

        try_files                       $uri =404;
        include                         /etc/nginx/fastcgi_params;
        fastcgi_param                   SCRIPT_FILENAME $document_root$fastcgi_script_name;
        fastcgi_pass                    unix:/run/php/php8.2-fpm.sock;
        fastcgi_index                   index.php;
                fastcgi_cache_bypass $skip_cache;
                fastcgi_no_cache $skip_cache;
                fastcgi_cache WORDPRESS;
                fastcgi_cache_valid 200 30d;
                fastcgi_cache_valid 301 302 303 307 308 404 410 451 1m;
                add_header X-Cache $upstream_cache_status;

}

location = /favicon.ico {
log_not_found off;
access_log off;
}

location = /robots.txt {
log_not_found off;
access_log off;
allow all;
}

location ~* .(css|gif|ico|svg|webp|woff2|eot|jpeg|jpg|js|png)$ {
expires 1y;
log_not_found off;
}

# Enable Gzip compression.
gzip on;

# Disable Gzip on IE6.
gzip_disable "msie6";

# Allow proxies to cache both compressed and regular version of file.
# Avoids clients that don't support Gzip outputting gibberish.
gzip_vary on;

# Compress data, even when the client connects through a proxy.
gzip_proxied any;

# The level of compression to apply to files. A higher compression level increases
# CPU usage. Level 5 is a happy medium resulting in roughly 75% compression.
gzip_comp_level 5;

# Compress the following MIME types.
gzip_types
 application/atom+xml
 application/javascript
 application/json
 application/ld+json
 application/manifest+json
 application/rss+xml
 application/vnd.geo+json
 application/vnd.ms-fontobject
 application/x-font-ttf
 application/x-web-app-manifest+json
 application/xhtml+xml
 application/xml
 font/opentype
 image/bmp
 image/svg+xml
 image/x-icon
 text/cache-manifest
 text/css
 text/plain
 text/vcard
 text/vnd.rim.location.xloc
 text/vtt
 text/x-component
 text/x-cross-domain-policy;
}
Para guardar, prima a tecla CTRL+O e Enter. Em seguida, sair do nano editor usando o comando CTRL+X.
No caso de FastCGI, é necessário utilizar o plugin ‘NGINX Helper‘. Funciona também com o URL codificado Hindi. Tenha em mente que não suporta AMP. Eu pessoalmente não uso AMP. (Recomendado)
Alternativamente, a cache NGINX funciona para purgar a URL AMP mas não suporta a URL codificada Hindi. Em configurações, deve manter o caminho da cache /var/run/nginx-cache/
Cuidado!
- Por exemplo, se estiver a utilizar o tema Newspaper e servir um tema móvel separado, por favor, colar sem o método FastCGI e utilizar um plugin WP Rocket porque pode servir um cache móvel separado fora da caixa.
7. Criar ligações simbólicas entre dois directórios
Se falhar este passo, pode obter ERR_CONNECTION_REFUSED
Para activar o bloco do servidor, crie uma ligação simbólica do seu ficheiro NGINX Server Block do directório /etc/nginx/sites-available/ para /etc/nginx/sites-enabled
Antes de correr abaixo do comando, substitua por favor exemplo.com para possuir o domínio.
ln -s /etc/nginx/sites-available/example.com /etc/nginx/sites-enabled/Configuração de teste
nginx -tReiniciar e actualizar
service nginx restart && service php8.2-fpm restart && service mysql restart && apt-get update && apt upgrade -y8. Instalar WordPress
Download WordPress files in /var/www/html directory and set permission.
cd /var/www/html && wget https://pt.wordpress.org/latest-pt_PT.tar.gz && tar -xvzf latest-pt_PT.tar.gz && mv -v wordpress/* /var/www/html && rm -rf index.nginx-debian.html latest-pt_PT.tar.gz wordpress && chown -R www-data:www-data /var/www/ && sudo chmod -R 755 /var/wwwPara actualizar a permissão no futuro, use o comando abaixo
chown -R www-data:www-data /var/www/ && sudo chmod -R 755 /var/www9. Actualização do DNS
Se estiver a alojar o WordPress localmente, quiser contornar o proxy ou quiser realizar uma migração sem tempo de paragem, este passo é útil. Eu geralmente prefiro no caso da área WordPress Dev estática 😉
- Se estiver a alojar o WordPress localmente, quiser contornar o proxy ou quiser realizar uma migração sem tempo de paragem, este passo é útil. Eu geralmente prefiro no caso da área WordPress Dev estática
Para Windows
- Ir para propriedades de
C:\Windows\System32\drivers\etc\hosts - Alterar a permissão “Segurança” para controlo total do seu nome de utilizador actual
- Agora pode editar livremente o ficheiro anfitrião sob o seu utilizador do Sistema e guardá-lo.
# Para a mesma máquina pode ter o endereço do local de acolhimento outro IP público
127.0.0.1 example.com
127.0.0.1 www.example.com
Este é o aspecto que deve ter.
Para Mac ou Linux
Pode editar o ficheiro anfitrião usando o comando abaixo
sudo nano /etc/hostsActualização do DNS com Cloudflare
- Se tudo estiver perfeito e quiser fazer o seu site ao vivo, inicie sessão no Cloudflare DNS e actualize o novo IP
| A | @ | IPV4 address |
| AAAA | @ | IPV6 address |
| CNAME | www | example.com |
onde @ denota domínio nú example.com
9. Visite o seu nome de domínio para configurar o WordPress
Se quiser manter o domínio da versão não-www para o seu WordPress, então visite a versão não-wwww.
https://example.com- Fornecer credencial de login na base de dados para iniciar a configuração do WordPress
- Instalação em execução
- Preencha os detalhes básicos do seu novo site e instale o WordPress.
- Iniciar sessão no WordPress
- Se utilizou FastCGI server block então a primeira coisa que deve fazer é instalar NGINX Cache plugin e configurar
/var/www/cachecomo caminho de cache.
Outras coisas necessárias
Utilize os Serviços SMTP plugin para o envio de e-mail do WordPress, caso contrário não poderá receber a ligação de redefinição de palavra-passe, formulário de contacto 7 mensagens.
Finalmente, a instalação do WordPress foi concluída. Mantenha sempre o backup.
Aprecio muito o vosso precioso tempo na leitura deste artigo. Vejo-o no próximo tutorial!
Exactly followed the same steps, but at the end i am getting 502 bad gateway. I built some sites with the same steps before, however i don’t know what changed now.
Consider checking the error log using command
tail -f /var/log/nginx/error.logto get a hint about exact issue.getting this
tail: cannot open ‘/var/log/error.log’ for reading: No such file or directory
tail: no files remaining
Sorry, there was a typo in my previous comment. Try below command
tail -f /var/log/nginx/error.logCan you explain me what is the difference between inactive and fastcgi_cache_valid values? Can you explain them please? Thanks
location ~* .(css|gif|ico|svg|jpeg|jpg|js|png)$ {
expires 1y;
log_not_found off;
}
is this code for page caching?
I use cloudflare so it has page cache too.
If i use that can i remove it from codes?
Can you please explain what is this code for?
Thanks
That code is for setting up 1 year browser caching for static files. You may use Cloudflare Page caching as normally you do. There shouldn’t be any problem.
For Nginx cache helper (I take this info from offical site
There’s a ‘purge all’ button? Does it purge the whole site?
Yes, it does. It physically empties the cache directory. It is set by default to /var/run/nginx-cache/.
So the default is /var/run/nginx-cache/
can we change fastcgi_cache_path /var/www/cache to /var/run/nginx-cache/ ?
Thanks
Se o seu directório de cache for diferente, pode anulá-lo no seu wp-config.php, adicionando.
define('RT_WP_NGINX_HELPER_CACHE_PATH','/var/wwww/nginx-cache/')I finally installed wordpress with this guide. But I see only www version but not the non-www version. Is there any changes that I need to do.
Redirects to www version even If I enter non-www version.
You need to point DNS records for both hostnames. Second, make sure dot is not missing from the beginning of example.com in this code –
server_name .example.com;in the NGINX connfig at step 6. Another thing, Redirect from www to non-www or vice-versa (as neccessary) is taken care automatically from WordPress. You do not need to put any extra code for it.which is the best & compatible server side cache plugin If I use FastCGI server block code along with Nginx Cache plugin..
W3 Total Cache or WP Rocket
I have 2 questions
1) What if i have 2 domains on different cloudflare accounts?
Create a cloudflare.ini file inside /root/.secrets/ directory.
mkdir -p /root/.secrets/ && cd /root/.secrets/ && nano cloudflare.ini
Add below code and save using CTRL+O and exit using CTRL+X
dns_cloudflare_email = “[email protected]”
dns_cloudflare_api_key = “XXXXXXXXXXXXXXXXX”
/root/.secrets/1domaincloudfare.ini
/root/.secrets/2domaincloudfare.ini
certbot certonly –dns-cloudflare –dns-cloudflare-credentials 1domaincloudfare.ini -d example.com,*.1domain.com –preferred-challenges dns-01
certbot certonly –dns-cloudflare –dns-cloudflare-credentials 2domaincloudfare.ini -d example.com,*.2domain.com –preferred-challenges dns-01
Do this work?
2) If we have 2 domains in the same account on cloudflare can we use 1 cloudflare.ini
certbot certonly –dns-cloudflare –dns-cloudflare-credentials /root/.secrets/cloudflare.ini -d 1domain.com,*.example.com –preferred-challenges dns-01
certbot certonly –dns-cloudflare –dns-cloudflare-credentials /root/.secrets/cloudflare.ini -d 2domain.com,*.example.com –preferred-challenges
dns-01
3) If we dont use cloudflare what will our ns for domain?
CLoud VPNs IP?
ns1= 68.28.65.84
ns2= 68.28.65.84
Is this right?
thanks for your replies
1. True
2. True
3. I have no idea about it. I prefer using CF DNS.
Can we create multi wordpress sites on different domain in the same machine with this
method?
I think only changement is in the FastCGI?
server {
root /var/www/aaa.com/wordpress;
index index.php index.html index.htm;
server_name .aaa.com;
client_max_body_size 0;
server {
root /var/www/bbb.com/wordpress;
index index.php index.html index.htm;
server_name .bbb.com;
client_max_body_size 0;
server {
root /var/www/ccc.com/wordpress;
index index.php index.html index.htm;
server_name .ccc.com;
client_max_body_size 0;
is this make a problem cache path is the same path for 3 web site? /var/www/cache
Is this method works?
1 machine 3 different domain and wordpress?
Thanks
Not for multiple sites.
What do you think about Plesk Panel?
It is easy to install plesk and create a wordpress site.
Easy to find trial keys and we can use it unlimited.
If it expires sites goes on ftp works and only plesk panel does not work but there are too much trial keys
It has nginx cache.
Do you recommend why and why not?
Thanks
I do not trust 3rd-parties installers.
Do all commands work for Centos 8?
Sorry, this is for Ubuntu OS only not for Centos 8.
hello gulshanji i wanted to use cloudflare ssl direct from thier website and not thru api with fast cgi then what would the config
Hey bro what is your thoughts on EasyEngine and SlickStack etc or one click app instead to automate? what is your favorite and will you make any tut bro
Sure, there is one. I will post about it. Thanks for your feedback.
The FastCGI server block config throws 404 Errors.
fastcgi_pass unix:/run/php/php7.4-fpm-example.sock;
should be:
fastcgi_pass unix:/run/php/php7.4-fpm.sock;
And it is missing config for location /
This config must be defined:
location / {
try_files $uri $uri/ /index.php$is_args$args;
}
I see, it was intended for seperate user. But, to keep generic I have corrected. Thanks for pointing out.
Without the location / block only the home page was accessible.
When I added the below block i was able to access the post and pages.
location / {
try_files $uri $uri/ /index.php$is_args$args;
}
Hello Alpesh, Corrected. Thanks again for your tip.
It was a good article
Thanks for your comment.
Nice tutorial. Does it come with email hosting? Looking to make a small site in Singapore using VultrHF
E-mail is a different thing. G Suite by Google services is specialized in this segment.
What are the differences if any between doing this method and using the vultr 1 click install? I have also read about centminmod. Is that somrthing u will recommend for having a fast LEMP stack? Tnx
I alwyas keep this guide bookmarket to my web browser! You never know when I would need to setup a new LEMP server ! Thanks Gulshan
Thanks for your comment.
hi, Gulshan thanks for sharing.
can u please share how to install wp on subfoler?
This article is like Life-Saver for one of my website. I was about to move from Google Cloud to Digital Ocean because the trial was expired and I also wanted to use DigitaOcean because it is in-expensive yet powerful and gives great experience.
Previously, I used webinoly stack which was straightforward for installing WordPress but later on I got to know from Gulshan that there are so many issues with that stack so, this time I was going to do it manually. I checked the official guide by Digital ocean but end up with many confusion and issues. Then, I fortunately asked Gulshan for help and he recommended this article for me.
I installed WordPress easily and very fast even fast that Webinoly stack. Thanks a lot Gulshan for writing this amazing article. Hats off to you bro!!🎩
Hi Gulshan, I am also receiving the test failed error on step 7. I have tried several times now on different setup and still stuck here. Please could you help?
Please carefully read the post and then copy-paste code in Terminal. Sometime you need to replace with your own domain. Doing mistake can return error. Else, no wise. I use this guide everyday for myself. I am not aware about any problem.
In case of trouble
1. Run test using
nginx -t2. Check logs to get proper hint
tail -f /var/log/nginx/error.log3. Delete existing or earlier created virtualhost
rm /etc/nginx/sites-available/default && rm /etc/nginx/sites-enabled/default4. Make sure to replace example.com at all places, a) when you create conf file, its naming. b) when you add conf file and c) when you create symlink, check your command its conf file name must match with first process.
I feel in most cases, chances are you did not replaced
server_name .example.com;to own domain, or you did not obtained SSL. All steps are written in serial order as it should be.I am facing problem of infinite loop redirects. I had use fastcache code. how to fix it
Please try Full SSL mode of Cloudflare. Then check again!
How to check if fastcgi cache is working or not? while running sudo
curl -I https://example.comit is not showing x-cache parameterHey Gulshan,
In the 7th step while texting ngnix I got
nginx: [emerg] open() “/etc/nginx/sites-enabled/example.com” failed (2: No such file or directory) in /etc/nginx/nginx.conf:62
nginx: configuration file /etc/nginx/nginx.conf test failed
This error. How I can solve it? also what the error.
Please delete your existing server block and create again at sites-available and symlink at sites-enabled directory. The step 6 and 7 cover that clearly. Consider following patiently without any error. If you still face any problem, do let me know. Thanks for taking to leave your valuable comment.
Hi would like to know after configuring Fastcgi do we still need other caching plugin to speed up WordPress site?
Wonderful tutorial just complete solution for Nginx Fast CGI
Thanks Wasim for your kind feedback.
How Can I setup FastCGI on my ngnix server guided by you….
I have updated my article.
i want redirect too www plz help me urgent
If your WordPress General Settings has www version, server will do automatically. No additional action is required. In case you started WordPress installation at non-www version, then you need to migrate by changing at Database level.
You may use Better Search Replce plugin to perform this changes.
It Really Works Gulshan Bro. Thanks Really dear You are awesome…
Hello Gulshan Bro, First i want to say you that this is very beautiful and required post. I am really appreciating your work. but i have a problem can you please tell me
i have a droplet with digitalocean ($5/month plan) and i want to host multiple wordpress sites only with nginx(lemp ubuntu 18.04).
In simple i mean that this tutorial is complete to install a single wordpress and i did it but tell host it in some other sites
Hey Rohit,
Assuming, second site is example2.org
You need to follow steps this way.
1. create a new directory and add WordPress (Ref: steps 31)
cd /var/www/mkdir example2
wget https://wordpress.org/latest.tar.gz
tar -xvzf latest.tar.gz
mv -v wordpress/* /var/www/example2
rm -rf index.nginx-debian.html latest.tar.gz wordpress
chown -R www-data:www-data /var/www/
sudo chmod -R 755 /var/www
2. Create a new Server block with root path located to new directory as created in step 1.
cd /etc/nginx/sites-available/

nano gulshankumar-org
server {listen 80;
root /var/www/example2;
index index.php index.html index.htm;
server_name example2.org www.example2.org;
...
3. Point your example2.org domain to DNS, then install SSL
certbot --nginx -d example2.org -d www.example2.org4. Create new MySQL database
sudo mysql -u root -pcreate database example2;
grant all on example2.* to example2@localhost identified by 'TYPE HERE PASSWORD';
flush privileges;
exit;
5. Proceed to Installation by visiting your site
https://example2.orgLet me know if you have any additional question. You can always visit our forum for quick assistance.
Thanks & Regards,
Gulshan
It Really Works Gulshan Bro. Thanks Really dear You are awesome…
Hello Gulshan you written a comprehensive guide i highly appreciate your work. Can you help me with an error? Actually i have two websites the first website i have already hosted on Vultr following the above guide.
But when try to host a another WordPress website iam getting error. I followed the above steps you mentioned in comments. But still not able to fix it. The error is my website not working after hosting another WordPress website.
If possible please guide me step by step instructions. It will help me alot. Thanks in advance.
Consider checking log available at
/var/log/nginx/directory. Usenginx -tcommand to see what mistake causing issue.Very well. thank you so much
How to auto-renew SSL?
Add below cron job
crontab -eAdd below command and save.
15 3 * * 7 certbot renew --post-hook "service nginx restart"Thanks sos un groso, very well tutorial
Thank you for your tutorial, its the first one that actually showed me the wordpress setup page.
When I went to upload a plugin I received this message. “The uploaded file exceeds the upload_max_filesize directive in php.ini”
How do I increase the max filesize?
Please see the step 33.5
Thanks Gulshan, Finally I moved to NGINX server. You have created a great tutorial for beginners.
You’re welcome bro 🙂
Hi,
Thank you for this awesome guide.
How can I install WordPress multisite on Ubuntu 18.04 with Nginx?
Finally I loved this step by step tutorial with proper images.
Thanks Bhaiya you are awesome
Thanks a lot Gulshan. You save my breath
I search everywhere but not find any good article
You explained very well along with security concern
well done