この記事では、NGINX、MariaDB、PHP 8.2を使用して、Ubuntu 22.04サーバーにWordPressを手動でインストールするプロセスを学習します。これらのスタックは、驚くべき速度であなたのWordPressウェブサイトを実行するための強力かつ効率的なプラットフォームを提供します。
この3つのステップを踏んでください。困ったことがあれば、ご連絡ください😊。
パートA:「Cloudflare Nameservers」をアクティブにしておく。
Let’s Encrypt Wildcard SSL証明書を取得するために、Cloudflare DNSを使用する予定です。ダウンタイムなしの移行を実現するために、まずこのステップを完了させてください。
現在のネームサーバーを確認する
- アクティブなネームサーバーを https://www.whatsmydns.net/#NS/example.com で検索してください。
- もし、以前のホスティングサービスやドメインレジストラのデフォルトNSを使用している場合は、Cloudflareに置き換える必要があります。
- Cloudflare DNSの使用方法について
パートB:Ubuntu Server 22.04 LTS サーバーを準備する

1. Vultrに登録して$100の無料クレジットを手に入れよう(30日間有効)
多くのクラウドサーバー会社を試してきた者として、私の経験ではVultrを選べば間違いはないと思います。彼らはサポートとサービスに関して、誠実で思いやりのある人たちです。
⚡ パフォーマンス
- NVME / SSD
- 3.7 GHz CPU
- 最大5Gbpsのネットワークスピード
- アメリカ、ヨーロッパ、アジア、オーストリアのデータセンター
- IPV6対応
💡 特徴
- 初心者にやさしいダッシュボード
- ワンクリックで Snapshot。
- オートマティックバックアップ(有料)
- 無料クラウドファイアウォール
- 無料クラウドファイアウォール
- 100%KVM仮想化
⚙ サポート
- PayPal/カード
- 24時間365日チケットサポート
- ドキュメンテーション
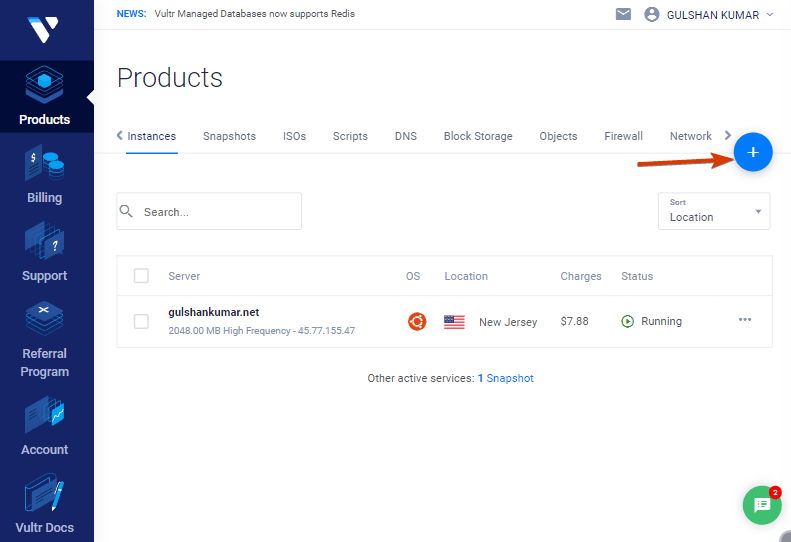
2. VPSサーバーを新規に作成する
プラスボタンをクリックするだけで、簡単に始められます
3. サーバーの種類を選択
共有CPUを手頃な価格で利用するなら、クラウドコンピューティングをお選びください。
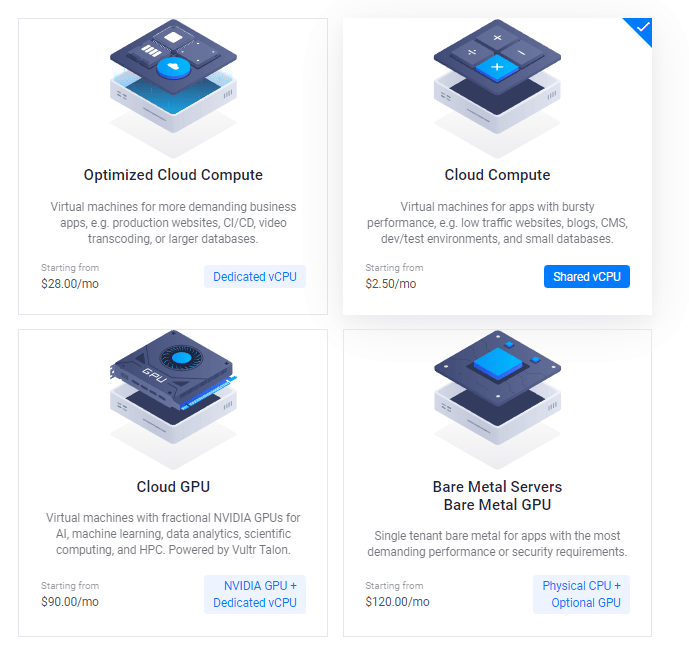
この後、「CPU&ストレージテクノロジー」で「AMD High Performance」または「Intel High Frequency」を選択してください。最速のCPUとNVMeディスクを搭載しています。もし、予算が少ない場合は、Intel CPUのレギュラープランにするとSSDディスクが手に入ります。

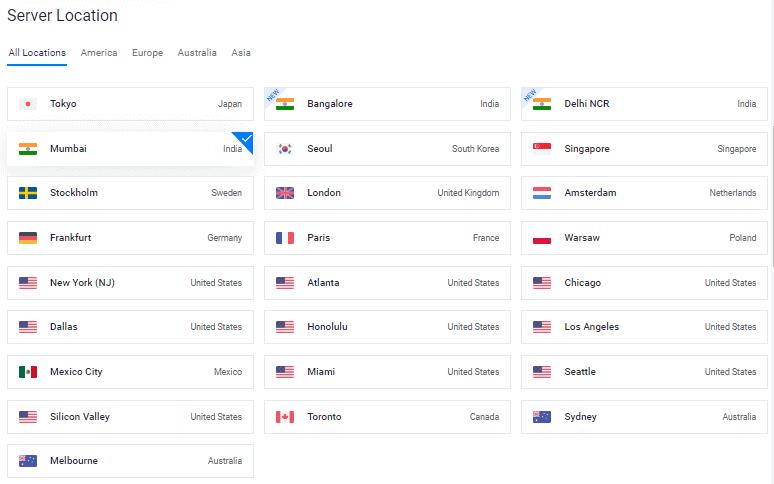
4. サーバーの場所を選択する
サーバーの設置場所は、ターゲットとするユーザーに近い場所を選びましょう。
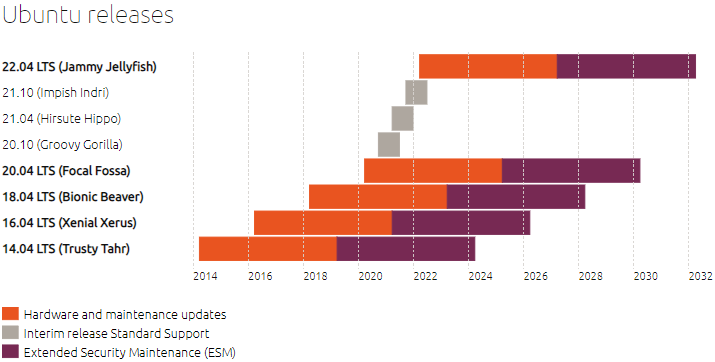
5. Ubuntu 22.04 x64のOSを選択します。
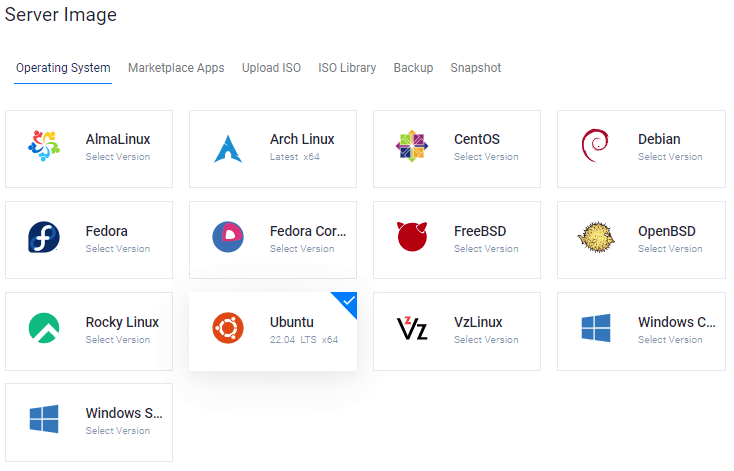
現在、Ubuntu 20.04×64、22.04×64ともにLTS(Long Term Supported)版で、これからインストールするほとんどのパッケージと互換性があります。
6. サーバーサイズの選択
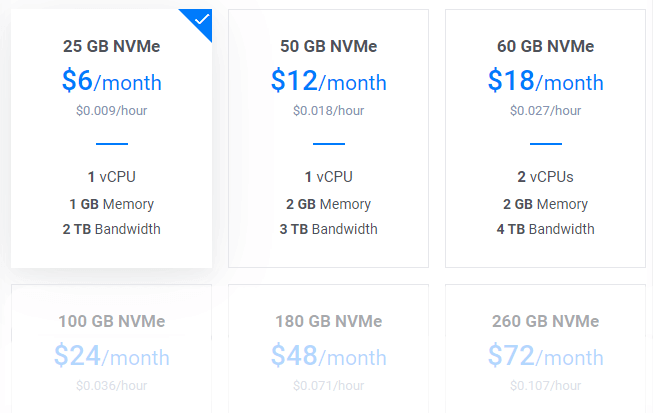
月々6ドルのプランは、新しいブログのスタート地点として最適です。また、ご要望に応じていつでもアップグレードが可能です。
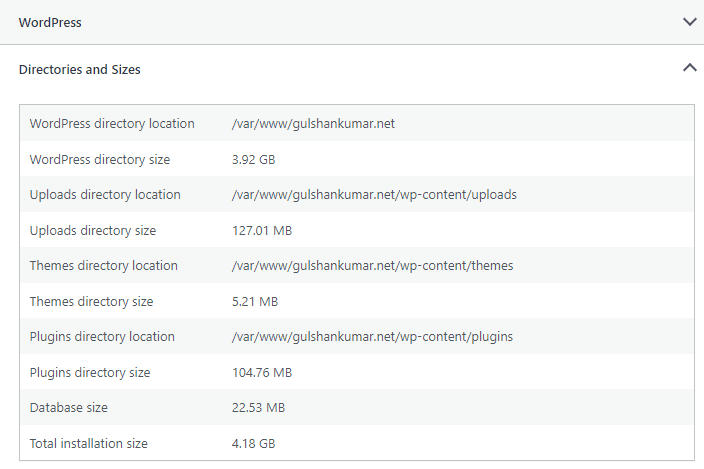
ヒント: 移行する場合は、[サイトの健全性情報]の[合計インストールサイズ]を確認してください。
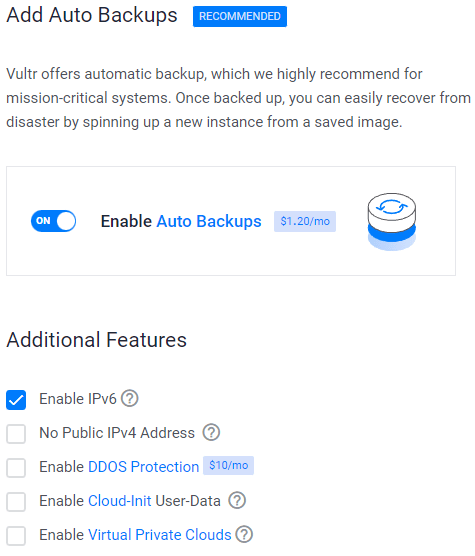
IPV6を有効にする、バックアップ
8. SSHキーの追加
これは、セキュリティ強化のために推奨されるオプションのステップです。
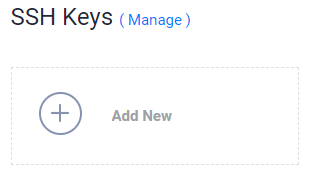
- Add Newボタンをクリックして、🔒公開鍵を提出するために新しいSSH鍵を追加します。
- お使いのOSに合わせて、以下の方法でキーを生成してください。

- PuTTyアプリケーションをダウンロードする。
- スタートメニューから「PuTTygen」を検索します。
- 生成ボタンをクリックし、マウスポインタを合わせます。
- 公開鍵をコピーし、Vultrに提供
- キー・パスフレーズの入力
- 最も安全な場所に🔑プライベートキーを保存してください。
- SSHやSFTPへのログインに使用することができます。

ssh-keygen -t rsaを実行します。より安全な 4096 ビット鍵の場合は、次のように実行します:ssh-keygen -t rsa -b 4096- キーを保存する場所を聞かれたら、エンターキーを押します(この場合、デフォルトの場所が使用されます)。
- 鍵のパスフレーズを入力します。
- cat ~/.ssh/id_rsa.pub を実行します。これにより、コントロールパネルに貼り付けるための適切な形式の鍵が得られます。
- 必ず ~/.ssh/id_rsa ファイルをバックアップしてください。これを失うと復元できません。
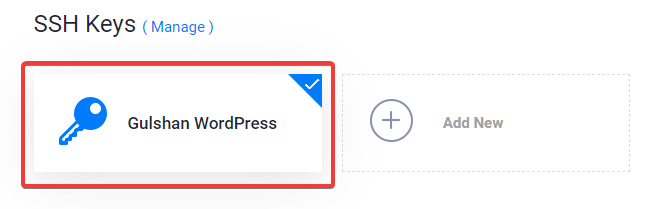
SSHキーを選択する
この手順で、公開鍵が新しいインスタンスにアタッチされます。その後、平文パスワードとSSH鍵の両方を使用してSSHにログインできるようになります。
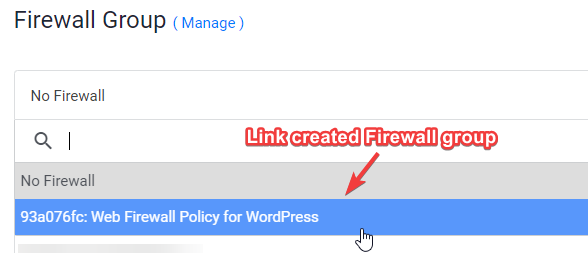
9. Webファイアウォールのルールをサーバーインスタンスにリンクさせる
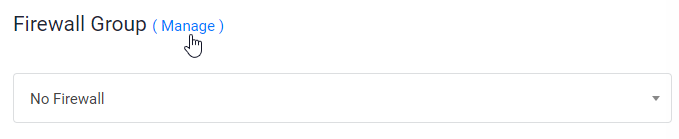
- 管理]をクリックし、新しいファイアウォールグループを作成します。
- 管理]をクリックし、新しいファイアウォールグループを作成します。
- Firewall グループをインスタンスにリンクします。
10. ホスト名とラベルを入力し、「今すぐデプロイ」をクリックします。
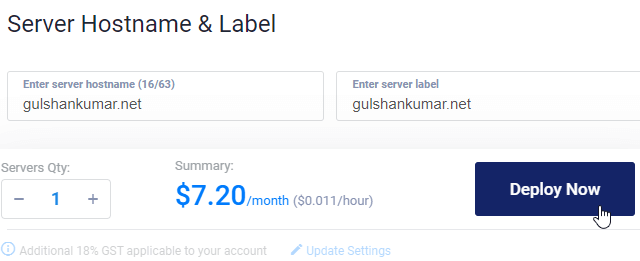
これで、インストールが進行中であることが確認できます
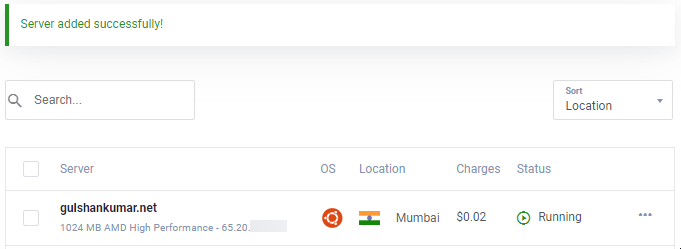
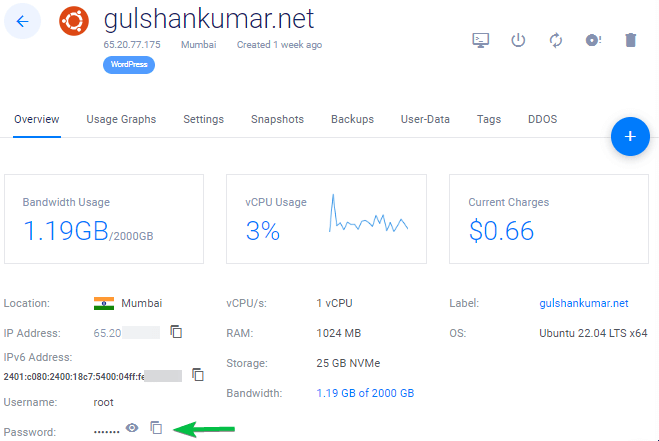
11. 新規インスタンス作成ページに移動します
IPアドレス、ユーザー名、パスワードをコピーします。あなたのデフォルトのポートは22です。
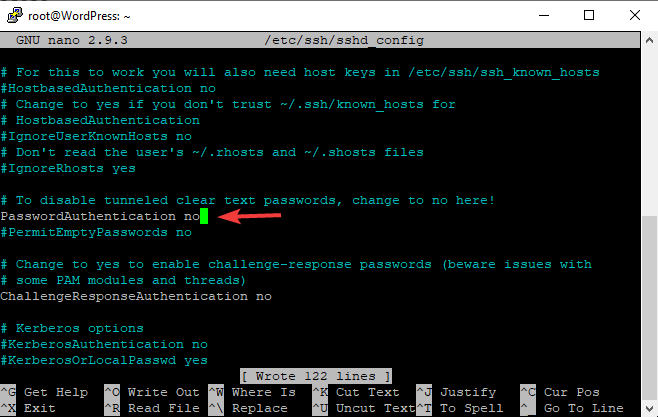
12. パスワードログインを無効にする
セキュリティ上の理由から、パスワード認証は無効にし、キーベースの認証のみを許可することをお勧めします。
- 設定ファイル
nano /etc/ssh/sshd_configを編集します。 - 検索(CTRL + W)で
PasswordAuthenticationを検索する - からの変更値
yestono - 保存する場合は、次のように入力します。, CTRL + O
- コマンドを使用して、SSHサービスを再起動します。
sudo service ssh restart
次回からは、動画にあるように鍵経由のSSHのみでご利用いただけます。
LinuxまたはMacの場合、ターミナルを使用して、次のようなコマンドを実行します。
ssh [email protected] -p 22 -i id_rsa
ステップ13. UFWを無効にする
VULTR で新しいインスタンスをデプロイすると、UFW (Uncomplicated Firewall) が有効になり、SSH ポート 22 を除くすべてのポートがブロックされたままになります。このため、ブラウザで ERR_CONNECTION_REFUSED Error が返されることがあります。これを解決するには、UFWを無効にしておくことをお勧めします。
ufw disable基本的なことについては十分な説明です。さて、LEMPスタックにWordPressをデプロイするための本来のプロセスをスピードアップしていきます。
パートC. LEMPスタックへのWordPressのデプロイ
リポジトリの更新
以下のコマンドを入力し、Enterキーを押してください。
sudo -sapt update && apt upgrade -y && apt dist-upgrade && apt autoclean && apt autoremove -y && rebootまたは
wget -qO update https://dl.gulshankumar.net/update && chmod +x update次回は、必ず下記のショートカットコマンドで更新してください。
./updateセキュリティ付きMariaDBをインストールする
再度ログインし、以下のコマンドを入力します。
sudo apt install mariadb-server -y && sudo mysql_secure_installation以下の質問にお答えください。
- Enter current password for root (enter for none): Enterキーを押す
- Switch to unix_socket authentication [Y/n]: 返信N
- Set root password? [Y/n]: Enterキーを押す
- New password: パスワードを入力し、Dashlaneを使用して生成することができます。右クリックでペースト。
- Re-enter new password: パスワードを再入力してください。
rootの現在のパスワードを入力します(入力しない場合はEnter)。
Password updated successfully!
Reloading privilege tables..
... Success!
また、以下の質問にもお答えください。
Remove anonymous users? [Y/n]: Yを押して入力
Disallow root login remotely? [Y/n]: Yを押して入力
Remove test database and access to it? [Y/n]: Yを押して入力
Reload privilege tables now? [Y/n]: Yを押して入力
3. WordPress用の新しいデータベースを作成する
MySQLにログインし、パスワードを要求されたらEnterキーを押す。
mysql -u root -pMySQLにログインし、パスワードを要求されたらEnterキーを押す。
create database wordpress;
grant all on wordpress.* to gulshan@localhost identified by '5pY8CKJxDRJEGQNkX7';
flush privileges;
exit;
どこであなたの …
database is wordpress
username is gulshan
password is 5pY8CKJxDRJEGQNkX7
ヒント ユニークなログイン資格の使用を検討する
4. PHP 8.2、NGINXのインストールとPermissionの設定
現在、PHP 8.2が最新の安定版です。もし、別のPHPバージョンを使用したい場合は、以下に示すすべてのコマンドでそのバージョンを維持するようにしてください。
sudo add-apt-repository ppa:ondrej/php -y && apt update && apt install php8.2-fpm php8.2-common php8.2-mysql php8.2-xml php8.2-xmlrpc php8.2-curl php8.2-gd php8.2-imagick php8.2-cli php8.2-dev php8.2-imap php8.2-mbstring php8.2-soap php8.2-zip php8.2-bcmath -y && sed -i 's/;cgi.fix_pathinfo=1/cgi.fix_pathinfo=0/g' /etc/php/8.2/fpm/php.ini && service php8.2-fpm restart && apt install nginx -y && chown -R www-data:www-data /var/www/ && chmod -R 755 /var/wwwPHPの設定を変更する
ほとんどのファンシーなテーマやプラグインは、実行するためにハイエンドのPHP設定を必要とします。そのため、この変更を行う必要があります。
sed -i 's/memory_limit = 128M/memory_limit = 512M/g' /etc/php/8.2/fpm/php.ini
sed -i 's/post_max_size = 8M/post_max_size = 128M/g' /etc/php/8.2/fpm/php.ini
sed -i 's/max_file_uploads = 20/max_file_uploads = 30/g' /etc/php/8.2/fpm/php.ini
sed -i 's/max_execution_time = 30/max_execution_time = 900/g' /etc/php/8.2/fpm/php.ini
sed -i 's/max_input_time = 60/max_input_time = 3000/g' /etc/php/8.2/fpm/php.ini
sed -i 's/upload_max_filesize = 2M/upload_max_filesize = 128M/g' /etc/php/8.2/fpm/php.ini
service php8.2-fpm restart
5. ワイルドカードのLet’s Encrypt SSL証明書をインストールする
/root/.secrets/ディレクトリ内にcloudflare.iniファイルを作成します。
mkdir -p /root/.secrets/ && cd /root/.secrets/ && nano cloudflare.ini以下のコードを追加し、CTRL + O で保存、CTRL + Xで終了します。
dns_cloudflare_email = "[email protected]"
dns_cloudflare_api_key = "XXXXXXXXXXXXXXXXX"
CloudflareのメールアドレスとグローバルAPIキーは、”My Profile” > API Tokens > Global API Keyでご確認ください。
chmod 0400 /root/.secrets/cloudflare.iniOSやHTTPウェブサーバーに合わせてCertbotとDNS Authenticatorをインストールします。
snap install --beta --classic certbot
snap set certbot trust-plugin-with-root=ok
snap install --beta certbot-dns-cloudflare
snap connect certbot:plugin certbot-dns-cloudflare
ワイルドカードSSL証明書の取得
certbot certonly --dns-cloudflare --dns-cloudflare-credentials /root/.secrets/cloudflare.ini -d example.com,*.example.com --preferred-challenges dns-01Cronジョブによる自動更新の設定
- crontab -eと入力します。
- nanoエディタ用タイプ1
- 以下のコマンドを入力し、保存してください。
0 0 * * * /etc/init.d/nginx reload >/dev/null 2>&1テスト更新
certbot renew --dry-run6. Nginxサーバーブロックの設定
これは、ドメインを設定し、NGINXがHTTPリクエストをどのように処理するかを設定する必要がある場合に重要です。
デフォルトのサーバーブロックを削除します。
rm /etc/nginx/sites-available/default && rm /etc/nginx/sites-enabled/default新しいサーバーブロックの作成
cd /etc/nginx/sites-available/
nano example.com- example.comを独自ドメインに置き換える
- 以下のコードを入力し、Ctrl+oで保存、Ctrl+xで終了してください。
一般
server {
    listen         80;
    return 301 https://$host$request_uri;
}
server {
# Document Root
root /var/www/html;
index index.php index.html index.htm;
server_name .example.com;
client_max_body_size 0;

    listen [::]:443 ssl http2 ipv6only=on;
    listen 443 ssl http2;
        ssl_protocols TLSv1.1 TLSv1.2 TLSv1.3;
        ssl_certificate /etc/letsencrypt/live/example.com/fullchain.pem;
        ssl_certificate_key /etc/letsencrypt/live/example.com/privkey.pem;
        ssl_prefer_server_ciphers on;
        ssl_session_cache   shared:SSL:20m;
        ssl_session_timeout 20m;
        ssl_ciphers 'TLS13+AESGCM+AES128:EECDH+AES128';


error_page 404 /404.html;
error_page 500 502 503 504 /50x.html;

# Block XMLRPC
location = /xmlrpc.php {
    deny all;
}

location / {
    try_files $uri $uri/ /index.php$is_args$args;
}

location ~* \.php$ {
if ($uri !~ "^/uploads/") {
fastcgi_pass unix:/run/php/php8.2-fpm.sock;
}
include fastcgi_params;
fastcgi_param SCRIPT_FILENAME $document_root$fastcgi_script_name;
fastcgi_param SCRIPT_NAME $fastcgi_script_name;
}
location = /favicon.ico {
log_not_found off;
access_log off;
}

location = /robots.txt {
log_not_found off;
access_log off;
allow all;
}

location ~* .(css|gif|svg|ico|woff2|eot|jpeg|webp|jpg|js|png)$ {
expires 1y;
log_not_found off;
}

# Enable Gzip compression.
gzip on;

# Disable Gzip on IE6.
gzip_disable "msie6";

# Allow proxies to cache both compressed and regular version of file.
# Avoids clients that don't support Gzip outputting gibberish.
gzip_vary on;

# Compress data, even when the client connects through a proxy.
gzip_proxied any;

# The level of compression to apply to files. A higher compression level increases
# CPU usage. Level 5 is a happy medium resulting in roughly 75% compression.
gzip_comp_level 5;

# Compress the following MIME types.
gzip_types
 application/atom+xml
 application/javascript
 application/json
 application/ld+json
 application/manifest+json
 application/rss+xml
 application/vnd.geo+json
 application/vnd.ms-fontobject
 application/x-font-ttf
 application/x-web-app-manifest+json
 application/xhtml+xml
 application/xml
 font/opentype
 image/bmp
 image/svg+xml
 image/x-icon
 text/cache-manifest
 text/css
 text/plain
 text/vcard
 text/vnd.rim.location.xloc
 text/vtt
 text/x-component
 text/x-cross-domain-policy;
}
キャッシュイネーブラー用
server {
    listen         80;
    return 301 https://$host$request_uri;
}
server {
# Document Root
root /var/www/html;
index index.php index.html index.htm;
server_name .example.com;
client_max_body_size 0;

    listen [::]:443 ssl http2 ipv6only=on;
    listen 443 ssl http2;
        ssl_protocols TLSv1.1 TLSv1.2 TLSv1.3;
        ssl_certificate /etc/letsencrypt/live/example.com/fullchain.pem;
        ssl_certificate_key /etc/letsencrypt/live/example.com/privkey.pem;
        ssl_prefer_server_ciphers on;
        ssl_session_cache   shared:SSL:20m;
        ssl_session_timeout 20m;
        ssl_ciphers 'TLS13+AESGCM+AES128:EECDH+AES128';


error_page 404 /404.html;
error_page 500 502 503 504 /50x.html;


# Block XMLRPC
location = /xmlrpc.php {
    deny all;
}


# Rules for Cache Enabler Plugin - Static File Serving

    set $cache_uri $request_uri;

    # bypass cache if POST requests or URLs with a query string
    if ($request_method = POST) {
    set $cache_uri 'nullcache';
    }

    if ($query_string != '') {
    set $cache_uri 'nullcache';
    }

    # bypass cache if URLs containing the following strings
    if ($request_uri ~* '(/wp-admin/|/xmlrpc.php|/wp-(app|cron|login|register|mail).php|wp-.*.php|/feed/|index.php|wp-comments-popup.php|wp-links-opml.php|wp-locations.php|sitemap(index)?.xml|[a-z0-9-]+-sitemap([0-9]+)?.xml)') {
    set $cache_uri 'nullcache';
    }

    # bypass cache if cookies contain the following strings
    if ($http_cookie ~* '(wp-postpass|wordpress_logged_in|comment_author)_') {
    set $cache_uri 'nullcache';
    }

    # custom installation subdirectory
    set $custom_subdir '';

    # default HTML file
    set $cache_enabler_uri '${custom_subdir}/wp-content/cache/cache-enabler/${http_host}${cache_uri}${scheme}-index.html';

    # WebP HTML file
    if ($http_accept ~* 'image/webp') {
    set $cache_enabler_uri '${custom_subdir}/wp-content/cache/cache-enabler/${http_host}${cache_uri}${scheme}-index-webp.html';
    }

    location / {
    gzip_static on; # this directive is not required but recommended
    try_files $cache_enabler_uri $uri $uri/ $custom_subdir/index.php?$args;
    }

location ~* \.php$ {
if ($uri !~ "^/uploads/") {
fastcgi_pass unix:/run/php/php8.2-fpm.sock;
}
include fastcgi_params;
fastcgi_param SCRIPT_FILENAME $document_root$fastcgi_script_name;
fastcgi_param SCRIPT_NAME $fastcgi_script_name;
}
location = /favicon.ico {
log_not_found off;
access_log off;
}

location = /robots.txt {
log_not_found off;
access_log off;
allow all;
}

location ~* .(css|gif|svg|ico|jpeg|webp|woff2|eot|jpg|js|png)$ {
expires 1y;
log_not_found off;
}

# Enable Gzip compression.
gzip on;

# Disable Gzip on IE6.
gzip_disable "msie6";

# Allow proxies to cache both compressed and regular version of file.
# Avoids clients that don't support Gzip outputting gibberish.
gzip_vary on;

# Compress data, even when the client connects through a proxy.
gzip_proxied any;

# The level of compression to apply to files. A higher compression level increases
# CPU usage. Level 5 is a happy medium resulting in roughly 75% compression.
gzip_comp_level 5;

# Compress the following MIME types.
gzip_types
 application/atom+xml
 application/javascript
 application/json
 application/ld+json
 application/manifest+json
 application/rss+xml
 application/vnd.geo+json
 application/vnd.ms-fontobject
 application/x-font-ttf
 application/x-web-app-manifest+json
 application/xhtml+xml
 application/xml
 font/opentype
 image/bmp
 image/svg+xml
 image/x-icon
 text/cache-manifest
 text/css
 text/plain
 text/vcard
 text/vnd.rim.location.xloc
 text/vtt
 text/x-component
 text/x-cross-domain-policy;
}- キャッシュを有効にするには、Cache Enablerプラグインをインストールする必要があります。
FastCGI
FastCGI Cacheを使用する場合は、以下のServer Blockを実装してください。
# NGINX Cache path
fastcgi_cache_path /var/run/nginx-cache levels=1:2 keys_zone=WORDPRESS:100m inactive=6h;
fastcgi_cache_key "$scheme$request_method$host$request_uri";
fastcgi_cache_use_stale error timeout invalid_header http_500;
fastcgi_ignore_headers Cache-Control Expires Set-Cookie;

server {
    listen         80;
    return 301 https://$host$request_uri;
}
server {
root /var/www/html;
index index.php index.html index.htm;
server_name .example.com;
client_max_body_size 0;

    listen [::]:443 ssl http2 ipv6only=on;
    listen 443 ssl http2;
        ssl_protocols TLSv1.1 TLSv1.2 TLSv1.3;
        ssl_certificate /etc/letsencrypt/live/example.com/fullchain.pem;
        ssl_certificate_key /etc/letsencrypt/live/example.com/privkey.pem;
        ssl_prefer_server_ciphers on;
        ssl_session_cache   shared:SSL:20m;
        ssl_session_timeout 20m;
        ssl_ciphers 'TLS13+AESGCM+AES128:EECDH+AES128';

error_page 404 /404.html;
error_page 500 502 503 504 /50x.html;


set $skip_cache 0;
    if ($request_method = POST) {set $skip_cache 1;}
    if ($request_uri ~* "/wp-admin/|/xmlrpc.php|/wp-.*.php|index.php|sitemap") {set $skip_cache 1;}
    if ($http_cookie ~* "comment_author|wordpress_[a-f0-9]+|wp-postpass|wordpress_no_cache|wordpress_logged_in") {set $skip_cache 1;}
    if ($query_string = "unapproved*") {set $skip_cache 1;}
    if ($cookie_woocommerce_items_in_cart = "1" ){ set $skip_cache 1;}
    if ($request_uri ~* "/(cart|checkout|my-account)/*$") {set $skip_cache 1;}

# Block XMLRPC
location = /xmlrpc.php {
    deny all;
}

location / {
try_files $uri $uri/ /index.php$is_args$args;
}

location ~* \.php$ {

 if ($uri !~ "^/uploads/") {
        fastcgi_pass unix:/run/php/php8.2-fpm.sock;
        }

        try_files                       $uri =404;
        include                         /etc/nginx/fastcgi_params;
        fastcgi_param                   SCRIPT_FILENAME $document_root$fastcgi_script_name;
        fastcgi_pass                    unix:/run/php/php8.2-fpm.sock;
        fastcgi_index                   index.php;
                fastcgi_cache_bypass $skip_cache;
                fastcgi_no_cache $skip_cache;
                fastcgi_cache WORDPRESS;
                fastcgi_cache_valid 200 30d;
                fastcgi_cache_valid 301 302 303 307 308 404 410 451 1m;
                add_header X-Cache $upstream_cache_status;

}

location = /favicon.ico {
log_not_found off;
access_log off;
}

location = /robots.txt {
log_not_found off;
access_log off;
allow all;
}

location ~* .(css|gif|ico|svg|webp|woff2|eot|jpeg|jpg|js|png)$ {
expires 1y;
log_not_found off;
}

# Enable Gzip compression.
gzip on;

# Disable Gzip on IE6.
gzip_disable "msie6";

# Allow proxies to cache both compressed and regular version of file.
# Avoids clients that don't support Gzip outputting gibberish.
gzip_vary on;

# Compress data, even when the client connects through a proxy.
gzip_proxied any;

# The level of compression to apply to files. A higher compression level increases
# CPU usage. Level 5 is a happy medium resulting in roughly 75% compression.
gzip_comp_level 5;

# Compress the following MIME types.
gzip_types
 application/atom+xml
 application/javascript
 application/json
 application/ld+json
 application/manifest+json
 application/rss+xml
 application/vnd.geo+json
 application/vnd.ms-fontobject
 application/x-font-ttf
 application/x-web-app-manifest+json
 application/xhtml+xml
 application/xml
 font/opentype
 image/bmp
 image/svg+xml
 image/x-icon
 text/cache-manifest
 text/css
 text/plain
 text/vcard
 text/vnd.rim.location.xloc
 text/vtt
 text/x-component
 text/x-cross-domain-policy;
}FastCGIの場合、NGINX Helperプラグインを使用する必要があります。ヒンディー語のエンコードされたURLでも動作します。ただし、AMPには対応しないので注意してください。私自身はAMPは使っていません。(推奨)
また、NGINXキャッシュはAMP URLのパージに有効ですが、ヒンディー語のエンコードされたURLには対応していません。設定では、キャッシュのパスを /var/run/nginx-cache/ にしておく必要があります。
注意!
- 例えば、Newspaperのテーマを使っていて、モバイル用のテーマを別に提供している場合、FastCGI方式を使わずに、WP Rocketというプラグインを使うと、モバイル用のキャッシュを別に提供できます。
7. 2つのディレクトリ間にシンボリックリンクを作成する
この手順を怠ると、ERR_CONNECTION_REFUSEDが表示されることがあります。
サーバーブロックを有効にするには、NGINX サーバーブロックファイルのシンボリックリンクを /etc/nginx/sites-available/ ディレクトリから /etc/nginx/sites-enabled/ ディレクトリに作成します。
以下のコマンドを実行する前に、example.comを独自ドメインに置き換えてください。
ln -s /etc/nginx/sites-available/example.com /etc/nginx/sites-enabled/テスト構成
nginx -tNGINXを再起動し、すべてを更新する
service nginx restart && service php8.2-fpm restart && service mysql restart && apt-get update && apt upgrade -y8. WordPressのインストール
WordPressのファイルを/var/www/htmlディレクトリにダウンロードし、パーミッションを設定します。
cd /var/www/html && wget https://ja.wordpress.org/latest-ja.tar.gz && tar -xvzf latest-ja.tar.gz && mv -v wordpress/* /var/www/html && rm -rf index.nginx-debian.test latest-ja.tar.gz wordpress && chown -R www-data:www-data /var/www/ && sudo chmod -R 755 /var/www将来的にパーミッションを更新するには、以下のコマンドを使用します。
chown -R www-data:www-data /var/www/ && sudo chmod -R 755 /var/www9. DNSの更新
WordPressをローカルでホスティングしている場合、プロキシを回避したい場合、ダウンタイムなしの移行を行いたい場合、この手順が有効です。私は一般的に、静的なWordPressの開発領域の場合に適しています。
- DNSを指定するには、2つの方法があります。Vultrにサイトを移行する際、まずローカルでテストしたい場合は、hostsファイルを編集し、そこにDNSを指定します。
Windows用
- Go to properties of
C:\Windows\System32\drivers\etc\hosts - Change “Security” permission to full control for your current Username
- これで、自分のSystem userでhostsファイルを自由に編集し、保存することができます。
# 同じマシンで、ローカルホストのアドレスとパブリックIPのアドレスがあります。
127.0.0.1 example.com
127.0.0.1 www.example.com
こんな感じでいいんじゃないでしょうか。
MacまたはLinuxの場合
hosts ファイルは、以下のコマンドで編集できます。
sudo nano /etc/hostsCloudflareでDNSを更新する
- すべてが完璧で、サイトを公開したい場合、Cloudflare DNSにログインし、新しいIPを更新してください。
| A | @ | IPV4 address |
| AAAA | @ | IPV6 address |
| CNAME | www | example.com |
ここで、@は裸のドメインexample.comを表します。
9. WordPressをセットアップするためにドメイン名を訪問
あなたのWordPressのための非wwwのバージョンのドメインを維持したい場合は、非wwwのバージョン別のwwwにアクセスしてください。
https://example.com- WordPressのセットアップを開始するために、データベースにログインするためのクレデンシャルを提供します。
- ラン・インストール
- 新しいサイトの基本情報を入力し、WordPressをインストールします。
- WordPressにログインする
- FastCGI サーバーブロックを使用している場合、最初に行うべきことは NGINX Cache プラグインをインストールし、キャッシュパスとして /var/www/cache を設定することです。
その他必要なもの
WordPress の送信メールに SMTP プラグインサービスを使用する。そうしないと、パスワードリセットリンクや Contact Form 7 のメッセージを受け取ることができない。
最後に、WordPressのインストールが完了しました。バックアップは必ず取っておきましょう。
この記事を読んでくださったあなたの貴重なお時間に大変感謝いたします。次回のチュートリアルでお会いしましょう
Exactly followed the same steps, but at the end i am getting 502 bad gateway. I built some sites with the same steps before, however i don’t know what changed now.
Consider checking the error log using command
tail -f /var/log/nginx/error.logto get a hint about exact issue.getting this
tail: cannot open ‘/var/log/error.log’ for reading: No such file or directory
tail: no files remaining
Sorry, there was a typo in my previous comment. Try below command
tail -f /var/log/nginx/error.logCan you explain me what is the difference between inactive and fastcgi_cache_valid values? Can you explain them please? Thanks
location ~* .(css|gif|ico|svg|jpeg|jpg|js|png)$ {
expires 1y;
log_not_found off;
}
is this code for page caching?
I use cloudflare so it has page cache too.
If i use that can i remove it from codes?
Can you please explain what is this code for?
Thanks
That code is for setting up 1 year browser caching for static files. You may use Cloudflare Page caching as normally you do. There shouldn’t be any problem.
For Nginx cache helper (I take this info from offical site
There’s a ‘purge all’ button? Does it purge the whole site?
Yes, it does. It physically empties the cache directory. It is set by default to /var/run/nginx-cache/.
So the default is /var/run/nginx-cache/
can we change fastcgi_cache_path /var/www/cache to /var/run/nginx-cache/ ?
Thanks
I finally installed wordpress with this guide. But I see only www version but not the non-www version. Is there any changes that I need to do.
Redirects to www version even If I enter non-www version.
You need to point DNS records for both hostnames. Second, make sure dot is not missing from the beginning of example.com in this code –
server_name .example.com;in the NGINX connfig at step 6. Another thing, Redirect from www to non-www or vice-versa (as neccessary) is taken care automatically from WordPress. You do not need to put any extra code for it.which is the best & compatible server side cache plugin If I use FastCGI server block code along with Nginx Cache plugin..
W3 Total Cache or WP Rocket
I have 2 questions
1) What if i have 2 domains on different cloudflare accounts?
Create a cloudflare.ini file inside /root/.secrets/ directory.
mkdir -p /root/.secrets/ && cd /root/.secrets/ && nano cloudflare.ini
Add below code and save using CTRL+O and exit using CTRL+X
dns_cloudflare_email = “[email protected]”
dns_cloudflare_api_key = “XXXXXXXXXXXXXXXXX”
/root/.secrets/1domaincloudfare.ini
/root/.secrets/2domaincloudfare.ini
certbot certonly –dns-cloudflare –dns-cloudflare-credentials 1domaincloudfare.ini -d example.com,*.1domain.com –preferred-challenges dns-01
certbot certonly –dns-cloudflare –dns-cloudflare-credentials 2domaincloudfare.ini -d example.com,*.2domain.com –preferred-challenges dns-01
Do this work?
2) If we have 2 domains in the same account on cloudflare can we use 1 cloudflare.ini
certbot certonly –dns-cloudflare –dns-cloudflare-credentials /root/.secrets/cloudflare.ini -d 1domain.com,*.example.com –preferred-challenges dns-01
certbot certonly –dns-cloudflare –dns-cloudflare-credentials /root/.secrets/cloudflare.ini -d 2domain.com,*.example.com –preferred-challenges
dns-01
3) If we dont use cloudflare what will our ns for domain?
CLoud VPNs IP?
ns1= 68.28.65.84
ns2= 68.28.65.84
Is this right?
thanks for your replies
1. True
2. True
3. I have no idea about it. I prefer using CF DNS.
Can we create multi wordpress sites on different domain in the same machine with this
method?
I think only changement is in the FastCGI?
server {
root /var/www/aaa.com/wordpress;
index index.php index.html index.htm;
server_name .aaa.com;
client_max_body_size 0;
server {
root /var/www/bbb.com/wordpress;
index index.php index.html index.htm;
server_name .bbb.com;
client_max_body_size 0;
server {
root /var/www/ccc.com/wordpress;
index index.php index.html index.htm;
server_name .ccc.com;
client_max_body_size 0;
is this make a problem cache path is the same path for 3 web site? /var/www/cache
Is this method works?
1 machine 3 different domain and wordpress?
Thanks
Not for multiple sites.
What do you think about Plesk Panel?
It is easy to install plesk and create a wordpress site.
Easy to find trial keys and we can use it unlimited.
If it expires sites goes on ftp works and only plesk panel does not work but there are too much trial keys
It has nginx cache.
Do you recommend why and why not?
Thanks
I do not trust 3rd-parties installers.
Do all commands work for Centos 8?
Sorry, this is for Ubuntu OS only not for Centos 8.
hello gulshanji i wanted to use cloudflare ssl direct from thier website and not thru api with fast cgi then what would the config
Hey bro what is your thoughts on EasyEngine and SlickStack etc or one click app instead to automate? what is your favorite and will you make any tut bro
Sure, there is one. I will post about it. Thanks for your feedback.
The FastCGI server block config throws 404 Errors.
fastcgi_pass unix:/run/php/php7.4-fpm-example.sock;
should be:
fastcgi_pass unix:/run/php/php7.4-fpm.sock;
And it is missing config for location /
This config must be defined:
location / {
try_files $uri $uri/ /index.php$is_args$args;
}
I see, it was intended for seperate user. But, to keep generic I have corrected. Thanks for pointing out.
Without the location / block only the home page was accessible.
When I added the below block i was able to access the post and pages.
location / {
try_files $uri $uri/ /index.php$is_args$args;
}
Hello Alpesh, Corrected. Thanks again for your tip.
It was a good article
Thanks for your comment.
Nice tutorial. Does it come with email hosting? Looking to make a small site in Singapore using VultrHF
E-mail is a different thing. G Suite by Google services is specialized in this segment.
What are the differences if any between doing this method and using the vultr 1 click install? I have also read about centminmod. Is that somrthing u will recommend for having a fast LEMP stack? Tnx
I alwyas keep this guide bookmarket to my web browser! You never know when I would need to setup a new LEMP server ! Thanks Gulshan
Thanks for your comment.
hi, Gulshan thanks for sharing.
can u please share how to install wp on subfoler?
This article is like Life-Saver for one of my website. I was about to move from Google Cloud to Digital Ocean because the trial was expired and I also wanted to use DigitaOcean because it is in-expensive yet powerful and gives great experience.
Previously, I used webinoly stack which was straightforward for installing WordPress but later on I got to know from Gulshan that there are so many issues with that stack so, this time I was going to do it manually. I checked the official guide by Digital ocean but end up with many confusion and issues. Then, I fortunately asked Gulshan for help and he recommended this article for me.
I installed WordPress easily and very fast even fast that Webinoly stack. Thanks a lot Gulshan for writing this amazing article. Hats off to you bro!!🎩
Hi Gulshan, I am also receiving the test failed error on step 7. I have tried several times now on different setup and still stuck here. Please could you help?
Please carefully read the post and then copy-paste code in Terminal. Sometime you need to replace with your own domain. Doing mistake can return error. Else, no wise. I use this guide everyday for myself. I am not aware about any problem.
In case of trouble
1. Run test using
nginx -t2. Check logs to get proper hint
tail -f /var/log/nginx/error.log3. Delete existing or earlier created virtualhost
rm /etc/nginx/sites-available/default && rm /etc/nginx/sites-enabled/default4. Make sure to replace example.com at all places, a) when you create conf file, its naming. b) when you add conf file and c) when you create symlink, check your command its conf file name must match with first process.
I feel in most cases, chances are you did not replaced
server_name .example.com;to own domain, or you did not obtained SSL. All steps are written in serial order as it should be.I am facing problem of infinite loop redirects. I had use fastcache code. how to fix it
Please try Full SSL mode of Cloudflare. Then check again!
How to check if fastcgi cache is working or not? while running sudo
curl -I https://example.comit is not showing x-cache parameterHey Gulshan,
In the 7th step while texting ngnix I got
nginx: [emerg] open() “/etc/nginx/sites-enabled/example.com” failed (2: No such file or directory) in /etc/nginx/nginx.conf:62
nginx: configuration file /etc/nginx/nginx.conf test failed
This error. How I can solve it? also what the error.
Please delete your existing server block and create again at sites-available and symlink at sites-enabled directory. The step 6 and 7 cover that clearly. Consider following patiently without any error. If you still face any problem, do let me know. Thanks for taking to leave your valuable comment.
Hi would like to know after configuring Fastcgi do we still need other caching plugin to speed up WordPress site?
Wonderful tutorial just complete solution for Nginx Fast CGI
Thanks Wasim for your kind feedback.
How Can I setup FastCGI on my ngnix server guided by you….
I have updated my article.
i want redirect too www plz help me urgent
If your WordPress General Settings has www version, server will do automatically. No additional action is required. In case you started WordPress installation at non-www version, then you need to migrate by changing at Database level.
You may use Better Search Replce plugin to perform this changes.
It Really Works Gulshan Bro. Thanks Really dear You are awesome…
Hello Gulshan Bro, First i want to say you that this is very beautiful and required post. I am really appreciating your work. but i have a problem can you please tell me
i have a droplet with digitalocean ($5/month plan) and i want to host multiple wordpress sites only with nginx(lemp ubuntu 18.04).
In simple i mean that this tutorial is complete to install a single wordpress and i did it but tell host it in some other sites
Hey Rohit,
Assuming, second site is example2.org
You need to follow steps this way.
1. create a new directory and add WordPress (Ref: steps 31)
cd /var/www/mkdir example2
wget https://wordpress.org/latest.tar.gz
tar -xvzf latest.tar.gz
mv -v wordpress/* /var/www/example2
rm -rf index.nginx-debian.html latest.tar.gz wordpress
chown -R www-data:www-data /var/www/
sudo chmod -R 755 /var/www
2. Create a new Server block with root path located to new directory as created in step 1.
cd /etc/nginx/sites-available/

nano gulshankumar-org
server {listen 80;
root /var/www/example2;
index index.php index.html index.htm;
server_name example2.org www.example2.org;
...
3. Point your example2.org domain to DNS, then install SSL
certbot --nginx -d example2.org -d www.example2.org4. Create new MySQL database
sudo mysql -u root -pcreate database example2;
grant all on example2.* to example2@localhost identified by 'TYPE HERE PASSWORD';
flush privileges;
exit;
5. Proceed to Installation by visiting your site
https://example2.orgLet me know if you have any additional question. You can always visit our forum for quick assistance.
Thanks & Regards,
Gulshan
It Really Works Gulshan Bro. Thanks Really dear You are awesome…
Hello Gulshan you written a comprehensive guide i highly appreciate your work. Can you help me with an error? Actually i have two websites the first website i have already hosted on Vultr following the above guide.
But when try to host a another WordPress website iam getting error. I followed the above steps you mentioned in comments. But still not able to fix it. The error is my website not working after hosting another WordPress website.
If possible please guide me step by step instructions. It will help me alot. Thanks in advance.
Consider checking log available at
/var/log/nginx/directory. Usenginx -tcommand to see what mistake causing issue.Very well. thank you so much
How to auto-renew SSL?
Add below cron job
crontab -eAdd below command and save.
15 3 * * 7 certbot renew --post-hook "service nginx restart"Thanks sos un groso, very well tutorial
Thank you for your tutorial, its the first one that actually showed me the wordpress setup page.
When I went to upload a plugin I received this message. “The uploaded file exceeds the upload_max_filesize directive in php.ini”
How do I increase the max filesize?
Please see the step 33.5
Thanks Gulshan, Finally I moved to NGINX server. You have created a great tutorial for beginners.
You’re welcome bro 🙂
Hi,
Thank you for this awesome guide.
How can I install WordPress multisite on Ubuntu 18.04 with Nginx?
Finally I loved this step by step tutorial with proper images.
Thanks Bhaiya you are awesome
Thanks a lot Gulshan. You save my breath
I search everywhere but not find any good article
You explained very well along with security concern
well done