Ter vários endereços de correio electrónico é fácil mas verificar cada caixa de correio é um trabalho moroso e difícil. Aplicar este truque para gerir todos os e-mails do webmail numa só caixa de correio do Gmail.
Agora pode livrar-se facilmente dos clientes de cPanel de correio electrónico incorporado, tais como – Roundcube, Squirrel Mail, etc. Usando esta técnica, pode enviar e receber e-mails de múltiplos endereços de e-mail personalizados num único ID de Gmail.
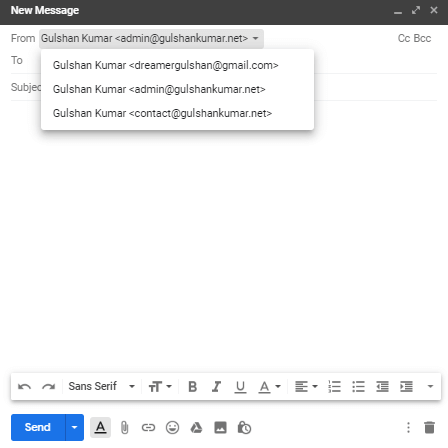
Para configurar o webmail no Gmail, basta seguir dois passos abaixo
Requisitos
- Acesso ao Painel de Acolhimento cPanel
- Uma conta Gmail
Encaminhar e-mail cPanel para o Gmail
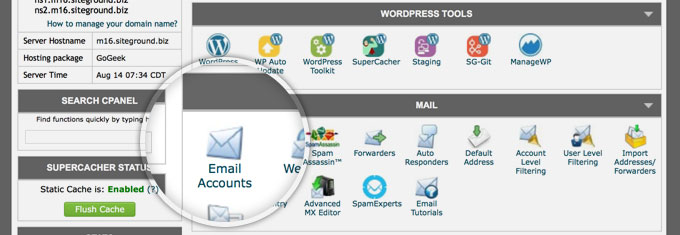
Passo 1. Entrar no seu cPanel e ir para a secção Contas de correio.
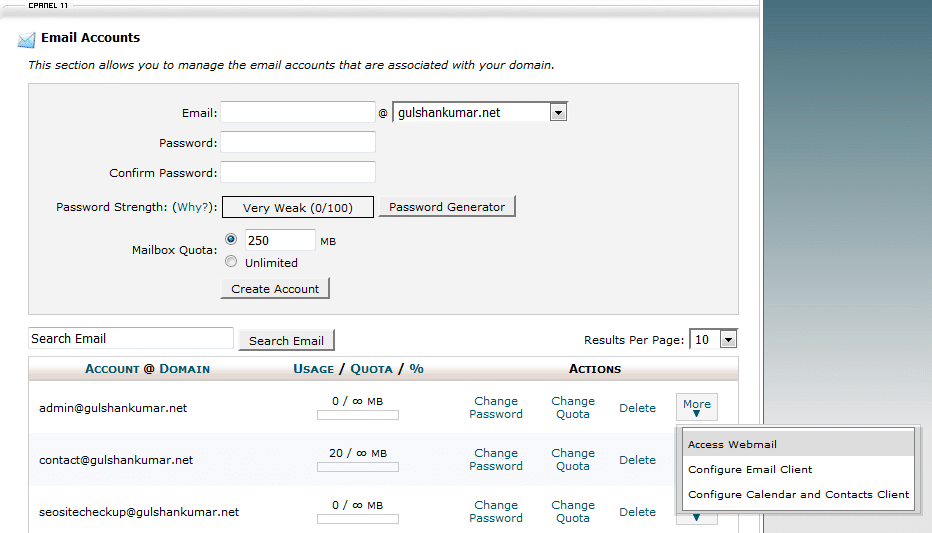
Passo 2. Seleccione o seu e-mail, na opção Mais, clique em Access Webmail
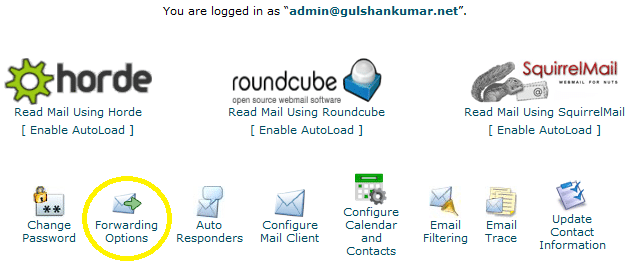
Passo 3. Ir para Opções de encaminhamento.
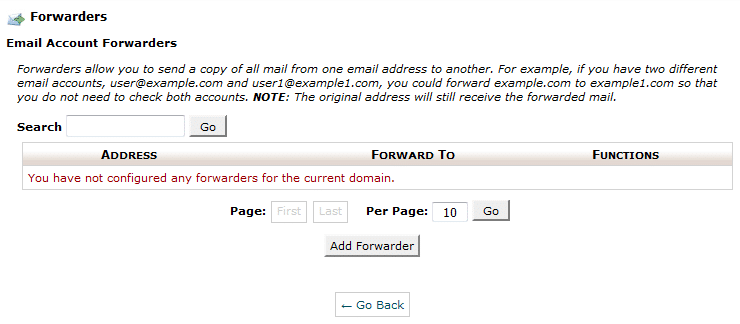
Passo 4. Clicar no botão Add Forwarder
Passo 5. Introduza o seu endereço de correio electrónico, no qual deseja receber todas as suas mensagens de correio electrónico do seu domínio personalizado. Depois, clique no botão Add Forwarder.
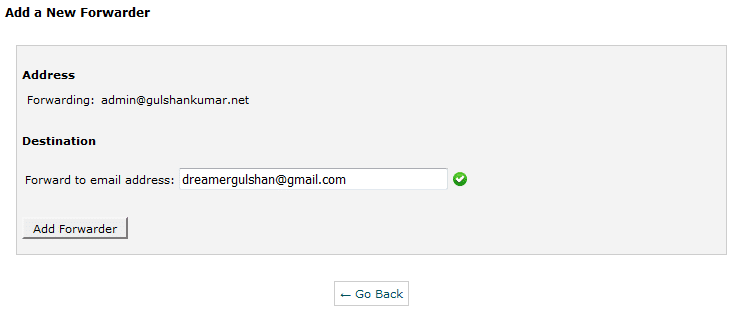
Passo 6. Verá uma mensagem de confirmação como esta.

Enviar e-mail do Gmail via SMTP
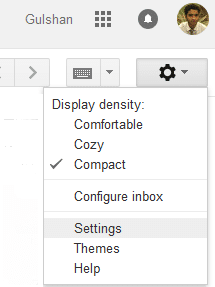
Agora vá para Configurações do Gmail
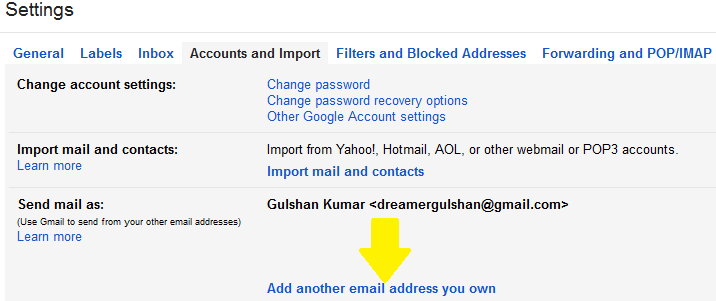
Passo 1. em Opção de Contas e Importação, clicar em Adicionar outro endereço de e-mail
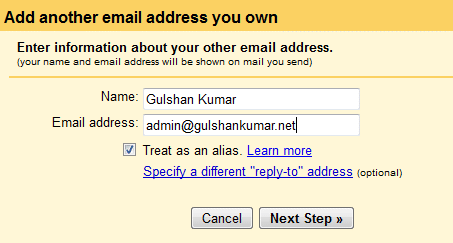
Passo 2. Introduza aqui o seu endereço de e-mail personalizado & clique em Next Step (Etapa seguinte)
Passo 3. Encontrar detalhes SMTP que ao clicar na opção ‘Configurar cliente de e-mail’ na secção de e-mail do seu cPanel. (Ref: Passo 3). Também pode contactar do anfitrião para obter informações SMTP.

Passo 4. Na página de configuração, pode encontrar o nome do seu servidor SMTP e o nº PORT.
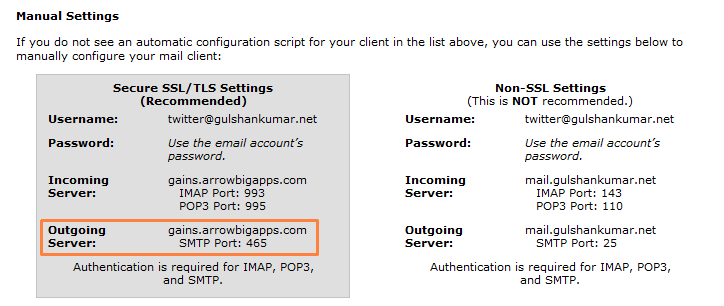
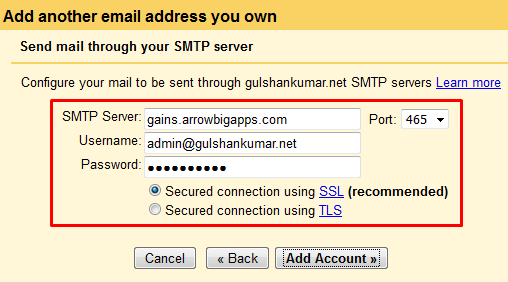
Passo 5. Dependendo do seu ambiente de acolhimento. Poucos anfitriões permitem aceder ao correio através do PORT 25(não seguro), e poucos requerem configurações SSL/TLS estritamente devido a preocupações de segurança. O meu anfitrião requer configurações seguras. Por isso, a minha configuração será a seguinte. Embora, recomendo a utilização da porta 587.
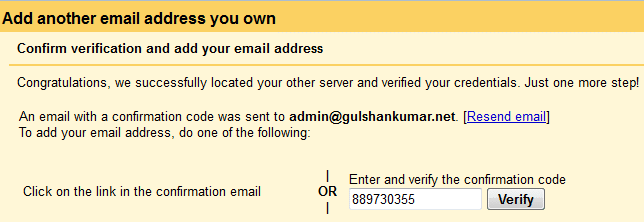
Passo 6. Agora, é altura de verificar o endereço de correio electrónico para enviar correio electrónico do domínio personalizado através do Gmail. Por favor, verifique a sua caixa de correio electrónico personalizada, clique no link de confirmação.
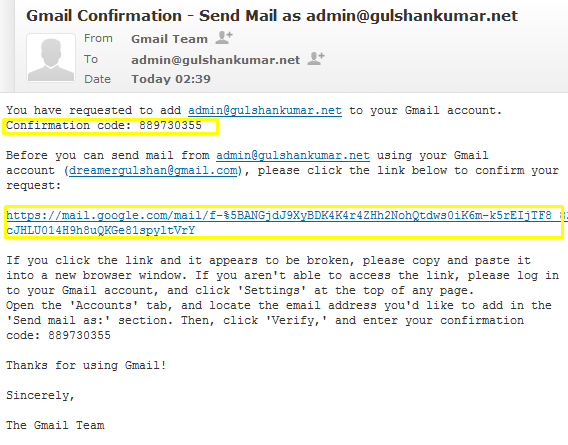
ou, introduzir manualmente o código de verificação. Ambos devem funcionar perfeitamente bem.
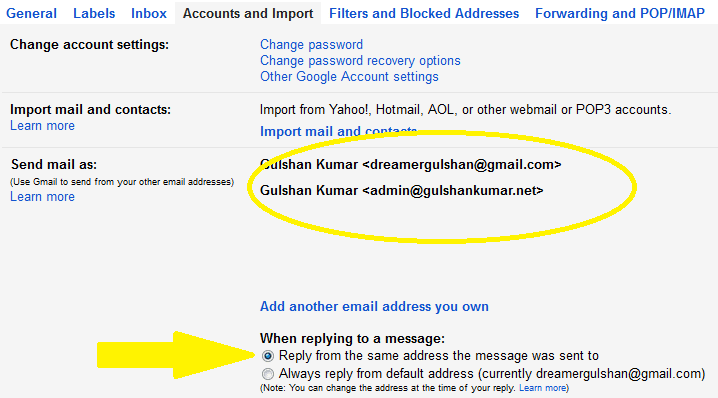
Passo 7. Para sua conveniência, deve escolher ‘Responder do mesmo endereço para o qual a mensagem foi enviada.
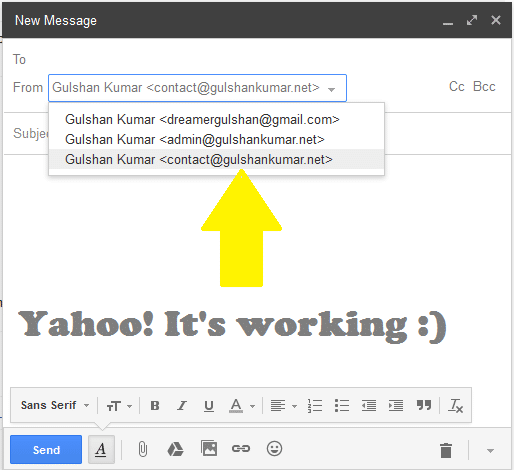
Passo 8. Pode testá-lo através da composição de um novo Email. Verá que está a funcionar bem e agora pode enviar o e-mail para qualquer pessoa com o seu endereço de e-mail personalizado, sem abrir o cliente de web-mail cPanel.
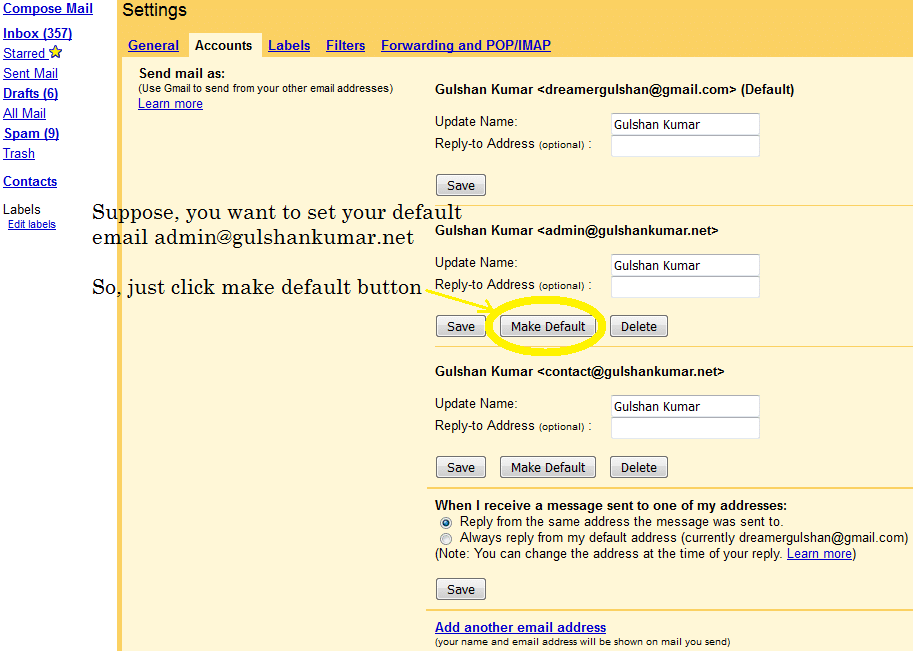
Passo 9. Pode definir o seu e-mail personalizado no Gmail como o seu mail por defeito para compor a caixa de diálogo de e-mail. Esta funcionalidade pode ser obtida na configuração Gmail > Contas e Importação.
No modo HTML do Gmail, não se pode mudar ‘do e-mail’ directamente da composição da caixa de correio, pelo que esta técnica melhorará a experiência de utilização do e-mail mesmo em ligações lentas à Internet.
Por gentileza, não se comprometa com a Segurança. Recomendo-lhe vivamente que mantenha actualizado o seu número de telemóvel e que se certifique de que activa a verificação em 2 passos nas definições da sua conta Gmail. Uma vez que sabe bem que o Gmail não é como o Yada…Yada conta falsa no Facebook. Pode estar a utilizar o Gmail ID para iniciar sessão em tantos outros serviços Google e aplicações de Terceiros também. Por conseguinte, a segurança deste e-mail é extremamente importante. Pode gerir esta configuração em accounts.google.com em opção de login.
Agradecia muito se pudesse partilhar feedback ou sugestão para este artigo. Obrigado.
✅ Como reencaminho o meu e-mail cPanel para o Gmail?
Inicie sessão no cPanel e configure o reencaminhamento de correio electrónico indo para a opção de reencaminhamento de contas de correio electrónico.
✅ O Gmail bloqueia o reencaminhamento?
Não, o Gmail não bloqueia o reencaminhamento.
✅ Quanto tempo demora o reencaminhamento do Gmail?
Geralmente, 5-10 minutos. Siga este guia passo a passo.
✅ O reencaminhamento de correio electrónico cPanel para o Gmail é gratuito?
Well, this method is limited for sending and receiving email. But, if you want to host email directly on Gmail Server, and apart from email-hosting if you want to enjoy full access to Google service then you should surely prefer Google Workspace.
There is a problem with this article: gmail and outlook will generally tag email forwarded this way as spam, because of a SPF fail or softfail. Email forwarded this way appears to come from a random server owned by your host, and not from your domain.
There is a simple fix: don’t use forwarding. Both gmail and outlook are willing to check email directly; go to settings and add account. Check it with security (995 pop3, 465 outgoing SSL). This just works and you get the benefit of effective spam filtering from gmail or outlook.
To be clear, if you want to use gmail to check
joe@example.comandsue@example.com, where example.com is your domain, you can forwardjoe@example.comtosue@example.comand just checksue@example.com, because forwarding “inside” your host works fine. But forwarding to gmail or outlook gets tagged as spam most of the time.Hi Preston, Thanks for your feedback at my article.
Hi Gulshan,
Is there any workaround for the spam issue? I tried to use direct email check as suggested by Preston but somehow my gmail is having problem connecting to my cpanel mail sever. Not sure how to fix that thus if you know the solution to forwarding as spam issue, please let me know.
my gmail is having problem connecting to my cpanel mail sever.
This is not helpful for me to understand your query. Could you please share any screenshot or particular error message?
Thanks
Sorry for my poor English, I meant to ask about Gmail sending forwarded emails from Cpanel webmail to the spam folder. I would like to know if you know of any way to avoid that?
1. Login to Gmail from the Desktop
2. In the Search bar, type
to:admin@your-domain.com3. Click on Show Search Option > Create a filter > Choose Never send it to spam. See Screenshot for help.
4. Make sure you’ve correct SPF records at DNS as per email hosting server.
If you feel above process is too difficult, I would recommend going with G Suite instead.
Thanks a lot for this guide. It have actually helped me to configure my email client properly.
Finally, I learned how to get free email with own domain. Thank you.
Hi Gulshan,
Thanks for this important idea.
I have implemented this for my blog email ID and I forwarded it to the Gmail personal ID. I found that when we receive the email to blog’s email id then it took few more minutes to reach at Gmail inbox.
If we directly configure the blog’s email id to any app, then it will come there real time.
Thanks,
Amit
Hi, how can I get the mail on my phone using gmail and a custom domain?
Dear Gulshan!
Thank you for this post! Thanks to you I was able to send/receive custom emails through gmail.
Hi Gulshan,
Nice post, also i want to know what this actually mean “Note: Well, this method is limited for sending and receiving email” ? I mean after following whole above steps( receiving and sending email), is it working only for 30 days or more ?
Hello Satinder, Thanks for kind words.
The above step which you learned about forwarding, will work for lifetime as long you will have custom domain linked to any Gmail id.
Please note, the limit comes with self hosted email, I’m not saying about Gmail for this whole steps. Suppose, if you have very busy email so chances are it will use more resources which your hosting can’t handle or they may set daily limits over it. So, it is my personal recommendation that for every business email always go with Google Apps for Work. It comes with 30 days free trial. After then, they will charge $5/mo.
If you have any more question, or need help with anything please let me know.
Regards,
Gulshan
Hi, This is awesome post and you are saving our money for buying custom emails. I would really appreciate you ! 🙂
Hi, glad to see you here. Thanks for your kind comment.
Good post Gulshan. I have implemented this trick for one of my company business mail. Thanks for sharing.
Very useful.