В этой статье вы изучите процесс установки WordPress вручную на сервер Ubuntu 22.04 с использованием NGINX, MariaDB и PHP 8.2. Этот стек обеспечит мощную и эффективную платформу для запуска вашего сайта WordPress с потрясающей скоростью.
Выполните эти 3 шага и посмотрите видео. Нужна помощь? связаться со мной. 😊
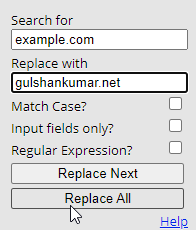
Прежде чем приступить к работе, вот небольшой совет. Используйте расширение Search and Replace для массовой замены example.com на ваш собственный домен на этой веб-странице.
Совет по экономии времени для пользователей Google Chrome.
Часть A: Поддерживайте серверы имен Cloudflare в активном состоянии
Мы будем использовать DNS Cloudflare для получения SSL-сертификата Let’s Encrypt Wildcard. Выполните этот шаг первым, чтобы насладиться миграцией без простоя.
Check Current Nameservers
- Find your active Nameservers at https://www.whatsmydns.net/#NS/example.com
- Если вы используете NS по умолчанию у предыдущего хостинга или регистратора домена, то вам необходимо заменить его на Cloudflare.
- Узнать как использовать Cloudflare DNS
Часть B: Подготовьте сервер Ubuntu Server 22.04 LTS Server

1. Зарегистрируйтесь в Vultr и получите $100 бесплатных кредитов (действует в течение 30 дней)
Как человек, перепробовавший множество компаний, предоставляющих облачные серверы, я могу сказать, что с Vultr вы не ошибетесь. Эти ребята искренни и заботливы, когда речь заходит о поддержке и услугах.
⚡ Производительность
- NVME / SSD
- Процессор 3,7 ГГц
- Скорость сети до 5 Гбит/с
- Датацентры в Америке, Европе, Азии, Австрии
- Готовность к IPV6
💡 Особенности
- Удобная для новичков приборная панель
- Снимок одним щелчком мыши
- Automtatic Backup (Платно)
- Бесплатный облачный брандмауэр
- Защита от DDoS-атак (платная)
- 100% виртуализация KVM
⚙ Поддержка
- PayPal/карта
- Круглосуточная поддержка по продаже билетов
- Документация
2. Создайте новый сервер VPS
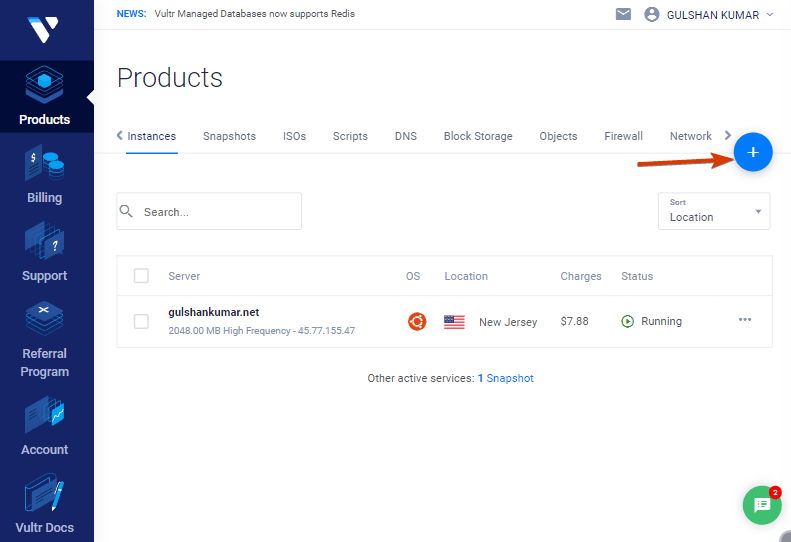
Просто нажмите на кнопку «плюс», чтобы начать работу
3. Выберите тип сервера
Выберите Cloud Compute для совместного использования ЦП по доступным ценам.

После этого вы можете выбрать опцию AMD High Performance или Intel High Frequency в разделе CPU & Storage Technology. Это самый быстрый процессор и диск NVMe. Если бюджет меньше, выберите тарифный план Regular с процессором Intel, в котором вы получите SSD-диск.

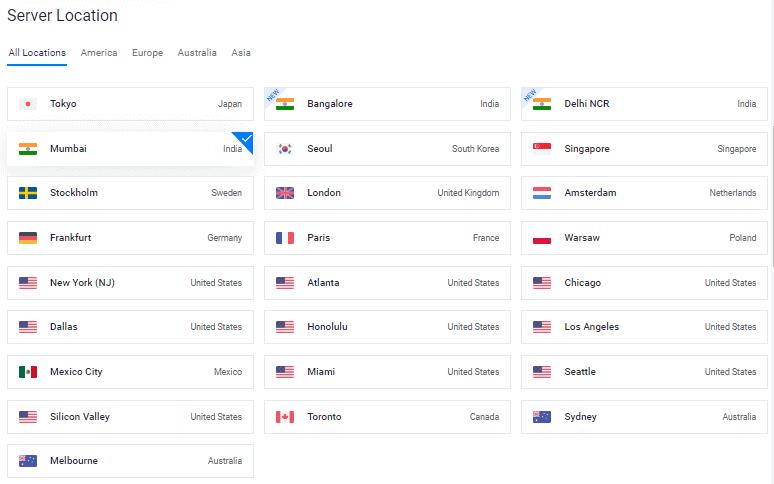
4. Выберите местоположение сервера
Выберите местоположение сервера, которое находится недалеко от вашей целевой аудитории.
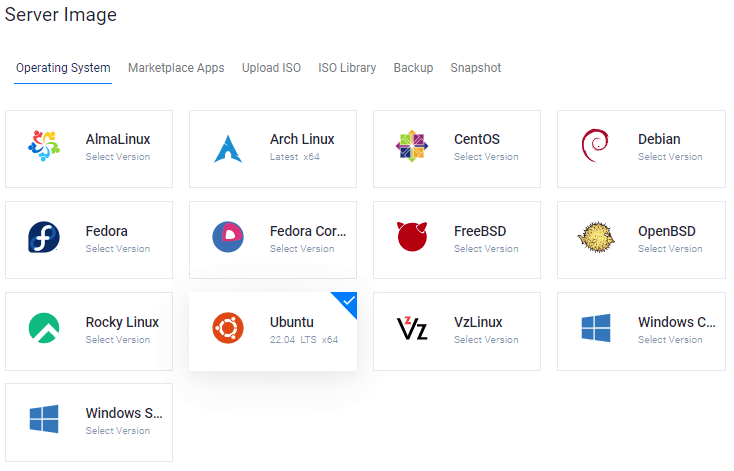
5. Выберите ОС Ubuntu 22.04 x64
В настоящее время Ubuntu 20.04×64 и 22.04×64 являются версиями LTS (Long Term Supported), совместимыми с большинством пакетов, которые мы собираемся установить.
6. Выберите размер сервера
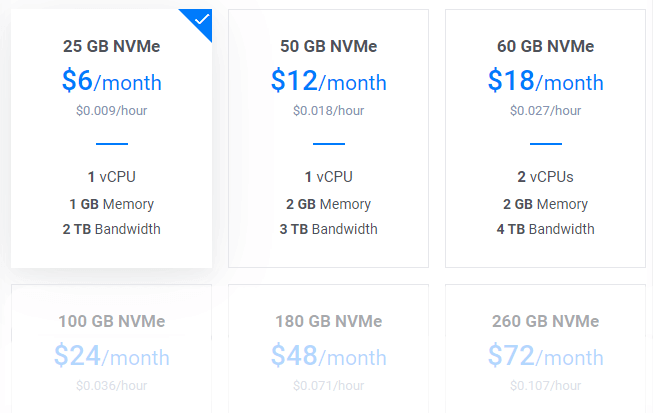
План $6/mo будет отличной отправной точкой для нового блога. Вы можете повысить тарифный план в любое время в соответствии с вашими требованиями.
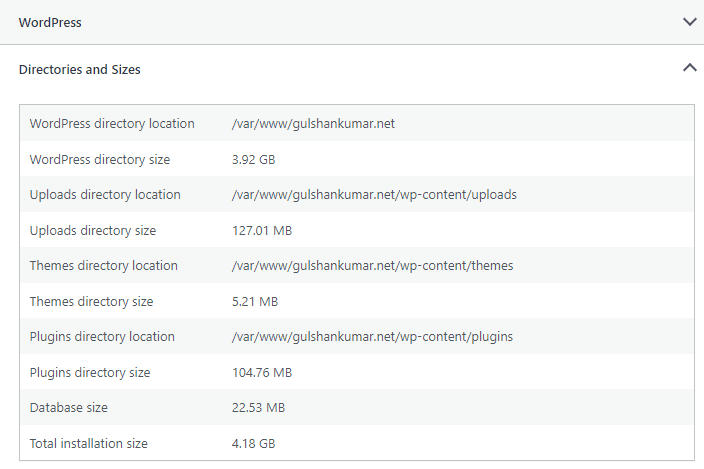
Совет: Если вы выполняете миграцию, проверьте Общий размер установки в разделе Информация о состоянии сайта.
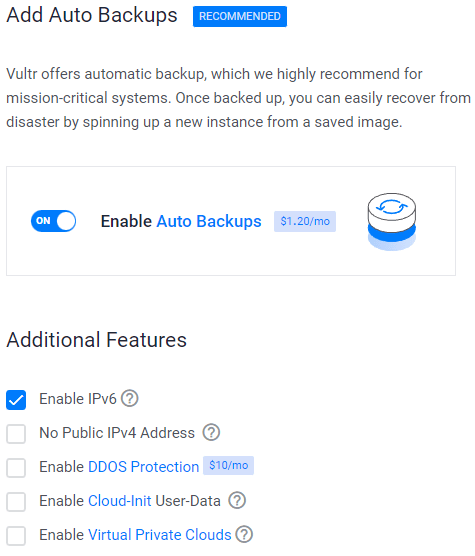
7. Включить IPV6, резервное копирование
8. Добавьте ключ SSH
Это рекомендуемый, необязательный шаг для повышения безопасности.
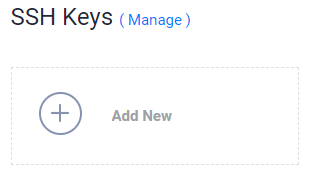
- Нажмите на кнопку Add New, чтобы добавить новый SSH-ключ для отправки 🔒Public key.
- Сгенерируйте ключи, используя приведенный ниже метод в соответствии с вашей ОС.

- Загрузите приложение PuTTy.
- Найдите PuTTygen в меню Пуск
- Нажмите на кнопку Generate и наведите указатель мыши
- Скопируйте открытый ключ и предоставьте его Vultr
- Введите ключевую кодовую фразу
- Сохраните 🔑Private Key в самом безопасном месте.
- Это может быть использовано для входа в SSH или SFTP.

- Выполните:
ssh-keygen -t rsa. Для получения более надежного 4096-битного ключа выполните:ssh-keygen -t rsa -b 4096 - Нажмите Enter, когда вас спросят, где вы хотите сохранить ключ (при этом будет использовано местоположение по умолчанию).
- Введите кодовую фразу для вашего ключа.
- Запустите
cat ~/.ssh/id_rsa.pub— это даст вам ключ в правильном формате для вставки в панель управления. - Обязательно создайте резервную копию файла
~/.ssh/id_rsa. Его невозможно восстановить, если он будет утерян.
Выберите свой SSH-ключ
Следуя этим шагам, вы прикрепите свой открытый ключ к новому инстансу. Затем вы сможете войти в SSH, используя пароль Plain Text и ключ SSH.

9. Свяжите правило веб-брандмауэра с экземпляром сервера

- Нажмите на Управление и создайте новую группу брандмауэра.
- Разрешите порт TCP 22 для SSH. 80 для HTTP и 443 HTTPS для правил IPV4 и IPV6.
- После этого свяжите группу Firewall с вашим экземпляром.
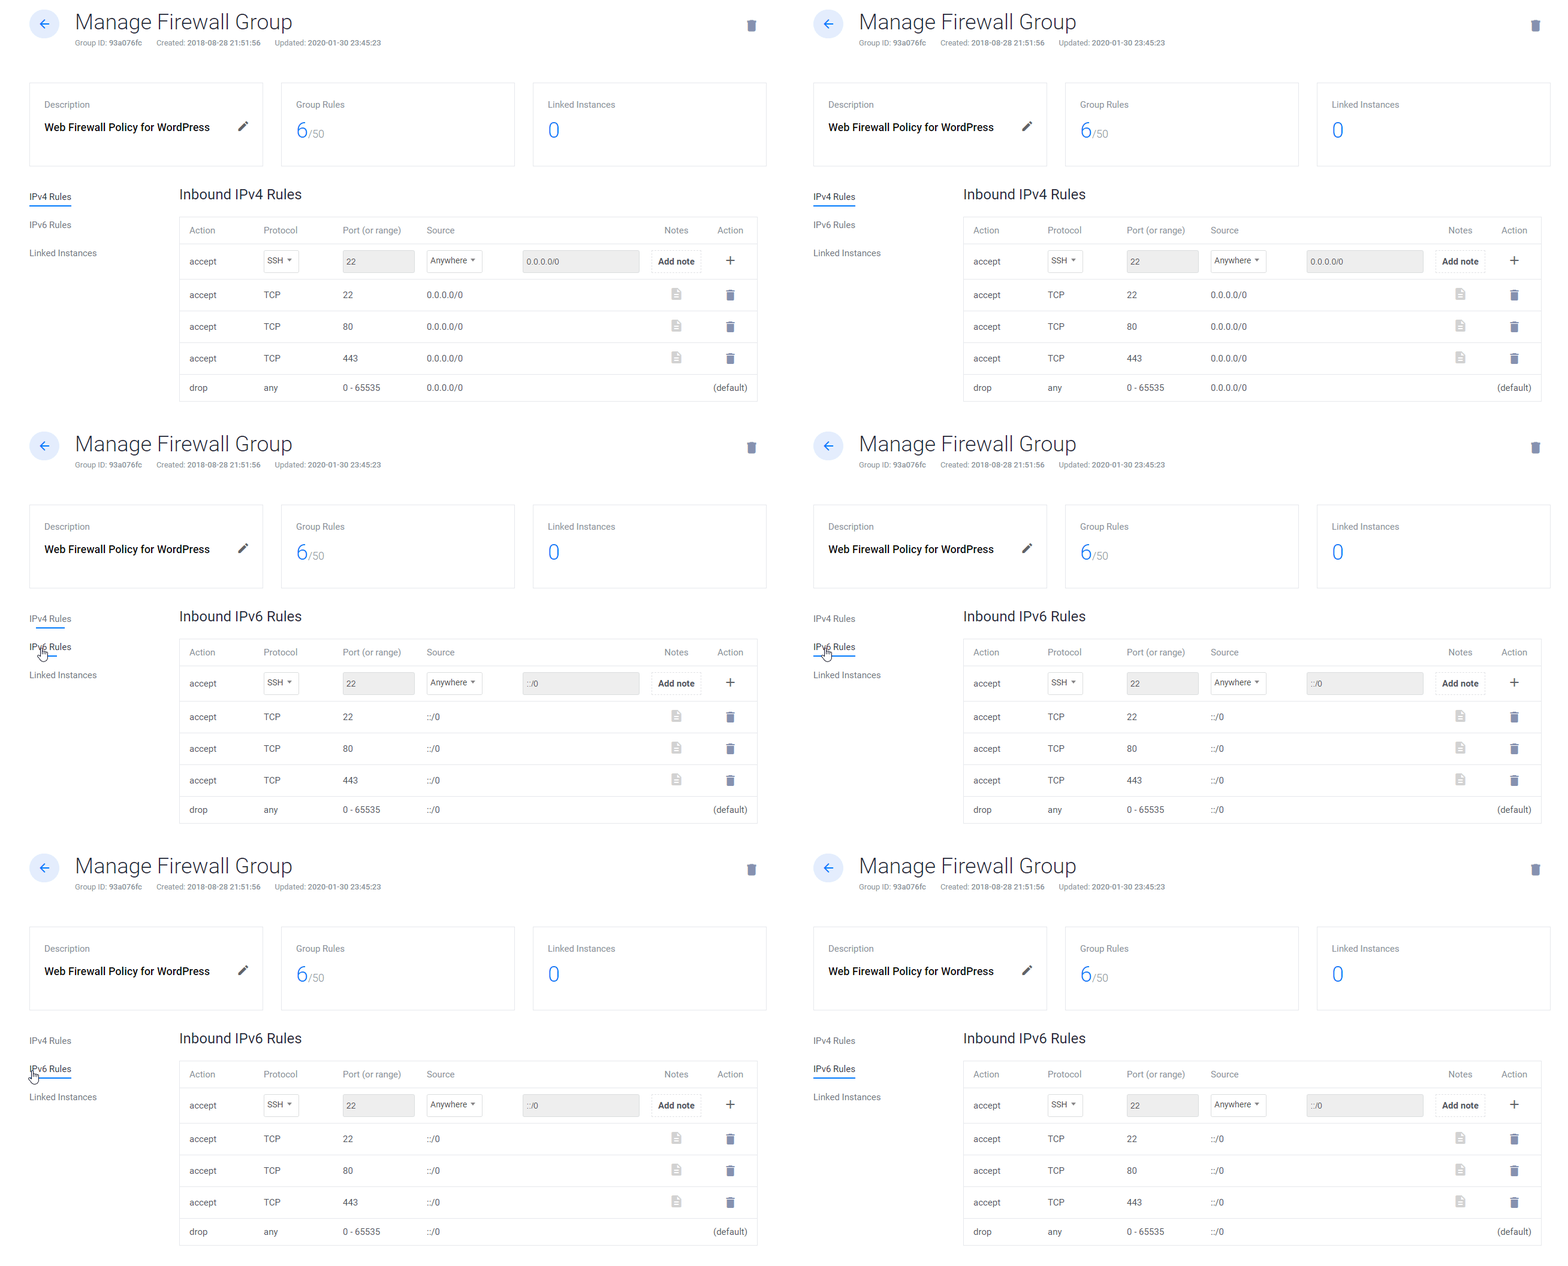
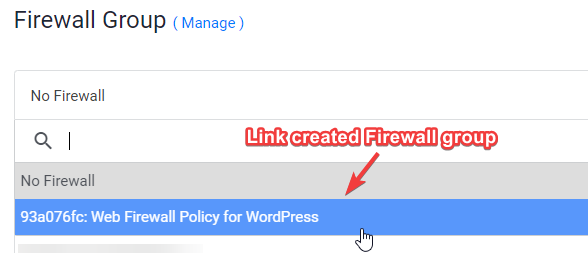
10. Введите имя хоста и ярлык, нажмите кнопку Развернуть сейчас
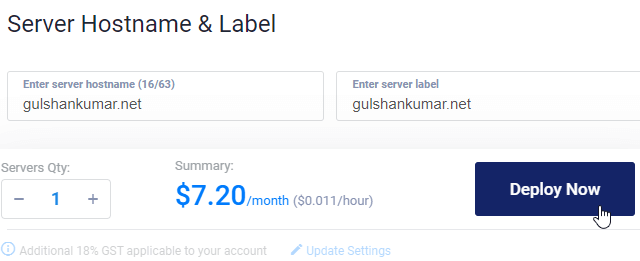
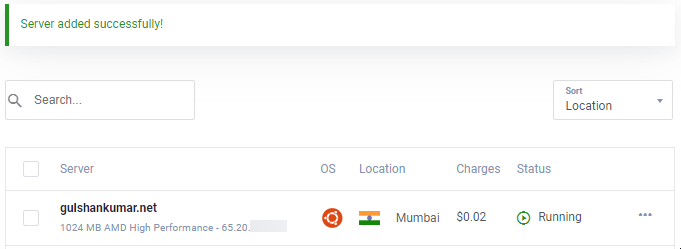
Теперь в процессе установки вы увидите
11. Перейдите на страницу Новый экземпляр
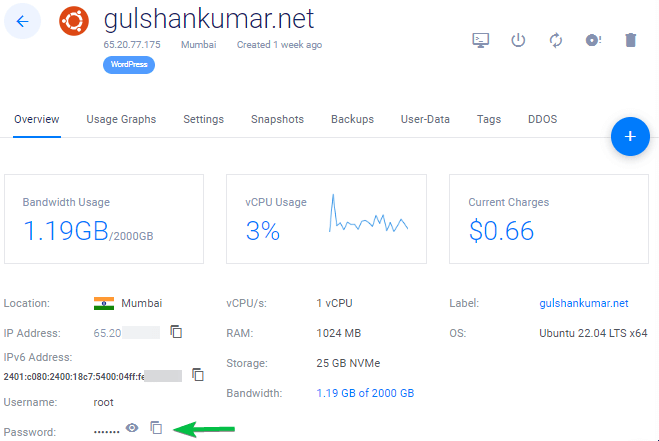
Скопируйте IP-адрес, имя пользователя и пароль. Ваш порт по умолчанию — 22.
12. Отключить вход по паролю
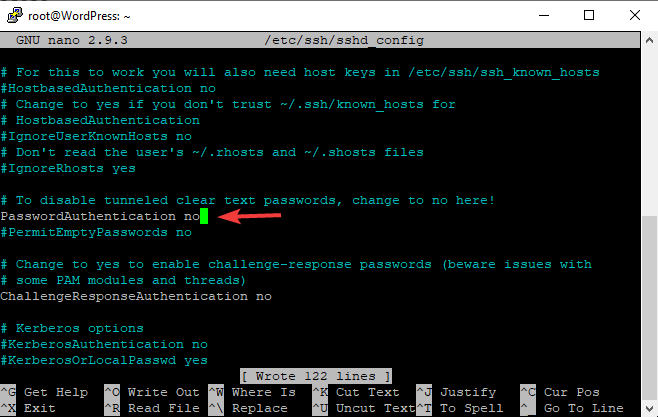
В целях безопасности рекомендуется отключить аутентификацию по паролю и разрешить только аутентификацию по ключу.
- Редактирование файла конфигурации
nano /etc/ssh/sshd_config - Найти (CTRL + W) и поиск
PasswordAuthentication - Изменить значение с «да» на «нет
- Для сохранения введите, CTRL + O
- Перезапустите службу SSH с помощью команды
sudo service ssh restart
В следующий раз вы можете использовать SSH только через ключ, как показано в видео.
Для Linux или Mac используйте Терминал с командой следующего содержания
ssh root@192.168.1.1 -p 22 -i id_rsa
Шаг 13. Отключите UFW
Когда вы устанавливаете новый экземпляр на VULTR, он поставляется с включенным UFW (Uncomplicated Firewall), который блокирует все порты, кроме SSH-порта 22. Это может привести к ошибке ERR_CONNECTION_REFUSED в браузере. Чтобы исправить это, я бы посоветовал отключить UFW.
ufw disableДостаточно объяснений для базовых вещей. Теперь я ускорю первоначальный процесс развертывания WordPress на стеке LEMP.
Часть C. Развертывание WordPress на стеке LEMP
1. Обновление репозиториев
Введите следующую команду и нажмите клавишу Enter
sudo -sapt update && apt upgrade -y && apt dist-upgrade && apt autoclean && apt autoremove -y && rebootили
wget -qO update https://dl.gulshankumar.net/update && chmod +x updateВ следующий раз всегда используйте следующую команду быстрого доступа для обновления.
./update2. Установка MariaDB с обеспечением безопасности
Снова войдите в систему и введите следующую команду
sudo apt install mariadb-server -y && sudo mysql_secure_installationОтветьте на следующие вопросы
- Enter current password for root (enter for none): Нажмите клавишу Enter
- Switch to unix_socket authentication [Y/n]: n
- Set root password? [Y/n]: Нажмите клавишу Enter.
- New password: Введите пароль, для генерации можно использовать Dashlane. Щелкните правой кнопкой мыши «Вставить».
- Re-enter new password: Повторно введите свой пароль.
После успешной установки пароля вы увидите
Password updated successfully!
Reloading privilege tables..
... Success!
Также вам необходимо ответить на следующие вопросы.
- Remove anonymous users? [Y/n]: Нажмите Y и введите
- Disallow root login remotely? [Y/n]: Нажмите Y и введите
- Remove test database and access to it? [Y/n]: Нажмите Y и введите
- Reload privilege tables now? [Y/n]: Нажмите Y и введите
3. Создайте новую базу данных для WordPress
Войдите в MySQL, нажмите клавишу ввода, когда он запросит пароль.
mysql -u root -pСоздайте новую базу данных и предоставьте привилегии ее пользователю с паролем. Именно здесь WordPress хранит всю информацию о постах, страницах, темах, плагинах и т.д.
create database wordpress;
grant all on wordpress.* to gulshan@localhost identified by '5pY8CKJxDRJEGQNkX7';
flush privileges;
exit;
Где ваш …
база данных wordpress
имя пользователя — Гульшан
пароль 5pY8CKKJxDRJEGQNkX7
Совет: Рассмотрите возможность использования уникальных учетных данных для входа в систему
4. Установите PHP 8.2, NGINX и установите права доступа
sudo add-apt-repository ppa:ondrej/php -y && apt update && apt install php8.2-fpm php8.2-common php8.2-mysql php8.2-xml php8.2-xmlrpc php8.2-curl php8.2-gd php8.2-imagick php8.2-cli php8.2-dev php8.2-imap php8.2-mbstring php8.2-soap php8.2-zip php8.2-bcmath -y && sed -i 's/;cgi.fix_pathinfo=1/cgi.fix_pathinfo=0/g' /etc/php/8.2/fpm/php.ini && service php8.2-fpm restart && apt install nginx -y && chown -R www-data:www-data /var/www/ && chmod -R 755 /var/wwwНастройка конфигурации PHP
Для работы большинства модных тем и плагинов требуется высококлассная конфигурация PHP. Поэтому мы должны внести эти изменения.
sed -i 's/memory_limit = 128M/memory_limit = 512M/g' /etc/php/8.2/fpm/php.ini
sed -i 's/post_max_size = 8M/post_max_size = 128M/g' /etc/php/8.2/fpm/php.ini
sed -i 's/max_file_uploads = 20/max_file_uploads = 30/g' /etc/php/8.2/fpm/php.ini
sed -i 's/max_execution_time = 30/max_execution_time = 900/g' /etc/php/8.2/fpm/php.ini
sed -i 's/max_input_time = 60/max_input_time = 3000/g' /etc/php/8.2/fpm/php.ini
sed -i 's/upload_max_filesize = 2M/upload_max_filesize = 128M/g' /etc/php/8.2/fpm/php.ini
service php8.2-fpm restart
5. Установите SSL-сертификат Wildcard Let’s Encrypt
Создайте файл cloudflare.ini в каталоге /root/.secrets/.
mkdir -p /root/.secrets/ && cd /root/.secrets/ && nano cloudflare.iniДобавьте приведенный ниже код, сохраните его с помощью CTRL+O и выйдите с помощью CTRL+X
dns_cloudflare_email = "your-cloudflare-email@example.com"
dns_cloudflare_api_key = "XXXXXXXXXXXXXXXXX"
Найдите свой электронный адрес Cloudflare и глобальный ключ API в разделе «Мой профиль» > Токены API > Глобальный ключ API
chmod 0400 /root/.secrets/cloudflare.iniУстановите Certbot и DNS Authenticator в соответствии с ОС и HTTP веб-сервером
snap install --beta --classic certbot
snap set certbot trust-plugin-with-root=ok
snap install --beta certbot-dns-cloudflare
snap connect certbot:plugin certbot-dns-cloudflare
Получить SSL-сертификат Wildcard
certbot certonly --dns-cloudflare --dns-cloudflare-credentials /root/.secrets/cloudflare.ini -d example.com,*.example.com --preferred-challenges dns-01Установка автоматического продления с помощью задания Cron
- Тип
crontab -e - Тип 1 для редактора nano
- Введите следующую команду и сохраните
0 0 * * * /etc/init.d/nginx reload >/dev/null 2>&1Возобновление испытаний
certbot renew --dry-run6. Настройка блока сервера Nginx
Это важно, когда вам нужно настроить ваш домен, как NGINX должен обрабатывать ваши HTTP-запросы.
Удалите блоки сервера по умолчанию.
rm /etc/nginx/sites-available/default && rm /etc/nginx/sites-enabled/defaultСоздайте новый серверный блок
cd /etc/nginx/sites-available/
nano example.com- Замените
example.comна собственный домен - Введите приведенный ниже код и нажмите
ctrl+oдля сохранения иctrl+xдля выхода.
Общий
server {
    listen         80;
    return 301 https://$host$request_uri;
}
server {
# Document Root
root /var/www/html;
index index.php index.html index.htm;
server_name .example.com;
client_max_body_size 0;

    listen [::]:443 ssl http2 ipv6only=on;
    listen 443 ssl http2;
        ssl_protocols TLSv1.1 TLSv1.2 TLSv1.3;
        ssl_certificate /etc/letsencrypt/live/example.com/fullchain.pem;
        ssl_certificate_key /etc/letsencrypt/live/example.com/privkey.pem;
        ssl_prefer_server_ciphers on;
        ssl_session_cache   shared:SSL:20m;
        ssl_session_timeout 20m;
        ssl_ciphers 'TLS13+AESGCM+AES128:EECDH+AES128';


error_page 404 /404.html;
error_page 500 502 503 504 /50x.html;

# Block XMLRPC
location = /xmlrpc.php {
    deny all;
}

location / {
    try_files $uri $uri/ /index.php$is_args$args;
}

location ~* \.php$ {
if ($uri !~ "^/uploads/") {
fastcgi_pass unix:/run/php/php8.2-fpm.sock;
}
include fastcgi_params;
fastcgi_param SCRIPT_FILENAME $document_root$fastcgi_script_name;
fastcgi_param SCRIPT_NAME $fastcgi_script_name;
}
location = /favicon.ico {
log_not_found off;
access_log off;
}

location = /robots.txt {
log_not_found off;
access_log off;
allow all;
}

location ~* .(css|gif|svg|ico|woff2|eot|jpeg|webp|jpg|js|png)$ {
expires 1y;
log_not_found off;
}

# Enable Gzip compression.
gzip on;

# Disable Gzip on IE6.
gzip_disable "msie6";

# Allow proxies to cache both compressed and regular version of file.
# Avoids clients that don't support Gzip outputting gibberish.
gzip_vary on;

# Compress data, even when the client connects through a proxy.
gzip_proxied any;

# The level of compression to apply to files. A higher compression level increases
# CPU usage. Level 5 is a happy medium resulting in roughly 75% compression.
gzip_comp_level 5;

# Compress the following MIME types.
gzip_types
 application/atom+xml
 application/javascript
 application/json
 application/ld+json
 application/manifest+json
 application/rss+xml
 application/vnd.geo+json
 application/vnd.ms-fontobject
 application/x-font-ttf
 application/x-web-app-manifest+json
 application/xhtml+xml
 application/xml
 font/opentype
 image/bmp
 image/svg+xml
 image/x-icon
 text/cache-manifest
 text/css
 text/plain
 text/vcard
 text/vnd.rim.location.xloc
 text/vtt
 text/x-component
 text/x-cross-domain-policy;
}
Для cache Enabler
server {
    listen         80;
    return 301 https://$host$request_uri;
}
server {
# Document Root
root /var/www/html;
index index.php index.html index.htm;
server_name .example.com;
client_max_body_size 0;

    listen [::]:443 ssl http2 ipv6only=on;
    listen 443 ssl http2;
        ssl_protocols TLSv1.1 TLSv1.2 TLSv1.3;
        ssl_certificate /etc/letsencrypt/live/example.com/fullchain.pem;
        ssl_certificate_key /etc/letsencrypt/live/example.com/privkey.pem;
        ssl_prefer_server_ciphers on;
        ssl_session_cache   shared:SSL:20m;
        ssl_session_timeout 20m;
        ssl_ciphers 'TLS13+AESGCM+AES128:EECDH+AES128';


error_page 404 /404.html;
error_page 500 502 503 504 /50x.html;


# Block XMLRPC
location = /xmlrpc.php {
    deny all;
}


# Rules for Cache Enabler Plugin - Static File Serving

    set $cache_uri $request_uri;

    # bypass cache if POST requests or URLs with a query string
    if ($request_method = POST) {
    set $cache_uri 'nullcache';
    }

    if ($query_string != '') {
    set $cache_uri 'nullcache';
    }

    # bypass cache if URLs containing the following strings
    if ($request_uri ~* '(/wp-admin/|/xmlrpc.php|/wp-(app|cron|login|register|mail).php|wp-.*.php|/feed/|index.php|wp-comments-popup.php|wp-links-opml.php|wp-locations.php|sitemap(index)?.xml|[a-z0-9-]+-sitemap([0-9]+)?.xml)') {
    set $cache_uri 'nullcache';
    }

    # bypass cache if cookies contain the following strings
    if ($http_cookie ~* '(wp-postpass|wordpress_logged_in|comment_author)_') {
    set $cache_uri 'nullcache';
    }

    # custom installation subdirectory
    set $custom_subdir '';

    # default HTML file
    set $cache_enabler_uri '${custom_subdir}/wp-content/cache/cache-enabler/${http_host}${cache_uri}${scheme}-index.html';

    # WebP HTML file
    if ($http_accept ~* 'image/webp') {
    set $cache_enabler_uri '${custom_subdir}/wp-content/cache/cache-enabler/${http_host}${cache_uri}${scheme}-index-webp.html';
    }

    location / {
    gzip_static on; # this directive is not required but recommended
    try_files $cache_enabler_uri $uri $uri/ $custom_subdir/index.php?$args;
    }

location ~* \.php$ {
if ($uri !~ "^/uploads/") {
fastcgi_pass unix:/run/php/php8.2-fpm.sock;
}
include fastcgi_params;
fastcgi_param SCRIPT_FILENAME $document_root$fastcgi_script_name;
fastcgi_param SCRIPT_NAME $fastcgi_script_name;
}
location = /favicon.ico {
log_not_found off;
access_log off;
}

location = /robots.txt {
log_not_found off;
access_log off;
allow all;
}

location ~* .(css|gif|svg|ico|jpeg|webp|woff2|eot|jpg|js|png)$ {
expires 1y;
log_not_found off;
}

# Enable Gzip compression.
gzip on;

# Disable Gzip on IE6.
gzip_disable "msie6";

# Allow proxies to cache both compressed and regular version of file.
# Avoids clients that don't support Gzip outputting gibberish.
gzip_vary on;

# Compress data, even when the client connects through a proxy.
gzip_proxied any;

# The level of compression to apply to files. A higher compression level increases
# CPU usage. Level 5 is a happy medium resulting in roughly 75% compression.
gzip_comp_level 5;

# Compress the following MIME types.
gzip_types
 application/atom+xml
 application/javascript
 application/json
 application/ld+json
 application/manifest+json
 application/rss+xml
 application/vnd.geo+json
 application/vnd.ms-fontobject
 application/x-font-ttf
 application/x-web-app-manifest+json
 application/xhtml+xml
 application/xml
 font/opentype
 image/bmp
 image/svg+xml
 image/x-icon
 text/cache-manifest
 text/css
 text/plain
 text/vcard
 text/vnd.rim.location.xloc
 text/vtt
 text/x-component
 text/x-cross-domain-policy;
}- Чтобы воспользоваться преимуществами кэша, необходимо установить плагин Cache Enabler.
FastCGI
Если вы хотите использовать FastCGI Cache, то вместо этого реализуйте приведенный ниже блок сервера.
# NGINX Cache path
fastcgi_cache_path /var/run/nginx-cache levels=1:2 keys_zone=WORDPRESS:100m inactive=6h;
fastcgi_cache_key "$scheme$request_method$host$request_uri";
fastcgi_cache_use_stale error timeout invalid_header http_500;
fastcgi_ignore_headers Cache-Control Expires Set-Cookie;

server {
    listen         80;
    return 301 https://$host$request_uri;
}
server {
root /var/www/html;
index index.php index.html index.htm;
server_name .example.com;
client_max_body_size 0;

    listen [::]:443 ssl http2 ipv6only=on;
    listen 443 ssl http2;
        ssl_protocols TLSv1.1 TLSv1.2 TLSv1.3;
        ssl_certificate /etc/letsencrypt/live/example.com/fullchain.pem;
        ssl_certificate_key /etc/letsencrypt/live/example.com/privkey.pem;
        ssl_prefer_server_ciphers on;
        ssl_session_cache   shared:SSL:20m;
        ssl_session_timeout 20m;
        ssl_ciphers 'TLS13+AESGCM+AES128:EECDH+AES128';

error_page 404 /404.html;
error_page 500 502 503 504 /50x.html;


set $skip_cache 0;
    if ($request_method = POST) {set $skip_cache 1;}
    if ($request_uri ~* "/wp-admin/|/xmlrpc.php|/wp-.*.php|index.php|sitemap") {set $skip_cache 1;}
    if ($http_cookie ~* "comment_author|wordpress_[a-f0-9]+|wp-postpass|wordpress_no_cache|wordpress_logged_in") {set $skip_cache 1;}
    if ($query_string = "unapproved*") {set $skip_cache 1;}
    if ($cookie_woocommerce_items_in_cart = "1" ){ set $skip_cache 1;}
    if ($request_uri ~* "/(cart|checkout|my-account)/*$") {set $skip_cache 1;}

# Block XMLRPC
location = /xmlrpc.php {
    deny all;
}

location / {
try_files $uri $uri/ /index.php$is_args$args;
}

location ~* \.php$ {

 if ($uri !~ "^/uploads/") {
        fastcgi_pass unix:/run/php/php8.2-fpm.sock;
        }

        try_files                       $uri =404;
        include                         /etc/nginx/fastcgi_params;
        fastcgi_param                   SCRIPT_FILENAME $document_root$fastcgi_script_name;
        fastcgi_pass                    unix:/run/php/php8.2-fpm.sock;
        fastcgi_index                   index.php;
                fastcgi_cache_bypass $skip_cache;
                fastcgi_no_cache $skip_cache;
                fastcgi_cache WORDPRESS;
                fastcgi_cache_valid 200 30d;
                fastcgi_cache_valid 301 302 303 307 308 404 410 451 1m;
                add_header X-Cache $upstream_cache_status;

}

location = /favicon.ico {
log_not_found off;
access_log off;
}

location = /robots.txt {
log_not_found off;
access_log off;
allow all;
}

location ~* .(css|gif|ico|svg|webp|woff2|eot|jpeg|jpg|js|png)$ {
expires 1y;
log_not_found off;
}

# Enable Gzip compression.
gzip on;

# Disable Gzip on IE6.
gzip_disable "msie6";

# Allow proxies to cache both compressed and regular version of file.
# Avoids clients that don't support Gzip outputting gibberish.
gzip_vary on;

# Compress data, even when the client connects through a proxy.
gzip_proxied any;

# The level of compression to apply to files. A higher compression level increases
# CPU usage. Level 5 is a happy medium resulting in roughly 75% compression.
gzip_comp_level 5;

# Compress the following MIME types.
gzip_types
 application/atom+xml
 application/javascript
 application/json
 application/ld+json
 application/manifest+json
 application/rss+xml
 application/vnd.geo+json
 application/vnd.ms-fontobject
 application/x-font-ttf
 application/x-web-app-manifest+json
 application/xhtml+xml
 application/xml
 font/opentype
 image/bmp
 image/svg+xml
 image/x-icon
 text/cache-manifest
 text/css
 text/plain
 text/vcard
 text/vnd.rim.location.xloc
 text/vtt
 text/x-component
 text/x-cross-domain-policy;
}
To save, press CTRL+O and Enter key. Then, exit nano editor using command CTRL+X.
В случае FastCGI необходимо использовать плагин NGINX Helper. Он также работает с URL в кодировке хинди. Имейте в виду, что он не поддерживает AMP. Лично я не использую AMP. (Recommended)
В качестве альтернативы, кэш NGINX работает для очистки AMP URL, но он не поддерживает URL в кодировке Hindi. В настройках следует сохранить путь кэша /var/run/nginx-cache/
Внимание!
- Например, если вы используете тему Newspaper и отдельную мобильную тему, пожалуйста, придерживайтесь метода FastCGI и используйте плагин WP Rocket, потому что он может обслуживать отдельный мобильный кэш из коробки.
7. Создание символических связей между двумя каталогами
Если вы пропустите этот шаг, вы можете получить сообщение ERR_CONNECTION_REFUSED
Чтобы активировать блок сервера, создайте символическую ссылку файла блока сервера NGINX из каталога /etc/nginx/sites-available/ в /etc/nginx/sites-enabled
Перед выполнением нижеприведенной команды, пожалуйста, замените example.com на собственный домен.
ln -s /etc/nginx/sites-available/example.com /etc/nginx/sites-enabled/Тестовая конфигурация
nginx -tПерезапуск и обновление
service nginx restart && service php8.2-fpm restart && service mysql restart && apt-get update && apt upgrade -y8. Установите WordPress
Загрузите файлы WordPress в каталог /var/www/html и установите разрешение.
cd /var/www/html && wget https://ru.wordpress.org/latest-ru_RU.tar.gz && tar -xvzf latest-ru_RU.tar.gz && mv -v wordpress/* /var/www/html && rm -rf latest-ru_RU.tar.gz wordpress && chown -R www-data:www-data /var/www/html && sudo chmod -R 755 /var/www/htmlЧтобы обновить разрешение в будущем, используйте следующую команду
chown -R www-data:www-data /var/www/ && sudo chmod -R 755 /var/www9. Обновление DNS
Если вы размещаете WordPress локально, хотите обойти прокси или хотите выполнить миграцию с нулевым временем простоя, этот шаг будет полезен. Я обычно предпочитаю в случае статической области WordPress Dev. 😉
- Есть два способа указать DNS. Если вы переносите сайт на Vultr и хотите сначала протестировать его локально, то отредактируйте файл hosts и укажите в нем.
Для Windows
- Перейдите к свойствам
C:\Windows\System32\drivers\etc\hosts - Измените разрешение «Безопасность» на полный контроль для вашего текущего имени пользователя
- Теперь вы можете свободно редактировать файл hosts под своим пользователем System и сохранить его.
# For same machine you can have localhost address else public IP
127.0.0.1 example.com
127.0.0.1 www.example.com
Вот как это должно выглядеть.
Для Mac или Linux
Вы можете отредактировать файл hosts с помощью следующей команды
sudo nano /etc/hostsОбновление DNS с помощью Cloudflare
- Если все идеально и вы хотите сделать ваш сайт живым, войдите в Cloudflare DNS и обновите новый IP
| A | @ | IPV4 address |
| AAAA | @ | IPV6 address |
| CNAME | www | example.com |
где @ обозначает голый домен example.com
9. Зайдите на свое доменное имя, чтобы настроить WordPress
Если вы хотите сохранить домен неwww-версии для вашего WordPress, то посетите неwww-версию, а www.
https://example.com- Предоставьте учетные данные для входа в базу данных, чтобы начать настройку WordPress
- Выполнить установку
- Заполните основные данные вашего нового сайта и установите WordPress.
- Войдите в WordPress
- Если вы использовали серверный блок FastCGI, то первым делом необходимо установить плагин NGINX Cache и настроить
/var/www/cacheкак путь к кэшу.
Другие необходимые вещи
Используйте плагин SMTP Services для отправки исходящей электронной почты WordPress, иначе вы не сможете получить ссылку сброса пароля, сообщения контактной формы 7.
Наконец, установка WordPress завершена. Всегда сохраняйте резервную копию.
Я очень ценю ваше драгоценное время, потраченное на чтение этой статьи. Увидимся в следующем учебнике!
Exactly followed the same steps, but at the end i am getting 502 bad gateway. I built some sites with the same steps before, however i don’t know what changed now.
Consider checking the error log using command
tail -f /var/log/nginx/error.logto get a hint about exact issue.getting this
tail: cannot open ‘/var/log/error.log’ for reading: No such file or directory
tail: no files remaining
Sorry, there was a typo in my previous comment. Try below command
tail -f /var/log/nginx/error.logCan you explain me what is the difference between inactive and fastcgi_cache_valid values? Can you explain them please? Thanks
location ~* .(css|gif|ico|svg|jpeg|jpg|js|png)$ {
expires 1y;
log_not_found off;
}
is this code for page caching?
I use cloudflare so it has page cache too.
If i use that can i remove it from codes?
Can you please explain what is this code for?
Thanks
That code is for setting up 1 year browser caching for static files. You may use Cloudflare Page caching as normally you do. There shouldn’t be any problem.
For Nginx cache helper (I take this info from offical site
There’s a ‘purge all’ button? Does it purge the whole site?
Yes, it does. It physically empties the cache directory. It is set by default to /var/run/nginx-cache/.
So the default is /var/run/nginx-cache/
can we change fastcgi_cache_path /var/www/cache to /var/run/nginx-cache/ ?
Thanks
Если ваш каталог кэша отличается, вы можете переопределить это в вашем
wp-config.php, добавив.define('RT_WP_NGINX_HELPER_CACHE_PATH','/var/www/nginx-cache/')I finally installed wordpress with this guide. But I see only www version but not the non-www version. Is there any changes that I need to do.
Redirects to www version even If I enter non-www version.
You need to point DNS records for both hostnames. Second, make sure dot is not missing from the beginning of example.com in this code —
server_name .example.com;in the NGINX connfig at step 6. Another thing, Redirect from www to non-www or vice-versa (as neccessary) is taken care automatically from WordPress. You do not need to put any extra code for it.which is the best & compatible server side cache plugin If I use FastCGI server block code along with Nginx Cache plugin..
W3 Total Cache or WP Rocket
I have 2 questions
1) What if i have 2 domains on different cloudflare accounts?
Create a cloudflare.ini file inside /root/.secrets/ directory.
mkdir -p /root/.secrets/ && cd /root/.secrets/ && nano cloudflare.ini
Add below code and save using CTRL+O and exit using CTRL+X
dns_cloudflare_email = «your-cloudflare-email@example.com»
dns_cloudflare_api_key = «XXXXXXXXXXXXXXXXX»
/root/.secrets/1domaincloudfare.ini
/root/.secrets/2domaincloudfare.ini
certbot certonly —dns-cloudflare —dns-cloudflare-credentials 1domaincloudfare.ini -d example.com,*.1domain.com —preferred-challenges dns-01
certbot certonly —dns-cloudflare —dns-cloudflare-credentials 2domaincloudfare.ini -d example.com,*.2domain.com —preferred-challenges dns-01
Do this work?
2) If we have 2 domains in the same account on cloudflare can we use 1 cloudflare.ini
certbot certonly —dns-cloudflare —dns-cloudflare-credentials /root/.secrets/cloudflare.ini -d 1domain.com,*.example.com —preferred-challenges dns-01
certbot certonly —dns-cloudflare —dns-cloudflare-credentials /root/.secrets/cloudflare.ini -d 2domain.com,*.example.com —preferred-challenges
dns-01
3) If we dont use cloudflare what will our ns for domain?
CLoud VPNs IP?
ns1= 68.28.65.84
ns2= 68.28.65.84
Is this right?
thanks for your replies
1. True
2. True
3. I have no idea about it. I prefer using CF DNS.
Can we create multi wordpress sites on different domain in the same machine with this
method?
I think only changement is in the FastCGI?
server {
root /var/www/aaa.com/wordpress;
index index.php index.html index.htm;
server_name .aaa.com;
client_max_body_size 0;
server {
root /var/www/bbb.com/wordpress;
index index.php index.html index.htm;
server_name .bbb.com;
client_max_body_size 0;
server {
root /var/www/ccc.com/wordpress;
index index.php index.html index.htm;
server_name .ccc.com;
client_max_body_size 0;
is this make a problem cache path is the same path for 3 web site? /var/www/cache
Is this method works?
1 machine 3 different domain and wordpress?
Thanks
Not for multiple sites.
What do you think about Plesk Panel?
It is easy to install plesk and create a wordpress site.
Easy to find trial keys and we can use it unlimited.
If it expires sites goes on ftp works and only plesk panel does not work but there are too much trial keys
It has nginx cache.
Do you recommend why and why not?
Thanks
I do not trust 3rd-parties installers.
Do all commands work for Centos 8?
Sorry, this is for Ubuntu OS only not for Centos 8.
hello gulshanji i wanted to use cloudflare ssl direct from thier website and not thru api with fast cgi then what would the config
Hey bro what is your thoughts on EasyEngine and SlickStack etc or one click app instead to automate? what is your favorite and will you make any tut bro
Sure, there is one. I will post about it. Thanks for your feedback.
The FastCGI server block config throws 404 Errors.
fastcgi_pass unix:/run/php/php7.4-fpm-example.sock;
should be:
fastcgi_pass unix:/run/php/php7.4-fpm.sock;
And it is missing config for location /
This config must be defined:
location / {
try_files $uri $uri/ /index.php$is_args$args;
}
I see, it was intended for seperate user. But, to keep generic I have corrected. Thanks for pointing out.
Without the location / block only the home page was accessible.
When I added the below block i was able to access the post and pages.
location / {
try_files $uri $uri/ /index.php$is_args$args;
}
Hello Alpesh, Corrected. Thanks again for your tip.
It was a good article
Thanks for your comment.
Nice tutorial. Does it come with email hosting? Looking to make a small site in Singapore using VultrHF
E-mail is a different thing. G Suite by Google services is specialized in this segment.
What are the differences if any between doing this method and using the vultr 1 click install? I have also read about centminmod. Is that somrthing u will recommend for having a fast LEMP stack? Tnx
I alwyas keep this guide bookmarket to my web browser! You never know when I would need to setup a new LEMP server ! Thanks Gulshan
Thanks for your comment.
hi, Gulshan thanks for sharing.
can u please share how to install wp on subfoler?
This article is like Life-Saver for one of my website. I was about to move from Google Cloud to Digital Ocean because the trial was expired and I also wanted to use DigitaOcean because it is in-expensive yet powerful and gives great experience.
Previously, I used webinoly stack which was straightforward for installing WordPress but later on I got to know from Gulshan that there are so many issues with that stack so, this time I was going to do it manually. I checked the official guide by Digital ocean but end up with many confusion and issues. Then, I fortunately asked Gulshan for help and he recommended this article for me.
I installed WordPress easily and very fast even fast that Webinoly stack. Thanks a lot Gulshan for writing this amazing article. Hats off to you bro!!🎩
Hi Gulshan, I am also receiving the test failed error on step 7. I have tried several times now on different setup and still stuck here. Please could you help?
Please carefully read the post and then copy-paste code in Terminal. Sometime you need to replace with your own domain. Doing mistake can return error. Else, no wise. I use this guide everyday for myself. I am not aware about any problem.
In case of trouble
1. Run test using
nginx -t2. Check logs to get proper hint
tail -f /var/log/nginx/error.log3. Delete existing or earlier created virtualhost
rm /etc/nginx/sites-available/default && rm /etc/nginx/sites-enabled/default4. Make sure to replace example.com at all places, a) when you create conf file, its naming. b) when you add conf file and c) when you create symlink, check your command its conf file name must match with first process.
I feel in most cases, chances are you did not replaced
server_name .example.com;to own domain, or you did not obtained SSL. All steps are written in serial order as it should be.I am facing problem of infinite loop redirects. I had use fastcache code. how to fix it
Please try Full SSL mode of Cloudflare. Then check again!
How to check if fastcgi cache is working or not? while running sudo
curl -I https://example.comit is not showing x-cache parameterHey Gulshan,
In the 7th step while texting ngnix I got
nginx: [emerg] open() «/etc/nginx/sites-enabled/example.com» failed (2: No such file or directory) in /etc/nginx/nginx.conf:62
nginx: configuration file /etc/nginx/nginx.conf test failed
This error. How I can solve it? also what the error.
Please delete your existing server block and create again at sites-available and symlink at sites-enabled directory. The step 6 and 7 cover that clearly. Consider following patiently without any error. If you still face any problem, do let me know. Thanks for taking to leave your valuable comment.
Hi would like to know after configuring Fastcgi do we still need other caching plugin to speed up WordPress site?
Wonderful tutorial just complete solution for Nginx Fast CGI
Thanks Wasim for your kind feedback.
How Can I setup FastCGI on my ngnix server guided by you….
I have updated my article.
i want redirect too www plz help me urgent
If your WordPress General Settings has www version, server will do automatically. No additional action is required. In case you started WordPress installation at non-www version, then you need to migrate by changing at Database level.
You may use Better Search Replce plugin to perform this changes.
It Really Works Gulshan Bro. Thanks Really dear You are awesome…
Hello Gulshan Bro, First i want to say you that this is very beautiful and required post. I am really appreciating your work. but i have a problem can you please tell me
i have a droplet with digitalocean ($5/month plan) and i want to host multiple wordpress sites only with nginx(lemp ubuntu 18.04).
In simple i mean that this tutorial is complete to install a single wordpress and i did it but tell host it in some other sites
Hey Rohit,
Assuming, second site is example2.org
You need to follow steps this way.
1. create a new directory and add WordPress (Ref: steps 31)
cd /var/www/mkdir example2
wget https://wordpress.org/latest.tar.gz
tar -xvzf latest.tar.gz
mv -v wordpress/* /var/www/example2
rm -rf index.nginx-debian.html latest.tar.gz wordpress
chown -R www-data:www-data /var/www/
sudo chmod -R 755 /var/www
2. Create a new Server block with root path located to new directory as created in step 1.
cd /etc/nginx/sites-available/

nano gulshankumar-org
server {listen 80;
root /var/www/example2;
index index.php index.html index.htm;
server_name example2.org www.example2.org;
...
3. Point your example2.org domain to DNS, then install SSL
certbot --nginx -d example2.org -d www.example2.org4. Create new MySQL database
sudo mysql -u root -pcreate database example2;
grant all on example2.* to example2@localhost identified by 'TYPE HERE PASSWORD';
flush privileges;
exit;
5. Proceed to Installation by visiting your site
https://example2.orgLet me know if you have any additional question. You can always visit our forum for quick assistance.
Thanks & Regards,
Gulshan
It Really Works Gulshan Bro. Thanks Really dear You are awesome…
Hello Gulshan you written a comprehensive guide i highly appreciate your work. Can you help me with an error? Actually i have two websites the first website i have already hosted on Vultr following the above guide.
But when try to host a another WordPress website iam getting error. I followed the above steps you mentioned in comments. But still not able to fix it. The error is my website not working after hosting another WordPress website.
If possible please guide me step by step instructions. It will help me alot. Thanks in advance.
Consider checking log available at
/var/log/nginx/directory. Usenginx -tcommand to see what mistake causing issue.Very well. thank you so much
How to auto-renew SSL?
Add below cron job
crontab -eAdd below command and save.
15 3 * * 7 certbot renew --post-hook "service nginx restart"Thanks sos un groso, very well tutorial
Thank you for your tutorial, its the first one that actually showed me the wordpress setup page.
When I went to upload a plugin I received this message. «The uploaded file exceeds the upload_max_filesize directive in php.ini»
How do I increase the max filesize?
Please see the step 33.5
Thanks Gulshan, Finally I moved to NGINX server. You have created a great tutorial for beginners.
You’re welcome bro 🙂
Hi,
Thank you for this awesome guide.
How can I install WordPress multisite on Ubuntu 18.04 with Nginx?
Finally I loved this step by step tutorial with proper images.
Thanks Bhaiya you are awesome
Thanks a lot Gulshan. You save my breath
I search everywhere but not find any good article
You explained very well along with security concern
well done