Ebben a cikkben a WordPress kézi telepítésének folyamatát ismerheted meg egy Ubuntu 22.04 szerveren az NGINX, a MariaDB és a PHP 8.2 használatával. Ezek a stackek erős és hatékony platformot biztosítanak a WordPress webhely elképesztő sebességgel történő futtatásához.
Kövesse ezt a 3 lépést, és nézze meg a videót. Segítségre van szüksége? Contact me.
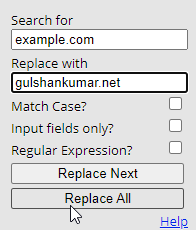
Mielőtt belekezdenél, itt egy gyors tipp. A Search and Replace kiterjesztés segítségével ömlesztve cserélje ki a example.com címet a saját domainjére ezen a weboldalon.
Időtakarékos tipp a Google Chrome felhasználóknak.
A. rész: Tartsa aktívan a Cloudflare névszervereket
A Cloudflare DNS-t fogjuk használni a Let’s Encrypt Wildcard SSL tanúsítvány megszerzéséhez. Először ezt a lépést fejezze be, hogy élvezhesse a zéró leállási idejű migrációt.
Aktuális Nameservers ellenőrzése
- Keresse meg aktív Nameservers a https://www.whatsmydns.net/#NS/example.com oldalon.
- Ha látja, hogy az előző tárhely- vagy domain-regisztrátor alapértelmezett NS-ét használja, akkor le kell cserélnie a Cloudflare-re.
- Ismerje meg a Cloudflare DNS használatát
Part B: Get a Ubuntu Server 22.04 LTS Server ready

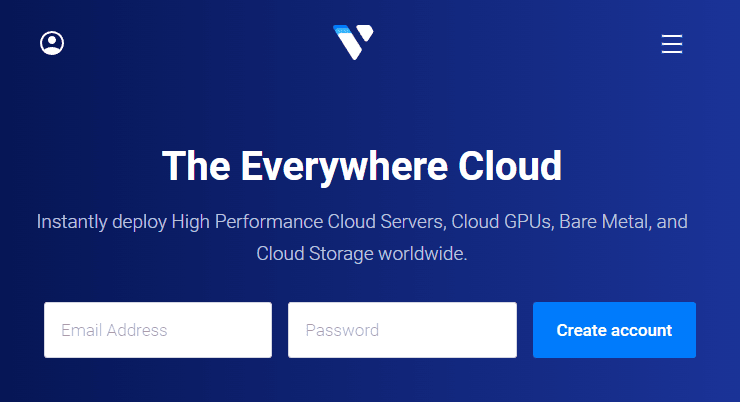
1. Regisztráljon Vultr, hogy megragad $100 Ingyenes kreditek (Érvényes 30 napig)
Mint valaki, aki már kipróbált sok Cloud szerver cég, a tapasztalatom azt mondja, hogy nem lehet rosszul járni a Vultr. Ezek a srácok valódiak és gondoskodóak, amikor a támogatásról és a szolgáltatásokról van szó.
⚡ Teljesítmény
- NVME / SSD
- 3.7 GHz CPU
- Akár 5 Gbps hálózati sebesség
- Adatközpontok Amerikában, Európában, Ázsiában, Ausztriában
- IPV6 készen áll
💡 Jellemzők
- Kezdőbarát műszerfal
- Egy kattintás a pillanatfelvételhez
- Automtatic Backup (fizetős)
- Ingyenes felhő tűzfal
- DDoS védelem (fizetős)
- 100% KVM Virtualization
⚙ Támogatás
- PayPal/Kártya
- 24/7 Ticket Support
- Dokumentáció
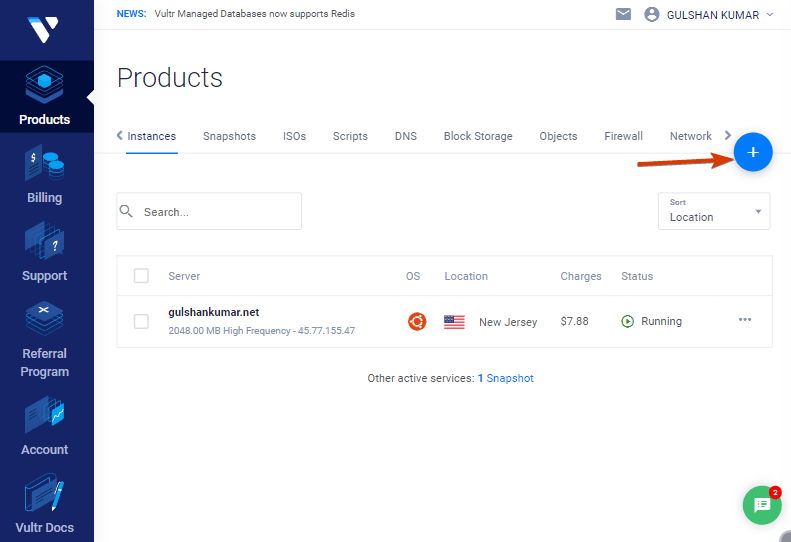
2. Új VPS szerver létrehozása
Egyszerűen kattintson a plusz gombra a kezdéshez
3. Válassza ki a Cloud Compute szervert
Válassza a Cloud Compute-ot, ha megosztott CPU-t szeretne megfizethető áron.
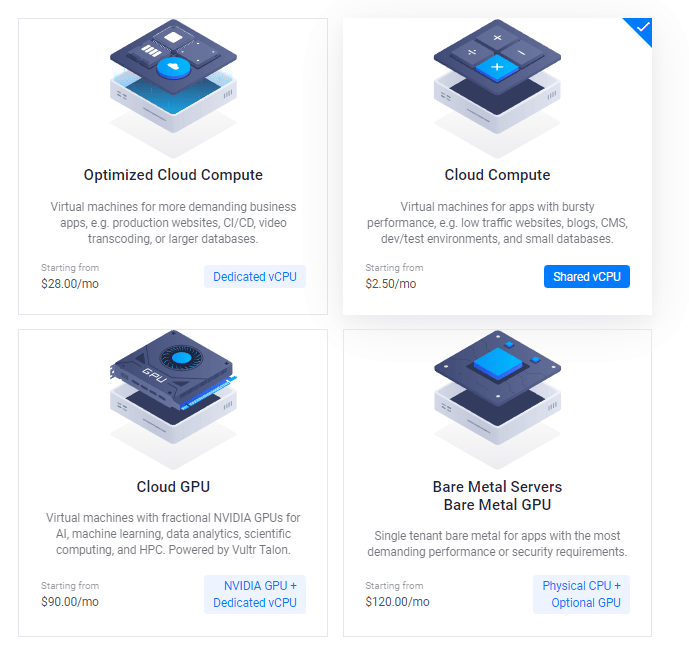
Ezt követően a CPU és tárolási technológia menüpontban kiválaszthatja az AMD High Performance vagy az Intel High Frequency opciót. Ez rendelkezik az eddigi leggyorsabb CPU-val és NVMe lemezzel. Ha a költségvetés kevesebb, akkor válassza a Regular csomagot Intel CPU-val, amelyben SSD lemezt kap.
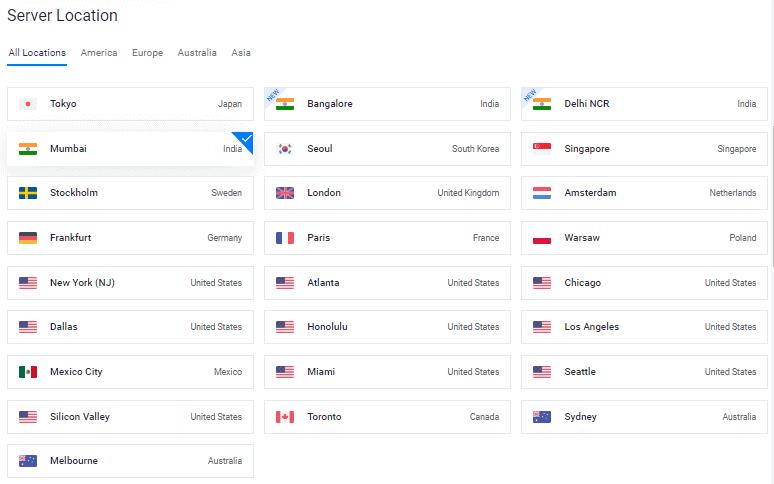
4. Kiszolgálóhely kiválasztása
Válasszon olyan kiszolgálóhelyet, amely közel van a célközönségéhez.
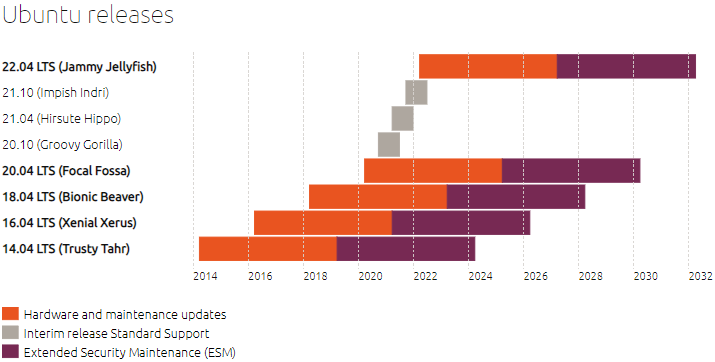
5. Válassza ki az Ubuntu 22.04 x64 OS-t
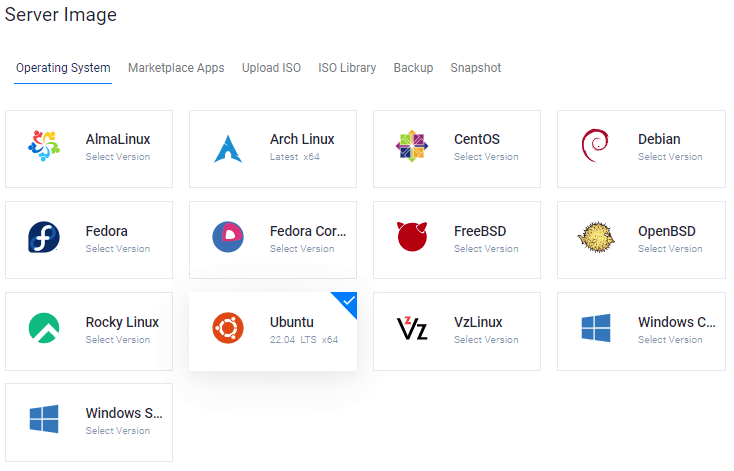
Currently, Ubuntu 20.04×64 and 22.04×64 both are LTS (Long Term Supported) version compatible with most packages that we are going to install.
6. Kiszolgálóméret kiválasztása
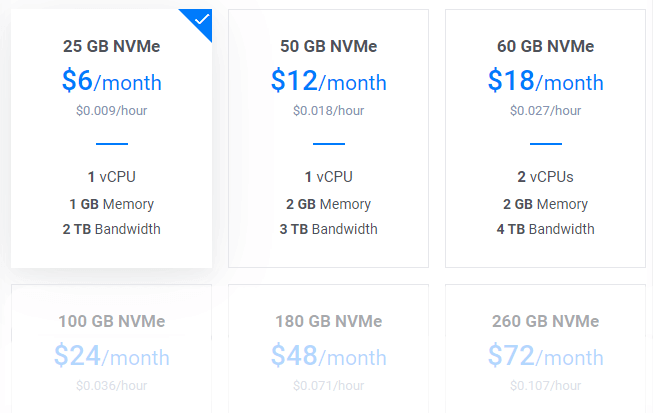
A $6/mo terv nagyszerű kiindulópont lenne egy új blog számára. Igény szerint bármikor frissíthet.
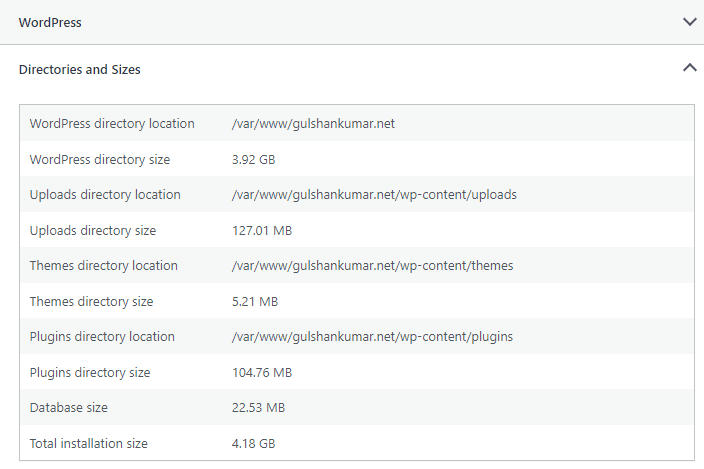
Tipp: Ha áttelepítésre készül, ellenőrizze a Telepítés teljes mérete a Site health info (Településállapot-információ) menüpontban.
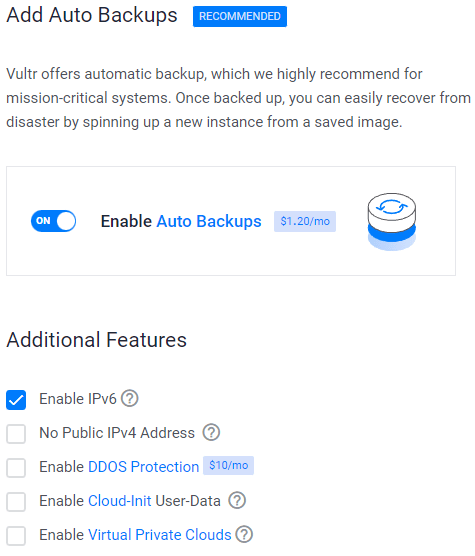
7. IPV6 engedélyezése, biztonsági mentés
8. SSH kulcs hozzáadása
Ez egy ajánlott, opcionális lépés a fokozott biztonság érdekében.
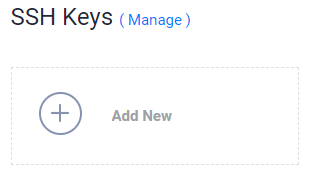
- Kattintson az Új hozzáadása gombra egy új SSH-kulcs hozzáadásához a 🔒 Nyilvános kulcs elküldéséhez.
- Generáljon Key-ket az alábbi módszerrel az Ön operációs rendszerének megfelelően.

- PuTTy alkalmazás letöltése.
- A PuTTygen keresése a Start menüben
- Kattintson a Generate gombra, és mozgassa az egérmutatót.
- Másolja a nyilvános kulcsot és adja meg a Vultr-nak
- A kulcs jelszavának megadása
- Mentsd el a 🔑Magánkulcsot a legbiztonságosabb helyre.
- Ez az SSH vagy SFTP bejelentkezéshez használható.

- Futtatás: ssh-keygen -t rsa. A biztonságosabb 4096 bites kulcshoz futtassa a következőt: ssh-keygen -t rsa -b 4096
- Nyomja meg az enter billentyűt, amikor megkérdezik, hogy hová szeretné menteni a kulcsot (ez az alapértelmezett helyet fogja használni).
- Adja meg a kulcs jelszavát.
- Futtassa a
cat ~/.ssh/id_rsa.pubparancsot – így megkapja a kulcsot a megfelelő formátumban, amit beilleszthet a vezérlőpultba. - Győződjön meg róla, hogy biztonsági másolatot készített a
~/.ssh/id_rsafájlról. Ez nem állítható vissza, ha elveszik.
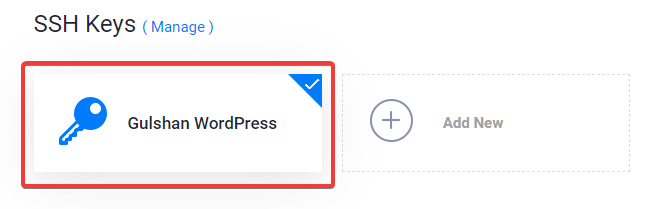
Válassza ki az SSH-kulcsot
A következő lépéseket követve a nyilvános kulcsot az új példányhoz csatolja. Ezután be tud majd jelentkezni az SSH rendszerbe a Plain Text jelszó és az SSH kulcs használatával.
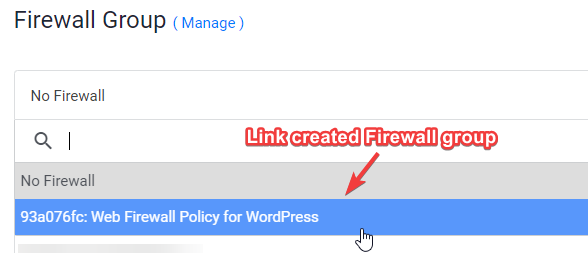
9. Webes tűzfal szabály összekapcsolása a kiszolgáló példányával
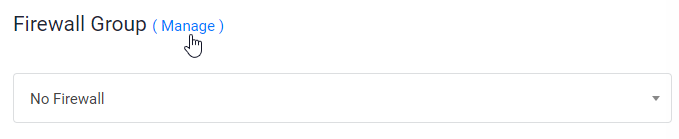
- Kattintson a Kezelés gombra, és hozzon létre egy új tűzfalcsoportot.
- Engedélyezze a 22-es TCP portot az SSH számára. 80 a HTTP-hez és 443 HTTPS az IPV4 és IPV6 szabályokhoz egyaránt.
- Ha ez megtörtént, kösse a tűzfalcsoportot az instanciához.
10. Adja meg a Hostnevet és a címkét kattintson a Deploy Now (Telepítés most) gombra
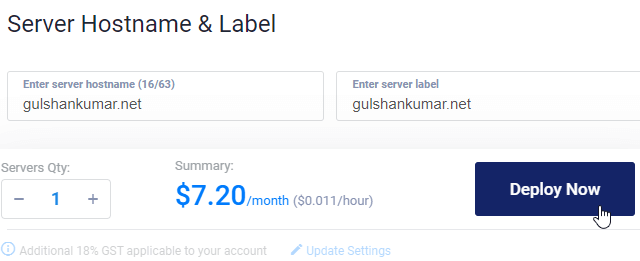
Now, you will see installing in the progress
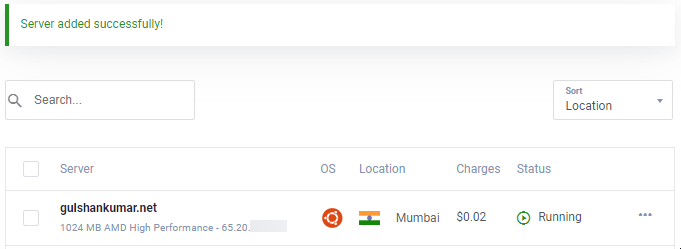
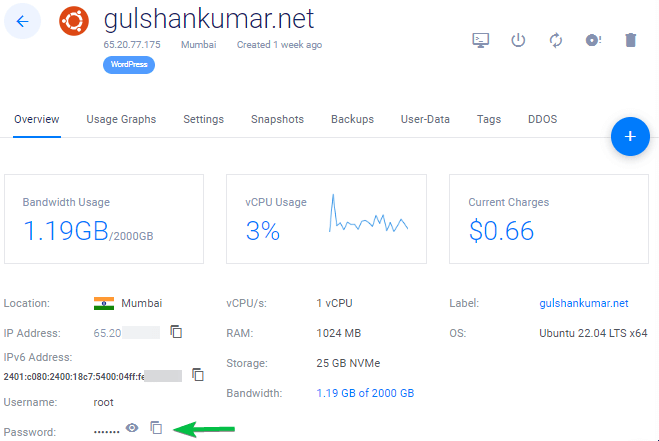
11. Menjen az Új példány oldalra
IP-cím, felhasználónév és jelszó másolása. Az alapértelmezett port 22.
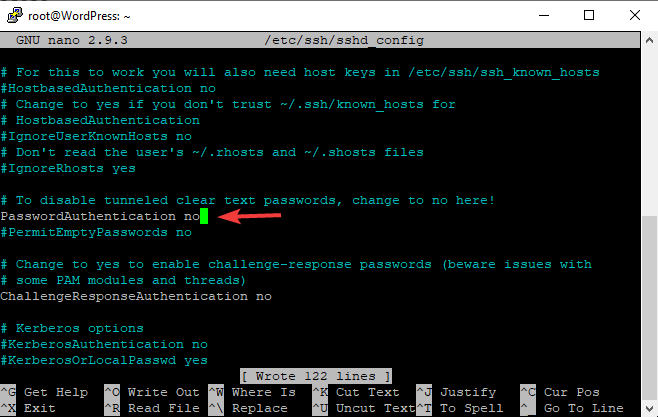
12. Jelszóval történő bejelentkezés letiltása
Biztonsági okokból ajánlott letiltani a jelszavas hitelesítést, és csak a kulcsalapú hitelesítést engedélyezni.
- A konfigurációs fájl szerkesztése
nano /etc/ssh/sshd_config - Keresés (CTRL + W) és keresés
PasswordAuthentication - Értékváltoztatás
yes-rőlnoértékre - A típus mentéséhez
CTRL+O - Az SSH szolgáltatás újraindítása a következő paranccsal
sudo service ssh restart
A következő alkalommal az SSH-t csak kulccsal használhatja, ahogy a videón látható.
Linux vagy Mac esetén használd a Terminált a következő paranccsal
ssh [email protected] -p 22 -i id_rsa
lépés. Az UFW letiltása
Amikor egy új példányt telepítesz a VULTR-en, az UFW (Uncomplicated Firewall) be van kapcsolva, amely az összes portot blokkolva tartja, kivéve a 22-es SSH portot. Ez ERR_CONNECTION_REFUSED hibát adhat vissza a böngészőben. Ennek kijavításához azt javasolnám, hogy az UFW-t tartsa kikapcsolva.
ufw disableEnough explanation for basic things. Now, I’ll speed up the original process for deploying WordPress on the LEMP stack.
Part C. Deploy WordPress on LEMP Stack
1. Update repositories
Írja be az alábbi parancsot és nyomja meg az enter billentyűt
sudo -sapt update && apt upgrade -y && apt dist-upgrade && apt autoclean && apt autoremove -y && rebootvagy
wget -qO update https://dl.gulshankumar.net/update && chmod +x updateLegközelebb mindig használja az alábbi parancsot a frissítéshez.
./update2. MariaDB telepítése biztonsággal
Jelentkezzen be újra, és adja meg a következő parancsot
sudo apt install mariadb-server -y && sudo mysql_secure_installationVálaszoljon az alábbi kérdésekre
- Enter current password for root (enter for none): Nyomja meg az Enter billentyűt
- Switch to unix_socket authentication [Y/n]: Írja be az n billentyűt, és nyomja meg az Enter billentyűt.
- Set root password? [Y/n]: Nyomja meg az Enter billentyűt.
- New password: Másoljon egy erős jelszót a Dashlane jelszógenerátorból. A jelszó beillesztéséhez az SSH-konzolban kattintson a jobb gombbal, és nyomja meg az Enter billentyűt. A jelszó nem lesz látható a képernyőn.
- Re-enter new password: Kattintson a jobb gombbal, és nyomja meg újra az Enter billentyűt.
A sikeres jelszóbeállítás után megjelenik
Password updated successfully!
Reloading privilege tables..
... Success!
A következő kérdésekre is válaszolnia kell.
- Remove anonymous users? [Y/n]: Nyomja meg az Y gombot és írja be
- Disallow root login remotely? [Y/n]: Nyomja meg az Y gombot és írja be
- Remove test database and access to it? [Y/n]: Nyomja meg az Y gombot és írja be
- Reload privilege tables now? [Y/n]: Nyomja meg az Y gombot és írja be
3. Új adatbázis létrehozása a WordPress számára
Jelentkezzen be a MySQL-be, nyomja meg az enter billentyűt, amikor jelszót kér.
mysql -u root -pHozzon létre egy új adatbázist, és adjon jogosultságokat a jelszóval rendelkező felhasználójának. Ez az a hely, ahol a WordPress tárolja az összes poszt, oldal, téma, plugin, stb. információt.
create database wordpress;
grant all on wordpress.* to gulshan@localhost identified by '5pY8CKJxDRJEGQNkX7';
flush privileges;
exit;
Where your …
database is wordpress
username is gulshan
password is 5pY8CKJxDRJEGQNkX7
Tipp: Egyedi bejelentkezési hitelesítő adatok használata
4. PHP 8.2, NGINX telepítése és engedélyek beállítása
sudo add-apt-repository ppa:ondrej/php -y && apt update && apt install php8.2-fpm php8.2-common php8.2-mysql php8.2-xml php8.2-xmlrpc php8.2-curl php8.2-gd php8.2-imagick php8.2-cli php8.2-dev php8.2-imap php8.2-mbstring php8.2-soap php8.2-zip php8.2-bcmath -y && sed -i 's/;cgi.fix_pathinfo=1/cgi.fix_pathinfo=0/g' /etc/php/8.2/fpm/php.ini && service php8.2-fpm restart && apt install nginx -y && chown -R www-data:www-data /var/www/ && chmod -R 755 /var/wwwPHP konfiguráció finomhangolása
A legtöbb divatos téma és bővítmény futtatásához high-end PHP konfigurációra van szükség. Ezért ezeket a változtatásokat el kell végeznünk.
sed -i 's/memory_limit = 128M/memory_limit = 512M/g' /etc/php/8.2/fpm/php.ini
sed -i 's/post_max_size = 8M/post_max_size = 128M/g' /etc/php/8.2/fpm/php.ini
sed -i 's/max_file_uploads = 20/max_file_uploads = 30/g' /etc/php/8.2/fpm/php.ini
sed -i 's/max_execution_time = 30/max_execution_time = 900/g' /etc/php/8.2/fpm/php.ini
sed -i 's/max_input_time = 60/max_input_time = 3000/g' /etc/php/8.2/fpm/php.ini
sed -i 's/upload_max_filesize = 2M/upload_max_filesize = 128M/g' /etc/php/8.2/fpm/php.ini
service php8.2-fpm restart
5. Wildcard Let’s Encrypt SSL tanúsítvány telepítése
Hozzon létre egy cloudflare.ini fájlt a /root/.secrets/ könyvtárban.
mkdir -p /root/.secrets/ && cd /root/.secrets/ && nano cloudflare.iniAdja hozzá az alábbi kódot és mentse a CTRL+O billentyűkombinációval, majd lépjen ki a CTRL+X billentyűkombinációval.
dns_cloudflare_email = "[email protected]"
dns_cloudflare_api_key = "XXXXXXXXXXXXXXXXX"
A Cloudflare e-mail címét és globális API kulcsát a „Saját profil” > API tokenek > Globális API kulcs menüpontban találja meg.
chmod 0400 /root/.secrets/cloudflare.iniA Certbot és a DNS Authenticator telepítése az operációs rendszernek és a HTTP webkiszolgálónak megfelelően
snap install --beta --classic certbot
snap set certbot trust-plugin-with-root=ok
snap install --beta certbot-dns-cloudflare
snap connect certbot:plugin certbot-dns-cloudflare
Wildcard SSL tanúsítvány beszerzése
certbot certonly --dns-cloudflare --dns-cloudflare-credentials /root/.secrets/cloudflare.ini -d example.com,*.example.com --preferred-challenges dns-01Automatikus megújítás beállítása Cron Job használatával
- Írja be a crontab -e parancsot
- A nano szerkesztőhöz írja be az 1-est
- Írja be az alábbi parancsot és mentse el
0 0 * * * /etc/init.d/nginx reload >/dev/null 2>&1A teszt megújítása
certbot renew --dry-run6. Configure Nginx Server Block
Ez akkor fontos, ha be kell állítania a domainjét, hogy az NGINX hogyan kezelje a HTTP-kérelmeket.
Alapértelmezett kiszolgálóblokkok törlése.
rm /etc/nginx/sites-available/default && rm /etc/nginx/sites-enabled/defaultÚj kiszolgálóblokk létrehozása
cd /etc/nginx/sites-available/
nano example.com- Helyettesítse a example.com-ot saját domainnel
- Írja be az alábbi kódot, majd nyomja meg a CTRL+O billentyűkombinációt a mentéshez és a CTRL+X billentyűkombinációt a kilépéshez.
General
server {
    listen         80;
    return 301 https://$host$request_uri;
}
server {
# Document Root
root /var/www/html;
index index.php index.html index.htm;
server_name .example.com;
client_max_body_size 0;

    listen [::]:443 ssl http2 ipv6only=on;
    listen 443 ssl http2;
        ssl_protocols TLSv1.1 TLSv1.2 TLSv1.3;
        ssl_certificate /etc/letsencrypt/live/example.com/fullchain.pem;
        ssl_certificate_key /etc/letsencrypt/live/example.com/privkey.pem;
        ssl_prefer_server_ciphers on;
        ssl_session_cache   shared:SSL:20m;
        ssl_session_timeout 20m;
        ssl_ciphers 'TLS13+AESGCM+AES128:EECDH+AES128';


error_page 404 /404.html;
error_page 500 502 503 504 /50x.html;

# Block XMLRPC
location = /xmlrpc.php {
    deny all;
}

location / {
    try_files $uri $uri/ /index.php$is_args$args;
}

location ~* \.php$ {
if ($uri !~ "^/uploads/") {
fastcgi_pass unix:/run/php/php8.2-fpm.sock;
}
include fastcgi_params;
fastcgi_param SCRIPT_FILENAME $document_root$fastcgi_script_name;
fastcgi_param SCRIPT_NAME $fastcgi_script_name;
}
location = /favicon.ico {
log_not_found off;
access_log off;
}

location = /robots.txt {
log_not_found off;
access_log off;
allow all;
}

location ~* .(css|gif|svg|ico|woff2|eot|jpeg|webp|jpg|js|png)$ {
expires 1y;
log_not_found off;
}

# Enable Gzip compression.
gzip on;

# Disable Gzip on IE6.
gzip_disable "msie6";

# Allow proxies to cache both compressed and regular version of file.
# Avoids clients that don't support Gzip outputting gibberish.
gzip_vary on;

# Compress data, even when the client connects through a proxy.
gzip_proxied any;

# The level of compression to apply to files. A higher compression level increases
# CPU usage. Level 5 is a happy medium resulting in roughly 75% compression.
gzip_comp_level 5;

# Compress the following MIME types.
gzip_types
 application/atom+xml
 application/javascript
 application/json
 application/ld+json
 application/manifest+json
 application/rss+xml
 application/vnd.geo+json
 application/vnd.ms-fontobject
 application/x-font-ttf
 application/x-web-app-manifest+json
 application/xhtml+xml
 application/xml
 font/opentype
 image/bmp
 image/svg+xml
 image/x-icon
 text/cache-manifest
 text/css
 text/plain
 text/vcard
 text/vnd.rim.location.xloc
 text/vtt
 text/x-component
 text/x-cross-domain-policy;
}
A ‘Cache Enabler’ plugin
server {
    listen         80;
    return 301 https://$host$request_uri;
}
server {
# Document Root
root /var/www/html;
index index.php index.html index.htm;
server_name .example.com;
client_max_body_size 0;

    listen [::]:443 ssl http2 ipv6only=on;
    listen 443 ssl http2;
        ssl_protocols TLSv1.1 TLSv1.2 TLSv1.3;
        ssl_certificate /etc/letsencrypt/live/example.com/fullchain.pem;
        ssl_certificate_key /etc/letsencrypt/live/example.com/privkey.pem;
        ssl_prefer_server_ciphers on;
        ssl_session_cache   shared:SSL:20m;
        ssl_session_timeout 20m;
        ssl_ciphers 'TLS13+AESGCM+AES128:EECDH+AES128';


error_page 404 /404.html;
error_page 500 502 503 504 /50x.html;


# Block XMLRPC
location = /xmlrpc.php {
    deny all;
}


# Rules for Cache Enabler Plugin - Static File Serving

    set $cache_uri $request_uri;

    # bypass cache if POST requests or URLs with a query string
    if ($request_method = POST) {
    set $cache_uri 'nullcache';
    }

    if ($query_string != '') {
    set $cache_uri 'nullcache';
    }

    # bypass cache if URLs containing the following strings
    if ($request_uri ~* '(/wp-admin/|/xmlrpc.php|/wp-(app|cron|login|register|mail).php|wp-.*.php|/feed/|index.php|wp-comments-popup.php|wp-links-opml.php|wp-locations.php|sitemap(index)?.xml|[a-z0-9-]+-sitemap([0-9]+)?.xml)') {
    set $cache_uri 'nullcache';
    }

    # bypass cache if cookies contain the following strings
    if ($http_cookie ~* '(wp-postpass|wordpress_logged_in|comment_author)_') {
    set $cache_uri 'nullcache';
    }

    # custom installation subdirectory
    set $custom_subdir '';

    # default HTML file
    set $cache_enabler_uri '${custom_subdir}/wp-content/cache/cache-enabler/${http_host}${cache_uri}${scheme}-index.html';

    # WebP HTML file
    if ($http_accept ~* 'image/webp') {
    set $cache_enabler_uri '${custom_subdir}/wp-content/cache/cache-enabler/${http_host}${cache_uri}${scheme}-index-webp.html';
    }

    location / {
    gzip_static on; # this directive is not required but recommended
    try_files $cache_enabler_uri $uri $uri/ $custom_subdir/index.php?$args;
    }

location ~* \.php$ {
if ($uri !~ "^/uploads/") {
fastcgi_pass unix:/run/php/php8.2-fpm.sock;
}
include fastcgi_params;
fastcgi_param SCRIPT_FILENAME $document_root$fastcgi_script_name;
fastcgi_param SCRIPT_NAME $fastcgi_script_name;
}
location = /favicon.ico {
log_not_found off;
access_log off;
}

location = /robots.txt {
log_not_found off;
access_log off;
allow all;
}

location ~* .(css|gif|svg|ico|jpeg|webp|woff2|eot|jpg|js|png)$ {
expires 1y;
log_not_found off;
}

# Enable Gzip compression.
gzip on;

# Disable Gzip on IE6.
gzip_disable "msie6";

# Allow proxies to cache both compressed and regular version of file.
# Avoids clients that don't support Gzip outputting gibberish.
gzip_vary on;

# Compress data, even when the client connects through a proxy.
gzip_proxied any;

# The level of compression to apply to files. A higher compression level increases
# CPU usage. Level 5 is a happy medium resulting in roughly 75% compression.
gzip_comp_level 5;

# Compress the following MIME types.
gzip_types
 application/atom+xml
 application/javascript
 application/json
 application/ld+json
 application/manifest+json
 application/rss+xml
 application/vnd.geo+json
 application/vnd.ms-fontobject
 application/x-font-ttf
 application/x-web-app-manifest+json
 application/xhtml+xml
 application/xml
 font/opentype
 image/bmp
 image/svg+xml
 image/x-icon
 text/cache-manifest
 text/css
 text/plain
 text/vcard
 text/vnd.rim.location.xloc
 text/vtt
 text/x-component
 text/x-cross-domain-policy;
}- You need to install Cache Enabler plugin to enjoy cache benefit.
FastCGI
Ha a FastCGI Cache-t szeretné használni, akkor helyette az alábbi szerverblokkot használja.
# NGINX Cache path
fastcgi_cache_path /var/run/nginx-cache levels=1:2 keys_zone=WORDPRESS:100m inactive=6h;
fastcgi_cache_key "$scheme$request_method$host$request_uri";
fastcgi_cache_use_stale error timeout invalid_header http_500;
fastcgi_ignore_headers Cache-Control Expires Set-Cookie;

server {
    listen         80;
    return 301 https://$host$request_uri;
}
server {
root /var/www/html;
index index.php index.html index.htm;
server_name .example.com;
client_max_body_size 0;

    listen [::]:443 ssl http2 ipv6only=on;
    listen 443 ssl http2;
        ssl_protocols TLSv1.1 TLSv1.2 TLSv1.3;
        ssl_certificate /etc/letsencrypt/live/example.com/fullchain.pem;
        ssl_certificate_key /etc/letsencrypt/live/example.com/privkey.pem;
        ssl_prefer_server_ciphers on;
        ssl_session_cache   shared:SSL:20m;
        ssl_session_timeout 20m;
        ssl_ciphers 'TLS13+AESGCM+AES128:EECDH+AES128';

error_page 404 /404.html;
error_page 500 502 503 504 /50x.html;


set $skip_cache 0;
    if ($request_method = POST) {set $skip_cache 1;}
    if ($request_uri ~* "/wp-admin/|/xmlrpc.php|/wp-.*.php|index.php|sitemap") {set $skip_cache 1;}
    if ($http_cookie ~* "comment_author|wordpress_[a-f0-9]+|wp-postpass|wordpress_no_cache|wordpress_logged_in") {set $skip_cache 1;}
    if ($query_string = "unapproved*") {set $skip_cache 1;}
    if ($cookie_woocommerce_items_in_cart = "1" ){ set $skip_cache 1;}
    if ($request_uri ~* "/(cart|checkout|my-account)/*$") {set $skip_cache 1;}

# Block XMLRPC
location = /xmlrpc.php {
    deny all;
}

location / {
try_files $uri $uri/ /index.php$is_args$args;
}

location ~* \.php$ {

 if ($uri !~ "^/uploads/") {
        fastcgi_pass unix:/run/php/php8.2-fpm.sock;
        }

        try_files                       $uri =404;
        include                         /etc/nginx/fastcgi_params;
        fastcgi_param                   SCRIPT_FILENAME $document_root$fastcgi_script_name;
        fastcgi_pass                    unix:/run/php/php8.2-fpm.sock;
        fastcgi_index                   index.php;
                fastcgi_cache_bypass $skip_cache;
                fastcgi_no_cache $skip_cache;
                fastcgi_cache WORDPRESS;
                fastcgi_cache_valid 200 30d;
                fastcgi_cache_valid 301 302 303 307 308 404 410 451 1m;
                add_header X-Cache $upstream_cache_status;

}

location = /favicon.ico {
log_not_found off;
access_log off;
}

location = /robots.txt {
log_not_found off;
access_log off;
allow all;
}

location ~* .(css|gif|ico|svg|webp|woff2|eot|jpeg|jpg|js|png)$ {
expires 1y;
log_not_found off;
}

# Enable Gzip compression.
gzip on;

# Disable Gzip on IE6.
gzip_disable "msie6";

# Allow proxies to cache both compressed and regular version of file.
# Avoids clients that don't support Gzip outputting gibberish.
gzip_vary on;

# Compress data, even when the client connects through a proxy.
gzip_proxied any;

# The level of compression to apply to files. A higher compression level increases
# CPU usage. Level 5 is a happy medium resulting in roughly 75% compression.
gzip_comp_level 5;

# Compress the following MIME types.
gzip_types
 application/atom+xml
 application/javascript
 application/json
 application/ld+json
 application/manifest+json
 application/rss+xml
 application/vnd.geo+json
 application/vnd.ms-fontobject
 application/x-font-ttf
 application/x-web-app-manifest+json
 application/xhtml+xml
 application/xml
 font/opentype
 image/bmp
 image/svg+xml
 image/x-icon
 text/cache-manifest
 text/css
 text/plain
 text/vcard
 text/vnd.rim.location.xloc
 text/vtt
 text/x-component
 text/x-cross-domain-policy;
}
To save, press CTRL+O and Enter key. Then, exit nano editor using command CTRL+X.
FastCGI esetén az NGINX Helper plugint kell használnia. Ez hindi kódolású URL-címekkel is működik. Ne feledje, hogy nem támogatja az AMP-t. Én személy szerint nem használom az AMP-t. (Ajánlott)
Alternatívaként az NGINX cache működik az AMP URL tisztítására, de nem támogatja a hindi kódolású URL-t. A beállításokban a cache elérési útvonalát /var/run/nginx-cache/ kell megtartani.
Vigyázat!
- For example, If you’re using Newspaper theme and serve seperate Mobile theme, please stick without FastCGI method and use a plugin WP Rocket because it can serve seperate mobile cache out of the box.
7. Szimbolikus linkek létrehozása két könyvtár között
Ha kihagyja ezt a lépést, akkor ERR_CONNECTION_REFUSED jelzést kaphat.
A szerverblokk aktiválásához hozzon létre egy szimbolikus hivatkozást az NGINX Server Block fájljára az /etc/nginx/sites-available/ könyvtárból az /etc/nginx/sites-enabled könyvtárba.
Az alábbi parancs futtatása előtt cserélje le a example.com címet a saját domainjére.
ln -s /etc/nginx/sites-available/example.com /etc/nginx/sites-enabled/Teszt konfiguráció
nginx -tÚjraindítás és frissítés
service nginx restart && service php8.2-fpm restart && service mysql restart && apt-get update && apt upgrade -y8. WordPress telepítése
Töltse le a WordPress fájlokat a /var/www/html könyvtárba, és állítsa be az engedélyeket.
cd /var/www/example.com/public && wget https://hu.wordpress.org/latest-hu_HU.tar.gz && tar -xvzf latest-hu_HU.tar.gz && mv -v wordpress/* /var/www/example.com/public && rm -rf index.nginx-debian.html latest-hu_HU.tar.gz wordpress && chown -R www-data:www-data /var/www/ && sudo chmod -R 755 /var/wwwAz engedélyek jövőbeni frissítéséhez használja az alábbi parancsot
chown -R www-data:www-data /var/www/ && sudo chmod -R 755 /var/www9. DNS frissítése
Ha a WordPress-t helyben hosztolja, meg akarja kerülni a proxyt, vagy zéró leállási idejű migrációt szeretne végrehajtani, ez a lépés hasznos. Én általában a statikus WordPress Dev terület esetén preferálom. 😉
- Kétféleképpen lehet a DNS-re mutatni. Ha a webhelyet a Vultr-ra költözteti, és először helyben szeretné tesztelni, akkor szerkessze meg a hosts fájlt, és mutasson oda.
Windowshoz
- Menjen a C
:\Windows\System32\drivers\etc\hoststulajdonságaihoz. - Módosítsa a “Biztonság” engedélyt teljes ellenőrzésre az aktuális felhasználónévhez.
- Most már szabadon szerkesztheti a hosts fájlt a System felhasználója alatt, és elmentheti azt.
# For same machine you can have localhost address else public IP
127.0.0.1 example.com
127.0.0.1 www.example.com
Egy példa, így kell kinéznie
Macre vagy Linuxra
A hosts fájlt ezzel a paranccsal szerkesztheti sudo felhasználó alatt.
sudo nano /etc/hostsDNS frissítése a Cloudflare-rel
- Ha minden tökéletesnek tűnik, és szeretné, hogy az oldalát élesítse, jelentkezzen be a Cloudflare DNS-be, és frissítse az új IP-címet.
| A | @ | IPV4 |
| AAAA | @ | IPV6 |
| CNAME | www | example.com |
where @ denotes root domain example.com
9. Látogasson el a domain nevére a WordPress beállításához
Ha nem-www verziójú domaint szeretne tartani a WordPress számára, akkor látogasson el a nem-www verzióra, különben www.
https://example.com- Adja meg az adatbázis bejelentkezési adatait a WordPress beállításának megkezdéséhez
- Telepítés futtatása
- Töltse ki az új webhely alapvető adatait és telepítse a WordPress-t.
- Bejelentkezés a WordPress-be
Egyéb szükséges dolgok
- Növelje a Swap memóriát a hirtelen terhelés kezelésére
swapoff -a
fallocate -l 2G /swapfile
chmod 600 /swapfile
mkswap /swapfile
swapon /swapfile
sudo cp /etc/fstab /etc/fstab.bak
echo '/swapfile none swap sw 0 0' | sudo tee -a /etc/fstab- Győződjön meg róla, hogy használ egy Page Caching plugint, hogy a szerverterhelést kordában tartsa. Mivel ez egy LAMP stack, a WP Fastest Cache-t ajánlom.
- Mindig tartson biztonsági másolatot.
- Használja SMTP plugin Szolgáltatások kimenő e-mail küldéséhez WordPress különben nem lesz képes fogadni jelszó visszaállítása link, kapcsolatfelvételi űrlap 7 üzenetek.
Végül a WordPress telepítése befejeződött.
Nagyra értékelem az értékes időt, amit ennek a cikknek az elolvasására szánt. Találkozunk a következő bemutatóban!
Successfully install wordpres for a single site and do the same i mean for another domain on the same instance but after creating server blocks get „nginx: (emerg) duplicate listen options for (::):443 in /etc/nginx/sites-enabled” on nginx -t
How Can i solve this?
Exactly followed the same steps, but at the end i am getting 502 bad gateway. I built some sites with the same steps before, however i don’t know what changed now.
Consider checking the error log using command
tail -f /var/log/nginx/error.logto get a hint about exact issue.getting this
tail: cannot open ‘/var/log/error.log’ for reading: No such file or directory
tail: no files remaining
Sorry, there was a typo in my previous comment. Try below command
tail -f /var/log/nginx/error.logCan you explain me what is the difference between inactive and fastcgi_cache_valid values? Can you explain them please? Thanks
location ~* .(css|gif|ico|svg|jpeg|jpg|js|png)$ {
expires 1y;
log_not_found off;
}
is this code for page caching?
I use cloudflare so it has page cache too.
If i use that can i remove it from codes?
Can you please explain what is this code for?
Thanks
That code is for setting up 1 year browser caching for static files. You may use Cloudflare Page caching as normally you do. There shouldn’t be any problem.
For Nginx cache helper (I take this info from offical site
There’s a ‘purge all’ button? Does it purge the whole site?
Yes, it does. It physically empties the cache directory. It is set by default to /var/run/nginx-cache/.
So the default is /var/run/nginx-cache/
can we change fastcgi_cache_path /var/www/cache to /var/run/nginx-cache/ ?
Thanks
Ha a cache könyvtárad más, akkor ezt felülbírálhatod a
wp-config.phpfájlban a következő hozzáadásával.define('RT_WP_NGINX_HELPER_CACHE_PATH','/var/www/nginx-cache/')I finally installed wordpress with this guide. But I see only www version but not the non-www version. Is there any changes that I need to do.
Redirects to www version even If I enter non-www version.
You need to point DNS records for both hostnames. Second, make sure dot is not missing from the beginning of example.com in this code –
server_name .example.com;in the NGINX connfig at step 6. Another thing, Redirect from www to non-www or vice-versa (as neccessary) is taken care automatically from WordPress. You do not need to put any extra code for it.which is the best & compatible server side cache plugin If I use FastCGI server block code along with Nginx Cache plugin..
W3 Total Cache or WP Rocket
I have 2 questions
1) What if i have 2 domains on different cloudflare accounts?
Create a cloudflare.ini file inside /root/.secrets/ directory.
mkdir -p /root/.secrets/ && cd /root/.secrets/ && nano cloudflare.ini
Add below code and save using CTRL+O and exit using CTRL+X
dns_cloudflare_email = „[email protected]”
dns_cloudflare_api_key = „XXXXXXXXXXXXXXXXX”
/root/.secrets/1domaincloudfare.ini
/root/.secrets/2domaincloudfare.ini
certbot certonly –dns-cloudflare –dns-cloudflare-credentials 1domaincloudfare.ini -d example.com,*.1domain.com –preferred-challenges dns-01
certbot certonly –dns-cloudflare –dns-cloudflare-credentials 2domaincloudfare.ini -d example.com,*.2domain.com –preferred-challenges dns-01
Do this work?
2) If we have 2 domains in the same account on cloudflare can we use 1 cloudflare.ini
certbot certonly –dns-cloudflare –dns-cloudflare-credentials /root/.secrets/cloudflare.ini -d 1domain.com,*.example.com –preferred-challenges dns-01
certbot certonly –dns-cloudflare –dns-cloudflare-credentials /root/.secrets/cloudflare.ini -d 2domain.com,*.example.com –preferred-challenges
dns-01
3) If we dont use cloudflare what will our ns for domain?
CLoud VPNs IP?
ns1= 68.28.65.84
ns2= 68.28.65.84
Is this right?
thanks for your replies
1. True
2. True
3. I have no idea about it. I prefer using CF DNS.
Can we create multi wordpress sites on different domain in the same machine with this
method?
I think only changement is in the FastCGI?
server {
root /var/www/aaa.com/wordpress;
index index.php index.html index.htm;
server_name .aaa.com;
client_max_body_size 0;
server {
root /var/www/bbb.com/wordpress;
index index.php index.html index.htm;
server_name .bbb.com;
client_max_body_size 0;
server {
root /var/www/ccc.com/wordpress;
index index.php index.html index.htm;
server_name .ccc.com;
client_max_body_size 0;
is this make a problem cache path is the same path for 3 web site? /var/www/cache
Is this method works?
1 machine 3 different domain and wordpress?
Thanks
Not for multiple sites.
What do you think about Plesk Panel?
It is easy to install plesk and create a wordpress site.
Easy to find trial keys and we can use it unlimited.
If it expires sites goes on ftp works and only plesk panel does not work but there are too much trial keys
It has nginx cache.
Do you recommend why and why not?
Thanks
I do not trust 3rd-parties installers.
Do all commands work for Centos 8?
Sorry, this is for Ubuntu OS only not for Centos 8.
hello gulshanji i wanted to use cloudflare ssl direct from thier website and not thru api with fast cgi then what would the config
Hey bro what is your thoughts on EasyEngine and SlickStack etc or one click app instead to automate? what is your favorite and will you make any tut bro
Sure, there is one. I will post about it. Thanks for your feedback.
The FastCGI server block config throws 404 Errors.
fastcgi_pass unix:/run/php/php7.4-fpm-example.sock;
should be:
fastcgi_pass unix:/run/php/php7.4-fpm.sock;
And it is missing config for location /
This config must be defined:
location / {
try_files $uri $uri/ /index.php$is_args$args;
}
I see, it was intended for seperate user. But, to keep generic I have corrected. Thanks for pointing out.
Without the location / block only the home page was accessible.
When I added the below block i was able to access the post and pages.
location / {
try_files $uri $uri/ /index.php$is_args$args;
}
Hello Alpesh, Corrected. Thanks again for your tip.
It was a good article
Thanks for your comment.
Nice tutorial. Does it come with email hosting? Looking to make a small site in Singapore using VultrHF
E-mail is a different thing. G Suite by Google services is specialized in this segment.
What are the differences if any between doing this method and using the vultr 1 click install? I have also read about centminmod. Is that somrthing u will recommend for having a fast LEMP stack? Tnx
I alwyas keep this guide bookmarket to my web browser! You never know when I would need to setup a new LEMP server ! Thanks Gulshan
Thanks for your comment.
hi, Gulshan thanks for sharing.
can u please share how to install wp on subfoler?
This article is like Life-Saver for one of my website. I was about to move from Google Cloud to Digital Ocean because the trial was expired and I also wanted to use DigitaOcean because it is in-expensive yet powerful and gives great experience.
Previously, I used webinoly stack which was straightforward for installing WordPress but later on I got to know from Gulshan that there are so many issues with that stack so, this time I was going to do it manually. I checked the official guide by Digital ocean but end up with many confusion and issues. Then, I fortunately asked Gulshan for help and he recommended this article for me.
I installed WordPress easily and very fast even fast that Webinoly stack. Thanks a lot Gulshan for writing this amazing article. Hats off to you bro!!🎩
Hi Gulshan, I am also receiving the test failed error on step 7. I have tried several times now on different setup and still stuck here. Please could you help?
Please carefully read the post and then copy-paste code in Terminal. Sometime you need to replace with your own domain. Doing mistake can return error. Else, no wise. I use this guide everyday for myself. I am not aware about any problem.
In case of trouble
1. Run test using
nginx -t2. Check logs to get proper hint
tail -f /var/log/nginx/error.log3. Delete existing or earlier created virtualhost
rm /etc/nginx/sites-available/default && rm /etc/nginx/sites-enabled/default4. Make sure to replace example.com at all places, a) when you create conf file, its naming. b) when you add conf file and c) when you create symlink, check your command its conf file name must match with first process.
I feel in most cases, chances are you did not replaced
server_name .example.com;to own domain, or you did not obtained SSL. All steps are written in serial order as it should be.I am facing problem of infinite loop redirects. I had use fastcache code. how to fix it
Please try Full SSL mode of Cloudflare. Then check again!
How to check if fastcgi cache is working or not? while running sudo
curl -I https://example.comit is not showing x-cache parameterHey Gulshan,
In the 7th step while texting ngnix I got
nginx: [emerg] open() „/etc/nginx/sites-enabled/example.com” failed (2: No such file or directory) in /etc/nginx/nginx.conf:62
nginx: configuration file /etc/nginx/nginx.conf test failed
This error. How I can solve it? also what the error.
Please delete your existing server block and create again at sites-available and symlink at sites-enabled directory. The step 6 and 7 cover that clearly. Consider following patiently without any error. If you still face any problem, do let me know. Thanks for taking to leave your valuable comment.
Hi would like to know after configuring Fastcgi do we still need other caching plugin to speed up WordPress site?
Wonderful tutorial just complete solution for Nginx Fast CGI
Thanks Wasim for your kind feedback.
How Can I setup FastCGI on my ngnix server guided by you….
I have updated my article.
i want redirect too www plz help me urgent
If your WordPress General Settings has www version, server will do automatically. No additional action is required. In case you started WordPress installation at non-www version, then you need to migrate by changing at Database level.
You may use Better Search Replce plugin to perform this changes.
It Really Works Gulshan Bro. Thanks Really dear You are awesome…
Hello Gulshan Bro, First i want to say you that this is very beautiful and required post. I am really appreciating your work. but i have a problem can you please tell me
i have a droplet with digitalocean ($5/month plan) and i want to host multiple wordpress sites only with nginx(lemp ubuntu 18.04).
In simple i mean that this tutorial is complete to install a single wordpress and i did it but tell host it in some other sites
Hey Rohit,
Assuming, second site is example2.org
You need to follow steps this way.
1. create a new directory and add WordPress (Ref: steps 31)
cd /var/www/mkdir example2
wget https://wordpress.org/latest.tar.gz
tar -xvzf latest.tar.gz
mv -v wordpress/* /var/www/example2
rm -rf index.nginx-debian.html latest.tar.gz wordpress
chown -R www-data:www-data /var/www/
sudo chmod -R 755 /var/www
2. Create a new Server block with root path located to new directory as created in step 1.
cd /etc/nginx/sites-available/

nano gulshankumar-org
server {listen 80;
root /var/www/example2;
index index.php index.html index.htm;
server_name example2.org www.example2.org;
...
3. Point your example2.org domain to DNS, then install SSL
certbot --nginx -d example2.org -d www.example2.org4. Create new MySQL database
sudo mysql -u root -pcreate database example2;
grant all on example2.* to example2@localhost identified by 'TYPE HERE PASSWORD';
flush privileges;
exit;
5. Proceed to Installation by visiting your site
https://example2.orgLet me know if you have any additional question. You can always visit our forum for quick assistance.
Thanks & Regards,
Gulshan
It Really Works Gulshan Bro. Thanks Really dear You are awesome…
Hello Gulshan you written a comprehensive guide i highly appreciate your work. Can you help me with an error? Actually i have two websites the first website i have already hosted on Vultr following the above guide.
But when try to host a another WordPress website iam getting error. I followed the above steps you mentioned in comments. But still not able to fix it. The error is my website not working after hosting another WordPress website.
If possible please guide me step by step instructions. It will help me alot. Thanks in advance.
Consider checking log available at
/var/log/nginx/directory. Usenginx -tcommand to see what mistake causing issue.Very well. thank you so much
How to auto-renew SSL?
Add below cron job
crontab -eAdd below command and save.
15 3 * * 7 certbot renew --post-hook "service nginx restart"Thanks sos un groso, very well tutorial
Thank you for your tutorial, its the first one that actually showed me the wordpress setup page.
When I went to upload a plugin I received this message. „The uploaded file exceeds the upload_max_filesize directive in php.ini”
How do I increase the max filesize?
Please see the step 33.5
Thanks Gulshan, Finally I moved to NGINX server. You have created a great tutorial for beginners.
You’re welcome bro 🙂
Hi,
Thank you for this awesome guide.
How can I install WordPress multisite on Ubuntu 18.04 with Nginx?
Finally I loved this step by step tutorial with proper images.
Thanks Bhaiya you are awesome
Thanks a lot Gulshan. You save my breath
I search everywhere but not find any good article
You explained very well along with security concern
well done