Tässä artikkelissa opit, miten WordPress asennetaan manuaalisesti Ubuntu 22.04 -palvelimelle NGINX:n, MariaDB:n ja PHP 8.2:n avulla. Nämä pinot tarjoavat tehokkaan ja tehokkaan alustan WordPress-sivuston pyörittämiseen hämmästyttävällä nopeudella.
Seuraa näitä 3 vaihetta ja katso video. Tarvitsetko apua? Ota yhteyttä.😊
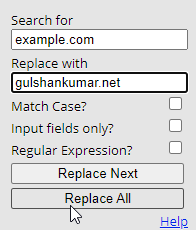
Ennen kuin aloitat, tässä on nopea vinkki. Käytä Etsi ja korvaa -laajennusta vaihtaaksesi example.com-verkkotunnuksen omaksi verkkotunnukseksesi tällä verkkosivulla.
Ajan säästövinkki Google Chromen käyttäjille.
Osa A: Pidä Cloudflaren Nameservers aktiivisina
Käytämme Cloudflare DNS:ää Let’s Encrypt Wildcard SSL -sertifikaatin hankkimiseen. Suorita tämä vaihe ensin, jotta pääset nauttimaan siirtymisestä ilman downtime-migraatiota.
Tarkista nykyiset Nameservers
- Etsi aktiiviset Nameserevrs osoitteesta https://www.whatsmydns.net/#NS/example.com
- Jos näet, että käytät aiempaa Hosting- tai Domain-rekisteröijän oletus-NS:ää, sinun on vaihdettava se Cloudflareen.
- Opi käyttämään Cloudflare DNS:ää
Osa B: Ubuntu Server 22.04 LTS -palvelimen valmiiksi saaminen

1. Rekisteröidy Vultr napata $100 Free hyvityksiä (Voimassa 30 päivää)
Koska olen kokeillut monia pilvipalvelinyrityksiä, kokemukseni mukaan Vultr ei voi mennä pieleen. Nämä kaverit ovat aitoja ja välittäviä, kun kyse on tuesta ja palveluista.

⚡ Suorituskyky
- NVME / SSD
- 3.7 GHz CPU
- Jopa 5 Gbit/s verkon nopeus
- Datakeskukset Amerikassa, Euroopassa, Aasiassa ja Australiassa.
- IPV6-valmius
💡 Ominaisuudet
- Aloittelijoille sopiva kojelauta
- Yhdellä napsautuksella tilannekuvaan
- Automtatic Backup (Maksullinen)
- Free Cloud Firewall
- DDoS-suojaus (maksullinen)
- 100% KVM-virtualisointi
⚙ Tuki
- PayPal/Card
- 24/7 lipputuki
- Dokumentaatio
2. Luo uusi VPS-palvelin
Klikkaa plus-painiketta päästäksesi alkuun
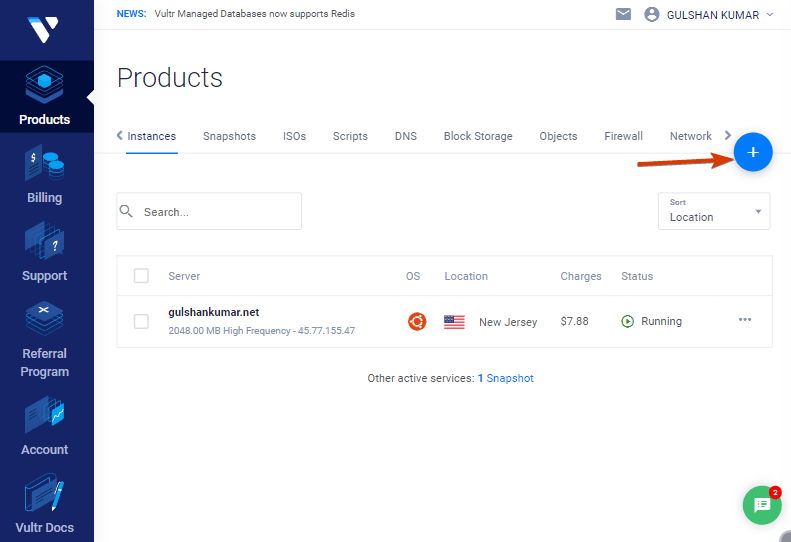
3. Valitse High Frequency Server

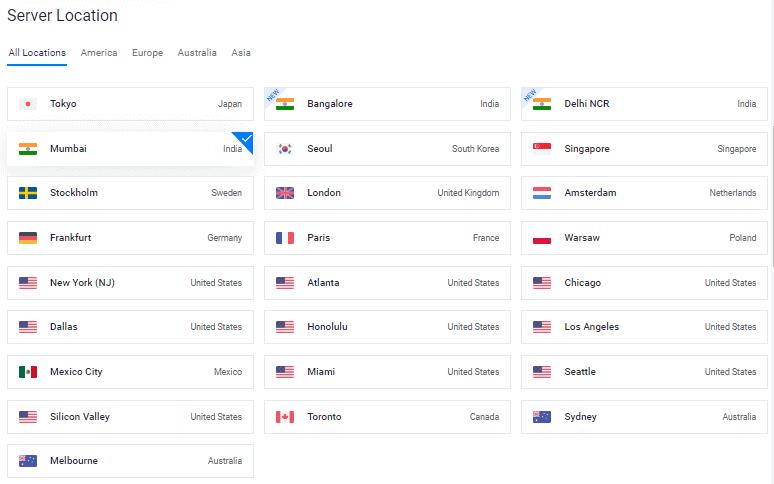
4. Valitse palvelimen sijainti
Valitse palvelimen sijainti, joka on lähellä kohdeyleisöäsi.
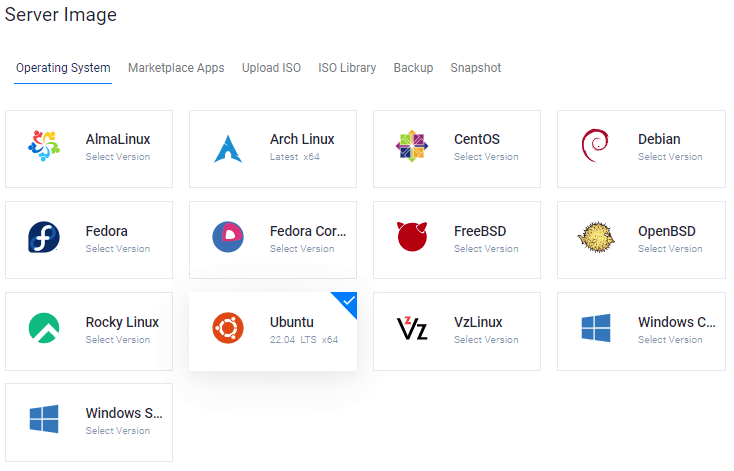
5. Valitse Ubuntu 22.04 x64 -käyttöjärjestelmä.
Tällä hetkellä Ubuntu 20.04×64 ja 22.04×64 ovat molemmat LTS (Long Term Supported) -versioita, jotka ovat yhteensopivia useimpien asennettavien pakettien kanssa.
6. Valitse palvelinkoko
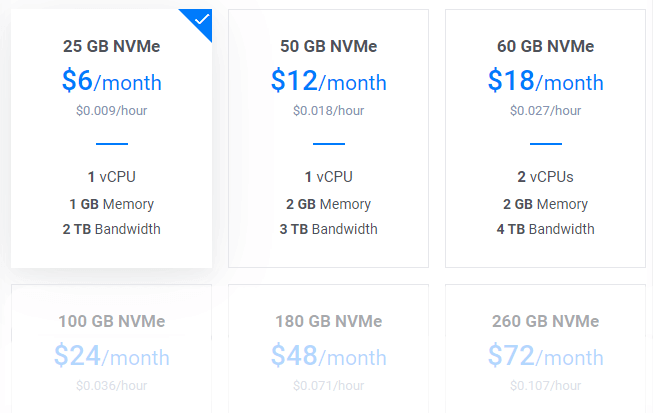
$6/mo suunnitelma olisi hyvä lähtökohta uudelle blogille. Voit päivittää milloin tahansa tarpeen mukaan.
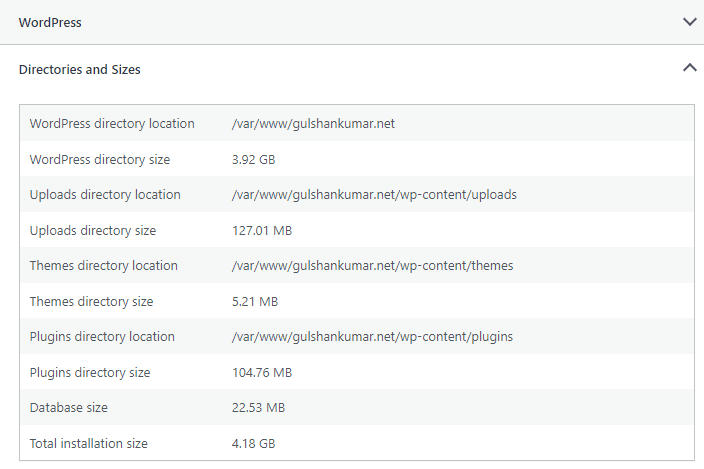
Vihje: Jos olet siirtymässä, tarkista asennuksen kokonaiskoko kohdasta Sivuston terveystiedot.
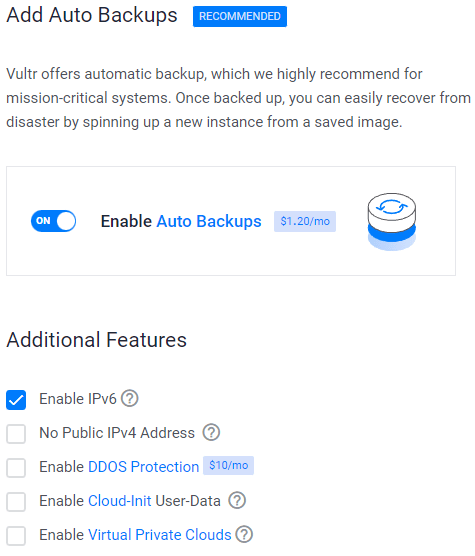
7. Ota IPV6 käyttöön, Varmuuskopiointi
8. Lisää SSH-avain
Tämä on suositeltava, valinnainen vaihe turvallisuuden parantamiseksi.
- Napsauta Lisää uusi -painiketta lisätäksesi uuden SSH-avaimen lähettämistä varten 🔒Public Key.
- Luo Keys käyttämällä alla olevaa menetelmää käyttöjärjestelmäsi mukaan.

- Download PuTTy application.
- Search for PuTTygen in the Start menu
- Click on Generate button and hover mouse pointer
- Copy Public key and provide to Vultr
- Enter key passphrase
- Save 🔑Private Key at the safest location.
- This can be used for login to SSH or SFTP.

- Run:
ssh-keygen -t rsa. For a more secure 4096-bit key, run:ssh-keygen -t rsa -b 4096 - Press enter when asked where you want to save the key (this will use the default location).
- Enter a passphrase for your key.
- Run
cat ~/.ssh/id_rsa.pub– this will give you the key in the proper format to paste into the control panel. - Make sure you backup the
~/.ssh/id_rsafile. This cannot be recovered if it is lost.
Valitse SSH-avaimesi
Näiden ohjeiden noudattaminen liittää julkisen avaimesi uuteen instanssiin. Sen jälkeen voit kirjautua SSH:hen käyttämällä sekä tavallisen tekstin salasanaa että SSH-avainta.

9. Linkitä verkkopalomuurin sääntö palvelininstanssiin

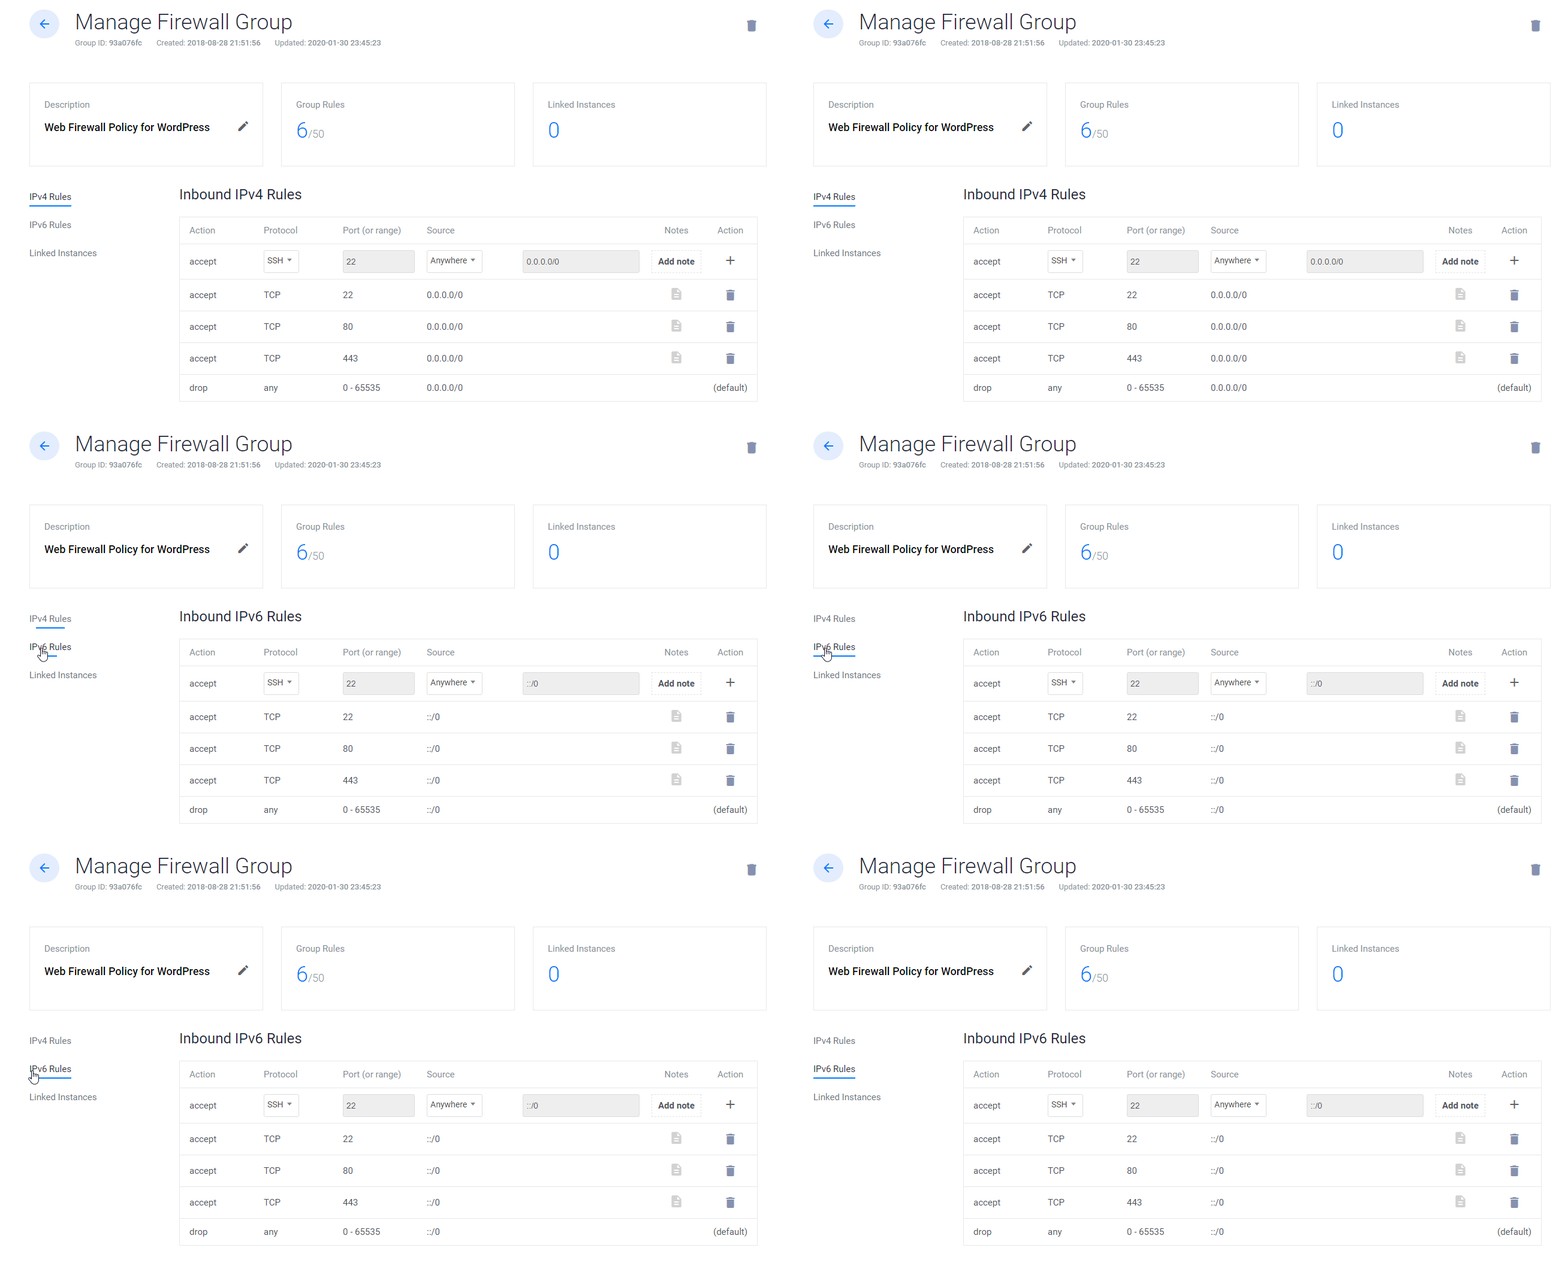
- Napsauta Hallitse ja luo uusi palomuuriryhmä.
- Allow TCP port 22 for SSH. 80 for HTTP and 443 HTTPS for IPV4 and IPV6 rules both.
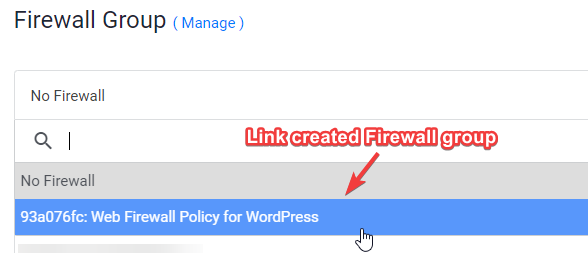
- Kun tämä on tehty, yhdistä palomuuriryhmä instanssiin.
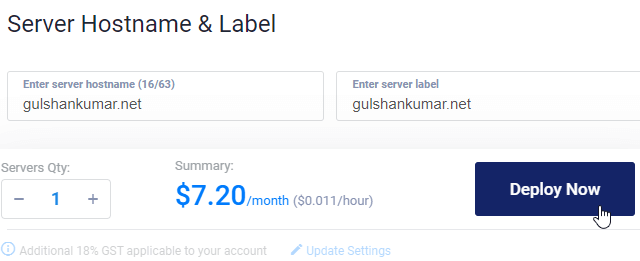
Kirjoita isäntänimi ja etiketti klikkaa Deploy Now
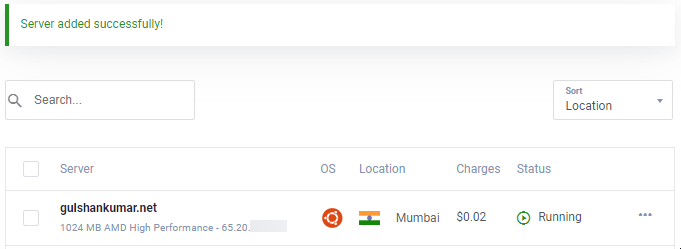
Nyt näet asentamisen etenemisessä olevan
11. Siirry Uusi instanssi -sivulle
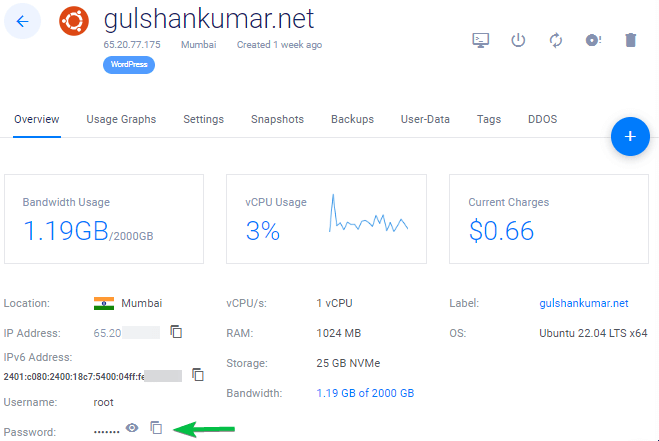
Kopieren Sie IP-Adresse, Benutzernamen und Passwort. Ihr Standard-Port ist 22.
12. Poista salasanalla kirjautuminen käytöstä
Turvallisuussyistä on suositeltavaa poistaa salasanatodennus käytöstä ja sallia vain avainpohjainen todennus.
- Muokkaa asetustiedostoa
nano /etc/ssh/sshd_config - Etsi (CTRL + W) ja hae
PasswordAuthentication - Muuta arvo kyllä:stä ei:ksi
- Tallenna tyyppi, CTRL + O
- Käynnistä SSH-palvelu uudelleen komennolla
sudo service ssh restart
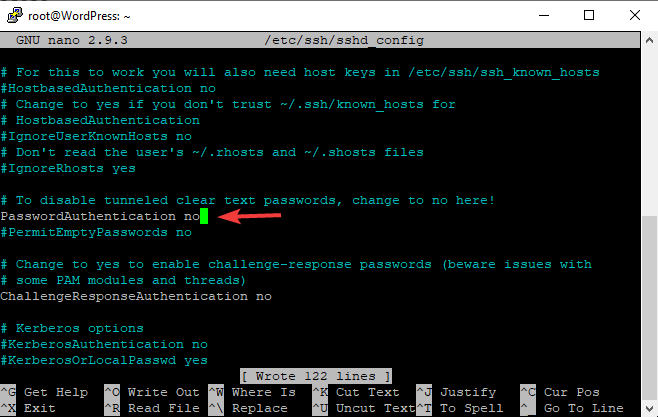
Seuraavalla kerralla voit käyttää SSH:ta vain avaimen kautta, kuten videolla näytetään.
Linuxissa tai Macissa, käytä Terminalia ja komentoa seuraavasti
ssh root@192.168.1.1 -p 22 -i id_rsa
13. Poista UFW käytöstä
Kun otat käyttöön uuden instanssin VULTR:ssä, sen mukana tulee UFW (Uncomplicated Firewall), joka pitää kaikki portit estettyinä lukuun ottamatta SSH-porttia 22. Tämä voi palauttaa selaimessa ERR_CONNECTION_REFUSED-virheen. Tämän korjaamiseksi suosittelen pitämään UFW:n pois käytöstä.
ufw disableNyt nopeutan alkuperäistä prosessia WordPressin käyttöönottamiseksi LAMP-pinossa.
Osa C. WordPressin käyttöönotto LEMP-pinossa
1. Päivitä arkistot
Kirjoita alla oleva komento ja paina enter-näppäintä
sudo -sapt update && apt upgrade -y && apt dist-upgrade && apt autoclean && apt autoremove -y && reboottai
wget -qO update https://dl.gulshankumar.net/update && chmod +x updateKäytä seuraavalla kerralla päivittämiseen aina alla olevaa pikakomentoa.
./update2. Asenna MariaDB tietoturvan kanssa
Kirjaudu uudelleen sisään ja anna seuraava komento
sudo apt install mariadb-server -y && sudo mysql_secure_installationVastaa alla oleviin kysymyksiin
- Enter current password for root (enter for none): Paina Enter-näppäintä
- Switch to unix_socket authentication [Y/n]: n
- Set root password? [Y/n]: Paina Enter-näppäintä
- New password: Kirjoita salasanasi, voit käyttää Dashlanea sen luomiseen. Klikkaa oikealla Liitä.
- Re-enter new password: Re-type your password.
Kun salasanan asettaminen on onnistunut, näet
Password updated successfully!
Reloading privilege tables..
... Success!
Lisäksi sinun on vastattava seuraaviin kysymyksiin.
- Remove anonymous users? [Y/n]: Paina Y ja enter-näppäintä
- Disallow root login remotely? [Y/n]: Paina Y ja enter-näppäintä
- Remove test database and access to it? [Y/n]: Paina Y ja enter-näppäintä
- Reload privilege tables now? [Y/n]: Paina Y ja enter-näppäintä
3. Luo uusi tietokanta WordPressille
Kirjaudu sisään MySQL:ään ja paina enter-näppäintä, kun se kysyy salasanaa.
mysql -u root -pLuo uusi tietokanta ja myönnä käyttöoikeudet sen käyttäjälle ja salasanalle. Tässä WordPress tallentaa kaikki viestit, sivut, teemat, laajennukset jne. tiedot.
create database wordpress;
grant all on wordpress.* to gulshan@localhost identified by '5pY8CKJxDRJEGQNkX7';
flush privileges;
exit;
Missä sinun …
database is wordpress
username is gulshan
password is 5pY8CKJxDRJEGQNkX7
Vinkki: Harkitse ainutlaatuisen kirjautumistunnuksen käyttöä
4. Asenna PHP 8.2, NGINX ja aseta käyttöoikeudet.
sudo add-apt-repository ppa:ondrej/php -y && apt update && apt install php8.2-fpm php8.2-common php8.2-mysql php8.2-xml php8.2-xmlrpc php8.2-curl php8.2-gd php8.2-imagick php8.2-cli php8.2-dev php8.2-imap php8.2-mbstring php8.2-soap php8.2-zip php8.2-bcmath -y && sed -i 's/;cgi.fix_pathinfo=1/cgi.fix_pathinfo=0/g' /etc/php/8.2/fpm/php.ini && service php8.2-fpm restart && apt install nginx -y && chown -R www-data:www-data /var/www/ && chmod -R 755 /var/wwwPHP-konfiguraation virittäminen
Useimmat hienot teemat ja lisäosat vaativat korkeatasoisen PHP-konfiguraation toimiakseen. Siksi meidän pitäisi tehdä nämä muutokset.
sed -i 's/memory_limit = 128M/memory_limit = 512M/g' /etc/php/8.2/fpm/php.ini
sed -i 's/post_max_size = 8M/post_max_size = 128M/g' /etc/php/8.2/fpm/php.ini
sed -i 's/max_file_uploads = 20/max_file_uploads = 30/g' /etc/php/8.2/fpm/php.ini
sed -i 's/max_execution_time = 30/max_execution_time = 900/g' /etc/php/8.2/fpm/php.ini
sed -i 's/max_input_time = 60/max_input_time = 3000/g' /etc/php/8.2/fpm/php.ini
sed -i 's/upload_max_filesize = 2M/upload_max_filesize = 128M/g' /etc/php/8.2/fpm/php.ini
service php8.2-fpm restart
5. Asenna Wildcard Let’s Encrypt SSL-sertifikaatti
Luo cloudflare.ini tiedosto hakemistoon /root/.secrets/.
mkdir -p /root/.secrets/ && cd /root/.secrets/ && nano cloudflare.iniLisää alla oleva koodi ja tallenna käyttämällä CTRL+O ja poistu käyttämällä CTRL+X.
dns_cloudflare_email = "cloudflare-email@example.com"
dns_cloudflare_api_key = "XXXXXXXXXXXXXXXXX"
Löydä Cloudflaren sähköpostiosoitteesi ja globaali API-avaimesi kohdasta ”My Profile” > API Tokens > Global API Key
chmod 0400 /root/.secrets/cloudflare.iniAsenna Certbot ja DNS Authenticator käyttöjärjestelmän ja HTTP-verkkopalvelimen mukaan.
snap install --beta --classic certbot
snap set certbot trust-plugin-with-root=ok
snap install --beta certbot-dns-cloudflare
snap connect certbot:plugin certbot-dns-cloudflare
Hanki Wildcard SSL-sertifikaatti
certbot certonly --dns-cloudflare --dns-cloudflare-credentials /root/.secrets/cloudflare.ini -d example.com,*.example.com --preferred-challenges dns-01Aseta automaattinen uusiminen käyttämällä Cron Jobia
- Tyyppi
crontab -e - Tyyppi 1 nanoeditorille
- Kirjoita alla oleva komento ja tallenna
0 0 * * * /etc/init.d/nginx reload >/dev/null 2>&1Testin uusiminen
certbot renew --dry-run6. Määritä Nginx-palvelinlohko
Tämä on tärkeää, kun sinun on määritettävä verkkotunnuksesi, miten NGINX:n tulisi käsitellä HTTP-pyyntöjäsi.
Poista oletuspalvelinlohkot.
rm /etc/nginx/sites-available/default && rm /etc/nginx/sites-enabled/defaultLuo uusi palvelinlohko
cd /etc/nginx/sites-available/
nano example.com- Korvaa example.com omalla verkkotunnuksella
- Syötä alla oleva koodi ja paina CTRL+O tallentaaksesi ja CTRL+X poistuaksesi.
Yleistä
server {
    listen         80;
    return 301 https://$host$request_uri;
}
server {
# Document Root
root /var/www/html;
index index.php index.html index.htm;
server_name .example.com;
client_max_body_size 0;

    listen [::]:443 ssl http2 ipv6only=on;
    listen 443 ssl http2;
        ssl_protocols TLSv1.1 TLSv1.2 TLSv1.3;
        ssl_certificate /etc/letsencrypt/live/example.com/fullchain.pem;
        ssl_certificate_key /etc/letsencrypt/live/example.com/privkey.pem;
        ssl_prefer_server_ciphers on;
        ssl_session_cache   shared:SSL:20m;
        ssl_session_timeout 20m;
        ssl_ciphers 'TLS13+AESGCM+AES128:EECDH+AES128';


error_page 404 /404.html;
error_page 500 502 503 504 /50x.html;

# Block XMLRPC
location = /xmlrpc.php {
    deny all;
}

location / {
    try_files $uri $uri/ /index.php$is_args$args;
}

location ~* \.php$ {
if ($uri !~ "^/uploads/") {
fastcgi_pass unix:/run/php/php8.2-fpm.sock;
}
include fastcgi_params;
fastcgi_param SCRIPT_FILENAME $document_root$fastcgi_script_name;
fastcgi_param SCRIPT_NAME $fastcgi_script_name;
}
location = /favicon.ico {
log_not_found off;
access_log off;
}

location = /robots.txt {
log_not_found off;
access_log off;
allow all;
}

location ~* .(css|gif|svg|ico|woff2|eot|jpeg|webp|jpg|js|png)$ {
expires 1y;
log_not_found off;
}

# Enable Gzip compression.
gzip on;

# Disable Gzip on IE6.
gzip_disable "msie6";

# Allow proxies to cache both compressed and regular version of file.
# Avoids clients that don't support Gzip outputting gibberish.
gzip_vary on;

# Compress data, even when the client connects through a proxy.
gzip_proxied any;

# The level of compression to apply to files. A higher compression level increases
# CPU usage. Level 5 is a happy medium resulting in roughly 75% compression.
gzip_comp_level 5;

# Compress the following MIME types.
gzip_types
 application/atom+xml
 application/javascript
 application/json
 application/ld+json
 application/manifest+json
 application/rss+xml
 application/vnd.geo+json
 application/vnd.ms-fontobject
 application/x-font-ttf
 application/x-web-app-manifest+json
 application/xhtml+xml
 application/xml
 font/opentype
 image/bmp
 image/svg+xml
 image/x-icon
 text/cache-manifest
 text/css
 text/plain
 text/vcard
 text/vnd.rim.location.xloc
 text/vtt
 text/x-component
 text/x-cross-domain-policy;
}
Cache Enabler -lisäosaa varten
server {
    listen         80;
    return 301 https://$host$request_uri;
}
server {
# Document Root
root /var/www/html;
index index.php index.html index.htm;
server_name .example.com;
client_max_body_size 0;

    listen [::]:443 ssl http2 ipv6only=on;
    listen 443 ssl http2;
        ssl_protocols TLSv1.1 TLSv1.2 TLSv1.3;
        ssl_certificate /etc/letsencrypt/live/example.com/fullchain.pem;
        ssl_certificate_key /etc/letsencrypt/live/example.com/privkey.pem;
        ssl_prefer_server_ciphers on;
        ssl_session_cache   shared:SSL:20m;
        ssl_session_timeout 20m;
        ssl_ciphers 'TLS13+AESGCM+AES128:EECDH+AES128';


error_page 404 /404.html;
error_page 500 502 503 504 /50x.html;


# Block XMLRPC
location = /xmlrpc.php {
    deny all;
}


# Rules for Cache Enabler Plugin - Static File Serving

    set $cache_uri $request_uri;

    # bypass cache if POST requests or URLs with a query string
    if ($request_method = POST) {
    set $cache_uri 'nullcache';
    }

    if ($query_string != '') {
    set $cache_uri 'nullcache';
    }

    # bypass cache if URLs containing the following strings
    if ($request_uri ~* '(/wp-admin/|/xmlrpc.php|/wp-(app|cron|login|register|mail).php|wp-.*.php|/feed/|index.php|wp-comments-popup.php|wp-links-opml.php|wp-locations.php|sitemap(index)?.xml|[a-z0-9-]+-sitemap([0-9]+)?.xml)') {
    set $cache_uri 'nullcache';
    }

    # bypass cache if cookies contain the following strings
    if ($http_cookie ~* '(wp-postpass|wordpress_logged_in|comment_author)_') {
    set $cache_uri 'nullcache';
    }

    # custom installation subdirectory
    set $custom_subdir '';

    # default HTML file
    set $cache_enabler_uri '${custom_subdir}/wp-content/cache/cache-enabler/${http_host}${cache_uri}${scheme}-index.html';

    # WebP HTML file
    if ($http_accept ~* 'image/webp') {
    set $cache_enabler_uri '${custom_subdir}/wp-content/cache/cache-enabler/${http_host}${cache_uri}${scheme}-index-webp.html';
    }

    location / {
    gzip_static on; # this directive is not required but recommended
    try_files $cache_enabler_uri $uri $uri/ $custom_subdir/index.php?$args;
    }

location ~* \.php$ {
if ($uri !~ "^/uploads/") {
fastcgi_pass unix:/run/php/php8.2-fpm.sock;
}
include fastcgi_params;
fastcgi_param SCRIPT_FILENAME $document_root$fastcgi_script_name;
fastcgi_param SCRIPT_NAME $fastcgi_script_name;
}
location = /favicon.ico {
log_not_found off;
access_log off;
}

location = /robots.txt {
log_not_found off;
access_log off;
allow all;
}

location ~* .(css|gif|svg|ico|jpeg|webp|woff2|eot|jpg|js|png)$ {
expires 1y;
log_not_found off;
}

# Enable Gzip compression.
gzip on;

# Disable Gzip on IE6.
gzip_disable "msie6";

# Allow proxies to cache both compressed and regular version of file.
# Avoids clients that don't support Gzip outputting gibberish.
gzip_vary on;

# Compress data, even when the client connects through a proxy.
gzip_proxied any;

# The level of compression to apply to files. A higher compression level increases
# CPU usage. Level 5 is a happy medium resulting in roughly 75% compression.
gzip_comp_level 5;

# Compress the following MIME types.
gzip_types
 application/atom+xml
 application/javascript
 application/json
 application/ld+json
 application/manifest+json
 application/rss+xml
 application/vnd.geo+json
 application/vnd.ms-fontobject
 application/x-font-ttf
 application/x-web-app-manifest+json
 application/xhtml+xml
 application/xml
 font/opentype
 image/bmp
 image/svg+xml
 image/x-icon
 text/cache-manifest
 text/css
 text/plain
 text/vcard
 text/vnd.rim.location.xloc
 text/vtt
 text/x-component
 text/x-cross-domain-policy;
}- Sinun on asennettava Cache Enabler plugin nauttiaksesi välimuistin eduista.
FastCGI (paras suorituskyvyn kannalta)
Jos haluat käyttää FastCGI-välimuistia, toteuta sen sijaan alla oleva Server Block.
# NGINX Cache path
fastcgi_cache_path /var/run/nginx-cache levels=1:2 keys_zone=WORDPRESS:100m inactive=6h;
fastcgi_cache_key "$scheme$request_method$host$request_uri";
fastcgi_cache_use_stale error timeout invalid_header http_500;
fastcgi_ignore_headers Cache-Control Expires Set-Cookie;

server {
    listen         80;
    return 301 https://$host$request_uri;
}
server {
root /var/www/html;
index index.php index.html index.htm;
server_name .example.com;
client_max_body_size 0;

    listen [::]:443 ssl http2 ipv6only=on;
    listen 443 ssl http2;
        ssl_protocols TLSv1.1 TLSv1.2 TLSv1.3;
        ssl_certificate /etc/letsencrypt/live/example.com/fullchain.pem;
        ssl_certificate_key /etc/letsencrypt/live/example.com/privkey.pem;
        ssl_prefer_server_ciphers on;
        ssl_session_cache   shared:SSL:20m;
        ssl_session_timeout 20m;
        ssl_ciphers 'TLS13+AESGCM+AES128:EECDH+AES128';

error_page 404 /404.html;
error_page 500 502 503 504 /50x.html;


set $skip_cache 0;
    if ($request_method = POST) {set $skip_cache 1;}
    if ($request_uri ~* "/wp-admin/|/xmlrpc.php|/wp-.*.php|index.php|sitemap") {set $skip_cache 1;}
    if ($http_cookie ~* "comment_author|wordpress_[a-f0-9]+|wp-postpass|wordpress_no_cache|wordpress_logged_in") {set $skip_cache 1;}
    if ($query_string = "unapproved*") {set $skip_cache 1;}
    if ($cookie_woocommerce_items_in_cart = "1" ){ set $skip_cache 1;}
    if ($request_uri ~* "/(cart|checkout|my-account)/*$") {set $skip_cache 1;}

# Block XMLRPC
location = /xmlrpc.php {
    deny all;
}

location / {
try_files $uri $uri/ /index.php$is_args$args;
}

location ~* \.php$ {

 if ($uri !~ "^/uploads/") {
        fastcgi_pass unix:/run/php/php8.2-fpm.sock;
        }

        try_files                       $uri =404;
        include                         /etc/nginx/fastcgi_params;
        fastcgi_param                   SCRIPT_FILENAME $document_root$fastcgi_script_name;
        fastcgi_pass                    unix:/run/php/php8.2-fpm.sock;
        fastcgi_index                   index.php;
                fastcgi_cache_bypass $skip_cache;
                fastcgi_no_cache $skip_cache;
                fastcgi_cache WORDPRESS;
                fastcgi_cache_valid 200 30d;
                fastcgi_cache_valid 301 302 303 307 308 404 410 451 1m;
                add_header X-Cache $upstream_cache_status;

}

location = /favicon.ico {
log_not_found off;
access_log off;
}

location = /robots.txt {
log_not_found off;
access_log off;
allow all;
}

location ~* .(css|gif|ico|svg|webp|woff2|eot|jpeg|jpg|js|png)$ {
expires 1y;
log_not_found off;
}

# Enable Gzip compression.
gzip on;

# Disable Gzip on IE6.
gzip_disable "msie6";

# Allow proxies to cache both compressed and regular version of file.
# Avoids clients that don't support Gzip outputting gibberish.
gzip_vary on;

# Compress data, even when the client connects through a proxy.
gzip_proxied any;

# The level of compression to apply to files. A higher compression level increases
# CPU usage. Level 5 is a happy medium resulting in roughly 75% compression.
gzip_comp_level 5;

# Compress the following MIME types.
gzip_types
 application/atom+xml
 application/javascript
 application/json
 application/ld+json
 application/manifest+json
 application/rss+xml
 application/vnd.geo+json
 application/vnd.ms-fontobject
 application/x-font-ttf
 application/x-web-app-manifest+json
 application/xhtml+xml
 application/xml
 font/opentype
 image/bmp
 image/svg+xml
 image/x-icon
 text/cache-manifest
 text/css
 text/plain
 text/vcard
 text/vnd.rim.location.xloc
 text/vtt
 text/x-component
 text/x-cross-domain-policy;
}FastCGI:n tapauksessa sinun on käytettävä NGINX Helper -lisäosaa. Se toimii myös Hindi-koodatun URL-osoitteen kanssa. Muista, että se ei tue AMP:tä. Itse en käytä AMP:tä. (Suositellaan)
Vaihtoehtoisesti NGINX-välimuisti toimii AMP-URL:n puhdistamiseen, mutta se ei tue Hindi-koodattua URL-osoitetta. Asetuksissa kannattaa säilyttää välimuistipolku /var/run/nginx-cache /
Varoitus!
- For example, If you’re using Newspaper theme and serve seperate Mobile theme, please stick without FastCGI method and use a plugin WP Rocket because it can serve seperate mobile cache out of the box.
7. Luo symbolisia linkkejä kahden hakemiston välille
Jos jätät tämän vaiheen väliin, saatat saada ilmoituksen ERR_CONNECTION_REFUSED.
Aktivoidaksesi palvelinlohkon luo symbolinen linkki NGINX-palvelinlohkotiedostoon hakemistosta /etc/nginx/sites-available/ hakemistoon /etc/nginx/sites-enabled/.
Before running below command, please replace example.com to own domain.
ln -s /etc/nginx/sites-available/example.com /etc/nginx/sites-enabled/Testikokoonpano
nginx -tUudelleenkäynnistys ja päivitys
service nginx restart && service php8.2-fpm restart && service mysql restart && apt-get update && apt upgrade -y8. Asenna WordPress
Lataa WordPress-tiedostot /var/www/html-hakemistoon ja aseta käyttöoikeus.
cd /var/www/html && wget https://fi.wordpress.org/latest-fi.tar.gz && tar -xvzf latest-fi.tar.gz && mv -v wordpress/* /var/www/html && rm -rf latest-fi.tar.gz wordpress && chown -R www-data:www-data /var/www/html && sudo chmod -R 755 /var/www/htmlTo update permission in future, use below command
chown -R www-data:www-data /var/www/ && sudo chmod -R 755 /var/www9. DNS:n päivittäminen
Jos isännöit WordPressiä paikallisesti, haluat ohittaa välityspalvelimen tai haluat tehdä siirtymisen ilman seisokkiaikaa, tämä vaihe on hyödyllinen. Suosin yleensä tapauksessa Static WordPress Dev -aluetta.😉
- DNS:n osoittamiseen on kaksi tapaa. Jos olet siirtämässä sivustoa Vultr:iin ja haluat testata ensin paikallisesti, muokkaa hosts-tiedostoa ja osoita se sinne.
Windows OS
- Go to properties of
C:\Windows\System32\drivers\etc\hosts - Vaihda ”Turvallisuus”-oikeudet täyteen hallintaan nykyiselle käyttäjätunnuksellesi.
- Nyt voit vapaasti muokata hosts-tiedostoa System-käyttäjälläsi ja tallentaa sen.
# Samalla koneella voi olla localhost-osoite tai julkinen IP-osoite.
127.0.0.1 example.com
127.0.0.1 www.example.com
Esimerkki, näin sen pitäisi näyttää
Macille tai Linuxille
Voit muokata hosts-tiedostoa tällä komennolla sudo-käyttäjänä.
sudo nano /etc/hostsDNS:n päivittäminen Cloudflaren avulla
- Jos kaikki näyttää täydelliseltä ja haluat saada sivustosi käyttöön, kirjaudu Cloudflare DNS:ään ja päivitä uusi IP-osoite.
| A | @ | IPV4 address |
| AAAA | @ | IPV6 address |
| CNAME | www | example.com |
jossa @ tarkoittaa alastonta verkkotunnusta example.com
9. Käy verkkotunnuksessasi asentamassa WordPress
Jos haluat pitää ei-www-versio verkkotunnuksen WordPress sitten käydä ei-www-versio muuten www.
https://example.com- Provide Database login credential to begin WordPress Setup
- Suorita asennus
- Täytä uuden sivustosi perustiedot ja asenna WordPress.
- Kirjaudu sisään WordPressiin
- Jos olet käyttänyt FastCGI-palvelinlohkoa, sinun on ensimmäiseksi asennettava NGINX Cache -lisäosa ja määritettävä /var/www/cache välimuistipoluksi.
Muut tarpeelliset asiat
Use SMTP plugin Services for sending outgoing email of WordPress otherwise you will not be able to receive password reset link, contact form 7 messages.
Lopuksi WordPressin asennus on valmis. Pidä aina varmuuskopio.
Arvostan suuresti arvokasta aikaasi tämän artikkelin lukemisessa. Nähdään seuraavassa opetusohjelmassa!
Successfully install wordpres for a single site and do the same i mean for another domain on the same instance but after creating server blocks get ”nginx: (emerg) duplicate listen options for (::):443 in /etc/nginx/sites-enabled” on nginx -t
How Can i solve this?
Exactly followed the same steps, but at the end i am getting 502 bad gateway. I built some sites with the same steps before, however i don’t know what changed now.
Consider checking the error log using command
tail -f /var/log/nginx/error.logto get a hint about exact issue.getting this
tail: cannot open ’/var/log/error.log’ for reading: No such file or directory
tail: no files remaining
Sorry, there was a typo in my previous comment. Try below command
tail -f /var/log/nginx/error.logCan you explain me what is the difference between inactive and fastcgi_cache_valid values? Can you explain them please? Thanks
location ~* .(css|gif|ico|svg|jpeg|jpg|js|png)$ {
expires 1y;
log_not_found off;
}
is this code for page caching?
I use cloudflare so it has page cache too.
If i use that can i remove it from codes?
Can you please explain what is this code for?
Thanks
That code is for setting up 1 year browser caching for static files. You may use Cloudflare Page caching as normally you do. There shouldn’t be any problem.
For Nginx cache helper (I take this info from offical site
There’s a ‘purge all’ button? Does it purge the whole site?
Yes, it does. It physically empties the cache directory. It is set by default to /var/run/nginx-cache/.
So the default is /var/run/nginx-cache/
can we change fastcgi_cache_path /var/www/cache to /var/run/nginx-cache/ ?
Thanks
Jos välimuistihakemistosi on erilainen, voit ohittaa tämän
wp-config.php:ssä lisäämällä.define('RT_WP_NGINX_HELPER_CACHE_PATH','/var/www/nginx-cache/')I finally installed wordpress with this guide. But I see only www version but not the non-www version. Is there any changes that I need to do.
Redirects to www version even If I enter non-www version.
You need to point DNS records for both hostnames. Second, make sure dot is not missing from the beginning of example.com in this code –
server_name .example.com;in the NGINX connfig at step 6. Another thing, Redirect from www to non-www or vice-versa (as neccessary) is taken care automatically from WordPress. You do not need to put any extra code for it.which is the best & compatible server side cache plugin If I use FastCGI server block code along with Nginx Cache plugin..
W3 Total Cache or WP Rocket
I have 2 questions
1) What if i have 2 domains on different cloudflare accounts?
Create a cloudflare.ini file inside /root/.secrets/ directory.
mkdir -p /root/.secrets/ && cd /root/.secrets/ && nano cloudflare.ini
Add below code and save using CTRL+O and exit using CTRL+X
dns_cloudflare_email = ”your-cloudflare-email@example.com”
dns_cloudflare_api_key = ”XXXXXXXXXXXXXXXXX”
/root/.secrets/1domaincloudfare.ini
/root/.secrets/2domaincloudfare.ini
certbot certonly –dns-cloudflare –dns-cloudflare-credentials 1domaincloudfare.ini -d example.com,*.1domain.com –preferred-challenges dns-01
certbot certonly –dns-cloudflare –dns-cloudflare-credentials 2domaincloudfare.ini -d example.com,*.2domain.com –preferred-challenges dns-01
Do this work?
2) If we have 2 domains in the same account on cloudflare can we use 1 cloudflare.ini
certbot certonly –dns-cloudflare –dns-cloudflare-credentials /root/.secrets/cloudflare.ini -d 1domain.com,*.example.com –preferred-challenges dns-01
certbot certonly –dns-cloudflare –dns-cloudflare-credentials /root/.secrets/cloudflare.ini -d 2domain.com,*.example.com –preferred-challenges
dns-01
3) If we dont use cloudflare what will our ns for domain?
CLoud VPNs IP?
ns1= 68.28.65.84
ns2= 68.28.65.84
Is this right?
thanks for your replies
1. True
2. True
3. I have no idea about it. I prefer using CF DNS.
Can we create multi wordpress sites on different domain in the same machine with this
method?
I think only changement is in the FastCGI?
server {
root /var/www/aaa.com/wordpress;
index index.php index.html index.htm;
server_name .aaa.com;
client_max_body_size 0;
server {
root /var/www/bbb.com/wordpress;
index index.php index.html index.htm;
server_name .bbb.com;
client_max_body_size 0;
server {
root /var/www/ccc.com/wordpress;
index index.php index.html index.htm;
server_name .ccc.com;
client_max_body_size 0;
is this make a problem cache path is the same path for 3 web site? /var/www/cache
Is this method works?
1 machine 3 different domain and wordpress?
Thanks
Not for multiple sites.
What do you think about Plesk Panel?
It is easy to install plesk and create a wordpress site.
Easy to find trial keys and we can use it unlimited.
If it expires sites goes on ftp works and only plesk panel does not work but there are too much trial keys
It has nginx cache.
Do you recommend why and why not?
Thanks
I do not trust 3rd-parties installers.
Do all commands work for Centos 8?
Sorry, this is for Ubuntu OS only not for Centos 8.
hello gulshanji i wanted to use cloudflare ssl direct from thier website and not thru api with fast cgi then what would the config
Hey bro what is your thoughts on EasyEngine and SlickStack etc or one click app instead to automate? what is your favorite and will you make any tut bro
Sure, there is one. I will post about it. Thanks for your feedback.
The FastCGI server block config throws 404 Errors.
fastcgi_pass unix:/run/php/php7.4-fpm-example.sock;
should be:
fastcgi_pass unix:/run/php/php7.4-fpm.sock;
And it is missing config for location /
This config must be defined:
location / {
try_files $uri $uri/ /index.php$is_args$args;
}
I see, it was intended for seperate user. But, to keep generic I have corrected. Thanks for pointing out.
Without the location / block only the home page was accessible.
When I added the below block i was able to access the post and pages.
location / {
try_files $uri $uri/ /index.php$is_args$args;
}
Hello Alpesh, Corrected. Thanks again for your tip.
It was a good article
Thanks for your comment.
Nice tutorial. Does it come with email hosting? Looking to make a small site in Singapore using VultrHF
E-mail is a different thing. G Suite by Google services is specialized in this segment.
What are the differences if any between doing this method and using the vultr 1 click install? I have also read about centminmod. Is that somrthing u will recommend for having a fast LEMP stack? Tnx
I alwyas keep this guide bookmarket to my web browser! You never know when I would need to setup a new LEMP server ! Thanks Gulshan
Thanks for your comment.
hi, Gulshan thanks for sharing.
can u please share how to install wp on subfoler?
This article is like Life-Saver for one of my website. I was about to move from Google Cloud to Digital Ocean because the trial was expired and I also wanted to use DigitaOcean because it is in-expensive yet powerful and gives great experience.
Previously, I used webinoly stack which was straightforward for installing WordPress but later on I got to know from Gulshan that there are so many issues with that stack so, this time I was going to do it manually. I checked the official guide by Digital ocean but end up with many confusion and issues. Then, I fortunately asked Gulshan for help and he recommended this article for me.
I installed WordPress easily and very fast even fast that Webinoly stack. Thanks a lot Gulshan for writing this amazing article. Hats off to you bro!!🎩
Hi Gulshan, I am also receiving the test failed error on step 7. I have tried several times now on different setup and still stuck here. Please could you help?
Please carefully read the post and then copy-paste code in Terminal. Sometime you need to replace with your own domain. Doing mistake can return error. Else, no wise. I use this guide everyday for myself. I am not aware about any problem.
In case of trouble
1. Run test using
nginx -t2. Check logs to get proper hint
tail -f /var/log/nginx/error.log3. Delete existing or earlier created virtualhost
rm /etc/nginx/sites-available/default && rm /etc/nginx/sites-enabled/default4. Make sure to replace example.com at all places, a) when you create conf file, its naming. b) when you add conf file and c) when you create symlink, check your command its conf file name must match with first process.
I feel in most cases, chances are you did not replaced
server_name .example.com;to own domain, or you did not obtained SSL. All steps are written in serial order as it should be.I am facing problem of infinite loop redirects. I had use fastcache code. how to fix it
Please try Full SSL mode of Cloudflare. Then check again!
How to check if fastcgi cache is working or not? while running sudo
curl -I https://example.comit is not showing x-cache parameterHey Gulshan,
In the 7th step while texting ngnix I got
nginx: [emerg] open() ”/etc/nginx/sites-enabled/example.com” failed (2: No such file or directory) in /etc/nginx/nginx.conf:62
nginx: configuration file /etc/nginx/nginx.conf test failed
This error. How I can solve it? also what the error.
Please delete your existing server block and create again at sites-available and symlink at sites-enabled directory. The step 6 and 7 cover that clearly. Consider following patiently without any error. If you still face any problem, do let me know. Thanks for taking to leave your valuable comment.
Hi would like to know after configuring Fastcgi do we still need other caching plugin to speed up WordPress site?
Wonderful tutorial just complete solution for Nginx Fast CGI
Thanks Wasim for your kind feedback.
How Can I setup FastCGI on my ngnix server guided by you….
I have updated my article.
i want redirect too www plz help me urgent
If your WordPress General Settings has www version, server will do automatically. No additional action is required. In case you started WordPress installation at non-www version, then you need to migrate by changing at Database level.
You may use Better Search Replce plugin to perform this changes.
It Really Works Gulshan Bro. Thanks Really dear You are awesome…
Hello Gulshan Bro, First i want to say you that this is very beautiful and required post. I am really appreciating your work. but i have a problem can you please tell me
i have a droplet with digitalocean ($5/month plan) and i want to host multiple wordpress sites only with nginx(lemp ubuntu 18.04).
In simple i mean that this tutorial is complete to install a single wordpress and i did it but tell host it in some other sites
Hey Rohit,
Assuming, second site is example2.org
You need to follow steps this way.
1. create a new directory and add WordPress (Ref: steps 31)
cd /var/www/mkdir example2
wget https://wordpress.org/latest.tar.gz
tar -xvzf latest.tar.gz
mv -v wordpress/* /var/www/example2
rm -rf index.nginx-debian.html latest.tar.gz wordpress
chown -R www-data:www-data /var/www/
sudo chmod -R 755 /var/www
2. Create a new Server block with root path located to new directory as created in step 1.
cd /etc/nginx/sites-available/

nano gulshankumar-org
server {listen 80;
root /var/www/example2;
index index.php index.html index.htm;
server_name example2.org www.example2.org;
...
3. Point your example2.org domain to DNS, then install SSL
certbot --nginx -d example2.org -d www.example2.org4. Create new MySQL database
sudo mysql -u root -pcreate database example2;
grant all on example2.* to example2@localhost identified by 'TYPE HERE PASSWORD';
flush privileges;
exit;
5. Proceed to Installation by visiting your site
https://example2.orgLet me know if you have any additional question. You can always visit our forum for quick assistance.
Thanks & Regards,
Gulshan
It Really Works Gulshan Bro. Thanks Really dear You are awesome…
Hello Gulshan you written a comprehensive guide i highly appreciate your work. Can you help me with an error? Actually i have two websites the first website i have already hosted on Vultr following the above guide.
But when try to host a another WordPress website iam getting error. I followed the above steps you mentioned in comments. But still not able to fix it. The error is my website not working after hosting another WordPress website.
If possible please guide me step by step instructions. It will help me alot. Thanks in advance.
Consider checking log available at
/var/log/nginx/directory. Usenginx -tcommand to see what mistake causing issue.Very well. thank you so much
How to auto-renew SSL?
Add below cron job
crontab -eAdd below command and save.
15 3 * * 7 certbot renew --post-hook "service nginx restart"Thanks sos un groso, very well tutorial
Thank you for your tutorial, its the first one that actually showed me the wordpress setup page.
When I went to upload a plugin I received this message. ”The uploaded file exceeds the upload_max_filesize directive in php.ini”
How do I increase the max filesize?
Please see the step 33.5
Thanks Gulshan, Finally I moved to NGINX server. You have created a great tutorial for beginners.
You’re welcome bro 🙂
Hi,
Thank you for this awesome guide.
How can I install WordPress multisite on Ubuntu 18.04 with Nginx?
Finally I loved this step by step tutorial with proper images.
Thanks Bhaiya you are awesome
Thanks a lot Gulshan. You save my breath
I search everywhere but not find any good article
You explained very well along with security concern
well done