In this article, you are going to learn through the process of installing WordPress manually on an Ubuntu 22.04 server using NGINX, MariaDB, and PHP 8.2. These stack will provide a powerful and efficient platform for running your WordPress website with an amazing speed.
Seguite questi 3 passaggi e guardate il video. Avete bisogno di aiuto? Contattatemi.. 😊
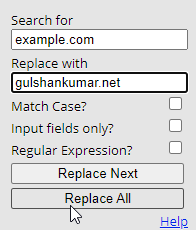
Prima di iniziare, ecco un consiglio veloce. Utilizzate l’estensione ‘Search and Replace’ per cambiare in blocco example.com con il vostro dominio su questa pagina web.
Suggerimento per risparmiare tempo agli utenti di Google Chrome.
Parte A: Mantenere attivi i server dei nomi Cloudflare
Utilizzeremo il DNS di Cloudflare per ottenere il certificato SSL Wildcard di Let’s Encrypt. Completate prima questo passaggio per godere di una migrazione a tempo zero.
Controllare i server dei nomi correnti
- Trova i tuoi server di nomi attivi su https://www.whatsmydns.net/#NS/example.com
- Se si utilizza il NS predefinito del precedente Hosting o registrar di dominio, è necessario sostituirlo con Cloudflare.
- Imparare a usare il DNS di Cloudflare
Parte B: Preparare un server Ubuntu 22.04 LTS

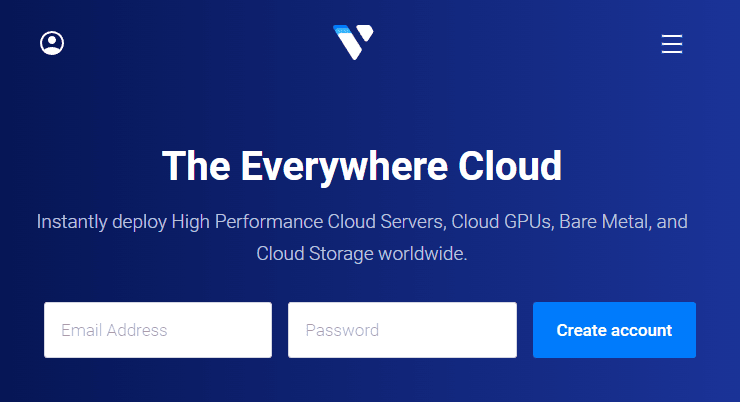
1. Iscriviti a Vultr per ottenere 100 dollari di crediti gratuiti (validi per 30 giorni)
Come persona che ha provato molte aziende di server cloud, la mia esperienza dice che non si può sbagliare con Vultr. Questi ragazzi sono genuini e premurosi quando si tratta di supporto e servizi.
⚡ Prestazioni
- NVME / SSD
- 3.7 GHz CPU
- Velocità di rete fino a 5Gbps
- Datacenter in America, Europa, Asia, Austraillia
- IPV6 ready
💡 Caratteristiche
- Cruscotto facile da usare per i principianti
- Un solo clic per creare un’istantanea
- Backup automatico (a pagamento)
- Firewall cloud gratuito
- Protezione DDoS (a pagamento)
- Virtualizzazione KVM al 100%
⚙ Supporto
- PayPal/Card
- 24/7 Ticket Support
- Documentation
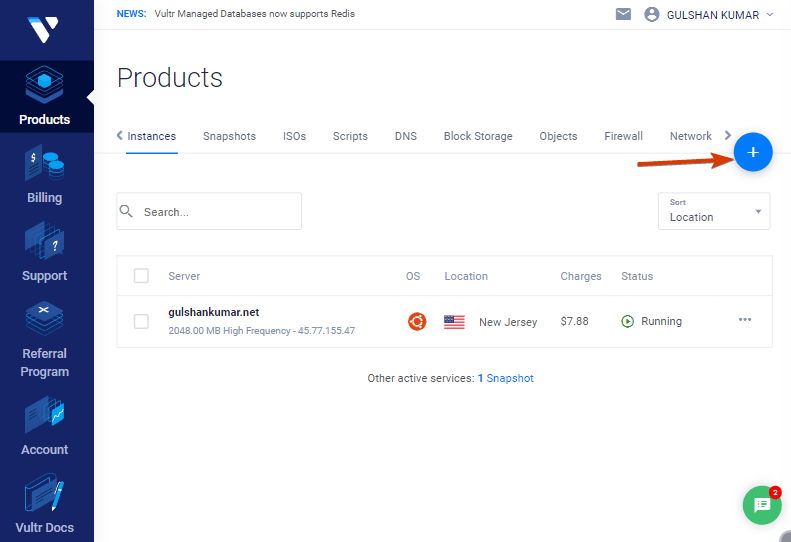
2. Creare un nuovo server VPS
Basta fare clic sul pulsante più per iniziare
3. Scegliere il server ad alta frequenza
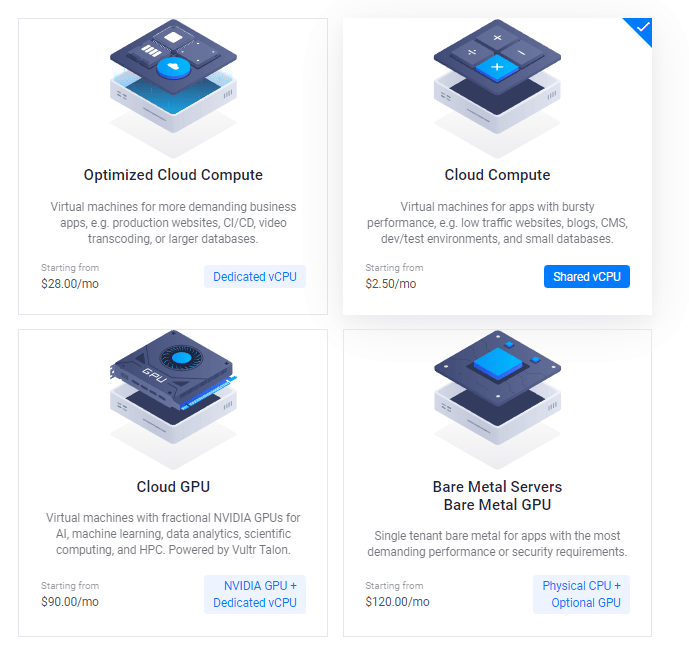
Successivamente, è possibile selezionare l’opzione AMD High Performance o Intel High Frequency in CPU & Storage Technology. Questa opzione offre la CPU e il disco NVMe più veloci in assoluto. Se il budget a disposizione è inferiore, si può optare per il piano Regular con CPU Intel, che offre un disco SSD.

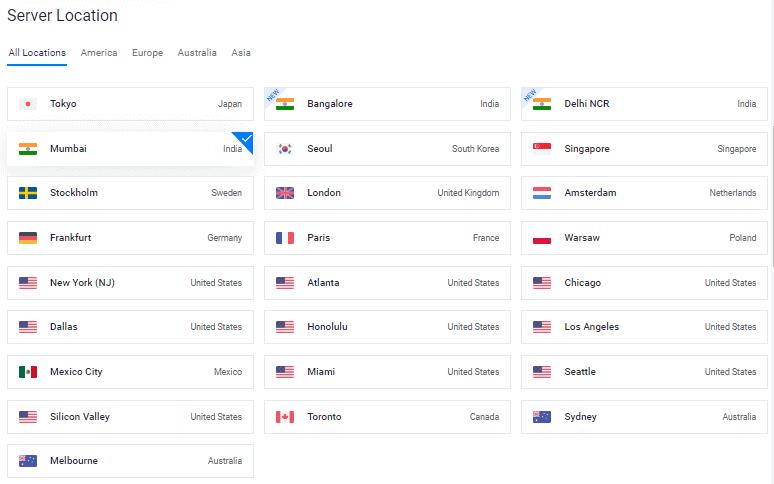
4. Scegliere la posizione del server
Scegliete una sede del server vicina al vostro pubblico di riferimento.
5. Selezionare il sistema operativo Ubuntu 22.04 x64
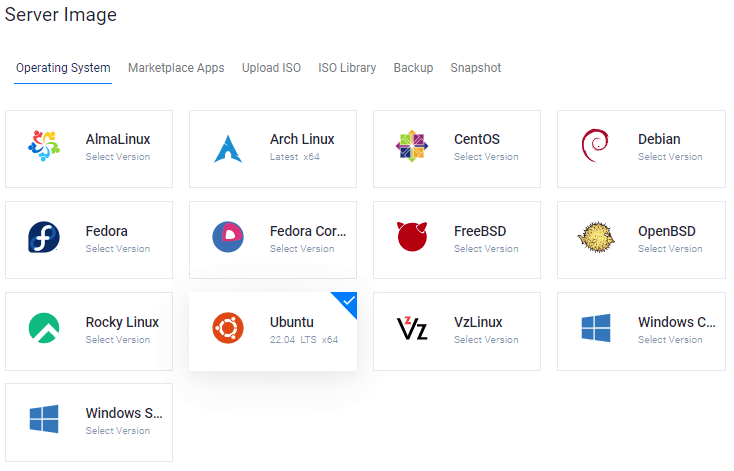
Attualmente, Ubuntu 20.04×64 e 22.04×64 sono entrambe versioni LTS (Long Term Supported) compatibili con la maggior parte dei pacchetti che stiamo per installare.
6. Scegliere la dimensione del server
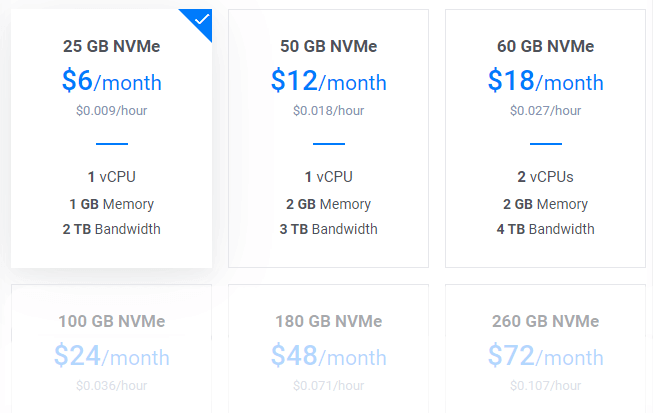
Il piano da 6$/mo è un ottimo punto di partenza per un nuovo blog. È possibile effettuare l’upgrade in qualsiasi momento in base alle esigenze.
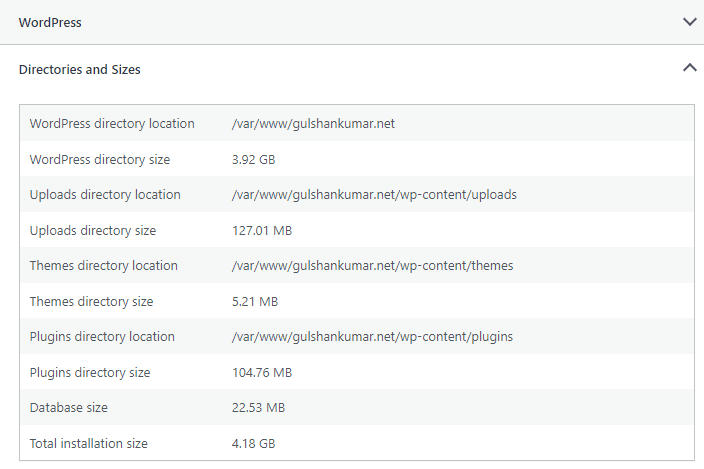
Suggerimento: Se si sta effettuando una migrazione, controllare la dimensione totale dell’installazione in Informazioni sullo stato del sito.
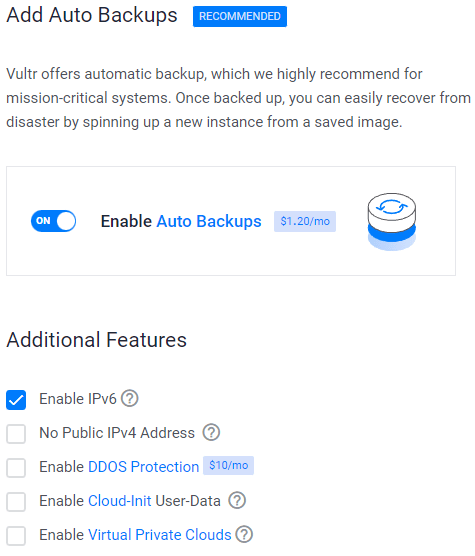
7. Abilita IPV6, Backup
8. Aggiungere una chiave SSH
Si tratta di un’operazione consigliata e facoltativa per una maggiore sicurezza.
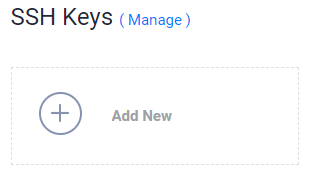
- Fare clic sul pulsante Aggiungi nuovo per aggiungere una nuova chiave SSH per inviare la chiave 🔒 pubblica.
- Generare le chiavi utilizzando il metodo seguente in base al proprio sistema operativo.

- Scaricare l’applicazione PuTTy.
- Cercare PuTTygen nel menu Start
- Fare clic sul pulsante Genera e passare il puntatore del mouse su di esso
- Copiare la chiave pubblica e fornirla a Vultr
- Inserire la passphrase della chiave
- Salvate la 🔑Private Key nel luogo più sicuro.
- Può essere utilizzato per il login a SSH o SFTP.

- Eseguire:
ssh-keygen -t rsa. Per una chiave più sicura a 4096 bit, eseguire:ssh-keygen -t rsa -b 4096 - Quando viene chiesto dove si desidera salvare la chiave, premere Invio (verrà utilizzata la posizione predefinita).
- Inserire una passphrase per la chiave.
- Eseguite cat ~/.ssh/id_rsa.pub – questo vi darà la chiave nel formato corretto da incollare nel pannello di controllo.
- Assicurarsi di eseguire un backup del file ~/.ssh/id_rsa. Questo non può essere recuperato se viene perso.
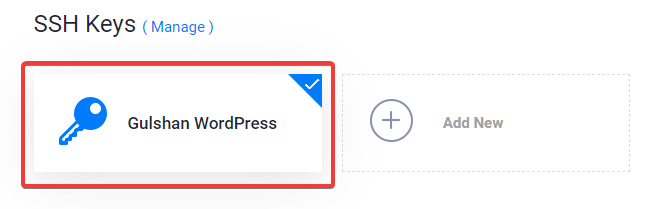
Selezionare la chiave SSH
Seguendo questi passaggi, la chiave pubblica verrà collegata alla nuova istanza. Quindi, sarà possibile accedere a SSH utilizzando sia la password in chiaro che la chiave SSH.
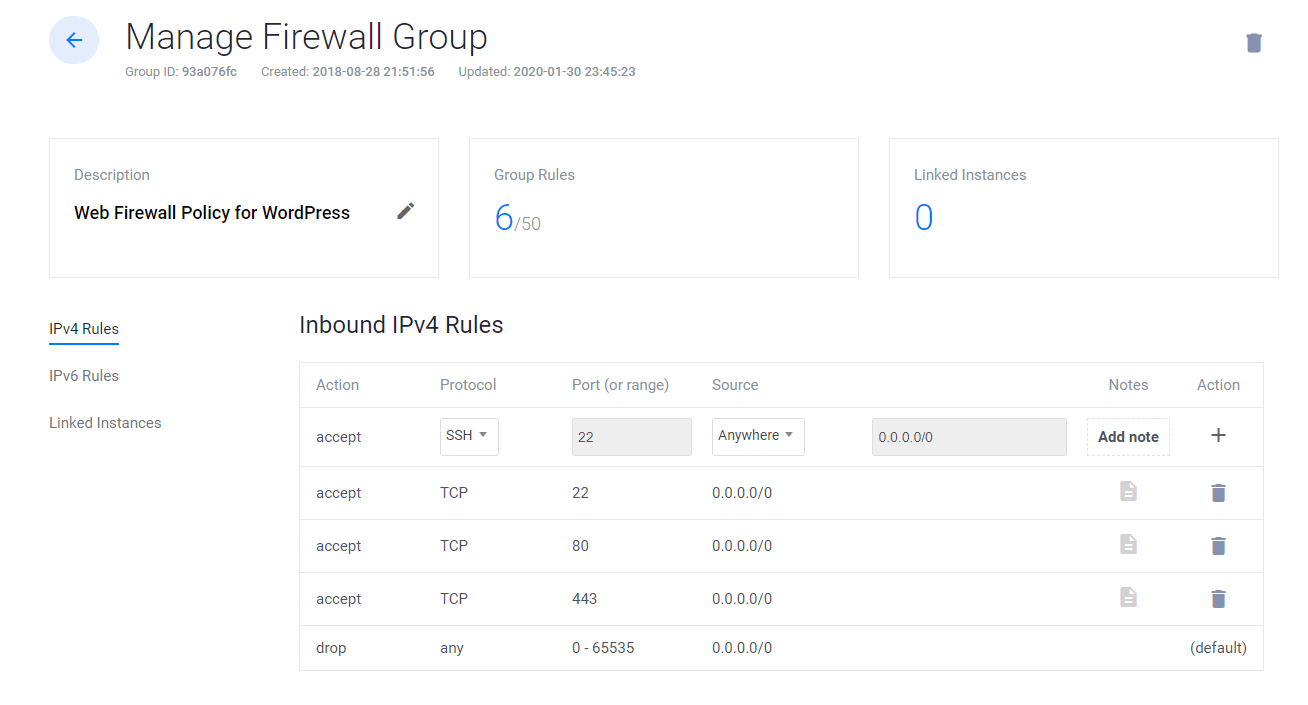
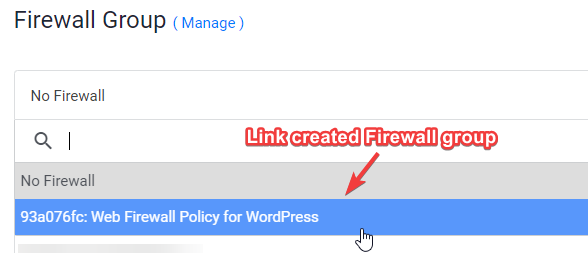
9. Collegare la regola del firewall web all’istanza del server
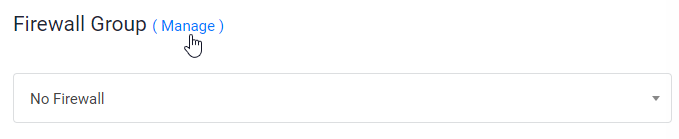
- Fare clic su Gestisci e creare un nuovo gruppo Firewall.
- Consentire la porta TCP 22 per SSH. 80 per HTTP e 443 HTTPS per le regole IPV4 e IPV6.
- Una volta fatto, collegare il gruppo Firewall all’istanza.
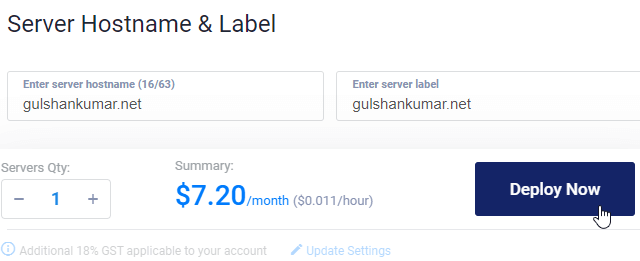
10. Inserite il nome host e l’etichetta facendo clic su Deploy Now
A questo punto, si vedrà l’installazione nel progresso
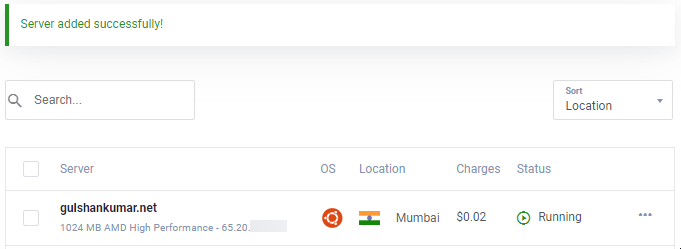
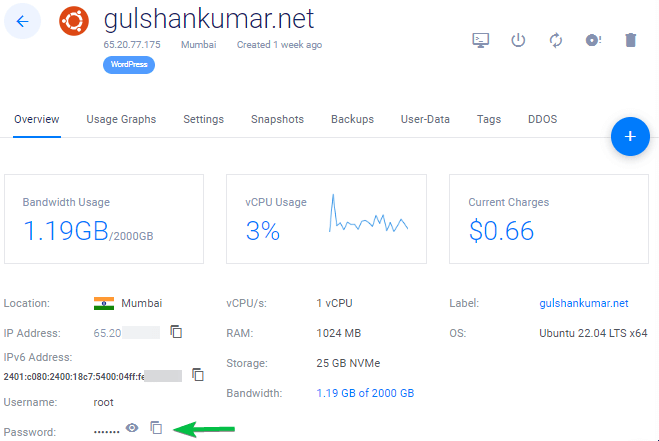
11. Andare alla pagina Nuova istanza
Copiare l’indirizzo IP, il nome utente e la password. La porta predefinita è la 22.
12. Disabilitare la password di accesso
Per motivi di sicurezza, si consiglia di disabilitare l’autenticazione tramite password e di consentire solo l’autenticazione tramite chiave.
- Modificare il file di configurazione nano /etc/ssh/sshd_config
- Find (CTRL + W) and search
PasswordAuthentication - Modificare il valore da sì a no
- Per salvare il tipo, CTRL + O
- Riavviare il servizio SSH con il comando sudo service ssh restart
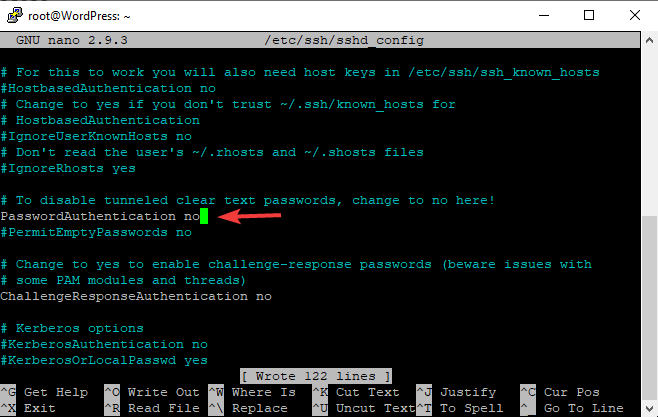
A partire dalla prossima volta, è possibile utilizzare SSH solo tramite chiave, come mostrato nel video.
Per Linux o Mac, utilizzare il Terminale con un comando simile a questo
ssh [email protected] -p 22 -i id_rsa
Passo 13. Disabilitare UFW
Quando si distribuisce una nuova istanza su VULTR, viene fornita con UFW (Uncomplicated Firewall) abilitato che mantiene tutte le porte bloccate, tranne la porta 22 di SSH. Questo può restituire l’errore ERR_CONNECTION_REFUSED nel browser. Per risolvere il problema, suggerisco di disattivare UFW.
ufw disableBasta con le spiegazioni di base. Ora accelererò il processo originale di distribuzione di WordPress sullo stack LEMP.
Parte C. Distribuzione di WordPress sullo stack LEMP
1. Aggiornare i repository
Digitare il comando seguente e premere il tasto Invio
sudo -sapt update && apt upgrade -y && apt dist-upgrade && apt autoclean && apt autoremove -y && rebootor
wget -qO update https://dl.gulshankumar.net/update && chmod +x updateLa prossima volta, utilizzate sempre il comando di scelta rapida sottostante per aggiornare.
./update2. Installare MariaDB con sicurezza
Effettuare nuovamente il login e inserire il seguente comando
sudo apt install mariadb-server -y && sudo mysql_secure_installationRispondere alle seguenti domande
- Enter current password for root (enter for none): Premere il tasto Invio
- Switch to unix_socket authentication [Y/n]: Risposta N
- Set root password? [Y/n]: Premere il tasto Invio.
- New password: Digitare la password, che può essere generata con Dashlane. Fare clic con il tasto destro del mouse su incolla.
- Re-enter new password: Digitare nuovamente la password.
Dopo aver impostato con successo la password, si vedrà
Password updated successfully!
Reloading privilege tables..
... Success!
Inoltre, è necessario rispondere alle seguenti domande.
Remove anonymous users? [Y/n]: Premere Y e immettere
Disallow root login remotely? [Y/n]: Premere Y e immettere
Remove test database and access to it? [Y/n]: Premere Y e immettere
Reload privilege tables now? [Y/n]: Premere Y e immettere
3. Creare un nuovo database per WordPress
Accedere a MySQL, premere il tasto Invio quando viene richiesta la password.
mysql -u root -pCreare un nuovo database e concedere i privilegi all’utente con password. È qui che WordPress memorizza tutti i post, le pagine, i temi, i plugin e così via.
create database wordpress;
grant all on wordpress.* to gulshan@localhost identified by '5pY8CKJxDRJEGQNkX7';
flush privileges;
exit;
Dove il vostro …
il database è wordpress
il nome utente è gulshan
la password è 5pY8CKJxDRJEGQNkX7
Suggerimento: Considerare l’utilizzo di credenziali di accesso uniche
4. Installare PHP 8.2, NGINX e impostare le autorizzazioni
Attualmente, PHP 8.2 è l’ultima versione stabile. Se si desidera utilizzare una versione PHP diversa, assicurarsi di mantenerla in tutti i comandi elencati di seguito.
sudo add-apt-repository ppa:ondrej/php -y && apt update && apt install php8.2-fpm php8.2-common php8.2-mysql php8.2-xml php8.2-xmlrpc php8.2-curl php8.2-gd php8.2-imagick php8.2-cli php8.2-dev php8.2-imap php8.2-mbstring php8.2-soap php8.2-zip php8.2-bcmath -y && sed -i 's/;cgi.fix_pathinfo=1/cgi.fix_pathinfo=0/g' /etc/php/8.2/fpm/php.ini && service php8.2-fpm restart && apt install nginx -y && chown -R www-data:www-data /var/www/ && chmod -R 755 /var/wwwModificare la configurazione di PHP
La maggior parte dei temi e dei plugin di fantasia richiede una configurazione PHP di alto livello per funzionare. Pertanto, è necessario apportare queste modifiche.
sed -i 's/memory_limit = 128M/memory_limit = 512M/g' /etc/php/8.2/fpm/php.ini
sed -i 's/post_max_size = 8M/post_max_size = 128M/g' /etc/php/8.2/fpm/php.ini
sed -i 's/max_file_uploads = 20/max_file_uploads = 30/g' /etc/php/8.2/fpm/php.ini
sed -i 's/max_execution_time = 30/max_execution_time = 900/g' /etc/php/8.2/fpm/php.ini
sed -i 's/max_input_time = 60/max_input_time = 3000/g' /etc/php/8.2/fpm/php.ini
sed -i 's/upload_max_filesize = 2M/upload_max_filesize = 128M/g' /etc/php/8.2/fpm/php.ini
service php8.2-fpm restart
5. Installare il certificato SSL Wildcard Let’s Encrypt
Creare un file cloudflare.ini all’interno della directory /root/.secrets/.
mkdir -p /root/.secrets/ && cd /root/.secrets/ && nano cloudflare.iniAggiungere il codice seguente e salvare con CTRL+O e uscire con CTRL+X.
dns_cloudflare_email = "[email protected]"
dns_cloudflare_api_key = "XXXXXXXXXXXXXXXXX"
Trovate l’e-mail di Cloudflare e la chiave API globale in “Il mio profilo” > Token API > Chiave API globale
chmod 0400 /root/.secrets/cloudflare.iniInstallare Certbot e DNS Authenticator in base al sistema operativo e al server web HTTP
snap install --beta --classic certbot
snap set certbot trust-plugin-with-root=ok
snap install --beta certbot-dns-cloudflare
snap connect certbot:plugin certbot-dns-cloudflare
Ottenere un certificato SSL Wildcard
certbot certonly --dns-cloudflare --dns-cloudflare-credentials /root/.secrets/cloudflare.ini -d example.com,*.example.com --preferred-challenges dns-01Impostare il rinnovo automatico con Cron Job
- Digitare
crontab -e - Tipo 1 per l’editor nano
- Inserite il comando seguente e salvate
0 0 * * * /etc/init.d/nginx reload >/dev/null 2>&1Rinnovo del test
certbot renew --dry-run6. Configurare il blocco del server Nginx
È importante per configurare il proprio dominio e il modo in cui NGINX deve gestire le richieste HTTP.
Delete default server blocks.
rm /etc/nginx/sites-available/default && rm /etc/nginx/sites-enabled/defaultCreare un nuovo blocco server
cd /etc/nginx/sites-available/
nano example.com- Sostituire
example.comcon il proprio dominio - Enter below code and Press CTRL+O to save and CTRL+X to exit.
Generale
server {
    listen         80;
    return 301 https://$host$request_uri;
}
server {
# Document Root
root /var/www/html;
index index.php index.html index.htm;
server_name .example.com;
client_max_body_size 0;

    listen [::]:443 ssl http2 ipv6only=on;
    listen 443 ssl http2;
        ssl_protocols TLSv1.1 TLSv1.2 TLSv1.3;
        ssl_certificate /etc/letsencrypt/live/example.com/fullchain.pem;
        ssl_certificate_key /etc/letsencrypt/live/example.com/privkey.pem;
        ssl_prefer_server_ciphers on;
        ssl_session_cache   shared:SSL:20m;
        ssl_session_timeout 20m;
        ssl_ciphers 'TLS13+AESGCM+AES128:EECDH+AES128';


error_page 404 /404.html;
error_page 500 502 503 504 /50x.html;

# Block XMLRPC
location = /xmlrpc.php {
    deny all;
}

location / {
    try_files $uri $uri/ /index.php$is_args$args;
}

location ~* \.php$ {
if ($uri !~ "^/uploads/") {
fastcgi_pass unix:/run/php/php8.2-fpm.sock;
}
include fastcgi_params;
fastcgi_param SCRIPT_FILENAME $document_root$fastcgi_script_name;
fastcgi_param SCRIPT_NAME $fastcgi_script_name;
}
location = /favicon.ico {
log_not_found off;
access_log off;
}

location = /robots.txt {
log_not_found off;
access_log off;
allow all;
}

location ~* .(css|gif|svg|ico|woff2|eot|jpeg|webp|jpg|js|png)$ {
expires 1y;
log_not_found off;
}

# Enable Gzip compression.
gzip on;

# Disable Gzip on IE6.
gzip_disable "msie6";

# Allow proxies to cache both compressed and regular version of file.
# Avoids clients that don't support Gzip outputting gibberish.
gzip_vary on;

# Compress data, even when the client connects through a proxy.
gzip_proxied any;

# The level of compression to apply to files. A higher compression level increases
# CPU usage. Level 5 is a happy medium resulting in roughly 75% compression.
gzip_comp_level 5;

# Compress the following MIME types.
gzip_types
 application/atom+xml
 application/javascript
 application/json
 application/ld+json
 application/manifest+json
 application/rss+xml
 application/vnd.geo+json
 application/vnd.ms-fontobject
 application/x-font-ttf
 application/x-web-app-manifest+json
 application/xhtml+xml
 application/xml
 font/opentype
 image/bmp
 image/svg+xml
 image/x-icon
 text/cache-manifest
 text/css
 text/plain
 text/vcard
 text/vnd.rim.location.xloc
 text/vtt
 text/x-component
 text/x-cross-domain-policy;
}
Per l’abilitatore di cache
server {
    listen         80;
    return 301 https://$host$request_uri;
}
server {
# Document Root
root /var/www/html;
index index.php index.html index.htm;
server_name .example.com;
client_max_body_size 0;

    listen [::]:443 ssl http2 ipv6only=on;
    listen 443 ssl http2;
        ssl_protocols TLSv1.1 TLSv1.2 TLSv1.3;
        ssl_certificate /etc/letsencrypt/live/example.com/fullchain.pem;
        ssl_certificate_key /etc/letsencrypt/live/example.com/privkey.pem;
        ssl_prefer_server_ciphers on;
        ssl_session_cache   shared:SSL:20m;
        ssl_session_timeout 20m;
        ssl_ciphers 'TLS13+AESGCM+AES128:EECDH+AES128';


error_page 404 /404.html;
error_page 500 502 503 504 /50x.html;


# Blocco XMLRPC
location = /xmlrpc.php {
    deny all;
}


# Regole per il plugin Cache Enabler - Servizio di file statici

    set $cache_uri $request_uri;

    # bypassare la cache in caso di richieste POST o URL con una stringa di query
    if ($request_method = POST) {
    set $cache_uri 'nullcache';
    }

    if ($query_string != '') {
    set $cache_uri 'nullcache';
    }

    # bypassare la cache se gli URL contengono le seguenti stringhe
    if ($request_uri ~* '(/wp-admin/|/xmlrpc.php|/wp-(app|cron|login|register|mail).php|wp-.*.php|/feed/|index.php|wp-comments-popup.php|wp-links-opml.php|wp-locations.php|sitemap(index)?.xml|[a-z0-9-]+-sitemap([0-9]+)?.xml)') {
    set $cache_uri 'nullcache';
    }

    # bypassare la cache se i cookie contengono le seguenti stringhe
    if ($http_cookie ~* '(wp-postpass|wordpress_logged_in|comment_author)_') {
    set $cache_uri 'nullcache';
    }

    # sottodirectory di installazione personalizzata
    set $custom_subdir '';

    # file HTML predefinito
    set $cache_enabler_uri '${custom_subdir}/wp-content/cache/cache-enabler/${http_host}${cache_uri}${scheme}-index.html';

    # WebP HTML file
    if ($http_accept ~* 'image/webp') {
    set $cache_enabler_uri '${custom_subdir}/wp-content/cache/cache-enabler/${http_host}${cache_uri}${scheme}-index-webp.html';
    }

    location / {
    gzip_static on; # this directive is not required but recommended
    try_files $cache_enabler_uri $uri $uri/ $custom_subdir/index.php?$args;
    }

location ~* \.php$ {
if ($uri !~ "^/uploads/") {
fastcgi_pass unix:/run/php/php8.2-fpm.sock;
}
include fastcgi_params;
fastcgi_param SCRIPT_FILENAME $document_root$fastcgi_script_name;
fastcgi_param SCRIPT_NAME $fastcgi_script_name;
}
location = /favicon.ico {
log_not_found off;
access_log off;
}

location = /robots.txt {
log_not_found off;
access_log off;
allow all;
}

location ~* .(css|gif|svg|ico|jpeg|webp|woff2|eot|jpg|js|png)$ {
expires 1y;
log_not_found off;
}

# Enable gzip compression.
gzip on;

# Disabilitare gzip  su IE6.
gzip_disable "msie6";

# Consentire ai proxy di memorizzare nella cache sia la versione compressa che quella normale del file.
# Avoids clients that don't support gzip outputting gibberish.
gzip_vary on;

# Comprimere i dati, anche quando il client si connette attraverso un proxy.
gzip_proxied any;

# Il livello di compressione da applicare ai file. Un livello di compressione più alto aumenta
# Utilizzo della CPU. Il livello 5 è una via di mezzo che porta a una compressione del 75% circa.
gzip_comp_level 5;

# Comprimere i seguenti tipi di MIME.
gzip_types
 application/atom+xml
 application/javascript
 application/json
 application/ld+json
 application/manifest+json
 application/rss+xml
 application/vnd.geo+json
 application/vnd.ms-fontobject
 application/x-font-ttf
 application/x-web-app-manifest+json
 application/xhtml+xml
 application/xml
 font/opentype
 image/bmp
 image/svg+xml
 image/x-icon
 text/cache-manifest
 text/css
 text/plain
 text/vcard
 text/vnd.rim.location.xloc
 text/vtt
 text/x-component
 text/x-cross-domain-policy;
}- È necessario installare il plugin Cache Enabler per usufruire dei vantaggi della cache.
FastCGI
Se si desidera utilizzare la cache FastCGI, implementare invece il seguente blocco di server.
# NGINX Cache path
fastcgi_cache_path /var/run/nginx-cache levels=1:2 keys_zone=WORDPRESS:100m inactive=6h;
fastcgi_cache_key "$scheme$request_method$host$request_uri";
fastcgi_cache_use_stale error timeout invalid_header http_500;
fastcgi_ignore_headers Cache-Control Expires Set-Cookie;

server {
    listen         80;
    return 301 https://$host$request_uri;
}
server {
root /var/www/html;
index index.php index.html index.htm;
server_name .example.com;
client_max_body_size 0;

    listen [::]:443 ssl http2 ipv6only=on;
    listen 443 ssl http2;
        ssl_protocols TLSv1.1 TLSv1.2 TLSv1.3;
        ssl_certificate /etc/letsencrypt/live/example.com/fullchain.pem;
        ssl_certificate_key /etc/letsencrypt/live/example.com/privkey.pem;
        ssl_prefer_server_ciphers on;
        ssl_session_cache   shared:SSL:20m;
        ssl_session_timeout 20m;
        ssl_ciphers 'TLS13+AESGCM+AES128:EECDH+AES128';

error_page 404 /404.html;
error_page 500 502 503 504 /50x.html;


set $skip_cache 0;
    if ($request_method = POST) {set $skip_cache 1;}
    if ($request_uri ~* "/wp-admin/|/xmlrpc.php|/wp-.*.php|index.php|sitemap") {set $skip_cache 1;}
    if ($http_cookie ~* "comment_author|wordpress_[a-f0-9]+|wp-postpass|wordpress_no_cache|wordpress_logged_in") {set $skip_cache 1;}
    if ($query_string = "unapproved*") {set $skip_cache 1;}
    if ($cookie_woocommerce_items_in_cart = "1" ){ set $skip_cache 1;}
    if ($request_uri ~* "/(cart|checkout|my-account)/*$") {set $skip_cache 1;}

# Blocco XMLRPC
location = /xmlrpc.php {
    deny all;
}

location / {
try_files $uri $uri/ /index.php$is_args$args;
}

location ~* \.php$ {

 if ($uri !~ "^/uploads/") {
        fastcgi_pass unix:/run/php/php8.2-fpm.sock;
        }

        try_files                       $uri =404;
        include                         /etc/nginx/fastcgi_params;
        fastcgi_param                   SCRIPT_FILENAME $document_root$fastcgi_script_name;
        fastcgi_pass                    unix:/run/php/php8.2-fpm.sock;
        fastcgi_index                   index.php;
                fastcgi_cache_bypass $skip_cache;
                fastcgi_no_cache $skip_cache;
                fastcgi_cache WORDPRESS;
                fastcgi_cache_valid 200 30d;
                fastcgi_cache_valid 301 302 303 307 308 404 410 451 1m;
                add_header X-Cache $upstream_cache_status;

}

location = /favicon.ico {
log_not_found off;
access_log off;
}

location = /robots.txt {
log_not_found off;
access_log off;
allow all;
}

location ~* .(css|gif|ico|svg|webp|woff2|eot|jpeg|jpg|js|png)$ {
expires 1y;
log_not_found off;
}

# Abilita la compressione gzip.
gzip on;

# Disattivare gzip su IE6.
gzip_disable "msie6";

# Consentire ai proxy di memorizzare nella cache sia la versione compressa che quella normale del file.
# Evita che i client che non supportano gzip emettano messaggi incomprensibili.
gzip_vary on;

# Comprimere i dati, anche quando il client si connette attraverso un proxy.
gzip_proxied any;

# Comprimere i dati, anche quando il client si connette attraverso un proxy.
# CPU usage. Level 5 is a happy medium resulting in roughly 75% compression.
gzip_comp_level 5;

# Comprimere i seguenti tipi di MIME.
gzip_types
 application/atom+xml
 application/javascript
 application/json
 application/ld+json
 application/manifest+json
 application/rss+xml
 application/vnd.geo+json
 application/vnd.ms-fontobject
 application/x-font-ttf
 application/x-web-app-manifest+json
 application/xhtml+xml
 application/xml
 font/opentype
 image/bmp
 image/svg+xml
 image/x-icon
 text/cache-manifest
 text/css
 text/plain
 text/vcard
 text/vnd.rim.location.xloc
 text/vtt
 text/x-component
 text/x-cross-domain-policy;
}
Per salvare, premere CTRL+O e Invio. Quindi, uscire dall’editor nano usando il comando CTRL+X.
In alternativa, la cache di NGINX funziona per eliminare gli URL AMP, ma non supporta gli URL codificati Hindi. Nelle impostazioni, si dovrebbe mantenere il percorso della cache /var/run/nginx-cache/
Attenzione!
- Ad esempio, se si utilizza il tema Newspaper e si serve un tema mobile separato, si consiglia di evitare il metodo FastCGI e di utilizzare il plugin WP Rocket, che può servire una cache mobile separata.
7. Creare collegamenti simbolici tra due directory
Se si salta questo passaggio, si può ottenere ERR_CONNECTION_REFUSED
Per attivare il blocco del server, creare un collegamento simbolico del file NGINX Server Block dalla directory /etc/nginx/sites-available/ a /etc/nginx/sites-enabled
Prima di eseguire il comando seguente, sostituire example.com con il proprio dominio.
ln -s /etc/nginx/sites-available/example.com /etc/nginx/sites-enabled/Configurazione del test
nginx -tRiavvio e aggiornamento
service nginx restart && service php8.2-fpm restart && service mysql restart && apt-get update && apt upgrade -y8. Installare WordPress
Scaricare i file di WordPress nella directory /var/www/html e impostare i permessi.
cd /var/www/html && wget https://it.wordpress.org/latest-it_IT.tar.gz && tar -xvzf latest-it_IT.tar.gz && mv -v wordpress/* /var/www/html && rm -rf latest-it_IT.tar.gz wordpress && chown -R www-data:www-data /var/www/html && sudo chmod -R 755 /var/www/htmlPer aggiornare l’autorizzazione in futuro, utilizzare il comando seguente
chown -R www-data:www-data /var/www/ && sudo chmod -R 755 /var/www9. Aggiornamento del DNS
Se state ospitando WordPress in locale, volete bypassare il proxy o volete eseguire una migrazione senza tempi di inattività, questo passaggio è utile. In genere, preferisco l’area statica di WordPress Dev.😉
- Ci sono due modi per puntare il DNS. Se si sta migrando un sito su Vultr e si vuole fare un test in locale, si può modificare il file hosts e puntare lì.
Per Windows
- Vai alle proprietà di
C:\Windows\System32\drivers\etc\hosts - Modificare l’autorizzazione “Sicurezza” in controllo completo per il nome utente corrente.
- Ora è possibile modificare liberamente il file hosts sotto il proprio utente di sistema e salvarlo.
# Per la stessa macchina si può avere un indirizzo localhost oppure un IP pubblico.
127.0.0.1 example.com
127.0.0.1 www.example.com
Ecco come dovrebbe apparire.
Per Mac o Linux
È possibile modificare il file hosts utilizzando il seguente comando
sudo nano /etc/hostsAggiornamento del DNS con Cloudflare
- Se tutto è perfetto e si vuole rendere il sito attivo, accedere al DNS di Cloudflare e aggiornare il nuovo IP.
| A | @ | IPV4 address |
| AAAA | @ | IPV6 address |
| CNAME | www | example.com |
dove @ indica il dominio nudo example.com
9. Visitate il vostro nome di dominio per configurare WordPress
Se si desidera mantenere il dominio della versione non www per il proprio WordPress, visitare la versione non www altrimenti www.
https://example.com- Fornire le credenziali di accesso al database per iniziare l’installazione di WordPress.
- Eseguire l’installazione
- Compilate i dati di base del vostro nuovo sito e installate WordPress.
- Accesso a WordPress
- Se si è utilizzato il blocco server FastCGI, la prima cosa da fare è installare il plugin NGINX Cache e configurare /var/www/cache come percorso della cache.
Altre cose necessarie
Utilizzare i servizi del plugin SMTP per l’invio di e-mail in uscita da WordPress, altrimenti non sarà possibile ricevere il link per la reimpostazione della password e il modulo di contatto 7.
Infine, l’installazione di WordPress è stata completata. Conservate sempre un backup.
Vi ringrazio molto per il tempo che avete dedicato alla lettura di questo articolo. Ci vediamo nel prossimo tutorial!
Exactly followed the same steps, but at the end i am getting 502 bad gateway. I built some sites with the same steps before, however i don’t know what changed now.
Consider checking the error log using command
tail -f /var/log/nginx/error.logto get a hint about exact issue.getting this
tail: cannot open ‘/var/log/error.log’ for reading: No such file or directory
tail: no files remaining
Sorry, there was a typo in my previous comment. Try below command
tail -f /var/log/nginx/error.logCan you explain me what is the difference between inactive and fastcgi_cache_valid values? Can you explain them please? Thanks
location ~* .(css|gif|ico|svg|jpeg|jpg|js|png)$ {
expires 1y;
log_not_found off;
}
is this code for page caching?
I use cloudflare so it has page cache too.
If i use that can i remove it from codes?
Can you please explain what is this code for?
Thanks
That code is for setting up 1 year browser caching for static files. You may use Cloudflare Page caching as normally you do. There shouldn’t be any problem.
For Nginx cache helper (I take this info from offical site
There’s a ‘purge all’ button? Does it purge the whole site?
Yes, it does. It physically empties the cache directory. It is set by default to /var/run/nginx-cache/.
So the default is /var/run/nginx-cache/
can we change fastcgi_cache_path /var/www/cache to /var/run/nginx-cache/ ?
Thanks
Se la cartella della cache è diversa, è possibile sovrascriverla nel file wp-config.php aggiungendo.
define('RT_WP_NGINX_HELPER_CACHE_PATH','/var/www/nginx-cache/');I finally installed wordpress with this guide. But I see only www version but not the non-www version. Is there any changes that I need to do.
Redirects to www version even If I enter non-www version.
You need to point DNS records for both hostnames. Second, make sure dot is not missing from the beginning of example.com in this code –
server_name .example.com;in the NGINX connfig at step 6. Another thing, Redirect from www to non-www or vice-versa (as neccessary) is taken care automatically from WordPress. You do not need to put any extra code for it.which is the best & compatible server side cache plugin If I use FastCGI server block code along with Nginx Cache plugin..
W3 Total Cache or WP Rocket
I have 2 questions
1) What if i have 2 domains on different cloudflare accounts?
Create a cloudflare.ini file inside /root/.secrets/ directory.
mkdir -p /root/.secrets/ && cd /root/.secrets/ && nano cloudflare.ini
Add below code and save using CTRL+O and exit using CTRL+X
dns_cloudflare_email = “[email protected]”
dns_cloudflare_api_key = “XXXXXXXXXXXXXXXXX”
/root/.secrets/1domaincloudfare.ini
/root/.secrets/2domaincloudfare.ini
certbot certonly –dns-cloudflare –dns-cloudflare-credentials 1domaincloudfare.ini -d example.com,*.1domain.com –preferred-challenges dns-01
certbot certonly –dns-cloudflare –dns-cloudflare-credentials 2domaincloudfare.ini -d example.com,*.2domain.com –preferred-challenges dns-01
Do this work?
2) If we have 2 domains in the same account on cloudflare can we use 1 cloudflare.ini
certbot certonly –dns-cloudflare –dns-cloudflare-credentials /root/.secrets/cloudflare.ini -d 1domain.com,*.example.com –preferred-challenges dns-01
certbot certonly –dns-cloudflare –dns-cloudflare-credentials /root/.secrets/cloudflare.ini -d 2domain.com,*.example.com –preferred-challenges
dns-01
3) If we dont use cloudflare what will our ns for domain?
CLoud VPNs IP?
ns1= 68.28.65.84
ns2= 68.28.65.84
Is this right?
thanks for your replies
1. True
2. True
3. I have no idea about it. I prefer using CF DNS.
Can we create multi wordpress sites on different domain in the same machine with this
method?
I think only changement is in the FastCGI?
server {
root /var/www/aaa.com/wordpress;
index index.php index.html index.htm;
server_name .aaa.com;
client_max_body_size 0;
server {
root /var/www/bbb.com/wordpress;
index index.php index.html index.htm;
server_name .bbb.com;
client_max_body_size 0;
server {
root /var/www/ccc.com/wordpress;
index index.php index.html index.htm;
server_name .ccc.com;
client_max_body_size 0;
is this make a problem cache path is the same path for 3 web site? /var/www/cache
Is this method works?
1 machine 3 different domain and wordpress?
Thanks
Not for multiple sites.
What do you think about Plesk Panel?
It is easy to install plesk and create a wordpress site.
Easy to find trial keys and we can use it unlimited.
If it expires sites goes on ftp works and only plesk panel does not work but there are too much trial keys
It has nginx cache.
Do you recommend why and why not?
Thanks
I do not trust 3rd-parties installers.
Do all commands work for Centos 8?
Sorry, this is for Ubuntu OS only not for Centos 8.
hello gulshanji i wanted to use cloudflare ssl direct from thier website and not thru api with fast cgi then what would the config
Hey bro what is your thoughts on EasyEngine and SlickStack etc or one click app instead to automate? what is your favorite and will you make any tut bro
Sure, there is one. I will post about it. Thanks for your feedback.
The FastCGI server block config throws 404 Errors.
fastcgi_pass unix:/run/php/php7.4-fpm-example.sock;
should be:
fastcgi_pass unix:/run/php/php7.4-fpm.sock;
And it is missing config for location /
This config must be defined:
location / {
try_files $uri $uri/ /index.php$is_args$args;
}
I see, it was intended for seperate user. But, to keep generic I have corrected. Thanks for pointing out.
Without the location / block only the home page was accessible.
When I added the below block i was able to access the post and pages.
location / {
try_files $uri $uri/ /index.php$is_args$args;
}
Hello Alpesh, Corrected. Thanks again for your tip.
It was a good article
Thanks for your comment.
Nice tutorial. Does it come with email hosting? Looking to make a small site in Singapore using VultrHF
E-mail is a different thing. G Suite by Google services is specialized in this segment.
What are the differences if any between doing this method and using the vultr 1 click install? I have also read about centminmod. Is that somrthing u will recommend for having a fast LEMP stack? Tnx
I alwyas keep this guide bookmarket to my web browser! You never know when I would need to setup a new LEMP server ! Thanks Gulshan
Thanks for your comment.
hi, Gulshan thanks for sharing.
can u please share how to install wp on subfoler?
This article is like Life-Saver for one of my website. I was about to move from Google Cloud to Digital Ocean because the trial was expired and I also wanted to use DigitaOcean because it is in-expensive yet powerful and gives great experience.
Previously, I used webinoly stack which was straightforward for installing WordPress but later on I got to know from Gulshan that there are so many issues with that stack so, this time I was going to do it manually. I checked the official guide by Digital ocean but end up with many confusion and issues. Then, I fortunately asked Gulshan for help and he recommended this article for me.
I installed WordPress easily and very fast even fast that Webinoly stack. Thanks a lot Gulshan for writing this amazing article. Hats off to you bro!!🎩
Hi Gulshan, I am also receiving the test failed error on step 7. I have tried several times now on different setup and still stuck here. Please could you help?
Please carefully read the post and then copy-paste code in Terminal. Sometime you need to replace with your own domain. Doing mistake can return error. Else, no wise. I use this guide everyday for myself. I am not aware about any problem.
In case of trouble
1. Run test using
nginx -t2. Check logs to get proper hint
tail -f /var/log/nginx/error.log3. Delete existing or earlier created virtualhost
rm /etc/nginx/sites-available/default && rm /etc/nginx/sites-enabled/default4. Make sure to replace example.com at all places, a) when you create conf file, its naming. b) when you add conf file and c) when you create symlink, check your command its conf file name must match with first process.
I feel in most cases, chances are you did not replaced
server_name .example.com;to own domain, or you did not obtained SSL. All steps are written in serial order as it should be.I am facing problem of infinite loop redirects. I had use fastcache code. how to fix it
Please try Full SSL mode of Cloudflare. Then check again!
How to check if fastcgi cache is working or not? while running sudo
curl -I https://example.comit is not showing x-cache parameterHey Gulshan,
In the 7th step while texting ngnix I got
nginx: [emerg] open() “/etc/nginx/sites-enabled/example.com” failed (2: No such file or directory) in /etc/nginx/nginx.conf:62
nginx: configuration file /etc/nginx/nginx.conf test failed
This error. How I can solve it? also what the error.
Please delete your existing server block and create again at sites-available and symlink at sites-enabled directory. The step 6 and 7 cover that clearly. Consider following patiently without any error. If you still face any problem, do let me know. Thanks for taking to leave your valuable comment.
Hi would like to know after configuring Fastcgi do we still need other caching plugin to speed up WordPress site?
Wonderful tutorial just complete solution for Nginx Fast CGI
Thanks Wasim for your kind feedback.
How Can I setup FastCGI on my ngnix server guided by you….
I have updated my article.
i want redirect too www plz help me urgent
If your WordPress General Settings has www version, server will do automatically. No additional action is required. In case you started WordPress installation at non-www version, then you need to migrate by changing at Database level.
You may use Better Search Replce plugin to perform this changes.
It Really Works Gulshan Bro. Thanks Really dear You are awesome…
Hello Gulshan Bro, First i want to say you that this is very beautiful and required post. I am really appreciating your work. but i have a problem can you please tell me
i have a droplet with digitalocean ($5/month plan) and i want to host multiple wordpress sites only with nginx(lemp ubuntu 18.04).
In simple i mean that this tutorial is complete to install a single wordpress and i did it but tell host it in some other sites
Hey Rohit,
Assuming, second site is example2.org
You need to follow steps this way.
1. create a new directory and add WordPress (Ref: steps 31)
cd /var/www/mkdir example2
wget https://wordpress.org/latest.tar.gz
tar -xvzf latest.tar.gz
mv -v wordpress/* /var/www/example2
rm -rf index.nginx-debian.html latest.tar.gz wordpress
chown -R www-data:www-data /var/www/
sudo chmod -R 755 /var/www
2. Create a new Server block with root path located to new directory as created in step 1.
cd /etc/nginx/sites-available/

nano gulshankumar-org
server {listen 80;
root /var/www/example2;
index index.php index.html index.htm;
server_name example2.org www.example2.org;
...
3. Point your example2.org domain to DNS, then install SSL
certbot --nginx -d example2.org -d www.example2.org4. Create new MySQL database
sudo mysql -u root -pcreate database example2;
grant all on example2.* to example2@localhost identified by 'TYPE HERE PASSWORD';
flush privileges;
exit;
5. Proceed to Installation by visiting your site
https://example2.orgLet me know if you have any additional question. You can always visit our forum for quick assistance.
Thanks & Regards,
Gulshan
It Really Works Gulshan Bro. Thanks Really dear You are awesome…
Hello Gulshan you written a comprehensive guide i highly appreciate your work. Can you help me with an error? Actually i have two websites the first website i have already hosted on Vultr following the above guide.
But when try to host a another WordPress website iam getting error. I followed the above steps you mentioned in comments. But still not able to fix it. The error is my website not working after hosting another WordPress website.
If possible please guide me step by step instructions. It will help me alot. Thanks in advance.
Consider checking log available at
/var/log/nginx/directory. Usenginx -tcommand to see what mistake causing issue.Very well. thank you so much
How to auto-renew SSL?
Add below cron job
crontab -eAdd below command and save.
15 3 * * 7 certbot renew --post-hook "service nginx restart"Thanks sos un groso, very well tutorial
Thank you for your tutorial, its the first one that actually showed me the wordpress setup page.
When I went to upload a plugin I received this message. “The uploaded file exceeds the upload_max_filesize directive in php.ini”
How do I increase the max filesize?
Please see the step 33.5
Thanks Gulshan, Finally I moved to NGINX server. You have created a great tutorial for beginners.
You’re welcome bro 🙂
Hi,
Thank you for this awesome guide.
How can I install WordPress multisite on Ubuntu 18.04 with Nginx?
Finally I loved this step by step tutorial with proper images.
Thanks Bhaiya you are awesome
Thanks a lot Gulshan. You save my breath
I search everywhere but not find any good article
You explained very well along with security concern
well done