Σε αυτό το άρθρο, θα μάθετε τη διαδικασία της χειροκίνητης εγκατάστασης του WordPress σε έναν διακομιστή Ubuntu 22.04 χρησιμοποιώντας NGINX, MariaDB και PHP 8.2. Αυτή η στοίβα θα παρέχει μια ισχυρή και αποτελεσματική πλατφόρμα για τη λειτουργία του ιστότοπου WordPress σας με εκπληκτική ταχύτητα.
Ακολουθήστε αυτά τα 3 βήματα και παρακολουθήστε το βίντεο. Χρειάζεστε βοήθεια; Επικοινωνήστε μαζί μου. 😊
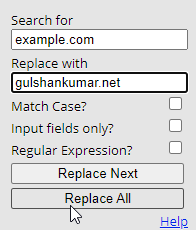
Πριν ξεκινήσετε, να μια γρήγορη συμβουλή. Χρησιμοποιήστε την Αναζήτηση και αντικατάσταση επέκτασης για να αλλάξετε μαζικά το
Συμβουλή εξοικονόμησης χρόνου για τους χρήστες του Google Chrome.example.comμε το δικό σας domain σε αυτή την ιστοσελίδα.
Μέρος Α: Διατηρήστε ενεργούς τους διακομιστές ονομάτων του Cloudflare
Θα χρησιμοποιήσουμε το Cloudflare DNS για την απόκτηση του πιστοποιητικού Let’s Encrypt Wildcard SSL. Ολοκληρώστε πρώτα αυτό το βήμα για να απολαύσετε τη μετάβαση χωρίς καθυστέρηση.
Έλεγχος τρεχόντων διακομιστών ονομάτων
- Βρείτε τους ενεργούς Nameservers σας στο https://www.whatsmydns.net/#NS/example.com
- Εάν βλέπετε ότι χρησιμοποιείτε το προεπιλεγμένο NS του προηγούμενου καταχωρητή φιλοξενίας ή domain σας, τότε πρέπει να το αντικαταστήσετε με το Cloudflare.
- Μάθετε πώς να χρησιμοποιείτε το Cloudflare DNS
Μέρος Β: Ετοιμάστε έναν διακομιστή Ubuntu Server 22.04 LTS Server

1. Εγγραφείτε στο Vultr για να πάρετε $100 Δωρεάν πιστώσεις (Ισχύει για 30 ημέρες)
Ως κάποιος που έχει δοκιμάσει τόσες πολλές εταιρείες διακομιστών Cloud, η εμπειρία μου λέει ότι δεν μπορείτε να κάνετε λάθος με τη Vultr. Αυτοί οι τύποι είναι γνήσιοι και προσεκτικοί όταν πρόκειται για υποστήριξη και υπηρεσίες.

⚡ Επιδόσεις
- NVME / SSD
- 3.7 GHz CPU
- Ταχύτητα δικτύου έως 5Gbps
- Datacenter in America, Europe, Asia, Austraillia
- IPV6 ready
💡 Χαρακτηριστικά
- Ταμπλό φιλικό προς αρχάριους
- Ένα κλικ για στιγμιότυπο
- Automtatic Backup (επί πληρωμή)
- Δωρεάν Cloud Firewall
- DDoS protection (Paid)
- 100% KVM Virtualization
⚙ Υποστήριξη
- PayPal/Card
- 24/7 Υποστήριξη εισιτηρίων
- Τεκμηρίωση
2. Δημιουργία νέου διακομιστή VPS
Απλά κάντε κλικ στο κουμπί συν για να ξεκινήσετε
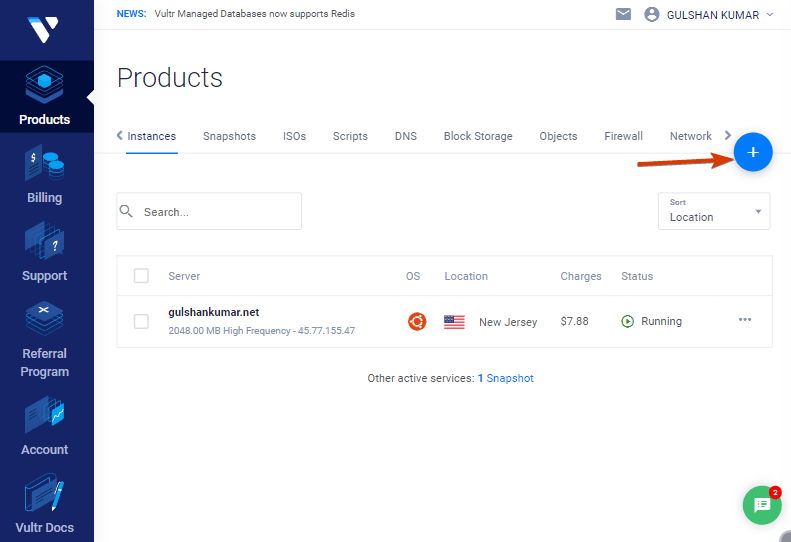
3. Επιλέξτε Υψηλή συχνότητα Διακομιστής

4. Επιλέξτε μια Θέση διακομιστή
Επιλέξτε μια τοποθεσία διακομιστή που βρίσκεται κοντά στο κοινό-στόχο σας.
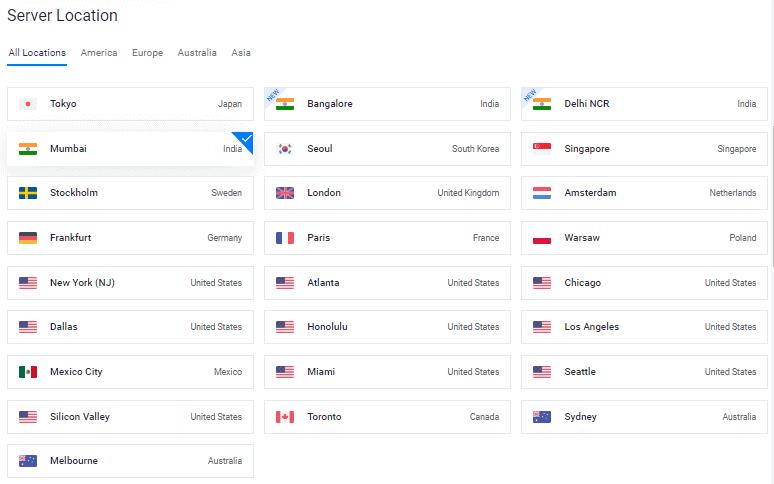
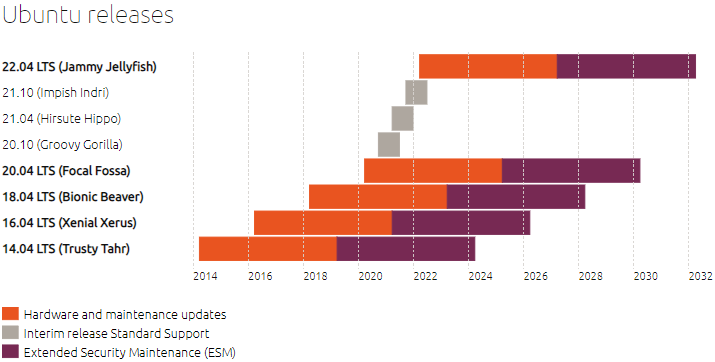
5. Επιλέξτε το λειτουργικό σύστημα Ubuntu 22.04 x64
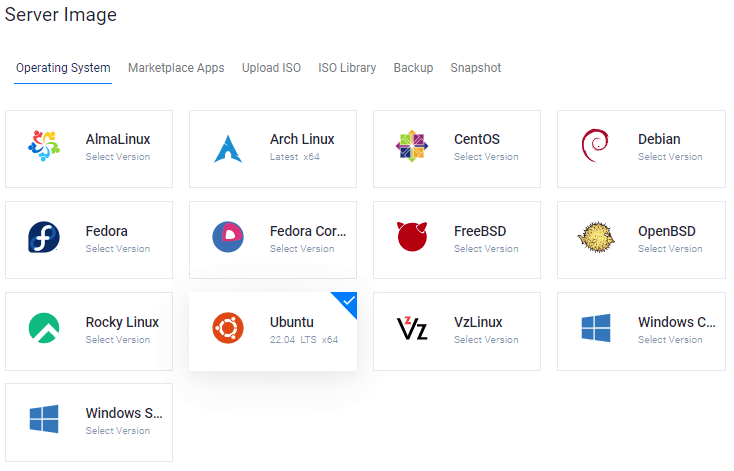
Η μακροχρόνια υποστήριξη (LTS) είναι μια πολιτική διαχείρισης του κύκλου ζωής ενός προϊόντος κατά την οποία μια σταθερή έκδοση λογισμικού υπολογιστών διατηρείται για μεγαλύτερο χρονικό διάστημα από την τυπική έκδοση.
6. Επιλέξτε μέγεθος διακομιστή
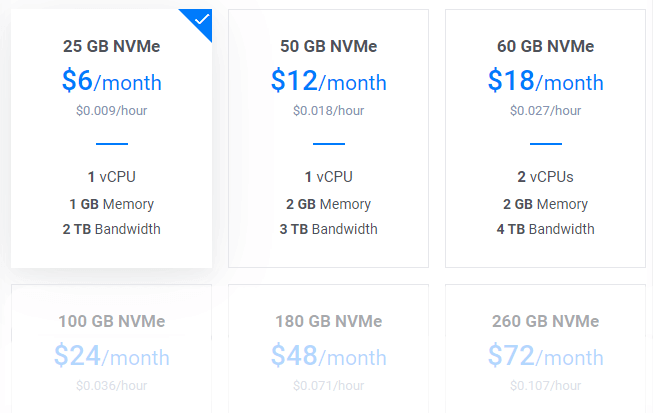
Το πρόγραμμα $6/mo θα ήταν ένα εξαιρετικό σημείο εκκίνησης για ένα νέο ιστολόγιο. Μπορείτε να το αναβαθμίσετε ανά πάσα στιγμή σύμφωνα με τις απαιτήσεις.
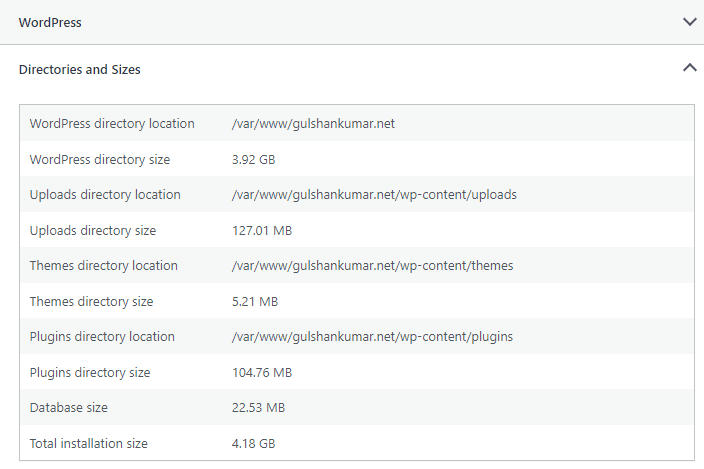
Συμβουλή: Εάν πραγματοποιείτε μετεγκατάσταση, ελέγξτε το Συνολικό μέγεθος εγκατάστασης στις πληροφορίες για την υγεία της τοποθεσίας.
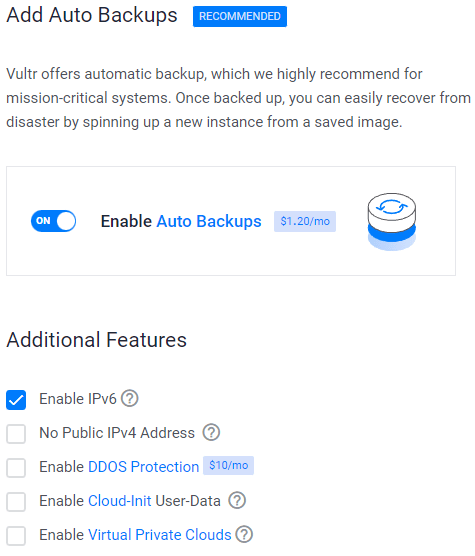
7. Ενεργοποίηση IPV6, Δημιουργία αντιγράφων ασφαλείας
8. Προσθέστε ένα κλειδί SSH
Αυτό είναι ένα συνιστώμενο, προαιρετικό βήμα για την ενισχυμένη ασφάλεια.
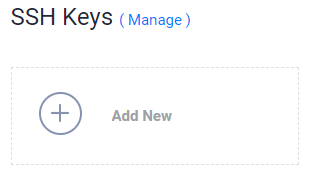
- Κάντε κλικ στο κουμπί Προσθήκη νέου για να προσθέσετε ένα νέο κλειδί SSH για να υποβάλετε το 🔒Δημόσιο κλειδί σας.
- Δημιουργήστε κλειδιά χρησιμοποιώντας την παρακάτω μέθοδο σύμφωνα με το λειτουργικό σας σύστημα.

- Κατεβάστε την εφαρμογή PuTTy.
- Αναζητήστε το PuTTygen στο μενού Έναρξη
- Κάντε κλικ στο κουμπί Generate και αιωρήστε το δείκτη του ποντικιού.
- Αντιγράψτε το δημόσιο κλειδί και δώστε το στη Vultr
- Εισάγετε τη συνθηματική φράση του κλειδιού
- Αποθηκεύστε το 🔑Private Key στην ασφαλέστερη τοποθεσία.
- Αυτό μπορεί να χρησιμοποιηθεί για σύνδεση σε SSH ή SFTP.

- Τρέξτε:
ssh-keygen -t rsa. Για ένα πιο ασφαλές κλειδί 4096-bit, εκτελέστε:ssh-keygen -t rsa -b 4096 - Πατήστε enter όταν σας ζητηθεί να αποθηκεύσετε το κλειδί (θα χρησιμοποιηθεί η προεπιλεγμένη θέση).
- Εισάγετε μια συνθηματική φράση για το κλειδί σας.
- Εκτελέστε
cat ~/.ssh/id_rsa.pub– αυτό θα σας δώσει το κλειδί στη σωστή μορφή για να το επικολλήσετε στον πίνακα ελέγχου. - Βεβαιωθείτε ότι έχετε δημιουργήσει αντίγραφο ασφαλείας του αρχείου
~/.ssh/id_rsaΑυτό δεν μπορεί να ανακτηθεί αν χαθεί.
Επιλέξτε το κλειδί SSH
Ακολουθώντας αυτά τα βήματα θα συνδέσετε το δημόσιο κλειδί σας με το νέο σας Instance. Στη συνέχεια, θα μπορείτε να συνδεθείτε στο SSH χρησιμοποιώντας τον κωδικό πρόσβασης απλού κειμένου και το κλειδί SSH.

9. Σύνδεσμος κανόνα τείχους προστασίας Web με Instance διακομιστή

- Κάντε κλικ στην επιλογή Διαχείριση και δημιουργήστε μια νέα ομάδα τείχους προστασίας.
- Επιτρέψτε τη θύρα TCP 22 για SSH. 80 για HTTP και 443 HTTPS για τους κανόνες IPV4 και IPV6.
- Μόλις γίνει αυτό, συνδέστε την ομάδα τείχους προστασίας με το Instance σας.
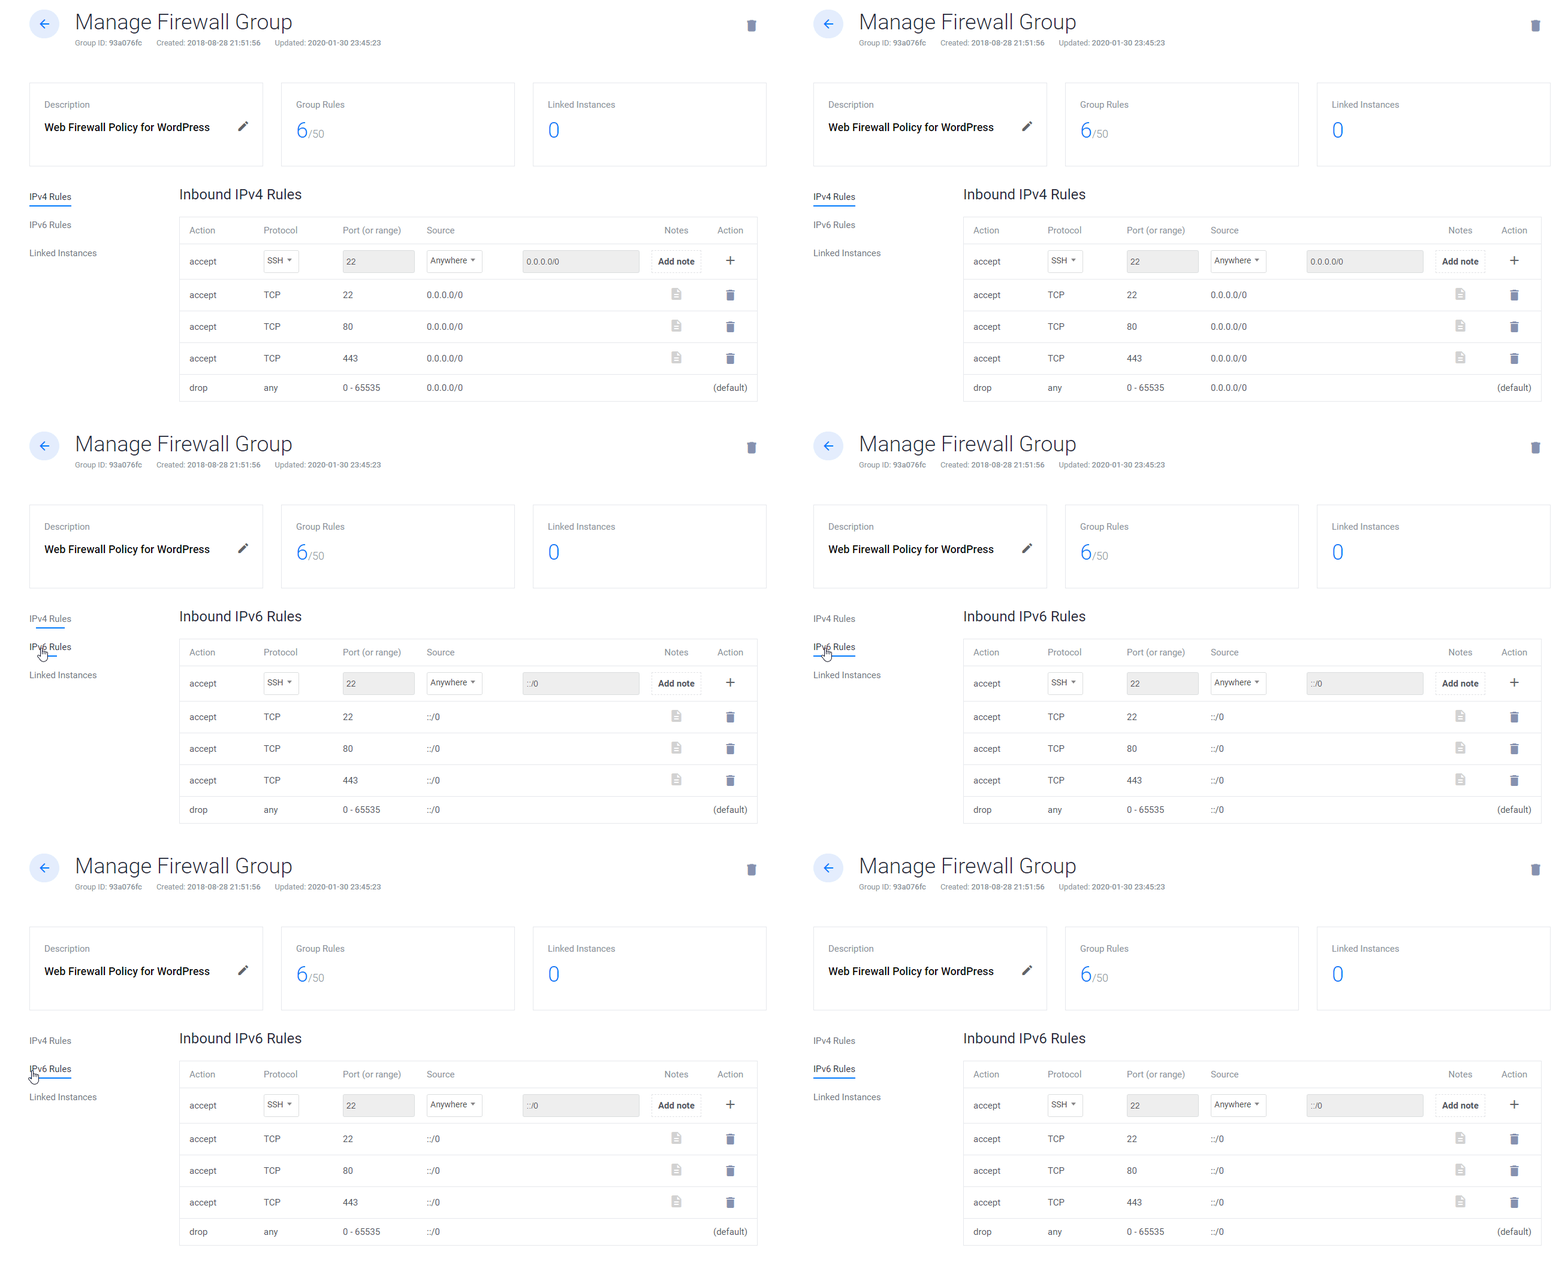
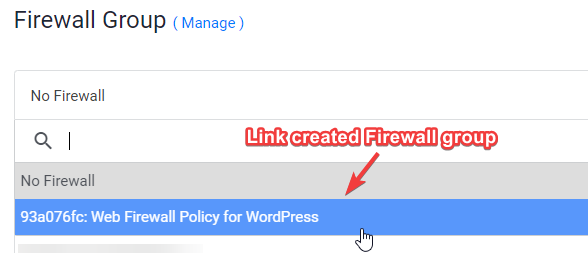
10. Εισάγετε το όνομα κεντρικού υπολογιστή και την ετικέτα κάντε κλικ στο Deploy Now
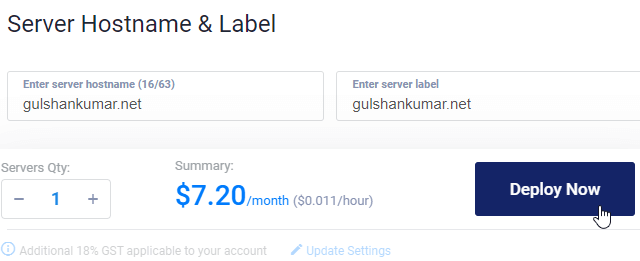
Τώρα, θα δείτε την εγκατάσταση στην πρόοδο
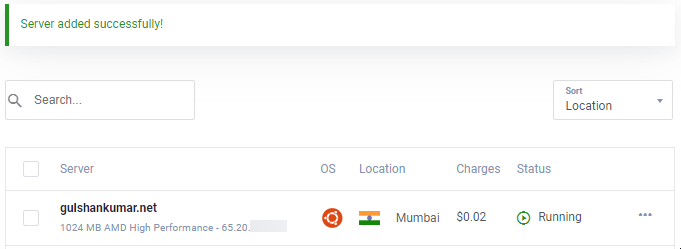
11. Μεταβείτε στη σελίδα New Instance
Αντιγράψτε τη διεύθυνση IP, το όνομα χρήστη και τον κωδικό πρόσβασης. Η προεπιλεγμένη θύρα σας είναι 22.
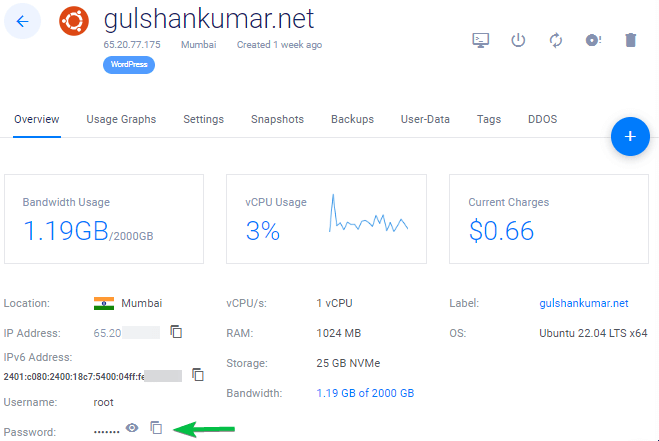
12. Απενεργοποίηση σύνδεσης με κωδικό πρόσβασης
Για λόγους ασφαλείας, συνιστάται να απενεργοποιήσετε τον έλεγχο ταυτότητας με κωδικό πρόσβασης και να επιτρέψετε μόνο τον έλεγχο ταυτότητας με βάση το κλειδί.
- Επεξεργαστείτε το αρχείο ρυθμίσεων
nano /etc/ssh/sshd_config - Εύρεση (CTRL + W) και αναζήτηση
PasswordAuthentication - Αλλαγή τιμής από ναι σε όχι
- Για να αποθηκεύσετε τον τύπο, CTRL + O
- Επανεκκινήστε την υπηρεσία SSH χρησιμοποιώντας την εντολή
sudo service ssh restart
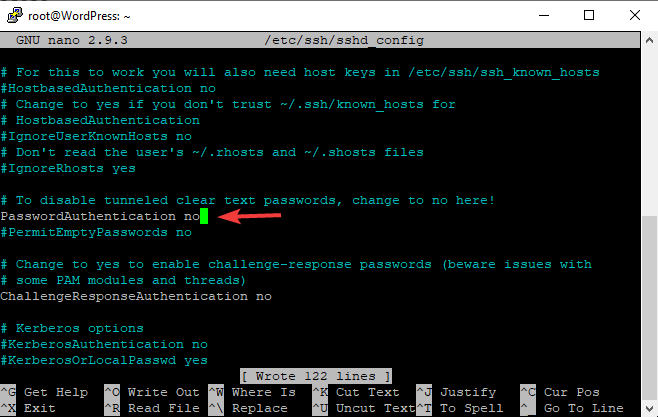
Από την επόμενη φορά, μπορείτε να χρησιμοποιήσετε το SSH μόνο μέσω κλειδιού, όπως φαίνεται στο βίντεο.
Για Linux ή Mac, χρησιμοποιήστε το Terminal με εντολή όπως αυτή
ssh root@192.168.1.1 -p 22 -i id_rsa
Βήμα 13. Απενεργοποίηση του UFW
Όταν αναπτύσσετε μια νέα περίπτωση στο VULTR, έρχεται με ενεργοποιημένο το UFW (Uncomplicated Firewall) που διατηρεί όλες τις θύρες αποκλεισμένες εκτός από τη θύρα SSH 22. Αυτό μπορεί να επιστρέψει το σφάλμα ERR_CONNECTION_REFUSED στο πρόγραμμα περιήγησης. Για να το διορθώσετε αυτό, θα πρότεινα να διατηρήσετε το UFW απενεργοποιημένο.
ufw disableΑρκετές εξηγήσεις για τα βασικά πράγματα. Τώρα, θα επιταχύνω την αρχική διαδικασία για την ανάπτυξη του WordPress στη στοίβα LEMP.
Μέρος Γ. Ανάπτυξη του WordPress στη στοίβα LEMP
1. Ενημέρωση αποθετηρίων
Πληκτρολογήστε την παρακάτω εντολή και πατήστε το πλήκτρο enter
sudo -sapt update && apt upgrade -y && apt dist-upgrade && apt autoclean && apt autoremove -y && rebootor
wget -qO update https://dl.gulshankumar.net/update && chmod +x updateΤην επόμενη φορά, χρησιμοποιήστε πάντα την παρακάτω εντολή συντόμευσης για ενημέρωση.
./update2. Εγκατάσταση της MariaDB με ασφάλεια
Συνδεθείτε ξανά και εισαγάγετε την ακόλουθη εντολή
sudo apt install mariadb-server -y && sudo mysql_secure_installationΑπαντήστε στις παρακάτω ερωτήσεις
- Enter current password for root (enter for none): Πατήστε το πλήκτρο Enter
- Switch to unix_socket authentication [Y/n]: Πληκτρολογήστε n και πατήστε το πλήκτρο Enter.
- Set root password? [Y/n]: Πατήστε το πλήκτρο Enter
- New password: Αντιγράψτε έναν ισχυρό κωδικό πρόσβασης από τη γεννήτρια κωδικών πρόσβασης Dashlane. Για να επικολλήσετε έναν κωδικό πρόσβασης στην κονσόλα SSH, κάντε δεξί κλικ και πατήστε το πλήκτρο Enter. Ο κωδικός πρόσβασης δεν θα είναι ορατός στην οθόνη.
- Re-enter new password: Κάντε δεξί κλικ και πατήστε ξανά το πλήκτρο Enter.
Μετά την επιτυχή ρύθμιση του κωδικού πρόσβασης, θα δείτε
Password updated successfully!
Reloading privilege tables..
... Success!
Επίσης, πρέπει να απαντήσετε στις ακόλουθες ερωτήσεις.
- Remove anonymous users? [Y/n]: Πατήστε το πλήκτρο Enter
- Disallow root login remotely? [Y/n]: Πατήστε το πλήκτρο Enter
- Remove test database and access to it? [Y/n]: Πατήστε το πλήκτρο Enter
- Reload privilege tables now? [Y/n]: Πατήστε το πλήκτρο Enter
3.Δημιουργήστε μια νέα βάση δεδομένων για το WordPress
Συνδεθείτε στη MySQL, πατήστε το πλήκτρο enter όταν σας ζητηθεί κωδικός πρόσβασης.
mysql -u root -pΔημιουργήστε μια νέα βάση δεδομένων και παραχωρήστε προνόμια για τη χρήση του χρήστη της με κωδικό πρόσβασης. Εδώ αποθηκεύει το WordPress όλες τις πληροφορίες για τις αναρτήσεις, τις σελίδες, τα θέματα, τα πρόσθετα κ.λπ.
create database wordpress;
grant all on wordpress.* to gulshan@localhost identified by '5pY8CKJxDRJEGQNkX7';
flush privileges;
exit;
Όπου η …
η βάση δεδομένων είναι wordpress
το όνομα χρήστη είναι gulshan
ο κωδικός πρόσβασης είναι 5pY8CKJxDRJEGQNkX7
Συμβουλή: Εξετάστε το ενδεχόμενο χρήσης μοναδικών διαπιστευτηρίων σύνδεσης
4. Εγκαταστήστε την PHP 8.2, το NGINX και ορίστε το Permission
sudo add-apt-repository ppa:ondrej/php -y && apt update && apt install php8.2-fpm php8.2-common php8.2-mysql php8.2-xml php8.2-xmlrpc php8.2-curl php8.2-gd php8.2-imagick php8.2-cli php8.2-dev php8.2-imap php8.2-mbstring php8.2-soap php8.2-zip php8.2-bcmath -y && sed -i 's/;cgi.fix_pathinfo=1/cgi.fix_pathinfo=0/g' /etc/php/8.2/fpm/php.ini && service php8.2-fpm restart && apt install nginx -y && chown -R www-data:www-data /var/www/ && chmod -R 755 /var/wwwΡύθμιση παραμέτρων PHP
Τα περισσότερα φανταχτερά θέματα και πρόσθετα απαιτούν ρυθμίσεις PHP υψηλών προδιαγραφών για να τρέξουν. Ως εκ τούτου, θα πρέπει να κάνουμε αυτές τις αλλαγές.
sed -i 's/memory_limit = 128M/memory_limit = 512M/g' /etc/php/8.2/fpm/php.ini
sed -i 's/post_max_size = 8M/post_max_size = 128M/g' /etc/php/8.2/fpm/php.ini
sed -i 's/max_file_uploads = 20/max_file_uploads = 30/g' /etc/php/8.2/fpm/php.ini
sed -i 's/max_execution_time = 30/max_execution_time = 900/g' /etc/php/8.2/fpm/php.ini
sed -i 's/max_input_time = 60/max_input_time = 3000/g' /etc/php/8.2/fpm/php.ini
sed -i 's/upload_max_filesize = 2M/upload_max_filesize = 128M/g' /etc/php/8.2/fpm/php.ini
service php8.2-fpm restart
5. Install Wildcard Let’s Encrypt SSL Certificate
Δημιουργήστε ένα αρχείο cloudflare.ini μέσα στον κατάλογο /root/.secrets/
mkdir -p /root/.secrets/ && cd /root/.secrets/ && nano cloudflare.iniΠροσθέστε τον παρακάτω κώδικα και αποθηκεύστε χρησιμοποιώντας CTRL+O και βγείτε χρησιμοποιώντας CTRL+X
dns_cloudflare_email = "your-cloudflare-email@example.com"
dns_cloudflare_api_key = "XXXXXXXXXXXXXXXXX"
Βρείτε το e-mail σας στο Cloudflare και το Global API key στο “My Profile” > API Tokens > Global API Key
chmod 0400 /root/.secrets/cloudflare.iniΕγκαταστήστε το Certbot και το DNS Authenticator σύμφωνα με το λειτουργικό σύστημα και τον διακομιστή ιστού HTTP
snap install --beta --classic certbot
snap set certbot trust-plugin-with-root=ok
snap install --beta certbot-dns-cloudflare
snap connect certbot:plugin certbot-dns-cloudflare
Αποκτήστε πιστοποιητικό SSL Wildcard
certbot certonly --dns-cloudflare --dns-cloudflare-credentials /root/.secrets/cloudflare.ini -d example.com,*.example.com --preferred-challenges dns-01Ορισμός αυτόματης ανανέωσης χρησιμοποιώντας την εργασία Cron
- Τύπος
crontab -e - Τύπος 1 για τον επεξεργαστή nano
- Εισάγετε την παρακάτω εντολή και αποθηκεύστε
0 0 * * * /etc/init.d/nginx reload >/dev/null 2>&1Ανανέωση δοκιμής
certbot renew --dry-run6. Ρύθμιση του μπλοκ διακομιστή Nginx
Αυτό είναι σημαντικό όπου πρέπει να ρυθμίσετε τον τομέα σας, πώς το NGINX θα πρέπει να χειρίζεται τα αιτήματα HTTP.
Διαγραφή προεπιλεγμένων μπλοκ διακομιστή.
rm /etc/nginx/sites-available/default && rm /etc/nginx/sites-enabled/defaultΔημιουργήστε ένα νέο μπλοκ διακομιστή
cd /etc/nginx/sites-available/
nano example.com- Αντικαταστήστε το
example.comμε το δικό σας domain - Εισάγετε τον παρακάτω κώδικα και πατήστε ctrl+o για να αποθηκεύσετε και ctrl+x για έξοδο.
Γενικά
server {
    listen         80;
    return 301 https://$host$request_uri;
}
server {
# Document Root
root /var/www/html;
index index.php index.html index.htm;
server_name .example.com;
client_max_body_size 0;

    listen [::]:443 ssl http2 ipv6only=on;
    listen 443 ssl http2;
        ssl_protocols TLSv1.1 TLSv1.2 TLSv1.3;
        ssl_certificate /etc/letsencrypt/live/example.com/fullchain.pem;
        ssl_certificate_key /etc/letsencrypt/live/example.com/privkey.pem;
        ssl_prefer_server_ciphers on;
        ssl_session_cache   shared:SSL:20m;
        ssl_session_timeout 20m;
        ssl_ciphers 'TLS13+AESGCM+AES128:EECDH+AES128';


error_page 404 /404.html;
error_page 500 502 503 504 /50x.html;

# Block XMLRPC
location = /xmlrpc.php {
    deny all;
}

location / {
    try_files $uri $uri/ /index.php$is_args$args;
}

location ~* \.php$ {
if ($uri !~ "^/uploads/") {
fastcgi_pass unix:/run/php/php8.2-fpm.sock;
}
include fastcgi_params;
fastcgi_param SCRIPT_FILENAME $document_root$fastcgi_script_name;
fastcgi_param SCRIPT_NAME $fastcgi_script_name;
}
location = /favicon.ico {
log_not_found off;
access_log off;
}

location = /robots.txt {
log_not_found off;
access_log off;
allow all;
}

location ~* .(css|gif|svg|ico|woff2|eot|jpeg|webp|jpg|js|png)$ {
expires 1y;
log_not_found off;
}

# Enable Gzip compression.
gzip on;

# Disable Gzip on IE6.
gzip_disable "msie6";

# Allow proxies to cache both compressed and regular version of file.
# Avoids clients that don't support Gzip outputting gibberish.
gzip_vary on;

# Compress data, even when the client connects through a proxy.
gzip_proxied any;

# The level of compression to apply to files. A higher compression level increases
# CPU usage. Level 5 is a happy medium resulting in roughly 75% compression.
gzip_comp_level 5;

# Compress the following MIME types.
gzip_types
 application/atom+xml
 application/javascript
 application/json
 application/ld+json
 application/manifest+json
 application/rss+xml
 application/vnd.geo+json
 application/vnd.ms-fontobject
 application/x-font-ttf
 application/x-web-app-manifest+json
 application/xhtml+xml
 application/xml
 font/opentype
 image/bmp
 image/svg+xml
 image/x-icon
 text/cache-manifest
 text/css
 text/plain
 text/vcard
 text/vnd.rim.location.xloc
 text/vtt
 text/x-component
 text/x-cross-domain-policy;
}
Για cache Enabler
server {
    listen         80;
    return 301 https://$host$request_uri;
}
server {
# Document Root
root /var/www/html;
index index.php index.html index.htm;
server_name .example.com;
client_max_body_size 0;

    listen [::]:443 ssl http2 ipv6only=on;
    listen 443 ssl http2;
        ssl_protocols TLSv1.1 TLSv1.2 TLSv1.3;
        ssl_certificate /etc/letsencrypt/live/example.com/fullchain.pem;
        ssl_certificate_key /etc/letsencrypt/live/example.com/privkey.pem;
        ssl_prefer_server_ciphers on;
        ssl_session_cache   shared:SSL:20m;
        ssl_session_timeout 20m;
        ssl_ciphers 'TLS13+AESGCM+AES128:EECDH+AES128';


error_page 404 /404.html;
error_page 500 502 503 504 /50x.html;


# Block XMLRPC
location = /xmlrpc.php {
    deny all;
}


# Rules for Cache Enabler Plugin - Static File Serving

    set $cache_uri $request_uri;

    # bypass cache if POST requests or URLs with a query string
    if ($request_method = POST) {
    set $cache_uri 'nullcache';
    }

    if ($query_string != '') {
    set $cache_uri 'nullcache';
    }

    # bypass cache if URLs containing the following strings
    if ($request_uri ~* '(/wp-admin/|/xmlrpc.php|/wp-(app|cron|login|register|mail).php|wp-.*.php|/feed/|index.php|wp-comments-popup.php|wp-links-opml.php|wp-locations.php|sitemap(index)?.xml|[a-z0-9-]+-sitemap([0-9]+)?.xml)') {
    set $cache_uri 'nullcache';
    }

    # bypass cache if cookies contain the following strings
    if ($http_cookie ~* '(wp-postpass|wordpress_logged_in|comment_author)_') {
    set $cache_uri 'nullcache';
    }

    # custom installation subdirectory
    set $custom_subdir '';

    # default HTML file
    set $cache_enabler_uri '${custom_subdir}/wp-content/cache/cache-enabler/${http_host}${cache_uri}${scheme}-index.html';

    # WebP HTML file
    if ($http_accept ~* 'image/webp') {
    set $cache_enabler_uri '${custom_subdir}/wp-content/cache/cache-enabler/${http_host}${cache_uri}${scheme}-index-webp.html';
    }

    location / {
    gzip_static on; # this directive is not required but recommended
    try_files $cache_enabler_uri $uri $uri/ $custom_subdir/index.php?$args;
    }

location ~* \.php$ {
if ($uri !~ "^/uploads/") {
fastcgi_pass unix:/run/php/php8.2-fpm.sock;
}
include fastcgi_params;
fastcgi_param SCRIPT_FILENAME $document_root$fastcgi_script_name;
fastcgi_param SCRIPT_NAME $fastcgi_script_name;
}
location = /favicon.ico {
log_not_found off;
access_log off;
}

location = /robots.txt {
log_not_found off;
access_log off;
allow all;
}

location ~* .(css|gif|svg|ico|jpeg|webp|woff2|eot|jpg|js|png)$ {
expires 1y;
log_not_found off;
}

# Enable Gzip compression.
gzip on;

# Disable Gzip on IE6.
gzip_disable "msie6";

# Allow proxies to cache both compressed and regular version of file.
# Avoids clients that don't support Gzip outputting gibberish.
gzip_vary on;

# Compress data, even when the client connects through a proxy.
gzip_proxied any;

# The level of compression to apply to files. A higher compression level increases
# CPU usage. Level 5 is a happy medium resulting in roughly 75% compression.
gzip_comp_level 5;

# Compress the following MIME types.
gzip_types
 application/atom+xml
 application/javascript
 application/json
 application/ld+json
 application/manifest+json
 application/rss+xml
 application/vnd.geo+json
 application/vnd.ms-fontobject
 application/x-font-ttf
 application/x-web-app-manifest+json
 application/xhtml+xml
 application/xml
 font/opentype
 image/bmp
 image/svg+xml
 image/x-icon
 text/cache-manifest
 text/css
 text/plain
 text/vcard
 text/vnd.rim.location.xloc
 text/vtt
 text/x-component
 text/x-cross-domain-policy;
}- Πρέπει να εγκαταστήσετε το πρόσθετο Cache Enabler για να επωφεληθείτε από το πλεονέκτημα της κρυφής μνήμης.
FastCGI
Αν θέλετε να χρησιμοποιήσετε την FastCGI Cache, τότε εφαρμόστε το παρακάτω Server Block.
# NGINX Cache path
fastcgi_cache_path /var/run/nginx-cache levels=1:2 keys_zone=WORDPRESS:100m inactive=6h;
fastcgi_cache_key "$scheme$request_method$host$request_uri";
fastcgi_cache_use_stale error timeout invalid_header http_500;
fastcgi_ignore_headers Cache-Control Expires Set-Cookie;

server {
    listen         80;
    return 301 https://$host$request_uri;
}
server {
root /var/www/html;
index index.php index.html index.htm;
server_name .example.com;
client_max_body_size 0;

    listen [::]:443 ssl http2 ipv6only=on;
    listen 443 ssl http2;
        ssl_protocols TLSv1.1 TLSv1.2 TLSv1.3;
        ssl_certificate /etc/letsencrypt/live/example.com/fullchain.pem;
        ssl_certificate_key /etc/letsencrypt/live/example.com/privkey.pem;
        ssl_prefer_server_ciphers on;
        ssl_session_cache   shared:SSL:20m;
        ssl_session_timeout 20m;
        ssl_ciphers 'TLS13+AESGCM+AES128:EECDH+AES128';

error_page 404 /404.html;
error_page 500 502 503 504 /50x.html;


set $skip_cache 0;
    if ($request_method = POST) {set $skip_cache 1;}
    if ($request_uri ~* "/wp-admin/|/xmlrpc.php|/wp-.*.php|index.php|sitemap") {set $skip_cache 1;}
    if ($http_cookie ~* "comment_author|wordpress_[a-f0-9]+|wp-postpass|wordpress_no_cache|wordpress_logged_in") {set $skip_cache 1;}
    if ($query_string = "unapproved*") {set $skip_cache 1;}
    if ($cookie_woocommerce_items_in_cart = "1" ){ set $skip_cache 1;}
    if ($request_uri ~* "/(cart|checkout|my-account)/*$") {set $skip_cache 1;}

# Block XMLRPC
location = /xmlrpc.php {
    deny all;
}

location / {
try_files $uri $uri/ /index.php$is_args$args;
}

location ~* \.php$ {

 if ($uri !~ "^/uploads/") {
        fastcgi_pass unix:/run/php/php8.2-fpm.sock;
        }

        try_files                       $uri =404;
        include                         /etc/nginx/fastcgi_params;
        fastcgi_param                   SCRIPT_FILENAME $document_root$fastcgi_script_name;
        fastcgi_pass                    unix:/run/php/php8.2-fpm.sock;
        fastcgi_index                   index.php;
                fastcgi_cache_bypass $skip_cache;
                fastcgi_no_cache $skip_cache;
                fastcgi_cache WORDPRESS;
                fastcgi_cache_valid 200 30d;
                fastcgi_cache_valid 301 302 303 307 308 404 410 451 1m;
                add_header X-Cache $upstream_cache_status;

}

location = /favicon.ico {
log_not_found off;
access_log off;
}

location = /robots.txt {
log_not_found off;
access_log off;
allow all;
}

location ~* .(css|gif|ico|svg|webp|woff2|eot|jpeg|jpg|js|png)$ {
expires 1y;
log_not_found off;
}

# Enable Gzip compression.
gzip on;

# Disable Gzip on IE6.
gzip_disable "msie6";

# Allow proxies to cache both compressed and regular version of file.
# Avoids clients that don't support Gzip outputting gibberish.
gzip_vary on;

# Compress data, even when the client connects through a proxy.
gzip_proxied any;

# The level of compression to apply to files. A higher compression level increases
# CPU usage. Level 5 is a happy medium resulting in roughly 75% compression.
gzip_comp_level 5;

# Compress the following MIME types.
gzip_types
 application/atom+xml
 application/javascript
 application/json
 application/ld+json
 application/manifest+json
 application/rss+xml
 application/vnd.geo+json
 application/vnd.ms-fontobject
 application/x-font-ttf
 application/x-web-app-manifest+json
 application/xhtml+xml
 application/xml
 font/opentype
 image/bmp
 image/svg+xml
 image/x-icon
 text/cache-manifest
 text/css
 text/plain
 text/vcard
 text/vnd.rim.location.xloc
 text/vtt
 text/x-component
 text/x-cross-domain-policy;
}
To save, press CTRL+O and Enter key. Then, exit nano editor using command CTRL+X.
Στην περίπτωση του FastCGI, πρέπει να χρησιμοποιήσετε το πρόσθετο NGINX Helper. Λειτουργεί και με κωδικοποιημένη URL στα Χίντι. Λάβετε υπόψη ότι δεν θα υποστηρίζει AMP. Προσωπικά δεν χρησιμοποιώ AMP (Συνιστάται)
Εναλλακτικά, η κρυφή μνήμη NGINX λειτουργεί για την εκκαθάριση της διεύθυνσης URL AMP, αλλά δεν υποστηρίζει κωδικοποιημένη διεύθυνση URL με Hindi. Στις ρυθμίσεις, θα πρέπει να διατηρήσετε τη διαδρομή cache /var/run/nginx-cache/
Προσοχή!
- Για παράδειγμα, εάν χρησιμοποιείτε θέμα εφημερίδας και εξυπηρετείτε ξεχωριστό θέμα για κινητά, παρακαλούμε κολλήστε χωρίς τη μέθοδο FastCGI και χρησιμοποιήστε ένα πρόσθετο WP Rocket επειδή μπορεί να εξυπηρετήσει ξεχωριστή κρυφή μνήμη για κινητά από το κουτί.
7. Δημιουργία συμβολικών συνδέσμων μεταξύ δύο καταλόγων
Εάν παραλείψετε αυτό το βήμα, ενδέχεται να εμφανιστεί η ένδειξη ERR_CONNECTION_REFUSED
Για να ενεργοποιήσετε το μπλοκ διακομιστή, δημιουργήστε μια συμβολική σύνδεση του αρχείου NGINX Server Block από τον κατάλογο /etc/nginx/sites-available/ στον κατάλογο /etc/nginx/sites-enabled
Πριν εκτελέσετε την παρακάτω εντολή, αντικαταστήστε το example.com με το δικό σας domain.
ln -s /etc/nginx/sites-available/example.com /etc/nginx/sites-enabled/Διαμόρφωση δοκιμής
nginx -tΕπανεκκίνηση και ενημέρωση
service nginx restart && service php8.2-fpm restart && service mysql restart && apt-get update && apt upgrade -y8. Εγκαταστήστε το WordPress
Κατεβάστε τα αρχεία του WordPress στον κατάλογο /var/www/html και ορίστε τα δικαιώματα.
cd /var/www/html && wget https://wordpress.org/latest.tar.gz && tar -xvzf latest.tar.gz && mv -v wordpress/* /var/www/html && rm -rf index.nginx-debian.html latest.tar.gz wordpress && chown -R www-data:www-data /var/www/ && sudo chmod -R 755 /var/wwwΓια να ενημερώσετε τα δικαιώματα στο μέλλον, χρησιμοποιήστε την παρακάτω εντολή
chown -R www-data:www-data /var/www/ && sudo chmod -R 755 /var/www9. Ενημέρωση DNS
Εάν φιλοξενείτε το WordPress τοπικά, θέλετε να παρακάμψετε τον διακομιστή μεσολάβησης ή θέλετε να εκτελέσετε μηδενικό χρόνο διακοπής της μετάβασης, αυτό το βήμα είναι χρήσιμο. Εγώ γενικά προτιμώ στην περίπτωση της στατικής περιοχής Dev του WordPress. 😉
- Υπάρχουν δύο τρόποι για να δείξετε το DNS. Αν μεταφέρετε το site στο Vultr και θέλετε να το δοκιμάσετε πρώτα τοπικά, τότε επεξεργαστείτε το αρχείο hosts και δείξτε το εκεί.
Για Windows
- Μεταβείτε στις ιδιότητες του C:\Windows\System32\drivers\etc\hosts
- Αλλάξτε το δικαίωμα “Ασφάλεια” σε πλήρη έλεγχο για το τρέχον όνομα χρήστη σας
- Τώρα μπορείτε να επεξεργαστείτε ελεύθερα το αρχείο hosts υπό τον χρήστη System και να το αποθηκεύσετε.
# For same machine you can have localhost address else public IP
127.0.0.1 example.com
127.0.0.1 www.example.com
Έτσι πρέπει να φαίνεται.
Για Mac ή Linux
Μπορείτε να επεξεργαστείτε το αρχείο hosts χρησιμοποιώντας την παρακάτω εντολή
sudo nano /etc/hostsΕνημέρωση DNS με το Cloudflare
- Αν όλα είναι τέλεια και θέλετε να κάνετε τον ιστότοπό σας ζωντανό, συνδεθείτε στο Cloudflare DNS και ενημερώστε τη νέα IP
| A | @ | IPV4 address |
| AAAA | @ | IPV6 address |
| CNAME | www | example.com |
όπου @ δηλώνει γυμνό τομέα example.com
9. Επισκεφθείτε το domain name σας για να ρυθμίσετε το WordPress
Αν θέλετε να διατηρήσετε το domain της έκδοσης non-www για το WordPress σας, τότε επισκεφθείτε την έκδοση non-www αλλιώς www.
https://example.com- Δώστε τα διαπιστευτήρια σύνδεσης στη βάση δεδομένων για να ξεκινήσετε την εγκατάσταση του WordPress
- Εκτέλεση εγκατάστασης
- Συμπληρώστε τα βασικά στοιχεία της νέας σας ιστοσελίδας και εγκαταστήστε το WordPress.
- Σύνδεση στο WordPress
- Εάν χρησιμοποιήσατε το μπλοκ διακομιστή FastCGI, τότε το πρώτο πράγμα που πρέπει να κάνετε είναι να εγκαταστήσετε το plugin NGINX Cache και να ρυθμίσετε το
/var/www/cacheως διαδρομή cache.
Άλλα απαραίτητα πράγματα
Χρησιμοποιήστε το SMTP plugin Services για την αποστολή εξερχόμενου email του WordPress, διαφορετικά δεν θα μπορείτε να λαμβάνετε τον σύνδεσμο επαναφοράς κωδικού πρόσβασης, τη φόρμα επικοινωνίας 7 μηνύματα.
Τέλος, η εγκατάσταση του WordPress έχει ολοκληρωθεί. Κρατάτε πάντα αντίγραφα ασφαλείας.
Εκτιμώ πολύ τον πολύτιμο χρόνο σας για την ανάγνωση αυτού του άρθρου. Τα λέμε στο επόμενο σεμινάριο!
Successfully install wordpres for a single site and do the same i mean for another domain on the same instance but after creating server blocks get “nginx: (emerg) duplicate listen options for (::):443 in /etc/nginx/sites-enabled” on nginx -t
How Can i solve this?
Exactly followed the same steps, but at the end i am getting 502 bad gateway. I built some sites with the same steps before, however i don’t know what changed now.
Consider checking the error log using command
tail -f /var/log/nginx/error.logto get a hint about exact issue.getting this
tail: cannot open ‘/var/log/error.log’ for reading: No such file or directory
tail: no files remaining
Sorry, there was a typo in my previous comment. Try below command
tail -f /var/log/nginx/error.logCan you explain me what is the difference between inactive and fastcgi_cache_valid values? Can you explain them please? Thanks
location ~* .(css|gif|ico|svg|jpeg|jpg|js|png)$ {
expires 1y;
log_not_found off;
}
is this code for page caching?
I use cloudflare so it has page cache too.
If i use that can i remove it from codes?
Can you please explain what is this code for?
Thanks
That code is for setting up 1 year browser caching for static files. You may use Cloudflare Page caching as normally you do. There shouldn’t be any problem.
For Nginx cache helper (I take this info from offical site
There’s a ‘purge all’ button? Does it purge the whole site?
Yes, it does. It physically empties the cache directory. It is set by default to /var/run/nginx-cache/.
So the default is /var/run/nginx-cache/
can we change fastcgi_cache_path /var/www/cache to /var/run/nginx-cache/ ?
Thanks
Αν ο κατάλογος cache σας είναι διαφορετικός, μπορείτε να το παρακάμψετε αυτό στο wp-config.php προσθέτοντας.
define('RT_WP_NGINX_HELPER_CACHE_PATH','/var/www/nginx-cache/')I finally installed wordpress with this guide. But I see only www version but not the non-www version. Is there any changes that I need to do.
Redirects to www version even If I enter non-www version.
You need to point DNS records for both hostnames. Second, make sure dot is not missing from the beginning of example.com in this code –
server_name .example.com;in the NGINX connfig at step 6. Another thing, Redirect from www to non-www or vice-versa (as neccessary) is taken care automatically from WordPress. You do not need to put any extra code for it.which is the best & compatible server side cache plugin If I use FastCGI server block code along with Nginx Cache plugin..
W3 Total Cache or WP Rocket
I have 2 questions
1) What if i have 2 domains on different cloudflare accounts?
Create a cloudflare.ini file inside /root/.secrets/ directory.
mkdir -p /root/.secrets/ && cd /root/.secrets/ && nano cloudflare.ini
Add below code and save using CTRL+O and exit using CTRL+X
dns_cloudflare_email = “your-cloudflare-email@example.com”
dns_cloudflare_api_key = “XXXXXXXXXXXXXXXXX”
/root/.secrets/1domaincloudfare.ini
/root/.secrets/2domaincloudfare.ini
certbot certonly –dns-cloudflare –dns-cloudflare-credentials 1domaincloudfare.ini -d example.com,*.1domain.com –preferred-challenges dns-01
certbot certonly –dns-cloudflare –dns-cloudflare-credentials 2domaincloudfare.ini -d example.com,*.2domain.com –preferred-challenges dns-01
Do this work?
2) If we have 2 domains in the same account on cloudflare can we use 1 cloudflare.ini
certbot certonly –dns-cloudflare –dns-cloudflare-credentials /root/.secrets/cloudflare.ini -d 1domain.com,*.example.com –preferred-challenges dns-01
certbot certonly –dns-cloudflare –dns-cloudflare-credentials /root/.secrets/cloudflare.ini -d 2domain.com,*.example.com –preferred-challenges
dns-01
3) If we dont use cloudflare what will our ns for domain?
CLoud VPNs IP?
ns1= 68.28.65.84
ns2= 68.28.65.84
Is this right?
thanks for your replies
1. True
2. True
3. I have no idea about it. I prefer using CF DNS.
Can we create multi wordpress sites on different domain in the same machine with this
method?
I think only changement is in the FastCGI?
server {
root /var/www/aaa.com/wordpress;
index index.php index.html index.htm;
server_name .aaa.com;
client_max_body_size 0;
server {
root /var/www/bbb.com/wordpress;
index index.php index.html index.htm;
server_name .bbb.com;
client_max_body_size 0;
server {
root /var/www/ccc.com/wordpress;
index index.php index.html index.htm;
server_name .ccc.com;
client_max_body_size 0;
is this make a problem cache path is the same path for 3 web site? /var/www/cache
Is this method works?
1 machine 3 different domain and wordpress?
Thanks
Not for multiple sites.
What do you think about Plesk Panel?
It is easy to install plesk and create a wordpress site.
Easy to find trial keys and we can use it unlimited.
If it expires sites goes on ftp works and only plesk panel does not work but there are too much trial keys
It has nginx cache.
Do you recommend why and why not?
Thanks
I do not trust 3rd-parties installers.
Do all commands work for Centos 8?
Sorry, this is for Ubuntu OS only not for Centos 8.
hello gulshanji i wanted to use cloudflare ssl direct from thier website and not thru api with fast cgi then what would the config
Hey bro what is your thoughts on EasyEngine and SlickStack etc or one click app instead to automate? what is your favorite and will you make any tut bro
Sure, there is one. I will post about it. Thanks for your feedback.
The FastCGI server block config throws 404 Errors.
fastcgi_pass unix:/run/php/php7.4-fpm-example.sock;
should be:
fastcgi_pass unix:/run/php/php7.4-fpm.sock;
And it is missing config for location /
This config must be defined:
location / {
try_files $uri $uri/ /index.php$is_args$args;
}
I see, it was intended for seperate user. But, to keep generic I have corrected. Thanks for pointing out.
Without the location / block only the home page was accessible.
When I added the below block i was able to access the post and pages.
location / {
try_files $uri $uri/ /index.php$is_args$args;
}
Hello Alpesh, Corrected. Thanks again for your tip.
It was a good article
Thanks for your comment.
Nice tutorial. Does it come with email hosting? Looking to make a small site in Singapore using VultrHF
E-mail is a different thing. G Suite by Google services is specialized in this segment.
What are the differences if any between doing this method and using the vultr 1 click install? I have also read about centminmod. Is that somrthing u will recommend for having a fast LEMP stack? Tnx
I alwyas keep this guide bookmarket to my web browser! You never know when I would need to setup a new LEMP server ! Thanks Gulshan
Thanks for your comment.
hi, Gulshan thanks for sharing.
can u please share how to install wp on subfoler?
This article is like Life-Saver for one of my website. I was about to move from Google Cloud to Digital Ocean because the trial was expired and I also wanted to use DigitaOcean because it is in-expensive yet powerful and gives great experience.
Previously, I used webinoly stack which was straightforward for installing WordPress but later on I got to know from Gulshan that there are so many issues with that stack so, this time I was going to do it manually. I checked the official guide by Digital ocean but end up with many confusion and issues. Then, I fortunately asked Gulshan for help and he recommended this article for me.
I installed WordPress easily and very fast even fast that Webinoly stack. Thanks a lot Gulshan for writing this amazing article. Hats off to you bro!!🎩
Hi Gulshan, I am also receiving the test failed error on step 7. I have tried several times now on different setup and still stuck here. Please could you help?
Please carefully read the post and then copy-paste code in Terminal. Sometime you need to replace with your own domain. Doing mistake can return error. Else, no wise. I use this guide everyday for myself. I am not aware about any problem.
In case of trouble
1. Run test using
nginx -t2. Check logs to get proper hint
tail -f /var/log/nginx/error.log3. Delete existing or earlier created virtualhost
rm /etc/nginx/sites-available/default && rm /etc/nginx/sites-enabled/default4. Make sure to replace example.com at all places, a) when you create conf file, its naming. b) when you add conf file and c) when you create symlink, check your command its conf file name must match with first process.
I feel in most cases, chances are you did not replaced
server_name .example.com;to own domain, or you did not obtained SSL. All steps are written in serial order as it should be.I am facing problem of infinite loop redirects. I had use fastcache code. how to fix it
Please try Full SSL mode of Cloudflare. Then check again!
How to check if fastcgi cache is working or not? while running sudo
curl -I https://example.comit is not showing x-cache parameterHey Gulshan,
In the 7th step while texting ngnix I got
nginx: [emerg] open() “/etc/nginx/sites-enabled/example.com” failed (2: No such file or directory) in /etc/nginx/nginx.conf:62
nginx: configuration file /etc/nginx/nginx.conf test failed
This error. How I can solve it? also what the error.
Please delete your existing server block and create again at sites-available and symlink at sites-enabled directory. The step 6 and 7 cover that clearly. Consider following patiently without any error. If you still face any problem, do let me know. Thanks for taking to leave your valuable comment.
Hi would like to know after configuring Fastcgi do we still need other caching plugin to speed up WordPress site?
Wonderful tutorial just complete solution for Nginx Fast CGI
Thanks Wasim for your kind feedback.
How Can I setup FastCGI on my ngnix server guided by you….
I have updated my article.
i want redirect too www plz help me urgent
If your WordPress General Settings has www version, server will do automatically. No additional action is required. In case you started WordPress installation at non-www version, then you need to migrate by changing at Database level.
You may use Better Search Replce plugin to perform this changes.
It Really Works Gulshan Bro. Thanks Really dear You are awesome…
Hello Gulshan Bro, First i want to say you that this is very beautiful and required post. I am really appreciating your work. but i have a problem can you please tell me
i have a droplet with digitalocean ($5/month plan) and i want to host multiple wordpress sites only with nginx(lemp ubuntu 18.04).
In simple i mean that this tutorial is complete to install a single wordpress and i did it but tell host it in some other sites
Hey Rohit,
Assuming, second site is example2.org
You need to follow steps this way.
1. create a new directory and add WordPress (Ref: steps 31)
cd /var/www/mkdir example2
wget https://wordpress.org/latest.tar.gz
tar -xvzf latest.tar.gz
mv -v wordpress/* /var/www/example2
rm -rf index.nginx-debian.html latest.tar.gz wordpress
chown -R www-data:www-data /var/www/
sudo chmod -R 755 /var/www
2. Create a new Server block with root path located to new directory as created in step 1.
cd /etc/nginx/sites-available/

nano gulshankumar-org
server {listen 80;
root /var/www/example2;
index index.php index.html index.htm;
server_name example2.org www.example2.org;
...
3. Point your example2.org domain to DNS, then install SSL
certbot --nginx -d example2.org -d www.example2.org4. Create new MySQL database
sudo mysql -u root -pcreate database example2;
grant all on example2.* to example2@localhost identified by 'TYPE HERE PASSWORD';
flush privileges;
exit;
5. Proceed to Installation by visiting your site
https://example2.orgLet me know if you have any additional question. You can always visit our forum for quick assistance.
Thanks & Regards,
Gulshan
It Really Works Gulshan Bro. Thanks Really dear You are awesome…
Hello Gulshan you written a comprehensive guide i highly appreciate your work. Can you help me with an error? Actually i have two websites the first website i have already hosted on Vultr following the above guide.
But when try to host a another WordPress website iam getting error. I followed the above steps you mentioned in comments. But still not able to fix it. The error is my website not working after hosting another WordPress website.
If possible please guide me step by step instructions. It will help me alot. Thanks in advance.
Consider checking log available at
/var/log/nginx/directory. Usenginx -tcommand to see what mistake causing issue.Very well. thank you so much
How to auto-renew SSL?
Add below cron job
crontab -eAdd below command and save.
15 3 * * 7 certbot renew --post-hook "service nginx restart"Thanks sos un groso, very well tutorial
Thank you for your tutorial, its the first one that actually showed me the wordpress setup page.
When I went to upload a plugin I received this message. “The uploaded file exceeds the upload_max_filesize directive in php.ini”
How do I increase the max filesize?
Please see the step 33.5
Thanks Gulshan, Finally I moved to NGINX server. You have created a great tutorial for beginners.
You’re welcome bro 🙂
Hi,
Thank you for this awesome guide.
How can I install WordPress multisite on Ubuntu 18.04 with Nginx?
Finally I loved this step by step tutorial with proper images.
Thanks Bhaiya you are awesome
Thanks a lot Gulshan. You save my breath
I search everywhere but not find any good article
You explained very well along with security concern
well done